Navigation
Install the app
How to install the app on iOS
Follow along with the video below to see how to install our site as a web app on your home screen.
Note: This feature may not be available in some browsers.
More options
You are using an out of date browser. It may not display this or other websites correctly.
You should upgrade or use an alternative browser.
You should upgrade or use an alternative browser.
Project: Stargate SG-1
- Thread starter Sobek
- Start date
Sobek said:The pics work, iupload may have been down while you tried to look at them.
Starhawk and anyone else, the virus or worm problem is whenever I restart my PC, after it boots and the WinXp Pro user logon screen comes up and I sign in, the PC either restarts or I get this message:
Windows could not start because the following file is missing or currupt: <windows root>\system32\hal.dll
Please reinstall a copy of the above file.
I have to do a repair install of windows which takes about an hour. I've done it 3 times now. I've rebooted in safe mode as well and run Nortan which found some things but didn't fix the problem.
Some of the virus's/worms that it found that kept popping up every few minutes while auto-protct was running are:
logppmj.dll
s_elite.exe
Backdoor Agent B
I downloaded and ran a file on Symantec's site that is supposed to get rid of Backdoor Agent B but when I rebooted to run it again I still had the same problem. I can make do with just not restarting for the next few days but I would like to get this fixed. I plan on ordering 2 Seagate 200gig+ SATA's to RAID when I get done with BT and a fresh Windows install will be on them.
Get SpyBot Search and Destory ( http://spybot.safer-networking.de/en/index.html ) and run it in safe mode. It's really good at fixing 'file missing or corrupt' problems from removing viruses and getting rid of trojans. It's free for personal use, too.
tom61 said:Get SpyBot Search and Destory ( http://spybot.safer-networking.de/en/index.html ) and run it in safe mode. It's really good at fixing 'file missing or corrupt' problems from removing viruses and getting rid of trojans. It's free for personal use, too.
I have Spybot and Adaware both installed. I just haven't tried running them to see if it fixes the problem. I'll give it a try later on. I've burned pretty much the entire contents of my My Documents folder to DVD+R for backup purposes (9 DVD's so far) just in case I have another serios problem.
I dunno what a mbr repair is starhawk.
My GF just left so I can finally resize and upload the rest of the pics tonight so check back in later to see if I have updated the log.
Here is the rest of the update: (BTW, the pics are pretty much in the order in which I did everything which is why some shots will go from one thing to something completely different.)
After blowing out all the dust I sat the case on some foam board on my desk to keep it clean and scratch free to be dissassembled. Spray bottle of 90% Isopropyl Alcohol and Q-Tips for extra cleaning can be seen as well.

Here is a shot of the fan on my 9800 non pro. This thing was disgusting but I suppose a year's worth of dust will do that.

I removed everything from the case and stuck the mobo, AGP, and PCI boards back in their anti-static bags (always good to save them") ). I used a permanent marker to "paint" my DVD writer black since I didn't do it last year when I got it on Black Friday. I used painters tape to mask the label and Warranty Void if Opened sticker.
). I used a permanent marker to "paint" my DVD writer black since I didn't do it last year when I got it on Black Friday. I used painters tape to mask the label and Warranty Void if Opened sticker.


Here is the PSU with the craptastic wiring job I did last September. I had 1/4" sleeving IIRC and used electrical tape on the ends since I didn't know about shrink tubing. I saved all the sleeving I removed since it may be handy later on.

Here you can see where I slid the hard drive horizontal mount into the hard drive cage. I made the mistake of installing it upside down by accident the first time which made it impossible to lkine up the hard drive screws and holes. I put a strip of Teflon tape on both sides so that it would slid in easier and keep from scratching the paint. I also used Teflon tape on the top and bottom of the Motherboard panel where it locks in place so that when it slides in it isn't scratched as much. There's Teflon tape on the top of the drive cage mount where it slides in as well. The lighting angle makes this pic look pinkish for some reason.

I put the storage bins that the Ancient Box came with to good use by using it to sort and house all the screws and parts of both the Acrylic and Lian-Li cases.

Here is the drive cage with both of my Seagate drives installed. I mounted them backwards to hide the wires better. I have been wanting to do this since seeing other people do it with Enermax cases. This presents a few problems as you will see later.

Drive cage installed and testing the wire lengths before I started sleeving.

I found a great way to aid in slipping the sleeving over molex pins. take a drinking stray and cut a short length. Bend one end and tape it to a point. Then you just slip it over the molex pins.

Begining of the wiring. Already sleeved up these wires and am testing the best way to route them. I have neither a heat gun or a hair dryer so I had to use a lighter on the heat shrink. I had to be careful not the melt the sleevng though.

I think I got the following idea from Cornelious in the Lian-Li gallery. I think flat4 has done this as well. I measured and taped up the top of the case above the Motherboard panel in order to make a hole for all the PSU wires to go through.

The basic cut.

After some sanding. Notice that clear plastic that is used to cover part of the case. It's about to get a new use...

as a way to hide the cuts made in both the case adn the motherboard back panel. It makes the holes look more rounded instead of the ugly rectangular cuts. This will keep the tubing and PSU wires from possibly getting scratched as well.


I applied the black permanent marker to both of them as well.

After blowing out all the dust I sat the case on some foam board on my desk to keep it clean and scratch free to be dissassembled. Spray bottle of 90% Isopropyl Alcohol and Q-Tips for extra cleaning can be seen as well.
Here is a shot of the fan on my 9800 non pro. This thing was disgusting but I suppose a year's worth of dust will do that.
I removed everything from the case and stuck the mobo, AGP, and PCI boards back in their anti-static bags (always good to save them
). I used a permanent marker to "paint" my DVD writer black since I didn't do it last year when I got it on Black Friday. I used painters tape to mask the label and Warranty Void if Opened sticker.
Here is the PSU with the craptastic wiring job I did last September. I had 1/4" sleeving IIRC and used electrical tape on the ends since I didn't know about shrink tubing. I saved all the sleeving I removed since it may be handy later on.
Here you can see where I slid the hard drive horizontal mount into the hard drive cage. I made the mistake of installing it upside down by accident the first time which made it impossible to lkine up the hard drive screws and holes. I put a strip of Teflon tape on both sides so that it would slid in easier and keep from scratching the paint. I also used Teflon tape on the top and bottom of the Motherboard panel where it locks in place so that when it slides in it isn't scratched as much. There's Teflon tape on the top of the drive cage mount where it slides in as well. The lighting angle makes this pic look pinkish for some reason.
I put the storage bins that the Ancient Box came with to good use by using it to sort and house all the screws and parts of both the Acrylic and Lian-Li cases.
Here is the drive cage with both of my Seagate drives installed. I mounted them backwards to hide the wires better. I have been wanting to do this since seeing other people do it with Enermax cases. This presents a few problems as you will see later.
Drive cage installed and testing the wire lengths before I started sleeving.
I found a great way to aid in slipping the sleeving over molex pins. take a drinking stray and cut a short length. Bend one end and tape it to a point. Then you just slip it over the molex pins.
Begining of the wiring. Already sleeved up these wires and am testing the best way to route them. I have neither a heat gun or a hair dryer so I had to use a lighter on the heat shrink. I had to be careful not the melt the sleevng though.
I think I got the following idea from Cornelious in the Lian-Li gallery. I think flat4 has done this as well. I measured and taped up the top of the case above the Motherboard panel in order to make a hole for all the PSU wires to go through.
The basic cut.
After some sanding. Notice that clear plastic that is used to cover part of the case. It's about to get a new use...
as a way to hide the cuts made in both the case adn the motherboard back panel. It makes the holes look more rounded instead of the ugly rectangular cuts. This will keep the tubing and PSU wires from possibly getting scratched as well.
I applied the black permanent marker to both of them as well.
Here I am working on the wiring.

There was one molex that gave me a huge problem. I couldn't get it out no matter what I tried. I finally said fuck it and just cut it since I had extra wires I wasn't using anyway. (I later learned this wasn't a good idea) I did in fact use permanet marker on the molex conectors last year if you are wondering.


The mostly finished wire sleeving and PSU mounted.

Installing the Mobo mounting standoffs. They chipped the paint in a few places so I had to use a black Sharpie on them even though they will be covered by the motherboard. It just gave me peace of mind I guess.

The motherboard mounted. I'm not setting up the WC for a while I guess which is why the Zalman is still on there. At least I managed to clean out all the dust from it.

The finsihed wire sleeving.

I mentioned that mounting the hard drives backwards causes some problems. The IDE cables and the top hardrive itself block the installation of the fans. I used my Dremel to cut some slits in one of the fans (only going to use one intake fan) so that I don't have this problem. The cuts don't interfer with airflow at all. The fan and drives get along fine now and fit great. I sleeved the fan wires so that they are just long enough to reach the fanbus on the front.

Shot of the wiring from the back. I'm glad I baught thoses zip ties from the auto section at Wallmart a few months back.

I decided to mount the UV blue 80mm fan w/ it's mini UV CCFL in the rear on the mobo panel. I wanted it to be controlled by the front fan switch which meant that the wires needed to be extended. I used the extra wire I ordered from Xoxide just for this purpose.


I took a break and sprayed primer on bote the Alu and the box (probably didn't need to though since the box was already orange but it was easier for me to be able to see what had paint on it and how much).

I sprayed the back panel plexi peice with Krylon Fusion and here it is in place. It keeps the wires tucked in and makes the other side look better.

The other side with everything installed.

Test fit of the heiroglyphic plexi panel. once this is installed, it should be nearly impossible to see the wiring and make the case look very clean.

There was one molex that gave me a huge problem. I couldn't get it out no matter what I tried. I finally said fuck it and just cut it since I had extra wires I wasn't using anyway. (I later learned this wasn't a good idea) I did in fact use permanet marker on the molex conectors last year if you are wondering.
The mostly finished wire sleeving and PSU mounted.
Installing the Mobo mounting standoffs. They chipped the paint in a few places so I had to use a black Sharpie on them even though they will be covered by the motherboard. It just gave me peace of mind I guess.
The motherboard mounted. I'm not setting up the WC for a while I guess which is why the Zalman is still on there. At least I managed to clean out all the dust from it.
The finsihed wire sleeving.
I mentioned that mounting the hard drives backwards causes some problems. The IDE cables and the top hardrive itself block the installation of the fans. I used my Dremel to cut some slits in one of the fans (only going to use one intake fan) so that I don't have this problem. The cuts don't interfer with airflow at all. The fan and drives get along fine now and fit great. I sleeved the fan wires so that they are just long enough to reach the fanbus on the front.
Shot of the wiring from the back. I'm glad I baught thoses zip ties from the auto section at Wallmart a few months back.
I decided to mount the UV blue 80mm fan w/ it's mini UV CCFL in the rear on the mobo panel. I wanted it to be controlled by the front fan switch which meant that the wires needed to be extended. I used the extra wire I ordered from Xoxide just for this purpose.
I took a break and sprayed primer on bote the Alu and the box (probably didn't need to though since the box was already orange but it was easier for me to be able to see what had paint on it and how much).
I sprayed the back panel plexi peice with Krylon Fusion and here it is in place. It keeps the wires tucked in and makes the other side look better.
The other side with everything installed.
Test fit of the heiroglyphic plexi panel. once this is installed, it should be nearly impossible to see the wiring and make the case look very clean.
G.I. Jesus
n00b
- Joined
- Oct 20, 2004
- Messages
- 28
did you tape and paint the DVD drive and thats it? you didnt open it up? and just paint the top? because painting it will void it too so why wouldnt you remove the stickers? but looks good man.
Last of the update.
The painted Alu for the Ancient Box.

Here is the test fit of the basic plexi cover I made to cover the AGP and PCI cards.

The mesh before I painted it that will go behind a hole for the AGP card fan to get air.

The finished PCI cover with the painted mesh. This is only a temporary one though. At some point I will make another that is a little longer, has a hole for the AGP waterblock, and I'd like it too look like the pedestal for flying a Hatac and communication.

The Ancient box parts being painted orange.


I mentioned that I had some problems with my PC besides the worm/virus thing that kept me from updating sooner (like I would have been able to since the [H] was down anyway)
It seems that when I cut that molex off earlier, it killed the PSU. It could be something else but regardless, I couldn't get it to power up both via the mobo and using the "paperclip" method. I was forced to run to Best Buy to get a new one. I got an Antec Truepower 430w for about $105. My Enermax was 460w and only cost me $80. This one has an external molex connection that will be useful for wiring up the switch box for all the CCFL's, LED's, etc. I was and still am pissed though since I had to unsleeve the other PSU and sleeve this one. I had to use a lot of zip ties instead of heatshrink since I used most of it up on the other PSU. That doesn't matter much since my wiring job is so great tht they are mostly unseen.

The ghetto test wiring to make usre this PSU powers up. Another good thing about it is that it has 2 SATA molex's so that when I get my SATA drives, I already have the power connections for them and wont have to use the molex convertors.

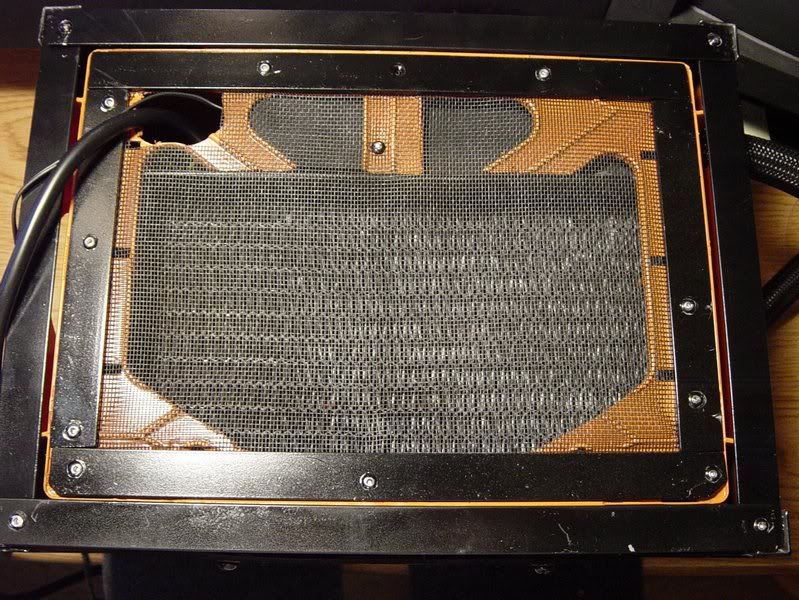
I took a break from working on the case to work on the Box. I cut a new mesh bottom adn mounted it to the box.

I also finished etching one of the text panels.

I tried to make a small switch box out of srap plexi and Alu but it became too much work and I didn't like the way it was going so I searched my house for an alternative. I found and emptied a Nestle Quick chocolate milk mix container. I washed it out and cut some holes for the 8 rocker switches. There's a hole in the side for the molex to pleg into. The lid comes off which makes things easier to install as well.

After the Krylon Fusion treatment.

The finished box with a rocker switch for test fitting. This box will probably be replaced with a better one some day but for now it will do.

The other Ancient text panel. I broke the smallest etching bit halfway through but that was ok since I was going to use the middle one for the wider text on the left.

I glued the black plexi pieces for the text in place and mounted the bottom Alu corners.

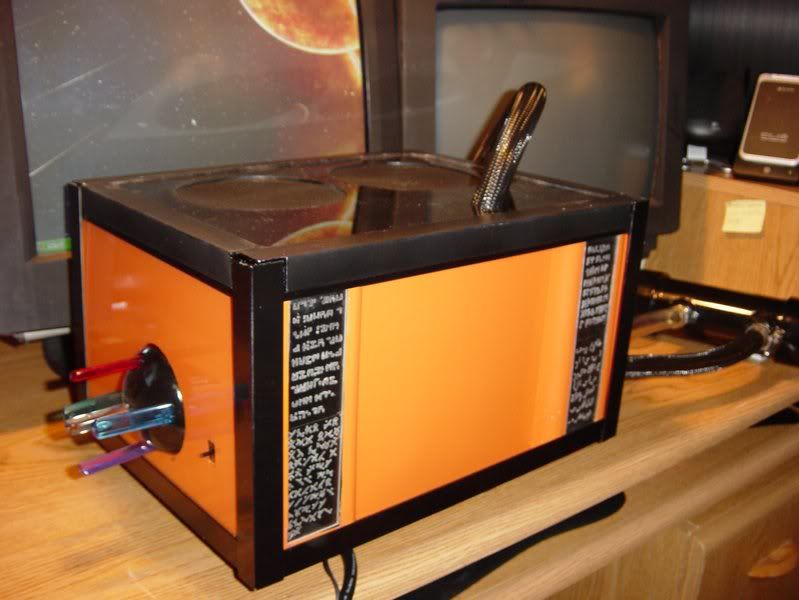
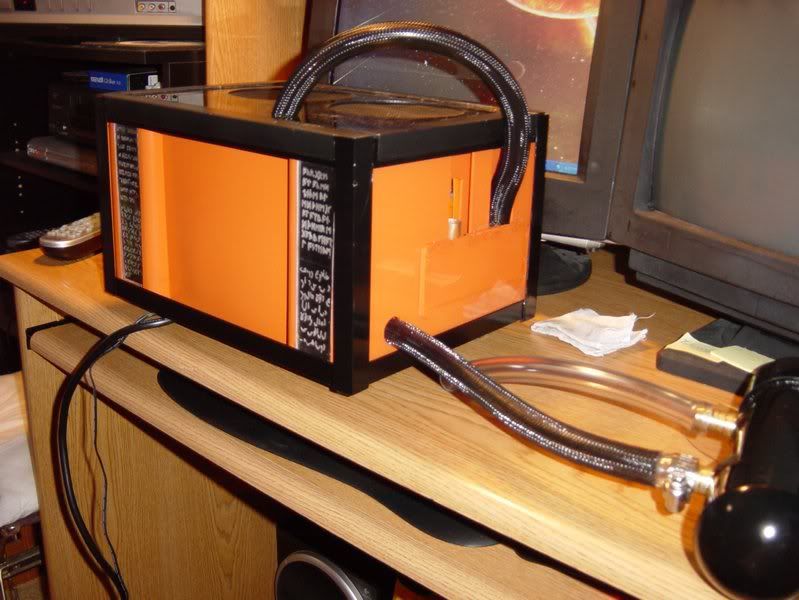
The nearly finished box with the text panels snapped in place, the top Alu riveted in, the new lid cut and painted. I also cut the PVC to fit, painted it and the lid with Krylon Fusion, cut a hole for the tubing from the pump to the heatercore and put the tubing on the heatercore barb by sticking the tubing in boiling water to soften it. (no clamps need, it's not going anywhere!)

Side view. The power crystal thing is removable. I opted not to glue it in place since it could break and making it removable makes it easier to transport.

I still have to paint and glue the Alu corners on (not going to rivet them on since it would leave ugly rivet marks). I already glued the Alu for the lid on but didn't take pics. I'll try to set up the WC loop tomorrow and run it to make sure there aren't any leaks. If not, I may go ahead and install it. I really want to get the heiroglyphic panel done as well so that will be a priority over the WC though.
The painted Alu for the Ancient Box.
Here is the test fit of the basic plexi cover I made to cover the AGP and PCI cards.
The mesh before I painted it that will go behind a hole for the AGP card fan to get air.
The finished PCI cover with the painted mesh. This is only a temporary one though. At some point I will make another that is a little longer, has a hole for the AGP waterblock, and I'd like it too look like the pedestal for flying a Hatac and communication.
The Ancient box parts being painted orange.
I mentioned that I had some problems with my PC besides the worm/virus thing that kept me from updating sooner (like I would have been able to since the [H] was down anyway)
It seems that when I cut that molex off earlier, it killed the PSU. It could be something else but regardless, I couldn't get it to power up both via the mobo and using the "paperclip" method. I was forced to run to Best Buy to get a new one. I got an Antec Truepower 430w for about $105. My Enermax was 460w and only cost me $80. This one has an external molex connection that will be useful for wiring up the switch box for all the CCFL's, LED's, etc. I was and still am pissed though since I had to unsleeve the other PSU and sleeve this one. I had to use a lot of zip ties instead of heatshrink since I used most of it up on the other PSU. That doesn't matter much since my wiring job is so great tht they are mostly unseen.
The ghetto test wiring to make usre this PSU powers up. Another good thing about it is that it has 2 SATA molex's so that when I get my SATA drives, I already have the power connections for them and wont have to use the molex convertors.
I took a break from working on the case to work on the Box. I cut a new mesh bottom adn mounted it to the box.
I also finished etching one of the text panels.
I tried to make a small switch box out of srap plexi and Alu but it became too much work and I didn't like the way it was going so I searched my house for an alternative. I found and emptied a Nestle Quick chocolate milk mix container. I washed it out and cut some holes for the 8 rocker switches. There's a hole in the side for the molex to pleg into. The lid comes off which makes things easier to install as well.
After the Krylon Fusion treatment.
The finished box with a rocker switch for test fitting. This box will probably be replaced with a better one some day but for now it will do.
The other Ancient text panel. I broke the smallest etching bit halfway through but that was ok since I was going to use the middle one for the wider text on the left.
I glued the black plexi pieces for the text in place and mounted the bottom Alu corners.
The nearly finished box with the text panels snapped in place, the top Alu riveted in, the new lid cut and painted. I also cut the PVC to fit, painted it and the lid with Krylon Fusion, cut a hole for the tubing from the pump to the heatercore and put the tubing on the heatercore barb by sticking the tubing in boiling water to soften it. (no clamps need, it's not going anywhere!)
Side view. The power crystal thing is removable. I opted not to glue it in place since it could break and making it removable makes it easier to transport.
I still have to paint and glue the Alu corners on (not going to rivet them on since it would leave ugly rivet marks). I already glued the Alu for the lid on but didn't take pics. I'll try to set up the WC loop tomorrow and run it to make sure there aren't any leaks. If not, I may go ahead and install it. I really want to get the heiroglyphic panel done as well so that will be a priority over the WC though.
G.I. Jesus said:did you tape and paint the DVD drive and thats it? you didnt open it up? and just paint the top? because painting it will void it too so why wouldnt you remove the stickers? but looks good man.
Yep, pretty much. I figured it voided the warranty too but the last time I tried to take apart a CD burner to paint it, I messed it up so that it wouldn't close the door correctly. I still have to put the drive door panels over my drives so that they are stealthed. I already cut them but haven't installed them yet. My drives are all hidden anyway so whether they are painted or not really doesn't matter.
flat4 said:nice idea with the dvd burner. i mite have to use it. everything is looking real good. keep up the good work.
Thanks Mike.
BTW, This update makes it 365 pics I have uploaded so far.
I had to clean up my garage before my Mom killed me (she's home to take me to the airport on Wed and just discovered the mess I made this weekend). I painted the Alu corners and am about to glue them on, sleeve up the tubing on the box, and set up the loop to test. Then I will try to etch and paint the heiroglyphic panel.
rogue_jedi
Supreme [H]ardness
- Joined
- Sep 6, 2002
- Messages
- 4,821
the etchings look nice. i like the idea of using the plastic stuff that comes with the case to protect the tubing holes - i may have to use that.

Sobek said:I just stealthed the drives.


wow! that is an idea that never had crossed my mind. Very cool stealth mod!!!
CGFMaster said:wow! that is an idea that never had crossed my mind. Very cool stealth mod!!!
Really?! I know I'm not the first to cut off the tabs and mount them to the drive trays using mounting tape. There's a piece of mounting tape on the inside of the faceplate that pushes the button when you press the front of the faceplate. I had to mash it in really well so that the drive doesn't keep ejecting itself when it tries to close.
The tape on the side panel is where the window with the Stargate will go eventually. I left it on there from when i was doing the mockup months ago.
Sobek said:Really?! I know I'm not the first to cut off the tabs and mount them to the drive trays using mounting tape. There's a piece of mounting tape on the inside of the faceplate that pushes the button when you press the front of the faceplate. I had to mash it in really well so that the drive doesn't keep ejecting itself when it tries to close.
The tape on the side panel is where the window with the Stargate will go eventually. I left it on there from when i was doing the mockup months ago.
Thanks for the how-to! Now if I can only find where I put those bezels........
CrimandEvil
Dick with a heart of gold
- Joined
- Oct 22, 2003
- Messages
- 19,670
Just so you know the pics aren't working for me.
CrimandEvil said:Just so you know the pics aren't working for me.
I figured they weren't since I iupload.net is down. They only work for me because they are cached in Firefox.
Hopefully it will be back up in the morning so I can upload the las few pics I have.
I have 6 final pics to post before I leave in 7 hours but can't because iupload is down. I didn't get anything else donw on the project today like I had hoped to because I was busy running errands all day. I did manage to glue some feet to the bottom of the case and etch one of the 6 columns of glyphs into the plexi last night. I'll try to get the pics uploaded and if I get the chance in the next 2-3 months while at BMT, I will respond to some comments.
edit: flat4 uploaded them for me using photobucket so here they are:
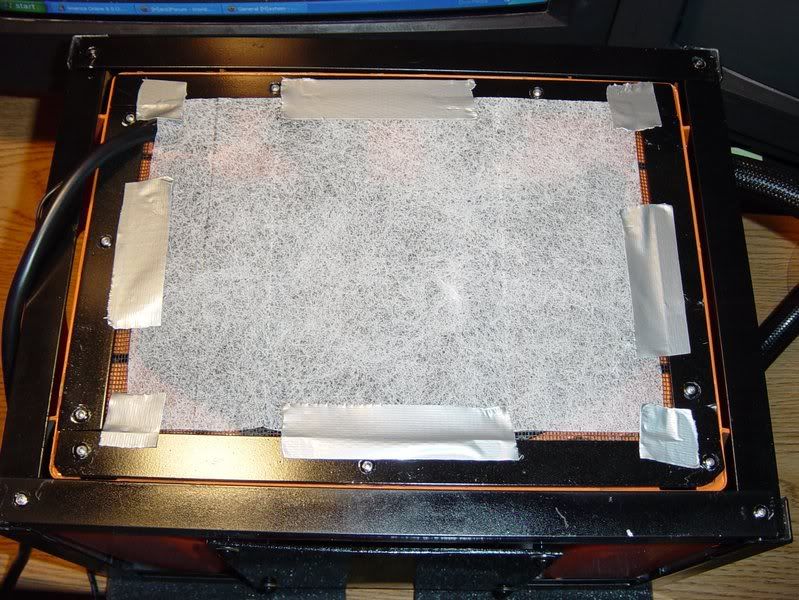
Bottom of box before and after dryer sheet was duct taped to it.
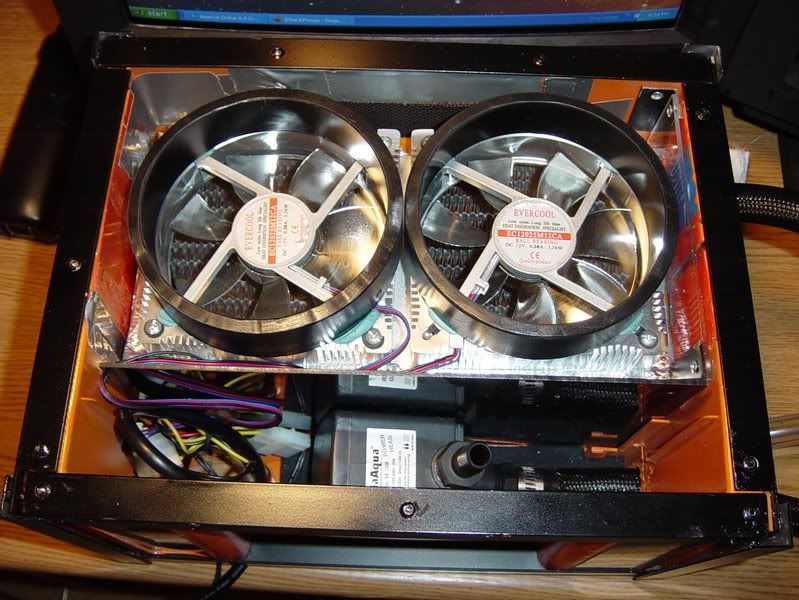
Inside view with lid off. I used plumbers goop epoxy to glue the side Alu corners on and painters tape to hold them on while it dried so they wouldnt slide off.
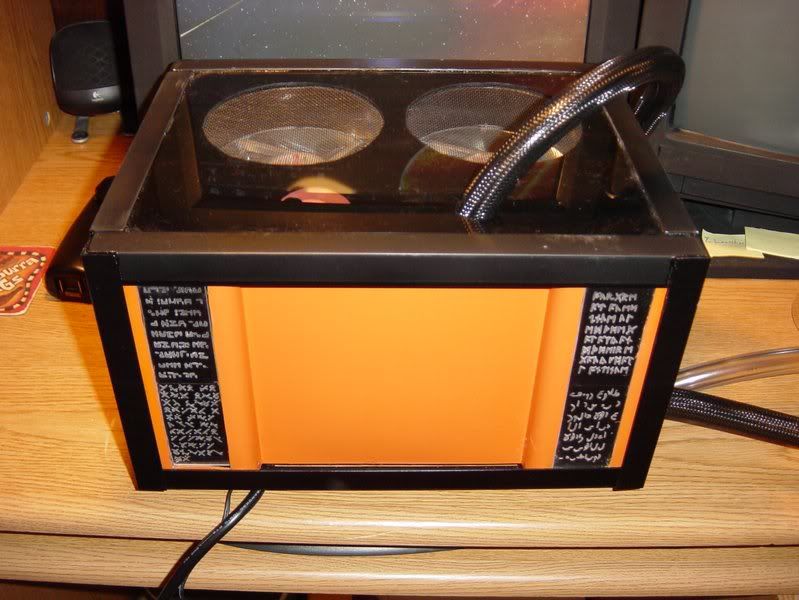
The final (for now!) box.
edit: flat4 uploaded them for me using photobucket so here they are:
Bottom of box before and after dryer sheet was duct taped to it.
Inside view with lid off. I used plumbers goop epoxy to glue the side Alu corners on and painters tape to hold them on while it dried so they wouldnt slide off.
The final (for now!) box.
CrimandEvil
Dick with a heart of gold
- Joined
- Oct 22, 2003
- Messages
- 19,670
How about here? http://www.nicoritschel.com/freehosting/index.php
CrimandEvil
Dick with a heart of gold
- Joined
- Oct 22, 2003
- Messages
- 19,670
Odd since I just loaded the page up twice now. Then again I am using Firefox which we all know to be superior to IE.
Then again I am using Firefox which we all know to be superior to IE. CrimandEvil said:How about here? http://www.nicoritschel.com/freehosting/index.php
thanks but it's been taken care of.
CrimandEvil said:Odd since I just loaded the page up twice now.
hmm... sounds like it's time to update...
CrimandEvil
Dick with a heart of gold
- Joined
- Oct 22, 2003
- Messages
- 19,670
Yeah the last posts pics are coming up... slowly. Anyone else notice how slow the forum has been recently?
Looks great Sobek. I haven't checked in on this thread since I lost my fat internet connection this summer. (Started grad school, live in off campus housing, too cheap to call the cable company, yada yada yada)
I have a lot of Stargate to catch up on.
I have a lot of Stargate to catch up on.
Hi everyone. This ins't an update to the log so I'm sorry if you clicked thinking it was. I just thought that I would update everyone on my status.
I just finished Air Force BMT. I'm now at Sheppard AFB, in Wichita Falls, TX. I'll be here for approx. the next 17 weeks for technical school. I'm going to be a turboprop mechanic.
I have money now since I haven't been able to spend much lately so as soon as a get back home I can order new harddrives, a CRT, and finish the mod.
I'f anyone wan't to ask me further questions, I'll be happy to answer them. It would probably be best to PM me rather than post in the log if it isn't anything specifically related to the mod itself. I'll try to check back here often since I now have time to use the internet.
I think the question everyone will have is 'when are we going to see some more?'
Do we have to wait 17 weeks while you train? or are you still going to be able to work on this?
I've been following it for a while, and have been pining for an update for a while...
Do we have to wait 17 weeks while you train? or are you still going to be able to work on this?
I've been following it for a while, and have been pining for an update for a while...
Legion© said:I think the question everyone will have is 'when are we going to see some more?'
Do we have to wait 17 weeks while you train? or are you still going to be able to work on this?
I've been following it for a while, and have been pining for an update for a while...
I'm sorry to say but it will most likely be early May before I can finish the project. I don't really have time, let alone my computer (i'm in the base library now) to work on it. I can promise you this, I WILL FINISH THE MOD AT SOME POINT!
I know how it feels to follow a mod for months and then the person falls off the face of the earth and you are left wondering what happened (ProjectTwin's RC Chevy Avalanche PC is a great example I always remember for those who have been around here long enough to remember that awesome mod and then he dissapeared).
I can't really have anything in my room right now unless it is locked up in my small wall-locker during the day. This includes PC's/laptops, TV's etc. I've thought about getting a laptop but would but would rather save my money and use some of it toward the mod later on (stuff like possibly having the Stargate milled out of Aluminum will not be cheap!) I'm probably just going to have my mom send my my PS2 and get a small TV to watch DVD's on.
Once again, I'm really sorry I can't update the mod and provide pics. I'm happy that the pics are still up on the first page and hope they stay even longer. Some of my friends here think that it is really sweet along with some of the other mods everyone is posting. I'll continue to post in other users threads when I get the chance and if you have any questions about the AF I can answer those as well.
JEEVES/whohasmyname?
Gawd
- Joined
- Mar 25, 2004
- Messages
- 696
sorry to hear that, there isnt much in Wichita Falls. Well hope the training goes well and cant wait to see this thing all finished.
JEEVES
JEEVES
Thanks for the comments guys. From what I hear, Wichita Falls does indeed suck which is why I'm going to have my mom send my my PS2 so I can finish GTA:SA and play the new Metal Gear Solid. I won't get to go off base till about mid February though but my GF will be coming done then for my birthday which is about the only thing I'm looking forward to. I'm logging off for now, I'll check back later when I have a chance.
Thanks.
Anyone who is reading this thread for the first time or has been wandering what the hell happened/ where I've been:
I am going to be getting back to finishing (finally) my SG-1 case mod I started last year. As soon as I finish building my new workbench in a few days I will resume. I etched some plexi the other day. I'll have to upload all the pics (around 370) from last year that are no longer showing up in the thread so new readers can see it. I appologize if you clicked thinking there were updates. Give me a week or so.
pilotman2004
Limp Gawd
- Joined
- Dec 10, 2004
- Messages
- 221
Awesome Sobek, I've been hoping that you would be able to get those pics back up. I'm one of those who strolled across this thread late, and I haven't been able to see the pics. Definitely looking forward to having them back up.
WillowHawk
Gawd
- Joined
- Jul 7, 2004
- Messages
- 590
hehe, i remember the first dayt he thread was actually posted...which is...woah...
07-12-2004
holy crap thats a long time ago.
well, i really would like to see it to completion, and good luck with pulling it all together. i just got my hands on sg1 season 8, so, i'm now back into the sg world.
you've got my cheers for this one, keep it up!
07-12-2004
holy crap thats a long time ago.
well, i really would like to see it to completion, and good luck with pulling it all together. i just got my hands on sg1 season 8, so, i'm now back into the sg world.
you've got my cheers for this one, keep it up!
mrmagoo_83
2[H]4U
- Joined
- Aug 8, 2002
- Messages
- 3,068
how much bandwidth you think you will need for these pics? As I have like 75GB that I hardly even touch, and tons of space if you would like me to host them for you.