NVIDIA EDID fix for "bugged" Westinghouse LVM-37w3se

Blahman

[H]ard|Gawd
Joined
Jul 8, 2005
Messages
1,323
Update 4/24/2008:
New simpler instructions added which don't require a driver uninstall/reinstall. Scroll down to the "Regedit Method" or click here.


------ Original Post ------

Alright, thanks to DocFaustus who kindly provided the EDID from his new SE, I now have a proper fix for those of us with NVIDIA cards and bugged SE's! This overrides the faulty input EDID with the new "proper" EDID at the graphics driver level. This doesn't magically turn your bugged SE into a good one (it only affects digital connections -- DVI and HDMI -- from your PC to your monitor, other devices like the Xbox 360 are still up sh*t creek), but it does fix the main issues people with NVIDIA graphics cards and a bugged SE will run in to. It should work on both XP and Vista, but I only have XP to test with.

NVIDIA EDID fix for "bugged" Westinghouse LVM-37w3se
How to tell if your LVM-37w3se is bugged or not (any of these are symptoms):
  • When your machine first boots, the POST/BIOS screen is cut off on the sides by black bars
  • Your monitor is identified by the NVIDIA drivers as a WDE4207 or W4207
  • When running at 1920x1080 resolution, pushing the "info" button on the remote shows that it is running at 1920x1080i (interlaced)

Instructions:
  1. Download Driver Cleaner PE or Driver Sweeper if you don't already have one of these cleaners
  2. Download and run the installer for the drivers you want to install, extract them to a location you can remember (anywhere but the default C:\NVIDIA, because Driver Cleaner PE will erase that folder), but instead of installing them straight away, cancel out, and open the folder you extracted them to.
  3. If using LaptopVideo2Go drivers download and copy Pieter's modded INF into the folder, overwriting the original INF.
  4. Open the INF file with notepad
  5. Search for the section labeled [nv_SoftwareDeviceSettings]
  6. Somewhere before the NV_Modes line, copy and paste the following code:

    Code:
    HKR,, OverrideEdidFlags0, %REG_BINARY%, 5C,85,07,42,00,00,FF,FF,04,00,00,00,00,80,00,FF,FF,FF,FF,FF,FF,00,5C,85,FA,14,00,00,00,00,10,11,01,03,80,52,2E,78,2A,E6,9D,A3,54,4A,99,26,0F,47,4A,A1,08,00,81,C0,81,80,81,00,8B,C0,01,01,01,01,01,01,01,01,02,3A,80,18,71,38,2D,40,58,2C,45,00,C4,8E,21,00,00,1E,00,00,00,FD,00,3A,48,1E,44,0F,00,0A,20,20,20,20,20,20,00,00,00,FC,00,57,65,73,74,69,6E,67,68,6F,75,73,65,20,00,00,00,FC,00,4C,56,4D,2D,33,37,77,33,73,65,0A,20,20,01,49
  7. Save and close the file
  8. Uninstall current drivers from the Add/Remove Programs control panel
  9. Reboot into safe mode (press F8 a few times quickly after the POST screen disappears).
  10. Say yes to the window asking if you want to use safe mode (duh!)
  11. Cancel/close any windows that try to install drivers for the graphics card
  12. Run Driver Cleaner PE or Driver Sweeper
  13. Locate the folder you extracted the new drivers to and run setup.exe and install the drivers.
  14. Reboot. After Windows boots up, set the Westy as your primary monitor and change resolution to 1920x1080. If all went well it should be running in 1080p, and where before it was incorrectly identified as a W4207 it should now be correctly identified as an LVM-37w3se.

History:
Update! 10-16-07 08:17 CST
- 1360x765 resolution is once again available (although not officially supported in the manual's specs page, it's a much nicer looking res than 1280x720).

Findings so far:
  • My available resolution list has changed.
    640x400
    640x480
    720x480
    800x600
    1024x768
    1280x720
    1280x800
    1280x1024
    1600x900 (interlaced) (result of my modded LaptopVideo2Go drivers, I've since removed it from my own INF nv_modes line since it's a useless, ugly res)
    1768x992 (result of NVIDIA's overscan/underscan compensation, interlaced)
    1920x1080 (progressive! centered! perfect!)
  • Strangely missing are the 136x by 76x resolutions but I will look into getting those back. I wonder if those resolutions are truly missing from the new SE's? I preferred 1360x765 to 1280x720 -- it's much sharper for some reason (less video processing). UPDATE: I found the flags for 1360x765 and compared the two EDIDs. This resolution is indeed missing in the "good" SE EDID, but I added it back into the OverrideEDIDFlags string. So it is once again available after using this fix. The monitor can also physically display 1366x768 but it gets chopped on the sides so I left it out.
  • With 162.xx series drivers and later, I found that when Windows first loads after applying this fix that there are black bars all around. This is because it's running at 1768x992 in a sub-resolution of 1920x1080 due to NVIDIA's overscan/underscan compensation. Raising the resolution in the Display control panel to 1920x1080 should fix this.
If you use this fix please post your results and experiences. More testing is needed to see if this is a good long term solution and whether it works on all OS's and driver versions.

Enjoy!
 
ALSO, for those of you that have "good" SE's (doesn't have any of the symptoms listed in the first post, near the top) please keep providing me with your EDIDs so we can compare them, see if there is any difference between the various batches and get the "best" EDID, if there is one!

Here's how you can help:
  • Install and run softMCCS
  • From the yellow drop down box make sure your Westinghouse monitor is selected
  • Do File-Save EDID As...
  • Change the "Save as type" box to "ASCII text file (*.txt)
  • Save the file somewhere and open it with Notepad
  • Copy and paste the contents of the file and post it here on the forums. Wrap in CODE tags for proper formatting. It should look something like this ( this is my buggy "W4207" EDID data)
    Code:
    00FFFFFFFFFFFF005C85074200000000
    16100103805D34782A3130A256499C25
    10484BA1080081C0810081808BC00101
    0101010101019D1C5692500028303020
    3500A20B3200001A000000FD003B481E
    440F000A202020202020000000FC0057
    657374696E67686F75736520000000FC
    0057343230370A20202020202020018C
 
Thanks for your work with this, Blahman! I'm still considering returning my faulty SE, mainly because I use an Xbox 360 with the HD-DVD player, and I'd like to eventually upgrade to a 360 with HDMI so I can get Dolby TrueHD.

I will try to apply this fix when I get a free chance. In the mean time, does this also correct the issue with the sides being cut off during POST? Or does the fix take place after POST? It would be nice to not feel like I'm walking around in the dark when messing with BIOS settings.

No this only fixes it at the driver level, so only in Windows. However there is a way to directly update the EDID so that it does indeed fix cropped POST screens, Xbox 360 not being able to select 1080p, etc. I think you've already seen it but here it is just in case: http://www.hardforum.com/showthread.php?t=1232024
 
This worked for me! I would just like to add that I had to change the resizing of the desktop, that freaked me out at first.

Thanks so much!
 
Great, good to hear. Check out the link a couple posts up if you want a more permanent/thorough fix.
 
If anyone is using this fix and you are still having problems with 720x480 (overscanned, blurry), or 1920x1080 (still being 1080i), or you want to use NVIDIA's own scaling modes as opposed to the built-in scaler on the monitor, which isn't very good, I have a little workaround you can try.

Follow the original instructions, except on step 6, use this line instead.
Code:
HKR,, OverrideEdidFlags0, %REG_BINARY%, 5C,85,07,42,00,00,FF,FF,04,00,00,00,00,80,00,FF,FF,FF,FF,FF,FF,00,5C,85,FA,14,00,00,00,00,10,11,01,03,80,52,2E,78,2A,E6,9D,A3,54,4A,99,26,0F,47,4A,A1,08,00,81,C0,81,80,81,00,8B,C0,01,01,01,01,01,01,01,01,02,3A,80,18,71,38,2D,40,58,2C,45,00,C4,8E,21,00,00,1E,00,00,00,FD,00,3A,48,1E,44,0F,00,0A,20,20,20,20,20,20,00,00,00,FC,00,57,65,73,74,69,6E,67,68,6F,75,73,65,20,00,00,00,FC,00,4C,56,4D,2D,33,37,77,33,73,65,0A,20,20,00,01

What this does is it disables the extension block entirely so that some NVIDIA drivers aren't fooled by it, thinking the monitor's optimal resolution is 1080i, when it is actually 1080p. It also disables the funky overscanning/cropping that was going on with 720x480.

Also, now you can use NVIDIA's different scaling modes which are far superior to the monitor's built-in ones in terms of sharpness and responsiveness, as well as allowing 1:1 pixel mapping ("centered output"), and the use of any custom resolution.
Note that in my experience newer NVIDIA drivers with the crappy new control panel have trouble engaging the various scaling modes, but you can get around this two ways.

1. Use NVTray to enable the "Classic" control panel, or
2. Apply them manually with a command line.

NVTray Method:
  1. Install & run NVTray
  2. Double click NVTray's icon in the system tray
  3. Under "Default Control Panel" select "Classic" and close the window.
  4. Open the Classic control panel (Right click on the desktop, select NVIDIA Display->Westinghouse LVM-37w3se)
  5. Under nView Display Settings, right click the Westinghouse monitor and uncheck "Treat as HDTV" if already selected. Right click it again and select "Device Adjustments".
  6. Select the scaling method you want to use.
Display Adapter Scaling - Stretches all resolutions to fill the panel
Centered Output - Displays the resolution with 1:1 pixel mapping in the center of the screen
Monitor Scaling - Uses the monitor's internal scaler, which isn't so great
Fixed Aspect Ratio Scaling - Expands the resolution to fit the panel but maintains the resolution's proper aspect ratio​

Command line method:
Go into Start->Run and using the following command.

Code:
rundll32.exe NvCpl.dll,dtcfg setscaling 1 DA <mode #>

Mode settings are as follows:
0 : Default
1 : Native
2 : Scaling
3 : Centered
5 : Aspect

Note that the number before "DA" is the number of displays you have connected minus 1, so if you have just the Westy hooked up, change that to 0. If you have two displays, use 1, three displays, use 2, etc.

Also "D" means "Digital" and "A" signifys that it's the first display (as reported by Windows' "Identify" button in the Display control panel). So if the Westy is the second display change that to DB.

For example, I have two digital displays, my laptop LCD and the Westy. The laptop is A and the Westy is B. I want to use Aspect Ratio scaling with my Westy, so I use the following command.

Code:
rundll32.exe NvCpl.dll,dtcfg setscaling 1 DB 5

For more info on the command line method and other commands you can use read: http://www.laptopvideo2go.com/forum/index.php?showtopic=9392
 
Hi, I'm trying to apply your guide to fix my Westy, but there are steps which I don't get. Like this one:
If using LaptopVideo2Go drivers download and copy Pieter's modded INF into the folder, overwriting the original INF.
I mean, what do I do "IF I'M NOT" using those. Matter of fact, I don't even know what those drivers are. I have Driver Cleaner, and the nVidia drivers, and none of them seem to have any INF file which I can edit. I'm confused.
A while back, yesterday actually, I was using the 158 drivers on a 8800GTS, and I did had a few problems, but nothing I couldn't fix, because it was the 5px shift issue, which is easily solved with switching inputs once. NOW, with the 169 Beta drivers, everything is worse. I do get the 5px shift, but now it seems like it is 10px. Also, my mouse disappears when I go near the edges, and sometimes goes well beyond my sight, leaving me moving my mouse like crazy until I'm able to find it again. I did managed to get 1080p with a custom timing and "CTV reduced blank".
Help would be appreciated.
 
There should be a file called nv4_disp.inf in the folder created by the NVIDIA driver setup.
 
Thank you so much for your work on this, getting mine to 1080P before was a real hassle, and had to use the classic panel reg hack. Followed directions and it worked like a charm, although couldn't find the INF file until reading the last message. Just installed the 169.21 on my 8800gtx, XP Pro, and it worked great.
 
Hey guys,

Does this work in Vista? I'm having trouble getting my HDMI monitor to display 1920x1200 and it's seeming like an EDID issue.

Thanks,
Bryan
 
do you mean 1920x1080?

also what monitor/video card/video driver version do you have?
 
do you mean 1920x1080?

also what monitor/video card/video driver version do you have?

I don't mean to hijack the thread, but the specs are:

Monitor - LG L246W
Video Card - ECS 8800GT
Driver - 169.25

The issue is that the video card thinks the monitor is a TV since it's using HDMI. So it's forcing TV only modes like 1920x1080, 1280x720 etc. My suspicion is that it's due to a bad EDID. So I tried adding the following to nv_disp:

HKR,, OverrideEdidFlags0, %REG_BINARY%, 1E,6D,3F,56,00,00,FF,FF,04,00,00,00,00,80,00,FF,FF,FF,FF,FF,FF,00,1E,6D,3F,56,2E,9E,00,00,03,11,01,03,8E,34,20,78,EA,5A,D5,A7,56,4B,9B,24,13,50,54,A5,4B,00,A9,40,81,8F,B3,00,81,4F,81,80,D1,00,01,01,01,01,28,3C,80,A0,70,B0,23,40,30,20,36,00,B0,44,11,00,00,1A,48,3F,40,30,62,B0,32,40,40,C0,13,00,B0,44,11,00,00,1E,00,00,00,FD,00,38,4B,1E,53,11,00,0A,20,20,20,20,20,20,00,00,00,FC,00,4C,32,34,36,57,50,0A,20,20,20,20,20,20,01,10

Assuming that is correct, it doesn't seem to have an effect in Vista.
 
I think my brother has that monitor and an 8800GT and hooking it up over HDMI has no such issue. More likely a Vista is retarded issue than an EDID issue, the only difference is he's running XP.

I'll try to think of something, I'm sure its something in the drivers causing this.

also (forgive me if this sounds patronizing), if all you're doing is modifying the nv_disp.ini it won't do anything. its an installer configuration file, meaning you need to follow the rest of the instructions, including uninstalling the old drivers and reinstalling the new ones using the setup.exe in the folder where you edited nv_disp.ini.

then again it could be it just doesn't work in Vista (NVIDIA's vista drivers are pretty abyssmal).

or it could be what you've used for EDID data, I can't tell what that code does without formatting it to something the viewsonic editor can read.

I did uninstall/reinstall after modifying the inf and verified that the value was in the registry after installation. I used the Phoenix EDID program to import the current EDID and modify it, which I can provide.
 
also I noticed the string you originally posted has a few spaces in it. if those are really there in your ini that would certainly cause the setting to have no effect.
 
and what did you change? might as well post the before and afters.

The original EDID did not seem to have 1920x1200 in the Standard Timings according to Phoenix:

EDID BYTES:
0x 00 01 02 03 04 05 06 07 08 09 0A 0B 0C 0D 0E 0F
------------------------------------------------
00 | 00 FF FF FF FF FF FF 00 1E 6D 3F 56 2E 9E 00 00
10 | 03 11 01 03 8E 34 20 78 EA 5A D5 A7 56 4B 9B 24
20 | 13 50 54 A5 4B 00 A9 40 81 8F B3 00 81 4F 81 80
30 | 01 01 01 01 01 01 28 3C 80 A0 70 B0 23 40 30 20
40 | 36 00 B0 44 11 00 00 1A 48 3F 40 30 62 B0 32 40
50 | 40 C0 13 00 B0 44 11 00 00 1E 00 00 00 FD 00 38
60 | 4B 1E 53 11 00 0A 20 20 20 20 20 20 00 00 00 FC
70 | 00 4C 32 34 36 57 50 0A 20 20 20 20 20 20 01 DF


So I added 1920x1200 which changed it to:

EDID BYTES:
0x 00 01 02 03 04 05 06 07 08 09 0A 0B 0C 0D 0E 0F
------------------------------------------------
00 | 00 FF FF FF FF FF FF 00 1E 6D 3F 56 2E 9E 00 00
10 | 03 11 01 03 8E 34 20 78 EA 5A D5 A7 56 4B 9B 24
20 | 13 50 54 A5 4B 00 A9 40 81 8F B3 00 81 4F 81 80
30 | D1 00 01 01 01 01 28 3C 80 A0 70 B0 23 40 30 20
40 | 36 00 B0 44 11 00 00 1A 48 3F 40 30 62 B0 32 40
50 | 40 C0 13 00 B0 44 11 00 00 1E 00 00 00 FD 00 38
60 | 4B 1E 53 11 00 0A 20 20 20 20 20 20 00 00 00 FC
70 | 00 4C 32 34 36 57 50 0A 20 20 20 20 20 20 01 10

You should be able to save either of those into a dat file and open them with Phoenix. I wasn't able to get the Viewsonic editor working in Vista.

also I noticed the string you originally posted has a few spaces in it. if those are really there in your ini that would certainly cause the setting to have no effect.

The spaces are not present in the actual inf. I think they are just added due to pasting it here.
 
in both there is a detailed timing for 1920x1200, so its not an EDID problem from what I can tell.

one thing you could try would be to disable the CEA extension block byte, which is the 2nd to last byte. in Phoenix EDID Designer under General->EDID Extensions, change Number of Extensions from 1 to 0 and save a new .dat.

Here's what I got, going off of your original EDID.

Code:
EDID BYTES:
0x   00 01 02 03 04 05 06 07 08 09 0A 0B 0C 0D 0E 0F
    ------------------------------------------------
00 | 00 FF FF FF FF FF FF 00 1E 6D 3F 56 2E 9E 00 00
10 | 03 11 01 03 8E 34 20 78 EA 5A D5 A7 56 4B 9B 24
20 | 13 50 54 A5 4B 00 A9 40 81 8F B3 00 81 4F 81 80
30 | 01 01 01 01 01 01 28 3C 80 A0 70 B0 23 40 30 20
40 | 36 00 B0 44 11 00 00 1A 48 3F 40 30 62 B0 32 40
50 | 40 C0 13 00 B0 44 11 00 00 1E 00 00 00 FD 00 38
60 | 4B 1E 53 11 00 0A 20 20 20 20 20 20 00 00 00 FC
70 | 00 4C 32 34 36 57 50 0A 20 20 20 20 20 20 00 E0
The CEA extension block basically announces to the source device that it is HDTV compatible and what HDTV modes it is capable of. Maybe if you disable that, the NVIDIA drivers will stop trying to force 1280x720 and 1920x1080.

There also might be something in the nv_disp.inf relating to HDTV modes, so if this doesn't work you might try scouring through the inf and disabling something that sounds like it might be forcing it to "treat as HDTV". Or it might be something in the registry. It's really hard to say, but I boil it down to NV's Vista drivers being so crappy.

Finally if none of that works, you could buy PowerStrip and try to update the monitor's EDID directly, since its possible that Vista NVIDIA drivers don't accept the EDID Override Flags and probably lots of other INF tweaks.

Blahman,

That worked! I can't tell you how long I've been trying to fix this, returning video cards etc.

In case the problem wasn't clear from my posts in this thread, I was able to select 1920x1200 etc. through the drivers, but the monitor was always being set to 1080p by the video card. This resulted in some strange stuff like 50% of the picture being cutoff, including the start button in Windows.

The key was just to set that number of extensions to 0. By the way I just added the OverrideEdidFlags0 to the registry directly rather than adding it to the inf. Rebooted and all was good.

Do you know if this would impact HDCP in any way? I use this PC/monitor as a Media Center. So far everything seems OK but I'd like to know for sure.

Thanks for all the help.
 
I am surprised that actually worked! But glad to hear it did. As for HDCP, no I don't think it should be affected.
 
For anyone interested in this fix, here is the simplified procedure which doesn't require you to uninstall/reinstall your video drivers, just edit the registry and reboot.

Regedit Method:

  1. Open Regedit by going to Start->Run and typing regedit and clicking OK.
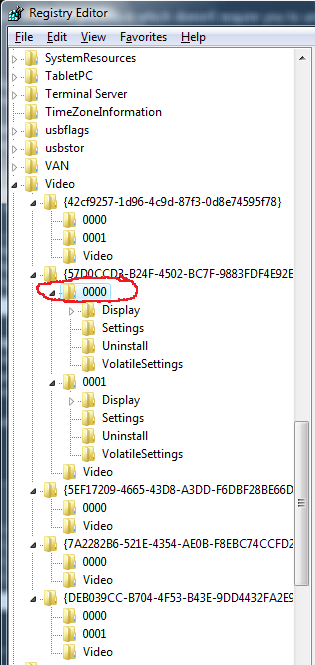
  2. By clicking the proper + signs (arrow symbols in Vista) and expanding the "folders", navigate to HKEY_LOCAL_MACHINE\SYSTEM\CurrentControlSet\Control\Video\
    You should see several folders that look something like {42cf9257-1d96-4c9d-87f3-0d8e74595f78}. This string of numbers and letters is called a GUID. You need to open each one of those GUIDs and look for the one that contains subfolders "0000" and "0001" which in turn contain the subfolders "Display", "Settings", "Uninstall", and "VolatileSettings". The GUID containing all these folders is the current GUID. This is random for every machine so this is why you have to find it yourself.​
  3. Under the current GUID, right click the "0000" folder and select "Copy Key Name". (We don't need to worry about the "0001" folder as it is just a mirror of the "0000" folder).
    nvidiaregloc.png
  4. Open Notepad and paste the key you just copied. Put square brackets around it and insert a line at the very top that says REGEDIT4.
  5. Add a line at the bottom and copy and paste the following text into it.
    Code:
    "OverrideEdidFlags0"=hex:5C,85,07,42,00,00,FF,FF,04,00,00,00,00,80,00,FF,FF,FF,FF,FF,FF,00,5C,85,FA,14,00,00,00,00,10,11,01,03,80,52,2E,78,2A,E6,9D,A3,54,4A,99,26,0F,47,4A,A1,08,00,81,C0,81,80,81,00,8B,C0,01,01,01,01,01,01,01,01,02,3A,80,18,71,38,2D,40,58,2C,45,00,C4,8E,21,00,00,1E,00,00,00,FD,00,3A,48,1E,44,0F,00,0A,20,20,20,20,20,20,00,00,00,FC,00,57,65,73,74,69,6E,67,68,6F,75,73,65,20,00,00,00,FC,00,4C,56,4D,2D,33,37,77,33,73,65,0A,20,20,00,01
    "OverrideEdidFlags1"=hex:5C,85,03,37,00,00,FF,FF,04,00,00,00,00,80,00,FF,FF,FF,FF,FF,FF,00,5C,85,FA,14,00,00,00,00,10,11,01,03,80,52,2E,78,2A,E6,9D,A3,54,4A,99,26,0F,47,4A,A1,08,00,81,C0,81,80,81,00,8B,C0,01,01,01,01,01,01,01,01,02,3A,80,18,71,38,2D,40,58,2C,45,00,C4,8E,21,00,00,1E,00,00,00,FD,00,3A,48,1E,44,0F,00,0A,20,20,20,20,20,20,00,00,00,FC,00,57,65,73,74,69,6E,67,68,6F,75,73,65,20,00,00,00,FC,00,4C,56,4D,2D,33,37,77,33,73,65,0A,20,20,00,01
    "OverrideEdidFlags2"=hex:5C,85,FA,14,00,00,FF,FF,04,00,00,00,00,80,00,FF,FF,FF,FF,FF,FF,00,5C,85,FA,14,00,00,00,00,10,11,01,03,80,52,2E,78,2A,E6,9D,A3,54,4A,99,26,0F,47,4A,A1,08,00,81,C0,81,80,81,00,8B,C0,01,01,01,01,01,01,01,01,02,3A,80,18,71,38,2D,40,58,2C,45,00,C4,8E,21,00,00,1E,00,00,00,FD,00,3A,48,1E,44,0F,00,0A,20,20,20,20,20,20,00,00,00,FC,00,57,65,73,74,69,6E,67,68,6F,75,73,65,20,00,00,00,FC,00,4C,56,4D,2D,33,37,77,33,73,65,0A,20,20,00,01
    Note: For the Westinghouse LVM-37w3 and LVM-37w3se only! Those 3 lines should cover all the LVM-37w3's I have seen including the "bad EDID" SE's that show up as W4207's.
  6. Go to File-Save As, change Save As Type to "All Files", and name the file OverrideEDIDFlags.reg (the name isn't important but the .reg extension is) and save it to your Documents or Desktop.
  7. Double click the OverrideEDIDFlags.reg file you just created and say Yes to add it to the registry.
  8. Restart. You should now have a properly functioning 1080p monitor, with no overscan, incorrect modes, interlacing or other bullcrap the NVIDIA drivers try to do when it thinks it's hooked up to an HDTV instead of a monitor :rolleyes:
Your final OverrideEDIDFlags.reg file should look something like this (only the GUID should differ).

*Example Only*
Code:
REGEDIT4

[HKEY_LOCAL_MACHINE\SYSTEM\CurrentControlSet\Control\Video\{57D0CCD3-B24F-4502-BC7F-9883FDF4E92E}\0000]
"OverrideEdidFlags0"=hex:5C,85,07,42,00,00,FF,FF,04,00,00,00,00,80,00,FF,FF,FF,FF,FF,FF,00,5C,85,FA,14,00,00,00,00,10,11,01,03,80,52,2E,78,2A,E6,9D,A3,54,4A,99,26,0F,47,4A,A1,08,00,81,C0,81,80,81,00,8B,C0,01,01,01,01,01,01,01,01,02,3A,80,18,71,38,2D,40,58,2C,45,00,C4,8E,21,00,00,1E,00,00,00,FD,00,3A,48,1E,44,0F,00,0A,20,20,20,20,20,20,00,00,00,FC,00,57,65,73,74,69,6E,67,68,6F,75,73,65,20,00,00,00,FC,00,4C,56,4D,2D,33,37,77,33,73,65,0A,20,20,00,01
"OverrideEdidFlags1"=hex:5C,85,03,37,00,00,FF,FF,04,00,00,00,00,80,00,FF,FF,FF,FF,FF,FF,00,5C,85,FA,14,00,00,00,00,10,11,01,03,80,52,2E,78,2A,E6,9D,A3,54,4A,99,26,0F,47,4A,A1,08,00,81,C0,81,80,81,00,8B,C0,01,01,01,01,01,01,01,01,02,3A,80,18,71,38,2D,40,58,2C,45,00,C4,8E,21,00,00,1E,00,00,00,FD,00,3A,48,1E,44,0F,00,0A,20,20,20,20,20,20,00,00,00,FC,00,57,65,73,74,69,6E,67,68,6F,75,73,65,20,00,00,00,FC,00,4C,56,4D,2D,33,37,77,33,73,65,0A,20,20,00,01
"OverrideEdidFlags2"=hex:5C,85,FA,14,00,00,FF,FF,04,00,00,00,00,80,00,FF,FF,FF,FF,FF,FF,00,5C,85,FA,14,00,00,00,00,10,11,01,03,80,52,2E,78,2A,E6,9D,A3,54,4A,99,26,0F,47,4A,A1,08,00,81,C0,81,80,81,00,8B,C0,01,01,01,01,01,01,01,01,02,3A,80,18,71,38,2D,40,58,2C,45,00,C4,8E,21,00,00,1E,00,00,00,FD,00,3A,48,1E,44,0F,00,0A,20,20,20,20,20,20,00,00,00,FC,00,57,65,73,74,69,6E,67,68,6F,75,73,65,20,00,00,00,FC,00,4C,56,4D,2D,33,37,77,33,73,65,0A,20,20,00,01
 
Blahman...

I have a Acer P243w and it shows under Vista when is set to 1920x1200 in the monitor osd 1600x1200 and the right field of the screen i cant see.

I have checked my EDID and modify it and i have add to the drivers and the reg method but the problem is not gone.

I have checked the Reg Method with the EDID from Westinghouse i have only enter my ID from my monitor. After Reboot my LCD is now a Westinghouse. But only with 1080p Resolution. I need the 1920x1200 can you make me a regkey for me?

Here is my EDID: http://comgames.de/AcerP243W.dat

I thank for up and hope you can help me.

Sorry for my English iam German :D

greetz: BLaKe

First of all DO NOT USE the above Westinghouse EDIDs with any other monitors than the models they were specifically made for. Using them with a completely different monitor is just plain dumb. You of course assume the responsibility and accept the risks of attempting any of the instructions in this thread. DO NOT attempt this if you are not confident you understand and can follow the instructions to the letter.

That said...

I took a look at your EDID file and it looks like there is a detailed timing section for 1920x1200, however it was not also listed in the standard timings section which I'm not sure is normal or not. But anyways I added 1920x1200@60hz to the standard timing section and hopefully this should work. I cannot make the entire regkey for you though, as the GUID is unique for everyone. Therefore you will have to follow the instructions in this post, using the following line in place of the lines given in step 5.

Code:
"OverrideEdidFlags0"=hex:04,72,AF,AD,00,00,FF,FF,04,00,00,00,00,80,00,FF,FF,FF,FF,FF,FF,00,04,72,AF,AD,79,01,40,80,04,12,01,03,80,34,20,78,0E,49,95,A9,54,37,AD,25,13,50,54,BF,CF,00,95,00,95,0F,81,00,81,0F,81,C0,81,80,A9,40,D1,00,28,3C,80,A0,70,B0,23,40,30,20,36,00,06,44,21,00,00,1A,00,00,00,FD,00,38,4B,1E,5E,11,00,0A,20,20,20,20,20,20,00,00,00,FC,00,41,63,65,72,20,50,32,34,33,57,0A,20,20,00,00,00,FF,00,4C,41,46,30,34,30,30,36,37,32,32,31,0A,00,6B
 
Hi. I have a somewhat similar issue, except I'm using different monitors. Here is my issue in detail. I was wondering if this "fix" can add a 1680x1050 resolution as "safe" for my Mintek's messed up EDID? It isn't really safe, but it should resize it down to 1280x1024.

Thanks!

~Ibrahim~
 
Hi all,

I just received my LVM-37w3se yesterday. I have it on my 4th DVI port on one of my two 8800GT's.

According to Buy.com, it's not effected by this EDID issue, but apparently it may be. Nvidia's control panel is showing it as a W4207, but the resolution is 1920x1080. It looks perfectly fine. No under or over scan issues, fits the screen perfectly. HD DVD and BD both look awesome.

When I hit "info" in the Westinghouse remote, it says 1920x1080i instead of progressive.

My computer thinks it's running 1920x1080p. Here's a screencap:

Do I really have an issue here?

Thanks!
 
Last edited by a moderator:
Yes if it says W4207 and the set says it's running at 1080i, then you have a bugged EDID. Buy.com lied.
 
According to Buy.com, it's not effected by this EDID issue, but apparently it may be. Nvidia's control panel is showing it as a W4207, but the resolution is 1920x1080. It looks perfectly fine. No under or over scan issues, fits the screen perfectly. HD DVD and BD both look awesome.

When I hit "info" in the Westinghouse remote, it says 1920x1080i instead of progressive.

I too just received the same monitor from Buy.com. Mine also states it's a W4207 in Windows. I did the registry fix and now it's displaying fine. However, before I edited the registry, I got 1080p to work by unchecking "Hide modes that this monitor cannot display" under the display properties. I was then able to select 60Hz for the refresh rate (before I was only able to select 30Hz).

I still need to try and see if my Xbox 360 will be able to display in 1080p on this monitor. If it can't, I guess I'll need to contact Buy.com or Westinghouse about this issue.

*UPDATE*
Both my Xbox 360 and PS3 have no problems displaying in 1080p through HDMI. I'm quite content w/ applying the registry fix if I ever reinstall Windows. Thanks to the OP!
 
This fix didn't work for me, as far as displaying 1080p when I hit the info button on the Westinghouse remote.

I didn't try the registry tweak because the key-folders in the instructions were not in my registry.
 
I just reinstalled XP pro and had issues with my screen due to the EDID issue.

I've gone through the steps and now the info button on my LVM-37w3se shows 1080p as it should. But I have bad overscaling. No matter what settings I change (IE resize desktop) it doesn't have any effect. The screen doesn't even blink or change when I apply settings.

Any ideas? I have about 3/4" overscaling on all sides of the screen.

Edit: I am using DVI input on the LCD.
 
I called Westinghouse to see what they would do. Can they fix this if a tech comes out? I tried reading the monitor info with powerstrip (as outlined in another fix to re-program the LCD's EDID) and it didn't work (on two different computers).

For now I am running at 1360x765 and have no under/over scaling, but it's not 1080p, the reason I bought this LCD.
 
I just reinstalled XP pro and had issues with my screen due to the EDID issue.

I've gone through the steps and now the info button on my LVM-37w3se shows 1080p as it should. But I have bad overscaling. No matter what settings I change (IE resize desktop) it doesn't have any effect. The screen doesn't even blink or change when I apply settings.

Any ideas? I have about 3/4" overscaling on all sides of the screen.

Edit: I am using DVI input on the LCD.

This may or may not be obvious, but are you sure the TV isn't in "Fill" mode? I think it's the button between the Vol and CH controls, under the Input button. Hit that a couple times to get to "Standard" mode. The way you describe it, sounds like the overscan is coming from the TV.
 
I am sure glad you pointed out the obvious Blahman, because it was on "fill" and not "standard". As soon as I set to "standard" the overscaling went away and is now perfect 1:1 1080p.

Thanks!
 
It looks like w/ the last two driver updates from NVIDIA, the registry fix for this monitor no longer works. It's back to reporting the monitor as a W4207 and displays in 1080i max. I added a custom resolution of 1920x1080 @ 60hz in the NVIDIA control panel, and it looked like it worked at first in just Windows, but whenever I try to play a game (Devil May Cry 4 and Wolverine) 1920x1080 is not selectable as a valid resolution. I tried to add the lines from the beginning of this post to the .INF file, but it looks like NVIDIA totally redid all the lines in there, so I can't find where to paste the EDID info.

Has anybody been able to get the last drivers to properly work with the LVM-37W3SE? Thanks in advance.
 
Yeah, these latest drivers have been causing monitor problems for others, as well. AFAIK, no fixes have been found. :(

~Ibrahim~
 
Back
Top