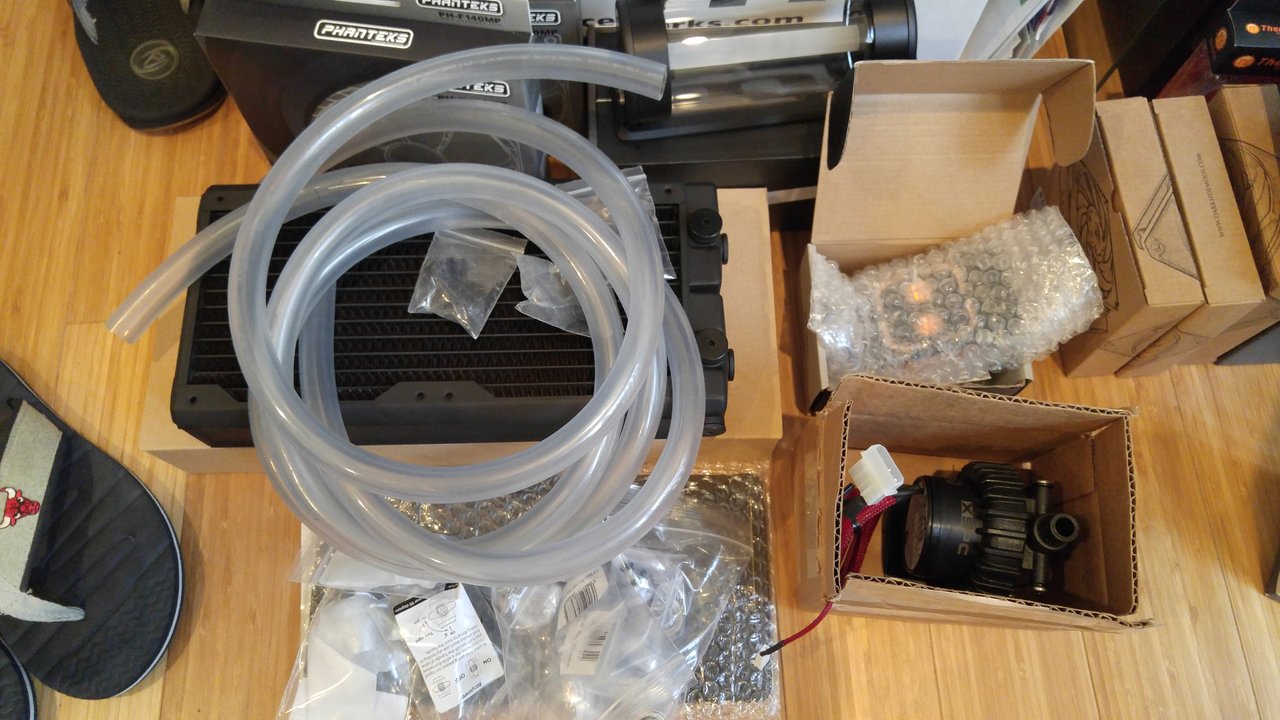
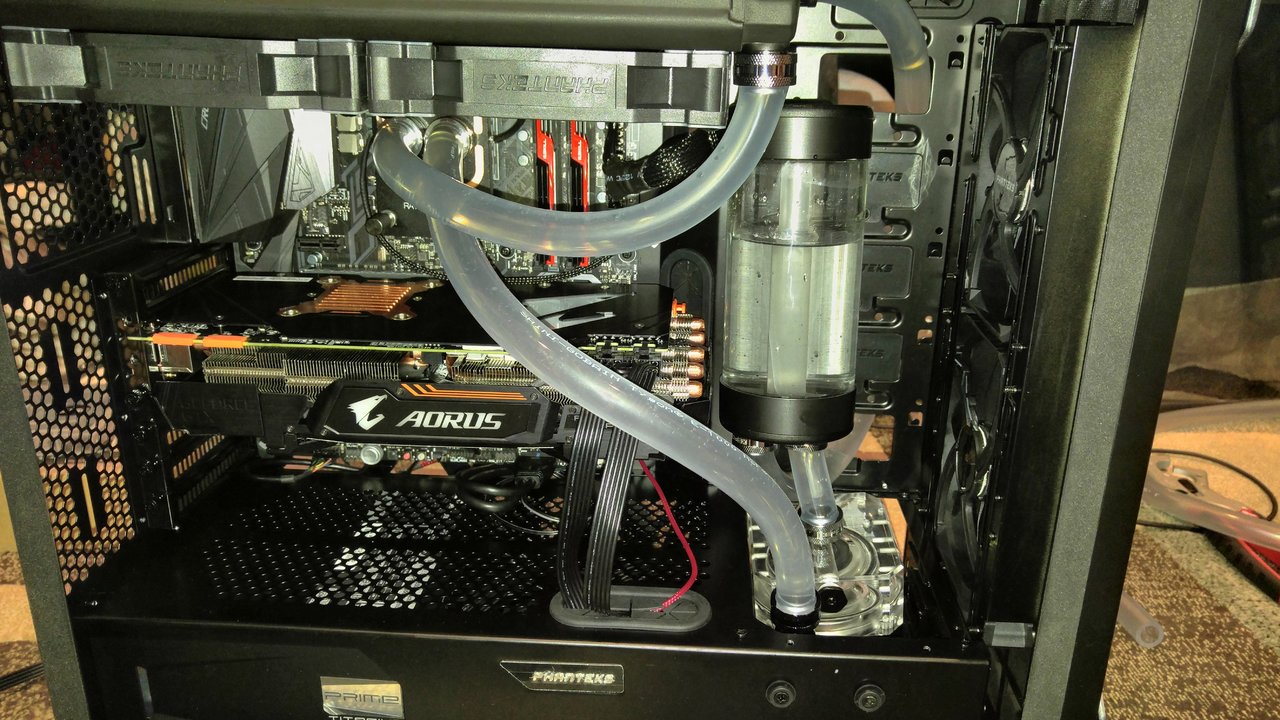
New to watercooling - ordered parts. Am I missing anything else?

boocake

Limp Gawd
Joined
Jul 11, 2015
Messages
170
Hello all!

Been carousing this forum for quite a bit (going through the sticky threads, some recent threads from other newbies) trying to absorb as much as possible. I'm looking to build a new rig, but for the first time in decades, wanted to kind of 'evolve' from the air / AIO coolers that made me lazy.

Not going to lie - I'm absolutely terrified about screwing up my first custom loop! In any case, I went ahead and ordered parts that are shipping from performance-pcs. I guess my question is- is there anything else that I should be looking to also get? The case I'm looking to use to build my first custom loop is a mean:it 4pm cube case (https://www.newegg.com/Product/Product.aspx?Item=9SIACUC57H2439)

For now, I'd like to get my feet wet by doing just the CPU. Maybe down the line, when I get enough courage, I'll start adding my GPU to the mix- but taking baby steps for now!

XSPC DDC Photon 170 Tube Reservoir
XSPC Raystorm Pro CPU Waterblock - AMD w/ G1/4" to 1/2" ID, 3/4" OD Chrome Compression Fittings
Tygon E-1000 1/2" ID (3/4" OD) "Plasticizer Free" Tubing - Clear (6 feet)
XSPC D5-Vario Series 12 VDC D5 Water Pumps - With Speed Control and Housing and Swiftech MCP655 Series Housing (Acrylic) DarkSide Gentle Typhoon Performance Radiator Fan - 2150rpm, 68cfm - Black Edition (3x)
EK-CoolStream XE 360 (Triple)
 
Yes. I don't know what, but you're missing something. You're always going to get 75% of the way done and realize you're missing ONE thing you need.

Draw out how you plan to hook everything up, and double-check the count on fittings you're going to need. It's usually two per component, so 2 for the res, 2 for the CPU block, 2 for the pump, 2 for the rad, 8 total for what you've got now. You might look into how you're doing to drain/fill the loop, and see if you might need a couple extra fittings for that (a G1/4 valve, a male-male G1/4 fittings, and a stop plug, and then another G1/4 fitting and a short piece of tube for the drain line) Are you using a fill port or have plans for filling/bleeding?

Do you have a fan splitter for the 3 fans? Or enough controllers onboard for them? Are you sure you need fans that fast, some 1400-1500rpm ones will probably give you the same performance at far less noise.

Do you have a tubing cutter? Not required, but it makes it FAR easier to get nice, neat cuts that work better with compression fittings. (no leaks)

Ack, you got me. For some reason, I ordered 7 compression fittings instead of 8! As for the fans, I wasn't honestly sure what I'd need for that particular radiator. I thought I'd error on the side of caution, but I'll look into some 1400-1500rpm fans to snag- I've seen some talk of Yate Loon fans that I'll look into. I've kind of been staring at the internals of the case I've got on order, and have been picturing having the radiator at the top. Going through the stickied thread of people posting their watercooling setups, I've kind of got a general idea of how I'd like to go. I should draw it out as you suggested, though my drawing skills are absolutely atrocious.

As for a fan splitter, I think my motherboard may have came with one. I haven't gotten around to acquiring all the components yet, but I did get the Gigabyte Aorus AX-370 K7 board, which I think has enough headers to account for the fans- I'll have to open up the box and take another peek. I also did snag a tube cutter from Home Depot a couple weeks back, so I think I've got that part covered. What I didn't really think of was the fill/drain setup. I'll need to order some parts again for that - from what I've been reading on the boards here (and some YouTube videos), it seems that's best placed near the bottom of the loop? So I'd need some tube, a stop plug, a couple of male-male G 1/4 fittings and a G/14 valve?

Once you've built a few rigs, you'll always have a box of spare fittings leftover to help fill the gaps. On your first one though, it's gotta be planned well!

I'd look into a fan splitter regardless. Even if your mobo does have enough headers, if you have to use them all, you'll have fan wires running all over your board, rather than just tucked neatly away in the top behind the radiator.

The drain HAS to be at the bottom, or you have to have a way to sit the case so the drain is at the lowest point...otherwise it won't work to drain the system. A fill port is more optional, but you DO need to figure out how to fill the system. I've been using a cheap 100cc plastic syringe I got off amazon for $5, and it's worked excellently to fill the system with no spills or mess. Like this: https://www.amazon.com/ANZESER-Plastic-Syringe-47-2in-Tubing/dp/B01EVJDTU8

For the drain, just do something like this: http://cdn.overclock.net/7/74/500x1000px-LL-747e756e_IMG_4533.jpeg Put a "T" connector at the low point in the loop, then do the male-male fitting, the valve, and the stop fitting. When you want to drain the loop, you pull off the stop fitting, put on a short piece of tubing that goes to a bucket or basin, then open the valve and everything will drain right out.
 
As an Amazon Associate, HardForum may earn from qualifying purchases.
Once you've built a few rigs, you'll always have a box of spare fittings leftover to help fill the gaps. On your first one though, it's gotta be planned well!

I'd look into a fan splitter regardless. Even if your mobo does have enough headers, if you have to use them all, you'll have fan wires running all over your board, rather than just tucked neatly away in the top behind the radiator.

The drain HAS to be at the bottom, or you have to have a way to sit the case so the drain is at the lowest point...otherwise it won't work to drain the system. A fill port is more optional, but you DO need to figure out how to fill the system. I've been using a cheap 100cc plastic syringe I got off amazon for $5, and it's worked excellently to fill the system with no spills or mess. Like this: https://www.amazon.com/ANZESER-Plastic-Syringe-47-2in-Tubing/dp/B01EVJDTU8

For the drain, just do something like this: http://cdn.overclock.net/7/74/500x1000px-LL-747e756e_IMG_4533.jpeg Put a "T" connector at the low point in the loop, then do the male-male fitting, the valve, and the stop fitting. When you want to drain the loop, you pull off the stop fitting, put on a short piece of tubing that goes to a bucket or basin, then open the valve and everything will drain right out.

You are legit. Thanks very much for the feedback and tips! I went ahead and put an order in again to performance-pcs, grabbing a a G 1/4" ball valve (I think this is what you meant?), a male to male G 1/4" fitting, a Fill Stop plug, an an additional G 1/4" compression fitting and extra tube as you recommended earlier. Thanks for the link depicting how to setup the drain- when the parts come in, I'll be sure to inspect them and should undoubtedly be able to sort out how I'd like it to come together. I think I actually have some spare brand new plastic syringes around somewhere that I was going to use to make vape juice for some friends that I think I can use, will definitely need to double check. Absolutely can't wait for my parts to arrive next week! Hopefully I'll be able to acquire the rest of my build (CPU, memory, NVMe, PSU) in due time.
 
As an Amazon Associate, HardForum may earn from qualifying purchases.
You are legit. Thanks very much for the feedback and tips! I went ahead and put an order in again to performance-pcs, grabbing a a G 1/4" ball valve (I think this is what you meant?), a male to male G 1/4" fitting, a Fill Stop plug, an an additional G 1/4" compression fitting and extra tube as you recommended earlier. Thanks for the link depicting how to setup the drain- when the parts come in, I'll be sure to inspect them and should undoubtedly be able to sort out how I'd like it to come together. I think I actually have some spare brand new plastic syringes around somewhere that I was going to use to make vape juice for some friends that I think I can use, will definitely need to double check. Absolutely can't wait for my parts to arrive next week! Hopefully I'll be able to acquire the rest of my build (CPU, memory, NVMe, PSU) in due time.

Glad I could help...Watercooling is a fun (if expensive) hobby. The more you plan out in advance, the better off you'll be. Just take your time measuring and cutting the tubing, make sure all your cuts are clean. Double check EVERY fitting to make sure the o-rings are on, the seating surfaces are clean, the tubing is installed flush, etc. Take your time and you'll never have a major problem.

Good luck!
 
Hate to break it to you now but you have a big problem. The EK Coolstream EX 360 will not fit that case. If you look at the overview on that NewEgg page you linked to, about 3/4 of the way down it clearly shows what size radiators will fit. 240 or 280 is the max size, front or top. Additionally, if you are planning to use the area behind the motherboard for the reservoir it might be a bit tight especially with 1/2" x 3/4" tubing. You might be able to get the res in the "front" side but it might interfere with a full length video card.

While this does look like a nice case I would shy away from buying from a new company like mean:it. They appear to be so new that I can't even find a web site for them. They may make great products and have great service but until I see reviews and comments from some of the more established review sites I would steer away from them. Fortunately there are MANY well established case manufacturers out there. Thermaltake has some cases in a similar style as the mean:it 4PM series. They are very flexible for water cooling, well built, and reasonably priced.

:( Yeah... I found out just yesterday when I got the case and started doing math (which I apparently am atrocious at). I ended up ordering a 280mm HW Black Ice radiator on the side which is actually coming in sometime tomorrow, along with fittings and a ball valve recommended by Bandalo above. I don't know how I completely missed that part of the page on NewEgg- in switching back and forth on the tabs on my browser doing comparisons, I may have gotten mixed up with I was initially looking at, which was their 5pm series. I did end up finding their website trying to find more details, they got specs on the 5pm series on there but not their 4pm series: http://www.meanit.co/

The fan options seem pretty nice though. As for the videocard, I'm going to be running in it is the Gigabyte Aorus GTX 1080 Ti Xtreme, which I think it's about 11 1/2" in length. I think it's a tight fit, but the right side chamber seems to allow for mounting a pump. Thing is, I think this is more for a pump/reservoir combo, which I don't have coming inbound from performance-pcs.

Thanks very much for bringing up Thermaltake! I didn't really look into them that much at the get go as I always seem to come across their full tower chassis cases. I was trying to find something with a small enough footprint to put upon my desk, away from this full tower cooler master I've had for what seems like forever. That specific case you referenced definitely catches my eye - I may just end up picking that one up and using this mean:it 4pm case for another rig.
 
I'll give them credit for the fans too. They do look pretty nice -- but then everybody and their mother have pretty nice LED fans now it seems like.

As for the pump and/or res I think you will have a tough time using that right side chamber. By looking at the layout shown on the NewEgg page that chamber is only about 90mm wide. Most pumps and tube res are 60mm. That does not leave much clearance if you have to put fittings on the side of the pump or res. Using 1/2" tubing is just going to exacerbate that situation. Personally I don't see the point of using 1/2" tubing anyway. Yes, technically you should be able to get more flow out of it but performance-wise will you see a difference over 3/8"? 1 or 2 degrees at best. It's harder to work with, the tubing costs more, and the fittings cost more. I'm sure there are many who would argue the point but in my opinion, it is not worth it. After looking at the pictures again it looks like all the hard drives also mount in that right side chamber. Depending on your configuration you may not have space back there for a pump/res at all. Then looking at the left side it is hard to tell how much space there is between the end of the motherboard and the front fans. There might be space there if your video card will allow it. Last option might be to mount it horizontally on the bottom or maybe on the top depending on where you can mount the 240 rad.

The more I look at that case the more I think it is a nice case for a single (or maybe dual) AIO, but not so good for a custom loop. Please understand that I am not knocking your choice, it's just the way I see that case. The Thermaltake Core X5 or X9 on the other hand are fully configurable for a variety of custom loop setups. The X9 can hold a ton of radiators up to 480mm, but that is a huge case. The X5 can hold a pair of 360's in the top and the bottom and one on the side, or various combinations of smaller radiators. The Core X5 is somewhat larger than the mean:it 4PM though (21.30" x 14.60" x 18.20" vs 15.9" x 11.8" x 15.6") so it may not fit your desk space. There are lots of other options though -- you just have to do the research. :)
 
Oh you'll thank yourself with choosing the HW radiator - the build quality is so much better than the EK.

A tip regarding loop bleeding - be prepared for it to take far longer than you expect initially. When I did my system I was thinking 15mins - hr max. Turns out, mine took something like 3 days before the cooling liquid ran crystal clear and all the major bubbles disappeared.
Be prepared for lots of gurgling and the occasional random pump noise during this time.
 
I'll give them credit for the fans too. They do look pretty nice -- but then everybody and their mother have pretty nice LED fans now it seems like.

As for the pump and/or res I think you will have a tough time using that right side chamber. By looking at the layout shown on the NewEgg page that chamber is only about 90mm wide. Most pumps and tube res are 60mm. That does not leave much clearance if you have to put fittings on the side of the pump or res. Using 1/2" tubing is just going to exacerbate that situation. Personally I don't see the point of using 1/2" tubing anyway. Yes, technically you should be able to get more flow out of it but performance-wise will you see a difference over 3/8"? 1 or 2 degrees at best. It's harder to work with, the tubing costs more, and the fittings cost more. I'm sure there are many who would argue the point but in my opinion, it is not worth it. After looking at the pictures again it looks like all the hard drives also mount in that right side chamber. Depending on your configuration you may not have space back there for a pump/res at all. Then looking at the left side it is hard to tell how much space there is between the end of the motherboard and the front fans. There might be space there if your video card will allow it. Last option might be to mount it horizontally on the bottom or maybe on the top depending on where you can mount the 240 rad.

The more I look at that case the more I think it is a nice case for a single (or maybe dual) AIO, but not so good for a custom loop. Please understand that I am not knocking your choice, it's just the way I see that case. The Thermaltake Core X5 or X9 on the other hand are fully configurable for a variety of custom loop setups. The X9 can hold a ton of radiators up to 480mm, but that is a huge case. The X5 can hold a pair of 360's in the top and the bottom and one on the side, or various combinations of smaller radiators. The Core X5 is somewhat larger than the mean:it 4PM though (21.30" x 14.60" x 18.20" vs 15.9" x 11.8" x 15.6") so it may not fit your desk space. There are lots of other options though -- you just have to do the research. :)

Thanks for the pointers!

I've been inspecting the case thoroughly and you guys are definitely right... it's definitely too small of a fit for what I've got incoming. I don't have the reservoir on hand yet (supposedly the whole package comes in sometime tomorrow) to try and place things out, but I was looking at mounting it horizontally on the bottom. Thing is, however, the GPU is pretty sizable and there probably won't be much room to work with. I also noticed that there's drilling involved with regards to mounting the reservoir that's coming in. I didn't see any reservoir mounting points for that bracket they leverage in the case, and I don't have a drill handy (at least, not until the weekend). I'm beginning to think this case might be good for an AIO build as you mentioned.

As for the diameter of the tubing, I was checking out the tubing sizes in the sticky at this forum and just kind of got 'locked in' from the first post from Cathar regarding 1/2" ID tubing. I don't know why, but it kind of just 'stuck' when I came about planning the loop and ordering the tubes. Would it hurt much if I planned on including a GPU for this loop in the future with this sizing? I think I may have been going a bit overkill on this first build.

I ended up looking for comparable Mid-ATX cases, the Core X5 seems to fit the bill for what I was looking at, maybe just a bit more wider than I anticipated. I could probably set it down on the floor as I do with my current case, but I guess with the idea of having done my first loop, I'd like it to have it on the desk for easy access as well. I did come across a Phanteks Enthoo Evolve case that doesn't seem to be 'too tall', and as a plus, seems to have actual reservoir mounting points.
 
Oh you'll thank yourself with choosing the HW radiator - the build quality is so much better than the EK.

A tip regarding loop bleeding - be prepared for it to take far longer than you expect initially. When I did my system I was thinking 15mins - hr max. Turns out, mine took something like 3 days before the cooling liquid ran crystal clear and all the major bubbles disappeared.
Be prepared for lots of gurgling and the occasional random pump noise during this time.

That's a relief! I think I've been kind of hit/miss on my initial order of parts, was hoping this particular 280mm radiator would fit the bill. I didn't realize how hefty this thing is, seems a bit 'thicker' than anything else I've come across. Then again, I've really been dealing with AIO over the past couple of years. I read some earlier threads about 'flushing out' a radiator prior to use- would that still be necessary for this? If so, do I use hot distilled water for prepping? Just kind of thinking maybe I could do some preliminary prep-work (if necessary) before the pump and other equipment arrives tomorrow.
 
That's a relief! I think I've been kind of hit/miss on my initial order of parts, was hoping this particular 280mm radiator would fit the bill. I didn't realize how hefty this thing is, seems a bit 'thicker' than anything else I've come across. Then again, I've really been dealing with AIO over the past couple of years. I read some earlier threads about 'flushing out' a radiator prior to use- would that still be necessary for this? If so, do I use hot distilled water for prepping? Just kind of thinking maybe I could do some preliminary prep-work (if necessary) before the pump and other equipment arrives tomorrow.

It's always a good idea to flush new blocks, pumps and rads before use. Even good ones can occasionally have some debris from manufacturing still inside. I'd do a quick rinse with hot water and drain it over a paper towel or coffee filter. If you see a lot of junk on the filter, then flush more. If there's no debris on the filter, then you're probably good.
 
Always clean out your radiator(s) by repeatedly shaking and flushing with hot water.

Loop bleeding is done in stages over hours or days as the water flows through the system. Eventually you may notice slight dips in the volume of water sitting in your res as the last air bubbles are forced into the common space of the res.

Buy extra fittings, especially rotatable 45 and 90 degree bends as well as a spacer or two. Buy some plumbers tape to help seals if needed and buy something like a kill coil to prevent algae growth.

Once you've built a few rigs, you'll always have a box of spare fittings leftover to help fill the gaps. On your first one though, it's gotta be planned well!

I'd look into a fan splitter regardless. Even if your mobo does have enough headers, if you have to use them all, you'll have fan wires running all over your board, rather than just tucked neatly away in the top behind the radiator.

The drain HAS to be at the bottom, or you have to have a way to sit the case so the drain is at the lowest point...otherwise it won't work to drain the system. A fill port is more optional, but you DO need to figure out how to fill the system. I've been using a cheap 100cc plastic syringe I got off amazon for $5, and it's worked excellently to fill the system with no spills or mess. Like this: https://www.amazon.com/ANZESER-Plastic-Syringe-47-2in-Tubing/dp/B01EVJDTU8

For the drain, just do something like this: http://cdn.overclock.net/7/74/500x1000px-LL-747e756e_IMG_4533.jpeg Put a "T" connector at the low point in the loop, then do the male-male fitting, the valve, and the stop fitting. When you want to drain the loop, you pull off the stop fitting, put on a short piece of tubing that goes to a bucket or basin, then open the valve and everything will drain right out.

If the reservoir has a point for you to add water above the intake and outflow points then you can make your own fill port with a single compression or worm fitting, some spare tubing, and a funnel.
 
As an Amazon Associate, HardForum may earn from qualifying purchases.
Always clean out your radiator(s) by repeatedly shaking and flushing with hot water.

Loop bleeding is done in stages over hours or days as the water flows through the system. Eventually you may notice slight dips in the volume of water sitting in your res as the last air bubbles are forced into the common space of the res.

Buy extra fittings, especially rotatable 45 and 90 degree bends as well as a spacer or two. Buy some plumbers tape to help seals if needed and buy something like a kill coil to prevent algae growth.


If the reservoir has a point for you to add water above the intake and outflow points then you can make your own fill port with a single compression or worm fitting, some spare tubing, and a funnel.


I agree with your points EXCEPT the plumbers tape. DO NOT USE THIS. G1/4 fittings are sealed by an o-ring on the seating surface, not the threads. If your o-ring or the seating surface is damaged, replace the o-ring or the part, don't try to "make it work".

On the fillport topic, they can be made a dozen ways, depending on your case and desires. My old case I had a fillport through-case fitting mounted to the top of the case, with a short length of tubing to the top of the res. That way I could fill, top it up and vent it without taking the side panels off.

My Ek res did not exactly have the best quality control and one of the G1/4 holes was cut a fraction of a millimeter too large such that a fitting's threads would not seat properly and then fall out under the pressure of filling with water in the sink. Winding tape about about the threads on a plug thickened it enough that it would remain seated in the mis-cut opening, and several years later still has not leaked. Under other circumstances using tape would like be a bad idea.
 
My Ek res did not exactly have the best quality control and one of the G1/4 holes was cut a fraction of a millimeter too large such that a fitting's threads would not seat properly and then fall out under the pressure of filling with water in the sink. Winding tape about about the threads on a plug thickened it enough that it would remain seated in the mis-cut opening, and several years later still has not leaked. Under other circumstances using tape would like be a bad idea.

If the threads are bad enough that the fitting won't mount properly, I'd return the res or radiator IMO. You don't need much to pull it tight against the seating surface, and if they're falling out under simple water pressure, they're WAAY too worn/loose. The OP in this case is using all new parts, and he should definitely RMA anything with damaged or worn threads before trying teflon tape.
 
That's a relief! I think I've been kind of hit/miss on my initial order of parts, was hoping this particular 280mm radiator would fit the bill. I didn't realize how hefty this thing is, seems a bit 'thicker' than anything else I've come across. Then again, I've really been dealing with AIO over the past couple of years. I read some earlier threads about 'flushing out' a radiator prior to use- would that still be necessary for this? If so, do I use hot distilled water for prepping? Just kind of thinking maybe I could do some preliminary prep-work (if necessary) before the pump and other equipment arrives tomorrow.

Flush with boiling water - over and over and over until the radiator doesn't smell. You can use some dish soap or rubbing alcohol etc in there while you do this.
It might take 20 or so flushes to get rid of the smell.

Final rinse with distilled if you feel like it - not essential though.

Distilled water is to prevent any hard water deposits and bacterial growth. However, as you're using boiling or extremely hot water, you're killing everything in there anyway.
 
If the threads are bad enough that the fitting won't mount properly, I'd return the res or radiator IMO. You don't need much to pull it tight against the seating surface, and if they're falling out under simple water pressure, they're WAAY too worn/loose. The OP in this case is using all new parts, and he should definitely RMA anything with damaged or worn threads before trying teflon tape.

It was a new res. I did not feel like paying for return shipping to eastern Europe to send the 400mm tall res (plus all the packaging) back to EK and also delay my build for several weeks while waiting for a replacement part / wasting money and time on an interim res before having to rebuild the cooling loop all over again. Plumber's tape was a fast and effective solution.

Flush with boiling water - over and over and over until the radiator doesn't smell. You can use some dish soap or rubbing alcohol etc in there while you do this.
It might take 20 or so flushes to get rid of the smell.

Final rinse with distilled if you feel like it - not essential though.

Distilled water is to prevent any hard water deposits and bacterial growth. However, as you're using boiling or extremely hot water, you're killing everything in there anyway.

Tubing needs to be cleaned the same way. As a bonus, warm tubing is often easier to slide over compression fittings. But doing that doesn't kill everything gets into the watercooling parts after cleaning but during the installation process. Leave it running without cleaning long enough and stuff will still find a way to grow in there.

If you don't have tubing cutter, that can be worthwhile to save you from making a bad cut since you only have 6 feet of tubing. It's always better to cut too long of a piece and then trim down than to be cutting yourself short. Along with that buy or make a power supply bridge. This tricks the power supply into running without being plugged into the motherboard so that you can "briefly" test the pump, use the pump to run water through your gear to clean it, and then run the completed loop for several hours with only the pump active. This is a great way to check for leaks without risking shorting out the cpu, gpu, or motherboard.
 
Last edited:
Mostly good advice here except I agree with Bandalo - plumbers tape (aka Teflon tape) is not needed. If the parts don't fit send 'em back. And extra fittings just add extra cost. If you plan your loop correctly you shouldn't need extras. Over a period of time (years) of making custom loops you'll eventually end up with extra fittings and that's great. But I would not buy extras "just in case." Planning is king!

Yeah that Enthoo Evolve is a popular case and damn sexy looking. It is set up pretty well for water cooling. Just need to be wary of the radiator thickness. I can't find any reference as to how much clearance there is but you can probably get by with up to about 40-45mm.
 
As a bonus, warm tubing is often easier to slide over compression fittings...

THIS... 110%. After a while getting those fittings on is a pain. I kept a jug of hot water at the ready and it saved my hands from oblivion. Having a rubber mat or gloves helps with compression fittings also...
 
It was a new res. I did not feel like paying for return shipping to eastern Europe to send the 400mm tall res (plus all the packaging) back to EK and also delay my build for several weeks while waiting for a replacement part / wasting money and time on an interim res before having to rebuild the cooling loop all over again. Plumber's tape was a fast and effective solution.

Tubing needs to be cleaned the same way. As a bonus, warm tubing is often easier to slide over compression fittings. But doing that doesn't kill everything gets into the watercooling parts after cleaning but during the installation process. Leave it running without cleaning long enough and stuff will still find a way to grow in there.

If you don't have tubing cutter, that can be worthwhile to save you from making a bad cut since you only have 6 feet of tubing. It's always better to cut too long of a piece and then trim down than to be cutting yourself short. Along with that buy or make a power supply bridge. This tricks the power supply into running without being plugged into the motherboard so that you can "briefly" test the pump, use the pump to run water through your gear to clean it, and then run the completed loop for several hours with only the pump active. This is a great way to check for leaks without risking shorting out the cpu, gpu, or motherboard.
In your situation I probably would have done the same, but I try to buy local (meaning stateside) to minimize shipping times in case I need to RMA something. I've never bothered with cleaning the tubing - I just let whatever biocide is in the fluid I choose take care of that. You are right about the warm tubing being easier to install! I used some PVC tubing once and that was impossible to install without softening it up in some very hot water first and even then it was very hard to get on the fittings.

I have always used scissors in the past to cut tubing. It does not make a perfectly square cut but it isn't bad especially on softer tubing like the Tygon E-1000. But on my next build I am going to get a cutter just because. :) Sound advise!
 
It was a new res. I did not feel like paying for return shipping to eastern Europe to send the 400mm tall res (plus all the packaging) back to EK and also delay my build for several weeks while waiting for a replacement part / wasting money and time on an interim res before having to rebuild the cooling loop all over again. Plumber's tape was a fast and effective solution.

In that case, I might have done the same to make it work.
 
My parts finally came in! All I need now is the case, which should be coming in tomorrow. I'll be sure to set some time this weekend (probably Friday evening) sweating profusely as I start putting together my first loop. Unfortunately, it seems that they forgot to add my D5 pump housing in this shipment (honestly, not sure if it's critical? I thought that acrylic housing looked nice). Then again, I actually still have no idea how to even apply it to the pump. Another case of impulse adding to a shopping cart. :l

20170425_163110.jpg
 
Note to self: Make sure that you have an actual AM4 mounting bracket for your CPU waterblock beforehand. :banghead:
 
20170502_195221.jpg

It's... Alive??

Oh god... Got it running off another PSU to see if I got leaks, removed paper towels and have it running. I am horrible at this.
 
Hope you enjoyed putting it together!
Don't stress the leak testing - anything that leaks will do so within 30 mins max. I tip is to add some UV dye and use a UV torch to see where any small drops are. Totally not necessary though - more of a fun luxury.

It's not easy to get the loop looking nice. In my case, I used a bunch of 90 degree and extender fittings to clean up the tubing. It's expensive when you add it all up, but the end result is nicer looking.
 
Hope you enjoyed putting it together!

It's not easy to get the loop looking nice. In my case, I used a bunch of 90 degree and extender fittings to clean up the tubing. It's expensive when you add it all up, but the end result is nicer looking.

This definitely would have been a lot easier in a larger case! Tinkering with these soft tubes were a bit of a pain- they kept 'slipping' out of the fittings, despite me having ordered the right ones for them. I think it's just the nature of the tube in general. I went ahead and ordered some 3/8 ID 5/8 OD tubing and fittings as RedWagnum mentioned earlier for a future re-build of this. I'm still figuring out how to get the air bubbles out- kept it on the other PSU and ran it for awhile, started it up and off again. Is there a special trick behind it?
 
This definitely would have been a lot easier in a larger case! Tinkering with these soft tubes were a bit of a pain- they kept 'slipping' out of the fittings, despite me having ordered the right ones for them. I think it's just the nature of the tube in general. I went ahead and ordered some 3/8 ID 5/8 OD tubing and fittings as RedWagnum mentioned earlier for a future re-build of this. I'm still figuring out how to get the air bubbles out- kept it on the other PSU and ran it for awhile, started it up and off again. Is there a special trick behind it?

Air bubbles - Just have to run it for a couple of days. Big bubbles will go soon, micro bubbles take a while. Up to 3 days or so for those to disappear depending on your pump power.
- Run the system whilst holding the case. Tip it from side to side to let trapped bubbles release. Remember they like to gather at high points. Make sure you don't tip so far that the pump sucks in air in the reservoir.
- Varying the pump speed from low to high also helps.

If you think that's tight.... check this out
 
Oh god... Got it running off another PSU to see if I got leaks, removed paper towels and have it running. I am horrible at this.
Take it easy on yourself! It looks fine and it is working. That's more than I can say for my first attempts at watercooling. :D

This definitely would have been a lot easier in a larger case! Tinkering with these soft tubes were a bit of a pain- they kept 'slipping' out of the fittings, despite me having ordered the right ones for them. I think it's just the nature of the tube in general. I went ahead and ordered some 3/8 ID 5/8 OD tubing and fittings as RedWagnum mentioned earlier for a future re-build of this. I'm still figuring out how to get the air bubbles out- kept it on the other PSU and ran it for awhile, started it up and off again. Is there a special trick behind it?
Yes, a larger case would have probably been easier but there are always tradeoffs.

The tubing should not "slip off" if it is installed correctly on the correct size fittings. When you push the tubing on the barb it should be pretty hard to push on and you should keep pushing until it bottoms out on the barb. Then screw the compression ring down "tightly" finger tight (IOW, as tight as you can get it with your fingers, but don't use a wrench on it.) It should be very hard to pull off at that point. Sorry I didn't mention it before but the 3/8x5/8 will be almost as hard to work with as the 1/2x3/4, because of the thick wall of the tubing. I would have recommended 3/8x1/2. As for getting the air bubbles out (AKA bleeding), tip the case forwards, backwards, and side-to-side several times with the pump running. Let it run for a while then do it again. After a while most of the larger air bubbles will have worked their way to the reservoir. You can flick the tubing with your finger to get the tiny bubbles that cling to it to release but it is not necessary to get ALL the tiny bubbles out before you use the system. Over time they will work their way out. Important to note though -- never, EVER let your pump run dry! Due to the way nearly all water cooling pumps are made the fluid traveling through them also acts somewhat as a lubricant to the very delicate bearing inside them. The bearing can be destroyed very quickly if allowed to run dry.
 
Chapeau must have posted just as I started my post. Same good advice.

That mITX build is sick! But no way, no how, could I or would I do a mITX system like that. Too cramped and too compromised for my style. It may work well, but in the back of my mind I would always be thinking about the thin radiator and fans, and the limited air flow. I'd always be checking to see it it was overheating. Kinda like running a 350 (or what's that - 5.7L?) that's been bored 0.065" when you know the limit is 0.060" - just a fear that it might blow if you push it hard enough... :)
 
Take it easy on yourself! It looks fine and it is working. That's more than I can say for my first attempts at watercooling. :D


Yes, a larger case would have probably been easier but there are always tradeoffs.

The tubing should not "slip off" if it is installed correctly on the correct size fittings. When you push the tubing on the barb it should be pretty hard to push on and you should keep pushing until it bottoms out on the barb. Then screw the compression ring down "tightly" finger tight (IOW, as tight as you can get it with your fingers, but don't use a wrench on it.) It should be very hard to pull off at that point. Sorry I didn't mention it before but the 3/8x5/8 will be almost as hard to work with as the 1/2x3/4, because of the thick wall of the tubing. I would have recommended 3/8x1/2. As for getting the air bubbles out (AKA bleeding), tip the case forwards, backwards, and side-to-side several times with the pump running. Let it run for a while then do it again. After a while most of the larger air bubbles will have worked their way to the reservoir. You can flick the tubing with your finger to get the tiny bubbles that cling to it to release but it is not necessary to get ALL the tiny bubbles out before you use the system. Over time they will work their way out. Important to note though -- never, EVER let your pump run dry! Due to the way nearly all water cooling pumps are made the fluid traveling through them also acts somewhat as a lubricant to the very delicate bearing inside them. The bearing can be destroyed very quickly if allowed to run dry.

What really worried me, was how easy it was for me to slip the ends of the tubing onto the barb - I didn't struggle at all. It was a bit too easy which has me a bit paranoid around the whole setup. I'm pretty certain I got the exact matching fittings with the tubing I had ordered (1/2" ID 3/4" OD). I read reviews on the tubing (much later, after I had purchased it) on PPCs that some folks noticed it was a bit 'slippery', which I can kind of confirm. Had I seen that review, I'd probably have considered a different type of tubing besides that Tygon stuff I ordered- but to be real honest, navigating PPCs site was a bit of a task in itself.

I'm a bit nervous tipping the case a bit because of the above, but for the most part, all the big air bubbles kind of got worked out. I have these small tiny bubbles in the reservoir though, which I'm not quite sure how to deal with. Also, should the reservoir be topped off? Or do people typically leave a bit of room or slack? I think I can add a bit more near the top, but wasn't sure what the consensus was regarding this.
 
Mini hose clamps - they are your friends and will grant you peace of mind grasshopper!

As long as your reservoir has enough liquid within it to prevent air from entering your loop, you are golden. I tend to like to leave my reservoir 90% full with just a bit of air so that I can see a water line... This let's me know the system is sound and no leaks/loss of coolant is occurring over time.
 
What really worried me, was how easy it was for me to slip the ends of the tubing onto the barb - I didn't struggle at all. It was a bit too easy which has me a bit paranoid around the whole setup. I'm pretty certain I got the exact matching fittings with the tubing I had ordered (1/2" ID 3/4" OD). I read reviews on the tubing (much later, after I had purchased it) on PPCs that some folks noticed it was a bit 'slippery', which I can kind of confirm. Had I seen that review, I'd probably have considered a different type of tubing besides that Tygon stuff I ordered- but to be real honest, navigating PPCs site was a bit of a task in itself.

I'm a bit nervous tipping the case a bit because of the above, but for the most part, all the big air bubbles kind of got worked out. I have these small tiny bubbles in the reservoir though, which I'm not quite sure how to deal with. Also, should the reservoir be topped off? Or do people typically leave a bit of room or slack? I think I can add a bit more near the top, but wasn't sure what the consensus was regarding this.

I have used Tygon tubing in the past (and present -- still have some in my system now), not sure if it was the E-1000 or another series, but it is very flexible and kind of stretchy. It should be somewhat hard to push on the barbs, not terribly hard but certainly not easy. Double-check the packaging for the barbs and the tubing to make sure they are both the same. If it is really so "loose" that you are afraid to tilt/tip the system then something is not right. Call PPCs and talk to them about it. They may know of compatibility issues with the fittings and/or tubing. That kind of thing is pretty rare but it can happen. Could be as simple as one manufacturer using metric measurements and another using imperial, eg: a 1/2" barb is 12.7mm so with 13mm ID tubing that slight difference can make a looser fit. I'm pretty sure they won't exchange the tubing since it has been cut but they may exchange the fittings for another brand.

Yes, the PPCs site could use some work, for sure. I ordered some stuff yesterday and had to call them to change something. While I was talking to the rep on the phone I asked him if they got many complaints about how slow the site is. He said the site tends to get slow when there are a lot of people on-line. Said there was about 200 people on-line at that moment. Sheesh, I would never visit the [H] if it was that slow with only 200 people using it. Sad excuse for not wanting to upgrade the hardware. :(

Supercharged_Z06 has good advice on the bubbles and water level - spot on.

Mini hose clamps - they are your friends and will grant you peace of mind grasshopper!

As long as your reservoir has enough liquid within it to prevent air from entering your loop, you are golden. I tend to like to leave my reservoir 90% full with just a bit of air so that I can see a water line... This let's me know the system is sound and no leaks/loss of coolant is occurring over time.

Yes, the hose clamps can work, as well as zip ties but I would not use them except as a stop-gap measure until you can get your compression fittings sorted out. If you want or need to use clamps or zip ties just unscrew your compression rings, slide them up and out of the way, and install your clamp/zip tie on the barb. You will not be able to re-attach the compression ring so it will look like poo until you get things sorted out.

Keep us posted.
 
Just checked my invoice, it was indeed E-1000 (Tygon E-1000 1/2" ID (3/4" OD) "Plasticizer Free" clear tubing) that I ordered and am using. The fittings I'm using are XSPC G1/4" to 1/2" ID, 3/4" OD. It was really super easy to slide the end of the tubing onto the barb for these fittings - they're not 'too' snug, but they just slid right on without me having to use the warm water that was mentioned earlier in the thread. I was measuring distance to cut with my hose cutters, when I notice how easy it seemed to slip off when put at an awkward angle. Not that I was trying to make an awkward angle of sorts. So I ended up putting on the compression ring to hold one end in place while I was routing the rest of the tube, when I notice it actually ended up slipping off. :oops:

I un-did the compression ring, pushed the end of the hose onto the barb, and then kind of applied pressure on the hose into the barb as I screwed on the compression ring. It's snug, but it definitely had me on potential panic alert as I didn't quite trust it at that point. I did a quick 'tug' prior to filling with distilled water and flushing out the components, and it seemed fine- but I guess I'm just a bit anxious over the possibility of a hose suddenly just popping off.

I'll give the setup another check tonight when I get home, the reviews on that specific tubing I didn't catch on the site until much later, when I figured that it just wasn't me who was experiencing this kind of issue:

http://www.performance-pcs.com/plas...cizer-free-tubing-clear.html#Customer-Reviews

EDIT:


...and I didn't realize they had different versions of their clear tubes with same dimensions:

http://www.performance-pcs.com/tygon-e-3603-1-2-id-3-4-od-clear-tubing.html
 
Back
Top