Navigation
Install the app
How to install the app on iOS
Follow along with the video below to see how to install our site as a web app on your home screen.
Note: This feature may not be available in some browsers.
More options
You are using an out of date browser. It may not display this or other websites correctly.
You should upgrade or use an alternative browser.
You should upgrade or use an alternative browser.
jadawgis's Patent Infringement
- Thread starter jadawgis732
- Start date
jadawgis732
Gawd
- Joined
- Jun 18, 2009
- Messages
- 536
So today I got my mounting hardware from EK. I found the parts 24 hours after I had sent the first email. Unfortunately, it was already on its way to the US and there was nothing that could be done. (Sorry guys) but great customer service always endears customer loyalty! Anyway, I was thinking about the link between the reservoir and pump and I thought this might look good. What do you guys think?


Itll mounted in this fashion:

Also this could be good fodder for a caption contest. She's scrutinizing the camera man quite hard!

Itll mounted in this fashion:
Also this could be good fodder for a caption contest. She's scrutinizing the camera man quite hard!
phiberoptik
Limp Gawd
- Joined
- Sep 24, 2010
- Messages
- 501
ouch!
jadawgis732
Gawd
- Joined
- Jun 18, 2009
- Messages
- 536
The Peter Griffen he stubs his toe.
jadawgis732
Gawd
- Joined
- Jun 18, 2009
- Messages
- 536
UPDATE: Sleeving, Mounting Rads, Cable Routing, Hammond Boxes
This will be a big update, for me at least. I’ve been doing a lot of planning lately, and I’ve come to like the Hammond Box idea for hiding cables and connections. Here you can see my idea and diagrams:


But to be able to use the boxes for cable routing, I needed to come up with an idea for letting cables go through the boxes, and I figured the thin piece would be mounted to the case with the box part of the Hammond Boxes used as a cap. I taped the boxes with blue painters tape, marked off where holes would go and used grooves for allowing the cables to go through. In retrospect this wasn’t the best idea but the boxes are cheap so I’ll test out the idea of using the box part mounted to the case, with the thin piece as a cover tomorrow. Here’s an example of what I had in mind. The terminal block will be mounted to the case, but the cover cannot have cables going through it, because I’ll need to have access to the blocks.


I also mounted the radiator and fans to the case, and attached a rocker switch for the CCFLs. I also have an idea to hide the CCFLS so that only ambient light can be seen. Check back tomorrow or Sunday for that idea. Meanwhile I’ve sleeved the SATA and Molex to modular connections and some CCFLs. I have the one inverter I need to use besides the Lamptron 4 way for a Liquid Neon CCFL in the garage drying. I painted it black to match the rest of the stuff. I also ordered a BFG EX-1000w as a backup and also to use while I’m sleeving the EX1200. But mostly I got it because Geeks.com had it for $54.99 shipped. Check back soon.


This will be a big update, for me at least. I’ve been doing a lot of planning lately, and I’ve come to like the Hammond Box idea for hiding cables and connections. Here you can see my idea and diagrams:
But to be able to use the boxes for cable routing, I needed to come up with an idea for letting cables go through the boxes, and I figured the thin piece would be mounted to the case with the box part of the Hammond Boxes used as a cap. I taped the boxes with blue painters tape, marked off where holes would go and used grooves for allowing the cables to go through. In retrospect this wasn’t the best idea but the boxes are cheap so I’ll test out the idea of using the box part mounted to the case, with the thin piece as a cover tomorrow. Here’s an example of what I had in mind. The terminal block will be mounted to the case, but the cover cannot have cables going through it, because I’ll need to have access to the blocks.
I also mounted the radiator and fans to the case, and attached a rocker switch for the CCFLs. I also have an idea to hide the CCFLS so that only ambient light can be seen. Check back tomorrow or Sunday for that idea. Meanwhile I’ve sleeved the SATA and Molex to modular connections and some CCFLs. I have the one inverter I need to use besides the Lamptron 4 way for a Liquid Neon CCFL in the garage drying. I painted it black to match the rest of the stuff. I also ordered a BFG EX-1000w as a backup and also to use while I’m sleeving the EX1200. But mostly I got it because Geeks.com had it for $54.99 shipped. Check back soon.
jadawgis732
Gawd
- Joined
- Jun 18, 2009
- Messages
- 536
I've redone the 360 rad paint (sanding first) and rewired the fans on that rad. I found some snap caps like on the back of murdermod trays for the bottom 240 rad grille. I was going to buy a dslr for better pics but someone suggested buying a halogen work light like carpenters use and bouncing the light off of whiteboard. I tried that and got much better pics. More pics to follow. A lot of people complained about the size of the pics discouraging them from wanting to read my thread so if I don't hear any complaints I'll be posting these clickable thumbnails from now on. The pseudo studio I made and the bottom rad grille pics:


jadawgis732
Gawd
- Joined
- Jun 18, 2009
- Messages
- 536
I need opinions. I can't mount the pump under the GPU because it's too tall. I will see when the components go into the case, but I'm pretty sure on this issue. If it can it will be using a verry thin male to male fitting connecting the MCP-655 with X-TOP V2 and the lower GPU. I have mounted the reservoir brackets and tried this out:

What do you guys think?
The other option is mounting on the side of the midplate which is only 8.5mm thick and will send the tube the wrong way from the GPUs. Maybe I could go from pump to rad rather than pump to GPUs. The problem with the above picture is the cover for the hotswap bays. That would have to be routed out to allow the pump to fit there.
Also here is the DVD drive after painting:
I need opinions. I can't mount the pump under the GPU because it's too tall. I will see when the components go into the case, but I'm pretty sure on this issue. If it can it will be using a verry thin male to male fitting connecting the MCP-655 with X-TOP V2 and the lower GPU. I have mounted the reservoir brackets and tried this out:
What do you guys think?
I have mine mounted in a similiar way, however I am using a DDC with Petra's top. I was able to shift it a bit more to the left then what you have and still have clearance for a GTX480.
jadawgis732
Gawd
- Joined
- Jun 18, 2009
- Messages
- 536
I've moved all the components over to the 800D now. I received a 1000W BFG EX series PSU for $55 to hold me over until I've modded the EX1200, also by BFG. So the internal components aren't ready for display. I also am using my H50 as there were problems finding a mounting location for the D5, so I ordered some 90 degree barbs which should be here soon. Unfortunately I will use the XSPC bayres with the GPU loop since the D5's only mounting location is in the PSU compartment right before the 240 rad which will be used to cool the CPU. I thought the 360 in the 800D wouldn't be as cool (temp wise) as the same components on a 240 in the Raven 2 because it has a lot more vertical space to cover in this case. But, keeping my fingers crossed, it has. I'm going to shave some depth off the Lian Li DVD bezel before mounting it to the front cover with double sided tape.
Finally, a lot of people advise against 90 degree fittings. But, I realized that most of the watercooled systems have a lot of 90 degree bends in the loop. Where? In the blocks! In my EK GPU blocks there are at least 2 90 degree bends per block. In CPU blocks there is a 180 degree bend over a very small area. So I don't think it'll be so bad.... Anyway here are the pics I can show now. After I have the CPU loop, lighting, and 1200W PSU modded, sleeved and installed I'll show the rest.


Finally, a lot of people advise against 90 degree fittings. But, I realized that most of the watercooled systems have a lot of 90 degree bends in the loop. Where? In the blocks! In my EK GPU blocks there are at least 2 90 degree bends per block. In CPU blocks there is a 180 degree bend over a very small area. So I don't think it'll be so bad.... Anyway here are the pics I can show now. After I have the CPU loop, lighting, and 1200W PSU modded, sleeved and installed I'll show the rest.
jadawgis732
Gawd
- Joined
- Jun 18, 2009
- Messages
- 536


jadawgis732
Gawd
- Joined
- Jun 18, 2009
- Messages
- 536
BIG UPDATE
First big update in a while. I think I wasn't getting enough responses in my threads because I didn't have good enough pics, or too much commentary or not enough good pics, or pics on things people have already seen or that weren't important enough. I have been looking at the worklogs that get a lot of comments, and granted they're usually the best modders/mods. Though mine won't be as good (not nearly) there are a couple steps I can take to make this a better worklog for everyone.
So I got a new DSLR to take better pics, and because it was only $250 for a Sony A200 which is a good deal. I've been working on the case for a while and have enough content that I think I can make a good update now. I may have tarnished my image by the posts up until now, but what's done is done, and I'm not going to open a new thread just because I revised my posting style.
Here's where the case stands now:

The first thing I'll talk about is the DVD/Lian Li Bezel painting and installation. I messed up the last one because the little panel that acts as a front piece for the sliding part of the drive wouldn't stay on. So I superglued it to the tray, and the glue must have gotten on the main part of the drive because it wouldn't open afterwards. Plus I messed up the paint job on it. So I started from scratch with a new drive. I sanded with 400 grit and applied primer. Then applied two coats of Satin Black Rustoleum and a thin coat of matte clearcoat. I pressed some vinyl onto the back of the drive and the part that acts as a front for the tray. Here are the pics and sorry about the lighting in the last two. I was in a rush to restore my OS because setpoint got uninstalled and the backups of profiles you export don't contain the paths to the exes for the application switcher. That's a pain in the ass to do and since WHS backs up the OS every night I was able to just restore the image.


Next I wanted to cut heatshrink the same length every time and quickly, without having to measure to ensure it. So I began searching for a way to do this, and saw Oliver's method in the Polarity thread. I tried it, but found it difficult to cut the shrink without using a ginsu knife. Crys1s GaMer (or some such iteration of the name) who is one of THE best sleevers mentioned using a piece of styrafoam. I found some of the hard styrafoam in my lcd packaging and began widdling my way towards heatshrink precision. This is what I came up with:


The last thing I'll talk about is the passthroughs. The midplate on the 800D is fine and all, but the room underneath isn't so easy to work with, and to make it look better I'll use the Bitspower Fill Port as passthroughs. I wanted some washers but the OD of the passthroughs is .75" and the hole in the midplate is 1" I didn't extending from the hole too much so I used some 1.125 OD .5 ID washers and widened the inner hole to .8" with a stepping bit. I filed, sanded and primed them, and finally applied a coat of satin and a thin coat of matte clearcoat. Here are the pics.


This shows the before and after:

And I final glamour shot before I tear it all down and rebuild with the CPU loop, pass throughs and everything else I need to do.

Last edited:
jadawgis732
Gawd
- Joined
- Jun 18, 2009
- Messages
- 536
So I brought in the D5 and Multioption 250, and a trucolor light bar. Tried to loop everything up, as I had gotten the UN D5 Mount and Bitspower fill port fittings I needed, but the 240 Rad was leaking. So I hooked everything but the XSPC pump up to the same loop (with Apogee XT on a i7 930 @ 4.2Ghz, 2 GTX470s with EK Blocks, and a 360 Swiftech Rad) and though my idle temps were 7c higher there isn't much of a difference at load. Here are some pics that show the build as it is for now. The trucolor light bar really shines well! And I have something in the garage, well actually 2 things, that will add to this effect.


The first one shows Vantage with old temps (old loop- h50 on CPU in push/XSPC bay res/pump to GPU1 to GPU0 to 360 to res/pump) and the second shows Vantage with new temps (multioption 250 to MCP-655b to 360 to Apogee XT to GPU0 to GPU1 back to multioption 250). Also does anyone know if I am using my multioption incorrectly? I think I have the input thread being used as an output, but I changed over to the EK branded cyclone adapter and removed the insert holding the 12mm tubes.


The first one shows Vantage with old temps (old loop- h50 on CPU in push/XSPC bay res/pump to GPU1 to GPU0 to 360 to res/pump) and the second shows Vantage with new temps (multioption 250 to MCP-655b to 360 to Apogee XT to GPU0 to GPU1 back to multioption 250). Also does anyone know if I am using my multioption incorrectly? I think I have the input thread being used as an output, but I changed over to the EK branded cyclone adapter and removed the insert holding the 12mm tubes.


jadawgis732
Gawd
- Joined
- Jun 18, 2009
- Messages
- 536
So I've been super lax about keeping this up, and posting questions in new threads (since mine doesn't have such a large readership) but I'm going to transfer some of the posts over here now. I realize this is double posting but they do relate to the worklog and it's progress.
So the first question was whether you can change fan wires by desoldering the old and soldering the new ones directly to the pcb. Here you can see what I mean:

You can, and I did. Here's what that allowed for:


So the first question was whether you can change fan wires by desoldering the old and soldering the new ones directly to the pcb. Here you can see what I mean:

You can, and I did. Here's what that allowed for:


Last edited:
jadawgis732
Gawd
- Joined
- Jun 18, 2009
- Messages
- 536
Here's the next part of the story. Problem has since been semi-solved. I was able to get things in working order, and the goal was essentially to have the reservoir lie flat on the midplate with the intention of putting a UV CCFL behind to illuminate the coolant branded as uv reactive (that phrase is suspect). As I was saying I was able to get things running, but the reservoir essentially is just a big fitting as it is being used. And it was a PAIN to fill and bleed. I ran into some issues one of which caused a puddle (of non conductive fluid which was to my amazement non conductive) to form on my motherboard right in a spot between the two graphics cards where i couldn't reach quickly and just had to stare at my hopes and dreams being pissed on by Primochill coolant. I think some even got in the PCI slot between the two PCI-e slots, it's amazing that the thing still works (to my knowledge, and knock on wood.) So here's that story and the next post will catch you all up to date.
Hello guys- need help again.
SHORT VERSION
Any advice for avoiding cyclones using a EK Multioption 250 Advanced Rev 2 in a horizontal position and bleeding? Do you guys know if this is even possible to do for the setup in the final pic?
LONG VERSION: The misadventures of stubbornness, how I got pissed on by my reservoir, HARD
So I've been trying and trying to get my multioption 250 advanced rev 2 working in a horizontal orientation. First try had problems with the return run from GPU 2 to the res.


The problem there was that my 90 degree adapter was causing the Bitspower crystallink to leak. Funny thing (well not really so funny when the coolant was spilling all over the bottom GPU as soon as the pump was started) was that it looked solid.

See?
So I resolved to switch to parallel flow on the next attempt(mostly as a way to get some wiggle room as space is getting tight) and reorient the reservoir in and out plugs.
Second try was a complete disaster, with coolant winding up in my eye from the bottom of the res unscrewing from the tube and pressure being high from a d5. Let me tell you those things spray hard if the restriction is high enough. So my motherboard was soaked (wet really, but between the two gpus so there was no way to gain quick access with some paper towels) but nothing was plugged in so after tilting the case to get move the flood AWAY from the expensive hardware, removing the gpus, going to town with some paper towel, and using a heatgun on low from about 5 feet away (kept it moving and only used for about 15 seconds in all) I sat down to regroup. (Sorry didn't have pics of the setup during the big mishap).
I came up with a T Line and some anticyclone inserts, but the longer insert is supposed to be used on the in port I take it. They were backwards, and it was a frothy brew in there, and LOUD.


Filling the thing is a pest too, I already installed a fillport up top to be used on the normal res placement in my case, and I'm not drilling anymore holes in the case damnit. I'm not liking the idea of running tubing from the current horizontal placement of the res to the top for the handy dandy useless fillport. A small T Line will have to do.
Any advice for avoiding cyclones (have all parts that came with the 250 multioption advanced rev 2) and bleeding with a multioption in a horizontal orientation? Do you guys know if this is even possible for the setup in the final pic?
I am hoping the hardware will still be alive but the way it looks I won't find out soon. And sorry for prattling on with my misadventures, it's been troublling to say the least.

jadawgis732
Gawd
- Joined
- Jun 18, 2009
- Messages
- 536
Okay and the final post for the time being. Still have that old cable management deal but aside from that I like how things are looking internally.
Guess I was wrong again. The problem wasn't with the board, but the X-Fi drivers that were trouble from day one. In fact the guy I bought it off of told me I should do a clean install. I absolutely dread doing that so I found a way around it but it took hours out of my life. Anyway, booted into safe mode, removed the driver for the sound card and tada, triple screen action.... Also removed the T Line in hopes of removing a bit of da bubblay but no go there. Here's a few pics. Also, the reason that I wanted to do the reservoir in that spot can be seen in the pics below, a 12" (should probably go with a 8") UV CCFL is right behind the res lighting it up.


Guess I was wrong again. The problem wasn't with the board, but the X-Fi drivers that were trouble from day one. In fact the guy I bought it off of told me I should do a clean install. I absolutely dread doing that so I found a way around it but it took hours out of my life. Anyway, booted into safe mode, removed the driver for the sound card and tada, triple screen action.... Also removed the T Line in hopes of removing a bit of da bubblay but no go there. Here's a few pics. Also, the reason that I wanted to do the reservoir in that spot can be seen in the pics below, a 12" (should probably go with a 8") UV CCFL is right behind the res lighting it up.


Last edited:
silent-circuit
[H]F Junkie
- Joined
- Sep 18, 2005
- Messages
- 16,136
Give up on that orientation, get another UV CCFL and put it behind the res in a normal vertical orientation and you're good. Setting it on its side like that is only causing problems, and I don't think they're easily surmountable ones. I've never seen someone use one of those in anything but a vertical orientation.
jadawgis732
Gawd
- Joined
- Jun 18, 2009
- Messages
- 536
I have a question for people. What do you think of buying one or two of these: http://www.newegg.com/Product/Product.aspx?Item=N82E16811995058 to use a paneling for interior?
jadawgis732
Gawd
- Joined
- Jun 18, 2009
- Messages
- 536
Another question, and a minor update:
I'm making a backplate for my 2 gpus, and have something in the mail from EK. Needless to say it's going to be awesome, but I don't want to spoil a surprise until it's installed.
My question is do you guys think I can dremel off 1 of the connections on a 3 slot SLI bridge? I'm trying to make my own but so far attemps to print something adhesive have been failures.


jadawgis732
Gawd
- Joined
- Jun 18, 2009
- Messages
- 536
Problem solved. For the record: (On XS)
Next concern. I'm trying to make a box to simplify cable management. My D5, Switch and all lighting, XSPC Pump, and DVD will all plug in there. I'm aiming for something like this:
My concern is with the DVD drive, the only one of those components requiring a 5V connection. I am trying to use a 3pin fan connection for it though. The two ground wires are spliced together and use only one of those pins. So I followed through wired it up, hit the switch on the psu and smoke started rising from the DVD. So is my use of two ground wires spliced together not kosher?
You can if you really wanted to, cut off the bottom on a Tri SLI bridge and have it still work. They way they are connected is as follows:
As you can see if you cut it just below the middle tabs you'll still have one functional bridge, and that's all you need for 2 way SLI.

Next concern. I'm trying to make a box to simplify cable management. My D5, Switch and all lighting, XSPC Pump, and DVD will all plug in there. I'm aiming for something like this:
My concern is with the DVD drive, the only one of those components requiring a 5V connection. I am trying to use a 3pin fan connection for it though. The two ground wires are spliced together and use only one of those pins. So I followed through wired it up, hit the switch on the psu and smoke started rising from the DVD. So is my use of two ground wires spliced together not kosher?
fullvietFX
[H]ard|Gawd
- Joined
- Sep 1, 2004
- Messages
- 2,015
This is going to look sweet when it's done. I want something similar to this for myself. I'm a amateur when it comes to modding however. I have a couple questions, is there a way to fill the reservoir to the top? Also the fans on the rad at the bottom are they blowing air on the rad or sucking air from the rad.
jadawgis732
Gawd
- Joined
- Jun 18, 2009
- Messages
- 536
Both rads have Scythe GTs in pull. You can tell by what side of the rad the fans are on usually. Filling the res in this orientation was the hardest part of the build, not really, but it was freaking hard. It involved a funnel and a short piece of tubing on a barb. This screwed into one of the open holes on the res, and the funnel went into the tube.
fullvietFX
[H]ard|Gawd
- Joined
- Sep 1, 2004
- Messages
- 2,015
Both rads have Scythe GTs in pull. You can tell by what side of the rad the fans are on usually. Filling the res in this orientation was the hardest part of the build, not really, but it was freaking hard. It involved a funnel and a short piece of tubing on a barb. This screwed into one of the open holes on the res, and the funnel went into the tube.
In the pictures there seems to still be a lot of air inside. Did you fill it up after?
jadawgis732
Gawd
- Joined
- Jun 18, 2009
- Messages
- 536
Bottom fans are pulling air into the case. I wouldn't suggest mounting the res horizontally, and there is no way to fill it ALL the way to the top I don't think.. But 95%? Sure...
Anyway here's what I was waiting for- new tops for the EK blocks. I'm getting sick of the clear plexi and it really doesn't go with my theme, and reminds me how dirty the blocks have become inside everytime I see them. So I got some white acetal tops and they were super cheap! ($49 USD with shipping from slovenia!)
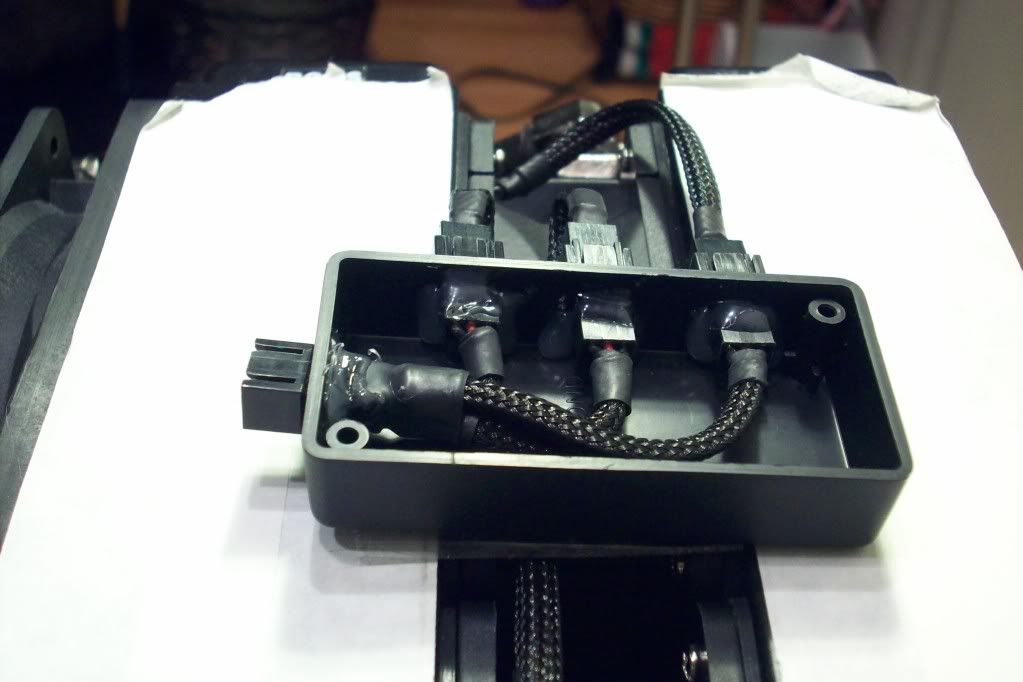
I also made a power distribution block. 3 Pin fan connectors can be used for devices requiring 12v and 5v lines by just splicing the grounds together. So that's what I'll do for the FC6 and DVD. The cable running to the block will first make a stop at the hotswap connector since I'm not down with gambling with my drives. So here are the pics.


Anyway here's what I was waiting for- new tops for the EK blocks. I'm getting sick of the clear plexi and it really doesn't go with my theme, and reminds me how dirty the blocks have become inside everytime I see them. So I got some white acetal tops and they were super cheap! ($49 USD with shipping from slovenia!)
I also made a power distribution block. 3 Pin fan connectors can be used for devices requiring 12v and 5v lines by just splicing the grounds together. So that's what I'll do for the FC6 and DVD. The cable running to the block will first make a stop at the hotswap connector since I'm not down with gambling with my drives. So here are the pics.


jadawgis732
Gawd
- Joined
- Jun 18, 2009
- Messages
- 536
Hey just an update. Concerned about wattages, and my plan to run everything off of one rail. So I took measurements, maybe they'll help someone maybe not:
2 1850 Gentle Typhoons: 5w (spinup) 3w (normal)
3 1450 Gentle Typhoons: 5w (spinup) 3w (normal)
1 140mm Aerocool Shark: 7w (spinup) 6w (normal)
Corsair Memory Cooler: 6w (spinup) 5w (normal)
MCP655-b: 28w
XSPC Dual Bay Res/Pump: 13w
12" TruColor LED: 6w
DVD: 15w (spinup) 8w (normal seek) 5w (spinup while tray is empty)
X25-m G2: 2-3w
WD 1Tb Black: 8w
All told, I'm looking at about 90w in peripherals at max load. I am worried that one 12v wire (18AWG or otherwise) won't handle this, and I don't really want to have two cable bunches coming from the PSU. I'm just going to push the limits, the worst that happens is the hub I'm making burns up, or my BFG EX1000W (which I got for $55) burns up (and that's unlikely, I think it'd shut off before it got damaged) or some wires burn out.
BTW I have been searching high and low for a good way to distribute power. I first came up with the hammond box idea:


But I found it too bulky.
I was thinking of getting one of those Bitspower X-Station thingies but figured it's so much better to make your own.
I figured the 4 pin molex to 6 three pin hub idea worked well, but needed it to be low profile. Then my eyes fell on a CCFL inverter laying on my desk. Well, the casing must have been made for this idea because it worked out perfectly. The slot on one end is exactly the width of a 4 pin molex connector, and the length is perfect for 6 three pin headers.


I spliced the headers and superglued them side to side. Next I'll make a cutout for the headers in the CCFL casing and then everything is a go. I imagine I'll also paint it black.
Here are all the parts I've been sleeving in preparation for the hub's completion

Nickbaldwin86
2[H]4U
- Joined
- Nov 8, 2009
- Messages
- 2,135
I really dont know where this thread begins and where this thread ends...
But nice build if I am looking at the thread right side up
But nice build if I am looking at the thread right side up
jadawgis732
Gawd
- Joined
- Jun 18, 2009
- Messages
- 536
Well I was able to execute the idea but not without experiencing some pain:

Here's the gist
Do not touch hot glue immediately after squeezing it out of a hot glue gun. I am not kidding when I tell you it is the most painful thing I've ever experienced. Immediate blister, with a REALLY hot shell of glue covering it, and 5 minutes after the fact it still feels like someone is holding a lighter to my thumb.
Use common sense. Don't try to pat the glue down before it solidifies. If you do then you're as stupid as me.
Right after:

5 minutes later:

jeremyshaw
[H]F Junkie
- Joined
- Aug 26, 2009
- Messages
- 12,511
huh.... you've injured your thumb, again.
We live and learn
We live and learn
silent-circuit
[H]F Junkie
- Joined
- Sep 18, 2005
- Messages
- 16,136
Ow. In a bad place, too. Pop it and wrap it with something, it'll hurt like hell for a while but you'll at least be able to use your thumb normally in a day or two.
howardsternspenis
n00b
- Joined
- Nov 11, 2010
- Messages
- 28
pro tip: hot stuff burns if you touch it.
hope this doesnt affect your build, awesome work so far. keep it up duder, minus the blisters.
hope this doesnt affect your build, awesome work so far. keep it up duder, minus the blisters.
harrison0550
Limp Gawd
- Joined
- Oct 28, 2010
- Messages
- 129
Moving right along! Looking good bro, aside from your multiple injuries. I think I will ship you some leather welders gloves to save your thumbs I really like the hub idea, I am actually at the same point in my build however I took the lazy mans approach and ordered this....
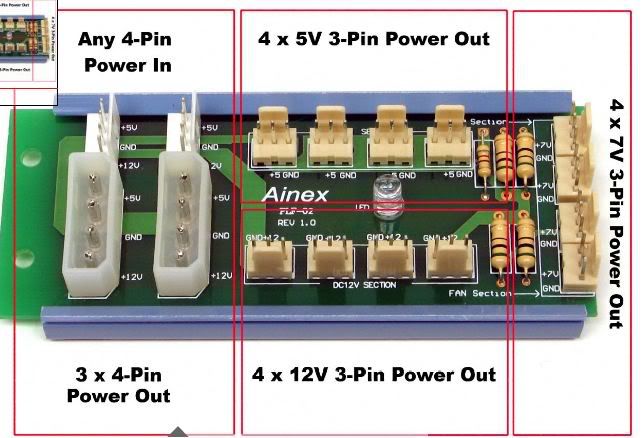
I needed 4 plugs to be dropped to 7V and 2 to stay at 12V and I didnt want to get into wiring that myself so lazy mans way it is. I think I will just build an acrylic case to house it in and drill some holes through it for the wires. Who Knows! I also just completed 99% of my sleeving, BIG THANKS TO YOU! and I think I will start a worklog soon of all the progress. Again keep up the good work. subbed
I really like the hub idea, I am actually at the same point in my build however I took the lazy mans approach and ordered this....
I needed 4 plugs to be dropped to 7V and 2 to stay at 12V and I didnt want to get into wiring that myself so lazy mans way it is. I think I will just build an acrylic case to house it in and drill some holes through it for the wires. Who Knows! I also just completed 99% of my sleeving, BIG THANKS TO YOU!
and I think I will start a worklog soon of all the progress. Again keep up the good work. subbedMoving right along! Looking good bro, aside from your multiple injuries. I think I will ship you some leather welders gloves to save your thumbs
(snip)
I needed 4 plugs to be dropped to 7V and 2 to stay at 12V and I didnt want to get into wiring that myself so lazy mans way it is. I think I will just build an acrylic case to house it in and drill some holes through it for the wires. Who Knows! I also just completed 99% of my sleeving, BIG THANKS TO YOU!
hey can you post a link to this guy? i kinda want one now.
harrison0550
Limp Gawd
- Joined
- Oct 28, 2010
- Messages
- 129
hey can you post a link to this guy? i kinda want one now.
Here ya go......... http://www.frozencpu.com/products/8...ti_Power_Port_-_12V_7V_5V_OF12.html?tl=g44c34
15 bucks at frozenCPU = lazy mans way, may favorite method of course.
jadawgis732
Gawd
- Joined
- Jun 18, 2009
- Messages
- 536
Wow, thanks for all the positive responses! I am very much stuck on the wiring right now, and I tend to get caught up on small details. But anyway here is what I am envisioning and I could use some advice on the implementation:
I want to have the GPUs and 24Pin/8Pin plug into modular connections (like on the backside of a power supply) but have those connections be on the midplate. So there will be short (6-8") links from the PSU to a hub on the midplate (all unsleeved in black wire) where there will be female connects.
The tough part is integrating this seemlessly into a midplate. It'll be something like this:


Need advice on:
1. How to make the female connectors secure in their spots, so that plugging in the male ends and pushing in the pins won't disturb their positions
2. Accurately cutting the ports for the connectors
PS Furryletters now carries gray MDPC grade sleeving as well! Enjoy it, great seller and fantastic prices. BTW if you email him directly he sells at a huge discount. I got something like 100' of 1/8" clean cut black for like $17 shipped
jadawgis732
Gawd
- Joined
- Jun 18, 2009
- Messages
- 536
Moving right along! Looking good bro, aside from your multiple injuries. I think I will ship you some leather welders gloves to save your thumbs
I needed 4 plugs to be dropped to 7V and 2 to stay at 12V and I didnt want to get into wiring that myself so lazy mans way it is. I think I will just build an acrylic case to house it in and drill some holes through it for the wires. Who Knows! I also just completed 99% of my sleeving, BIG THANKS TO YOU!
Hey James! Didn't see you there, thought the "big thanks" was due to some inspiration I provided until I looked at the screen name. Anyway, sorry I didn't get back to you sooner, I've been super busy with moving on to campus and this project. Glad to hear that the sleeving arrived safely and everything, and I know you have a wealth of pics built up, you should definitely start a worklog. Also good looks on the precut heatshrink, that DOES save a ton of time!
jadawgis732
Gawd
- Joined
- Jun 18, 2009
- Messages
- 536
Just keeping the lights on. Moving from the D5 w/ EK X-TOP and X2O 750 setup to a 2x Laing DDC + EK Dual DDC Top in White Acetal. Should be making progress now on weekends, and looking at a July completion (I know I'll regret saying that).
Out with the old...


In with the new...


Out with the old...


In with the new...


Use common sense. Don't try to pat the glue down before it solidifies. If you do then you're as stupid as me.
Right after:
5 minutes later:
Ouch, well if your going to make a habit of hurting and burning yourself I recommend you purchase some Silver Sulfadiazine Cream, as a welder by trade I have burned myself countless times, many a time bad enough to leave major scars, this is by far the best thing I have found as it quickly relieves the burning pain and leaves a tollorable stinging sensation that goes away within 20-30 minutes it also seems to minimize scarring.
Also love the mod only comment is MOAR! (and maybe wear some leather gloves next time you use the hot glue)
Last edited: