Mods...feel free to move this as I don't really know where I should have put it. Technically, it is a modification...but not for cases.
Anyway, due to the amount of PMs I've been receiving of people being interested in how to build this, I've decided to create a thread dedicated to my (easy) project.
So, let's begin. When I first saw the jerker with all the shelves, I thought it was a cool idea, but I did not like the lack of width nor did I really liked the way it looked (the metal bars going up so high). After going through Ikea, I came up with this idea that I could add a big shelf to the table-style jerker with (ideally) buying everything from Ikea. I decided upon the following materials:

Jerker (table) = $99.00 SKU: 90062277
Capita (set of 2 legs) = $9.99 SKU: 40051196
Lack (73" bookshelf) = $19.99 SKU: 40103751
which comes out to roughly $128.98 plus tax. The Lack shelf comes in ALL 3 different jerker colors.
(Ok...the name I gave it sucks but I'm an engineer so I have an excuse for no creativity.)
Next, let's move onto some pictures of the desk.


Some ugly, but somewhat effective cable management for a newbie:


These are the Capita legs/brackets. All of the necessary hardware comes with it. Drill 2 holes approx. 10.5" in from both sides. Use the diagram below (taken from the back of the Capita manual) as only a reference since the actual numbers refer to a different project.


Now, the slightly harder part of this project is mounting the bracket to the shelf. There is a caveat that you all need to be aware of: the shelf is somewhat hollow. There's a lot of cardboard inside the shelf that supports it, as well as some wood where the 2 screws on the left as shown in this picture are FIRMLY drilled into. As for the other two screws on the right, they're holding quite well in there, but not like the two on the left. If you go to an Ikea, they'll most likely have one of these shelves cut open so you can see how it's made inside. I can't really describe it anymore except for stating that it's holding very solid. They even use the same type of stuff for benches, which should tell you how strong these things are. Also, that brown hole you see came with the shelf, but you can't put a screw in it. Just try to drill where I did, then you'll hit solid wood for the left two screws of the bracket (or right two if you're doing the other bracket).

Shove the bolts (that come already attached to the bottom of the legs) through the holes, and then put the 2 washers and nuts on the opposite side.


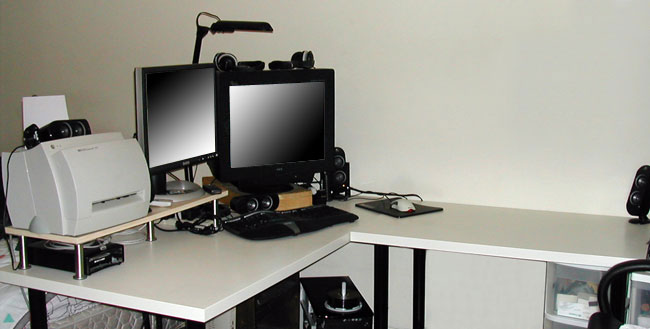
Some of you may think this is overkill and rightfully so. However, this is a typical day/night for my desk, and as such I find it very handy to have this much space when I have the ability to slide my keyboard and mouse under my monitor.


So that's it. If you have any questions, feel free to add to the thread or PM me if you want. The desk and the shelf have been very sturdy for quite a long time now and I expect nothing different for the life of ownership.
Anyway, due to the amount of PMs I've been receiving of people being interested in how to build this, I've decided to create a thread dedicated to my (easy) project.
So, let's begin. When I first saw the jerker with all the shelves, I thought it was a cool idea, but I did not like the lack of width nor did I really liked the way it looked (the metal bars going up so high). After going through Ikea, I came up with this idea that I could add a big shelf to the table-style jerker with (ideally) buying everything from Ikea. I decided upon the following materials:
Jerker (table) = $99.00 SKU: 90062277
Capita (set of 2 legs) = $9.99 SKU: 40051196
Lack (73" bookshelf) = $19.99 SKU: 40103751
which comes out to roughly $128.98 plus tax. The Lack shelf comes in ALL 3 different jerker colors.
(Ok...the name I gave it sucks but I'm an engineer so I have an excuse for no creativity.)
Next, let's move onto some pictures of the desk.
Some ugly, but somewhat effective cable management for a newbie:
These are the Capita legs/brackets. All of the necessary hardware comes with it. Drill 2 holes approx. 10.5" in from both sides. Use the diagram below (taken from the back of the Capita manual) as only a reference since the actual numbers refer to a different project.
Now, the slightly harder part of this project is mounting the bracket to the shelf. There is a caveat that you all need to be aware of: the shelf is somewhat hollow. There's a lot of cardboard inside the shelf that supports it, as well as some wood where the 2 screws on the left as shown in this picture are FIRMLY drilled into. As for the other two screws on the right, they're holding quite well in there, but not like the two on the left. If you go to an Ikea, they'll most likely have one of these shelves cut open so you can see how it's made inside. I can't really describe it anymore except for stating that it's holding very solid. They even use the same type of stuff for benches, which should tell you how strong these things are. Also, that brown hole you see came with the shelf, but you can't put a screw in it. Just try to drill where I did, then you'll hit solid wood for the left two screws of the bracket (or right two if you're doing the other bracket).
Shove the bolts (that come already attached to the bottom of the legs) through the holes, and then put the 2 washers and nuts on the opposite side.
Some of you may think this is overkill and rightfully so. However, this is a typical day/night for my desk, and as such I find it very handy to have this much space when I have the ability to slide my keyboard and mouse under my monitor.
So that's it. If you have any questions, feel free to add to the thread or PM me if you want. The desk and the shelf have been very sturdy for quite a long time now and I expect nothing different for the life of ownership.
")