Hello All
Having been fed up with my network cupboard for ages, I took some inspiration online, and after seeing countless perfect network cupboards, I decided I would make one of my own
A bit of history first. The house was completely gutted a few years ago and refurbished, and in doing so, I pulled Cat5 cables to many rooms in the house where I thought there might one day be a need for them. I also pulled 2 coaxial cables to most rooms for TV purposes.
However, I never got around to finishing the central cupboard where all the wires terminated in one of our roof bedrooms. In the need to get internet to some rooms, I shoved some plugs on the cat5 and shoved them into a switch, and my servers (Smoothwall Express, Windows Home Server) were placed in the same little cupboard along with the UPS. The Coax cables were terminated tidily by the company who did much of the AV install in the house.
However, I decided that I had had enough of the mess in Node 0 and I was going to fix it. Properly
 It also coincided with installing a fiber optic links to my grandparents house across the farmyard.
First of all the plan:
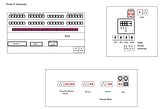
This shows my rough sketches deciding what I wanted the cupboard to look like. I knew I wanted a 19" cabinet to put some patch panels in, a rack mounted switch and my various other routers and modems and fiber media converter.
I planned to also patch the telephone sockets in the rack, as I may convert to using VOIP in the near future.
Along the floor, I wanted a series of sockets that I could plug my server into, the Smoothwall Router and a IP Camera server that will be installed shortly as well.
I already had an APC UPS so I decided to install this in the cupboard as well, with a series of tails hanging out of the wall which were patched into sockets behind the servers, to give a very clean look. I am going to purchase a brush plate to allow the tails with IEC connectors on them to exit the wall neatly.
I also decided to install a dedicated Fusebox, a) because it would give a central place to disconnect everything and b) because I wanted to
 and everything else is over the top anyway. I am also going to purchase one of those big red turnswitch Isolators before the fuse box.
Finally, I had a wireless access point that I wanted to mount neatly in the cupboard next to the one I am using.
In order to fit everything in, I realised I needed a bigger cupboard
So I went in to the bathroom next door where right next to the current network cupboard, I found a much bigger cupboard where most of the network drops were still long enough to reach (as they had never been trimmed).
It is very easy to work in the area where the cupboard is as it is all dry lined and there is plenty of space behind the wall to fish the cables through. Also, in the old cupboard there was no plaster on the walls, so I could remove the dry lining and access the wall easily behind the cupboard to pass cables through.
Once I figured out what I wanted to do, I sent off two very large orders, one to the company I buy all my network hardware from and another to a general electrical wholesaler.
Then this evening I started work
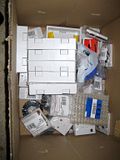
This was part of the order from the electrical supplier. Lots of sockets, fused switches, dry lining boxes and electrical tape
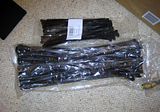
Very important cable ties.
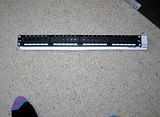
One of the two 24 port patch panels I ordered.
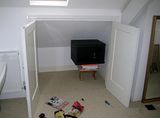
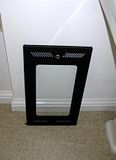
This is the new cupboard I have turned into Network HQ (or in the process of conversion!) You can see the cabinet being tried for size, but it is now mounted at the other end of the cupboard.
Again another view whilst I was lining the cabinet up ready to mount it (it is very heavy!)
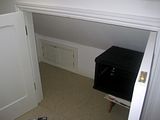
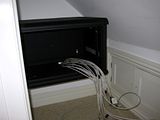
This is the end where the cabinet is now installed. Those two little doors allow me to access the space behind the rear of the cupboard (really to allow service access to a bathroom extractor fan which is always turned off).

This is the end where the cabinet is now installed. Those two little doors allow me to access the space behind the rear of the cupboard (really to allow service access to a bathroom extractor fan which is always turned off).
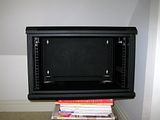
Another view of the cabinet. I am quite pleased with the quality of it considering how little I paid for it.
Another view of the cabinet. I am quite pleased with the quality of it considering how little I paid for it.

And..... the cabinet is now mounted with not silly stool holding it up

And..... the cabinet is now mounted with not silly stool holding it up
And some cables pulled into the cabinet. The cabinet only had top or bottom access points, so rather than trying to drill a hole and the file it down in the back of the cabinet myself, I just made a whole in the wall beneath one of the bottom entry points. You cannot see where the cables come through unless you look really hard for it from underneath.
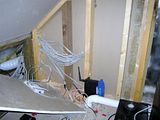
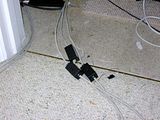
And this is the old cupboard. Please excuse the mess, I could not take the network offline when I was working on it this afternoon, so I had to work around this router. I had slid the servers out the way. Tomorrow I will be able to power the network down for the day hopefully.
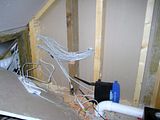
You can see where I added the two extra joists to support the cabinet from the other side. You can also see how handy it is to be able to access this cavity wall from this side. I was able to cut a nice big notch out of the joist to pass the cables through. I had to drill holes on little joist at the end. I have separate holes for cat5 and fibre, and one for power for the rack at the bottom. The drain is from the sink in the bathroom where the new cupboard is.
And this is the old cupboard. Please excuse the mess, I could not take the network offline when I was working on it this afternoon, so I had to work around this router. I had slid the servers out the way. Tomorrow I will be able to power the network down for the day hopefully.
You can see where I added the two extra joists to support the cabinet from the other side. You can also see how handy it is to be able to access this cavity wall from this side. I was able to cut a nice big notch out of the joist to pass the cables through. I had to drill holes on little joist at the end. I have separate holes for cat5 and fibre, and one for power for the rack at the bottom. The drain is from the sink in the bathroom where the new cupboard is.
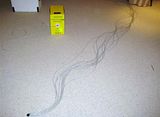
And here we are, half an hour later, all pulled through.
And again by the looks of it.
Another view of the old cabinet, with the new cable snake now threaded through. On the wall of the cupboard behind the camera is the coax distribution network, I am not going to move this as it has already been done tidily. The panel lying down is the dry wall from the exposed wall, it had a phone connection in it that passed through it and I did not have the opportunity to remove this today. So I had to work around it. Uhhh what a pain.
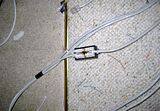
Some cables were sadly not long enough to reach the new cabinet (5 of them). I find punching these connector blocks down very boring work (and I still have one to do tomorrow). And they are fiddly as I can never remember where the wires go without looking at the lids to see the chart.
And again.
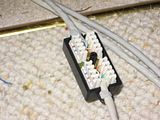
Another three done and sealed up.
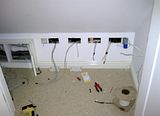
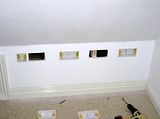
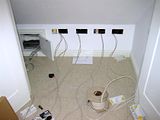
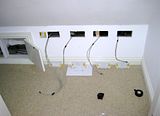
Finally the state I left things in tonight. I had started to run some power cables, and I have taken care to ensure that the power lines stay away from the data cables as far as possible.
You can also see the big blue socket on the right hand side, this is for the UPS. I have provisioned for two UPSs, so two of these sockets, but my order only came with one socket today, but there were two plugs. Strange.
The data and power cables are only temporarily taped together, the power runs along the ceiling and comes in the top of the boxes and the data comes in the bottom from the floor.
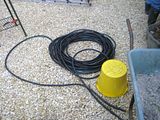
These final few pictures show the fiber optic line we are installing to my grandparents house across the yard. It is only a few hundred metres, but I didn't want to risk the lightening problems with a copper cable between the two. And wireless is just not fast enough or reliable enough for me.
I bought a roll of basically fibre patch cable with SC connectors on the ends very cheaply and have run it through a plastic pipe. I know it does not meet standards, but I figure it will be fine, and if it is not, well I will do it again with some proper underground rated cable
If Ockie is reading this, this is where you fibre cable you sent to Chicago went! Half way round the world into deepest darkest Souther UK!
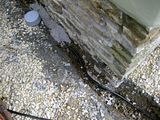
Burying the pipe around my grandparents house.
And the fibre cable going in to the house. I put some washers under the pipe so it is not trapped and can still move freely.
I have not finished terminating inside yet but I will get some photos of it when it is completed.
I hope you will enjoy looking through my project. It has become more of a personal project now then just a network, but I am enjoying doing it and learning in the process.
I will update this thread again tomorrow once I get more done. Today was just the first day.
Having been fed up with my network cupboard for ages, I took some inspiration online, and after seeing countless perfect network cupboards, I decided I would make one of my own
A bit of history first. The house was completely gutted a few years ago and refurbished, and in doing so, I pulled Cat5 cables to many rooms in the house where I thought there might one day be a need for them. I also pulled 2 coaxial cables to most rooms for TV purposes.
However, I never got around to finishing the central cupboard where all the wires terminated in one of our roof bedrooms. In the need to get internet to some rooms, I shoved some plugs on the cat5 and shoved them into a switch, and my servers (Smoothwall Express, Windows Home Server) were placed in the same little cupboard along with the UPS. The Coax cables were terminated tidily by the company who did much of the AV install in the house.
However, I decided that I had had enough of the mess in Node 0 and I was going to fix it. Properly
First of all the plan:

This shows my rough sketches deciding what I wanted the cupboard to look like. I knew I wanted a 19" cabinet to put some patch panels in, a rack mounted switch and my various other routers and modems and fiber media converter.
I planned to also patch the telephone sockets in the rack, as I may convert to using VOIP in the near future.
Along the floor, I wanted a series of sockets that I could plug my server into, the Smoothwall Router and a IP Camera server that will be installed shortly as well.
I already had an APC UPS so I decided to install this in the cupboard as well, with a series of tails hanging out of the wall which were patched into sockets behind the servers, to give a very clean look. I am going to purchase a brush plate to allow the tails with IEC connectors on them to exit the wall neatly.
I also decided to install a dedicated Fusebox, a) because it would give a central place to disconnect everything and b) because I wanted to
Finally, I had a wireless access point that I wanted to mount neatly in the cupboard next to the one I am using.
In order to fit everything in, I realised I needed a bigger cupboard
It is very easy to work in the area where the cupboard is as it is all dry lined and there is plenty of space behind the wall to fish the cables through. Also, in the old cupboard there was no plaster on the walls, so I could remove the dry lining and access the wall easily behind the cupboard to pass cables through.
Once I figured out what I wanted to do, I sent off two very large orders, one to the company I buy all my network hardware from and another to a general electrical wholesaler.
Then this evening I started work

This was part of the order from the electrical supplier. Lots of sockets, fused switches, dry lining boxes and electrical tape

Very important cable ties.

One of the two 24 port patch panels I ordered.

This is the new cupboard I have turned into Network HQ (or in the process of conversion!) You can see the cabinet being tried for size, but it is now mounted at the other end of the cupboard.

Again another view whilst I was lining the cabinet up ready to mount it (it is very heavy!)

This is the end where the cabinet is now installed. Those two little doors allow me to access the space behind the rear of the cupboard (really to allow service access to a bathroom extractor fan which is always turned off).

This is the end where the cabinet is now installed. Those two little doors allow me to access the space behind the rear of the cupboard (really to allow service access to a bathroom extractor fan which is always turned off).

Another view of the cabinet. I am quite pleased with the quality of it considering how little I paid for it.

Another view of the cabinet. I am quite pleased with the quality of it considering how little I paid for it.

And..... the cabinet is now mounted with not silly stool holding it up

And..... the cabinet is now mounted with not silly stool holding it up

And some cables pulled into the cabinet. The cabinet only had top or bottom access points, so rather than trying to drill a hole and the file it down in the back of the cabinet myself, I just made a whole in the wall beneath one of the bottom entry points. You cannot see where the cables come through unless you look really hard for it from underneath.

And this is the old cupboard. Please excuse the mess, I could not take the network offline when I was working on it this afternoon, so I had to work around this router. I had slid the servers out the way. Tomorrow I will be able to power the network down for the day hopefully.
You can see where I added the two extra joists to support the cabinet from the other side. You can also see how handy it is to be able to access this cavity wall from this side. I was able to cut a nice big notch out of the joist to pass the cables through. I had to drill holes on little joist at the end. I have separate holes for cat5 and fibre, and one for power for the rack at the bottom. The drain is from the sink in the bathroom where the new cupboard is.

And here we are, half an hour later, all pulled through.

And again by the looks of it.

Another view of the old cabinet, with the new cable snake now threaded through. On the wall of the cupboard behind the camera is the coax distribution network, I am not going to move this as it has already been done tidily. The panel lying down is the dry wall from the exposed wall, it had a phone connection in it that passed through it and I did not have the opportunity to remove this today. So I had to work around it. Uhhh what a pain.

Some cables were sadly not long enough to reach the new cabinet (5 of them). I find punching these connector blocks down very boring work (and I still have one to do tomorrow). And they are fiddly as I can never remember where the wires go without looking at the lids to see the chart.

And again.

Another three done and sealed up.

Finally the state I left things in tonight. I had started to run some power cables, and I have taken care to ensure that the power lines stay away from the data cables as far as possible.
You can also see the big blue socket on the right hand side, this is for the UPS. I have provisioned for two UPSs, so two of these sockets, but my order only came with one socket today, but there were two plugs. Strange.
The data and power cables are only temporarily taped together, the power runs along the ceiling and comes in the top of the boxes and the data comes in the bottom from the floor.

These final few pictures show the fiber optic line we are installing to my grandparents house across the yard. It is only a few hundred metres, but I didn't want to risk the lightening problems with a copper cable between the two. And wireless is just not fast enough or reliable enough for me.
I bought a roll of basically fibre patch cable with SC connectors on the ends very cheaply and have run it through a plastic pipe. I know it does not meet standards, but I figure it will be fine, and if it is not, well I will do it again with some proper underground rated cable
If Ockie is reading this, this is where you fibre cable you sent to Chicago went! Half way round the world into deepest darkest Souther UK!

Burying the pipe around my grandparents house.

And the fibre cable going in to the house. I put some washers under the pipe so it is not trapped and can still move freely.
I have not finished terminating inside yet but I will get some photos of it when it is completed.
I hope you will enjoy looking through my project. It has become more of a personal project now then just a network, but I am enjoying doing it and learning in the process.
I will update this thread again tomorrow once I get more done. Today was just the first day.