Fitting a large card in a Define Mini without removing the HDD bay

TeeJayHoward

Limpness Supreme
Joined
Feb 8, 2005
Messages
12,268
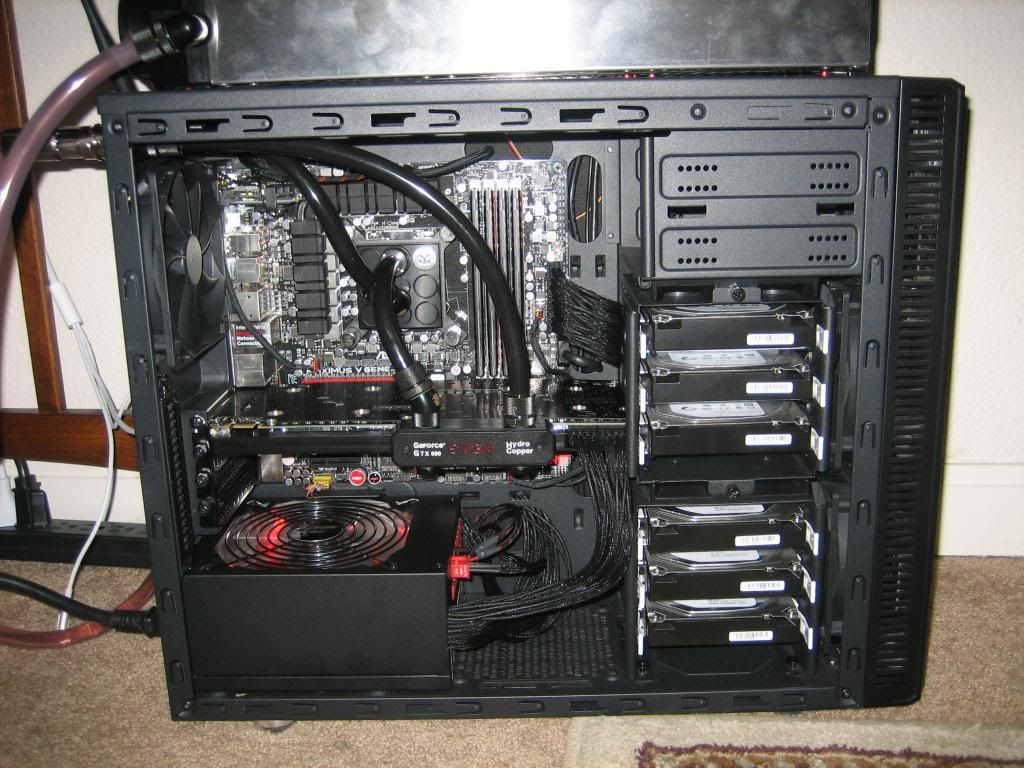
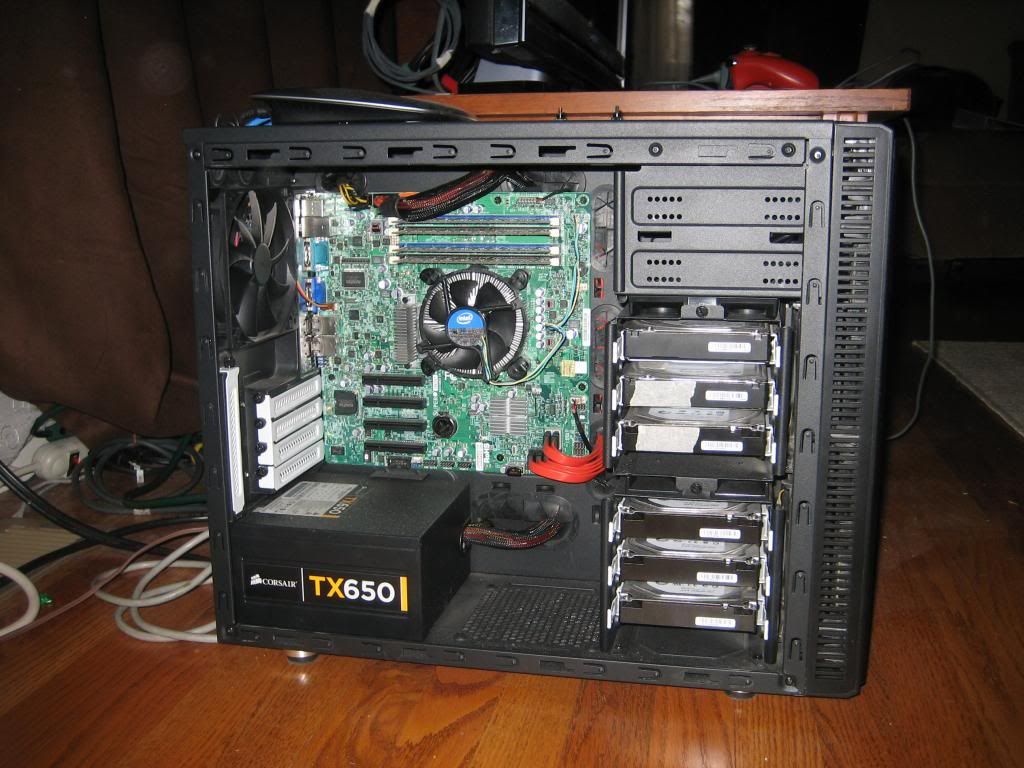
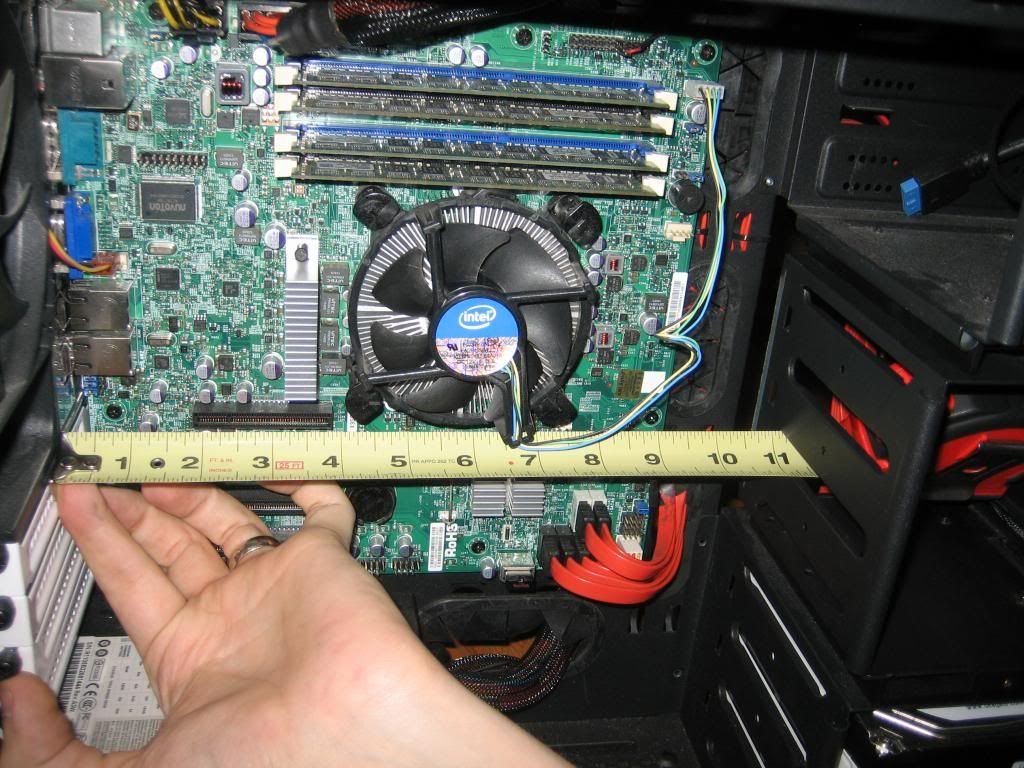
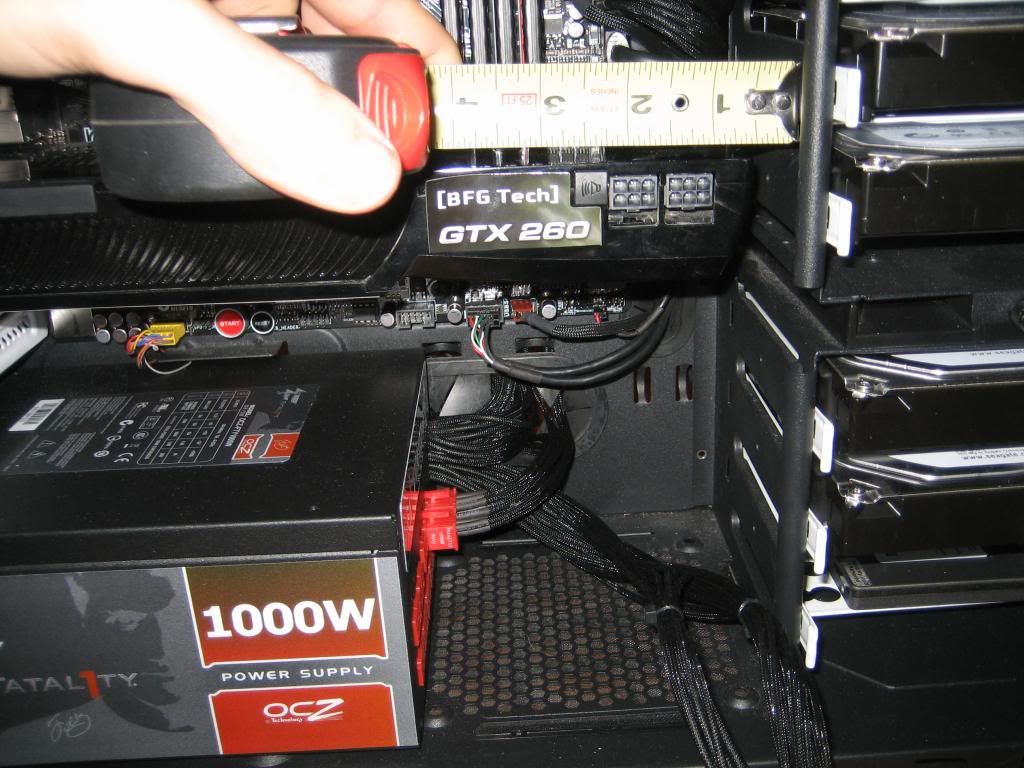
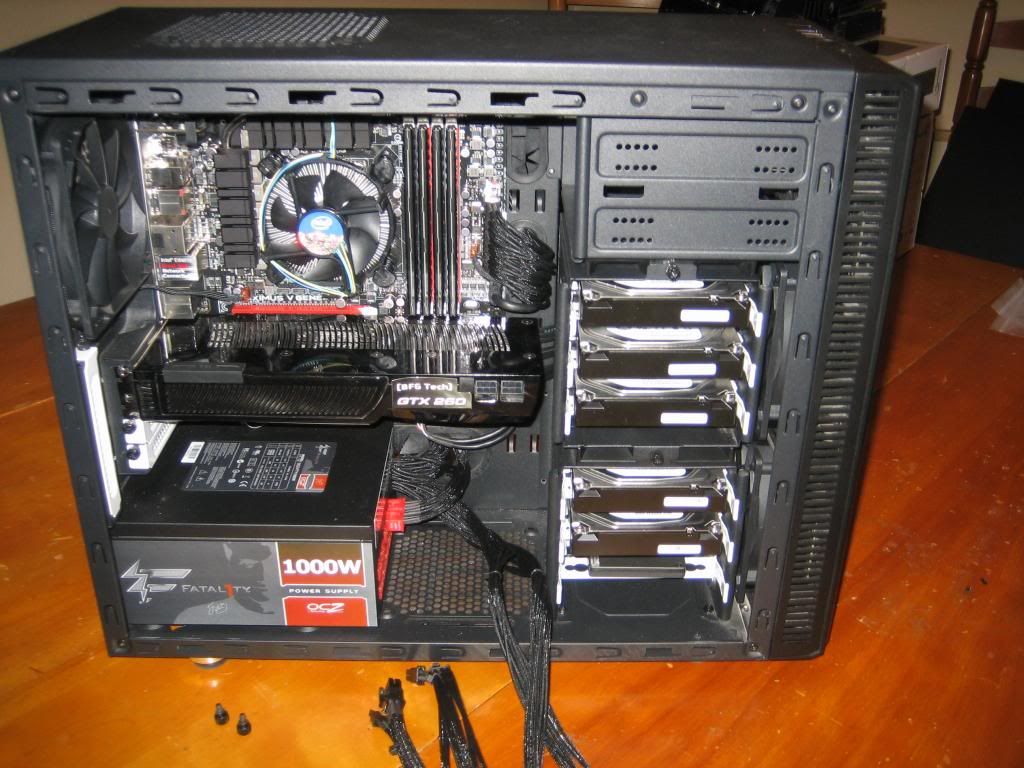
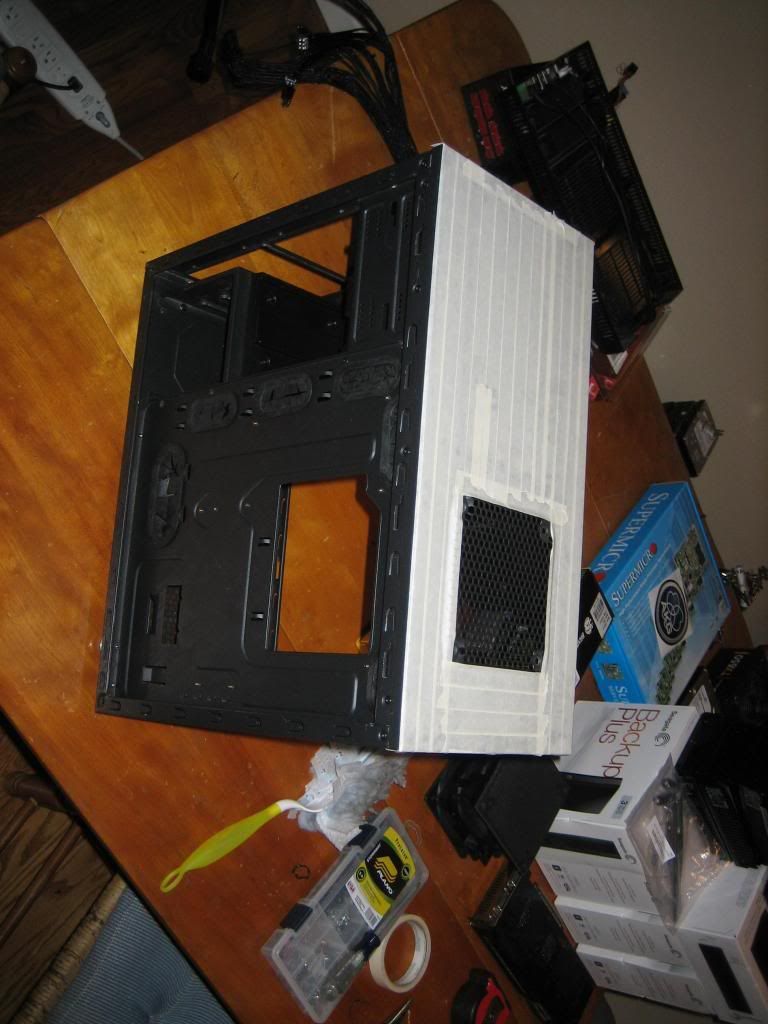
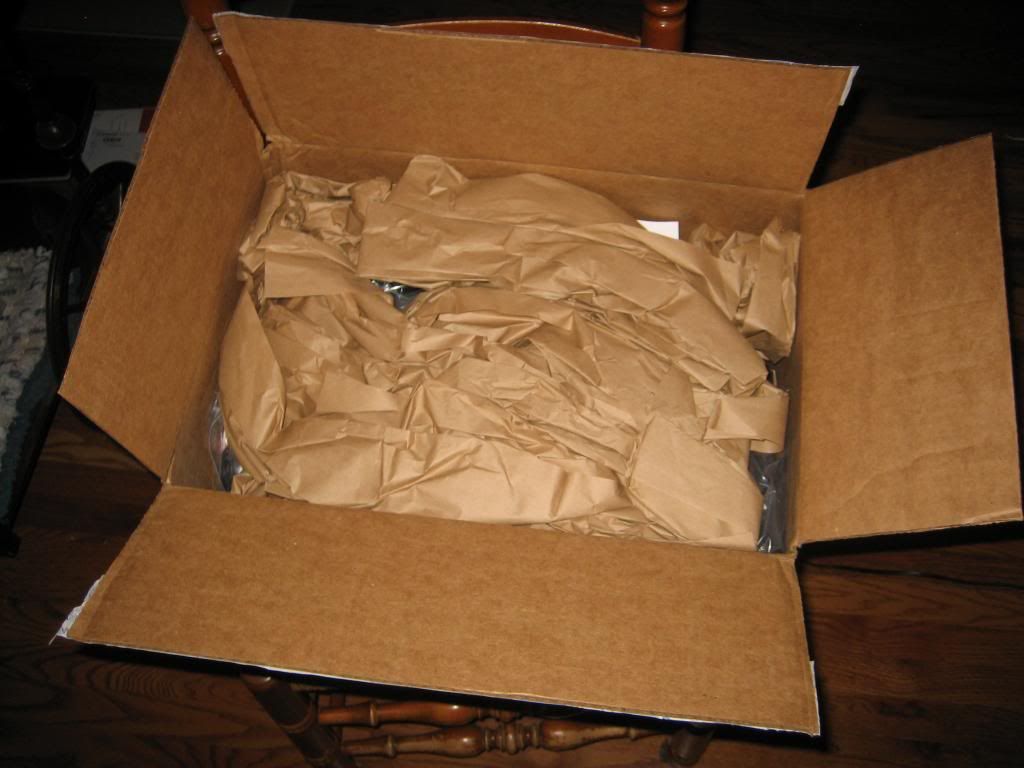
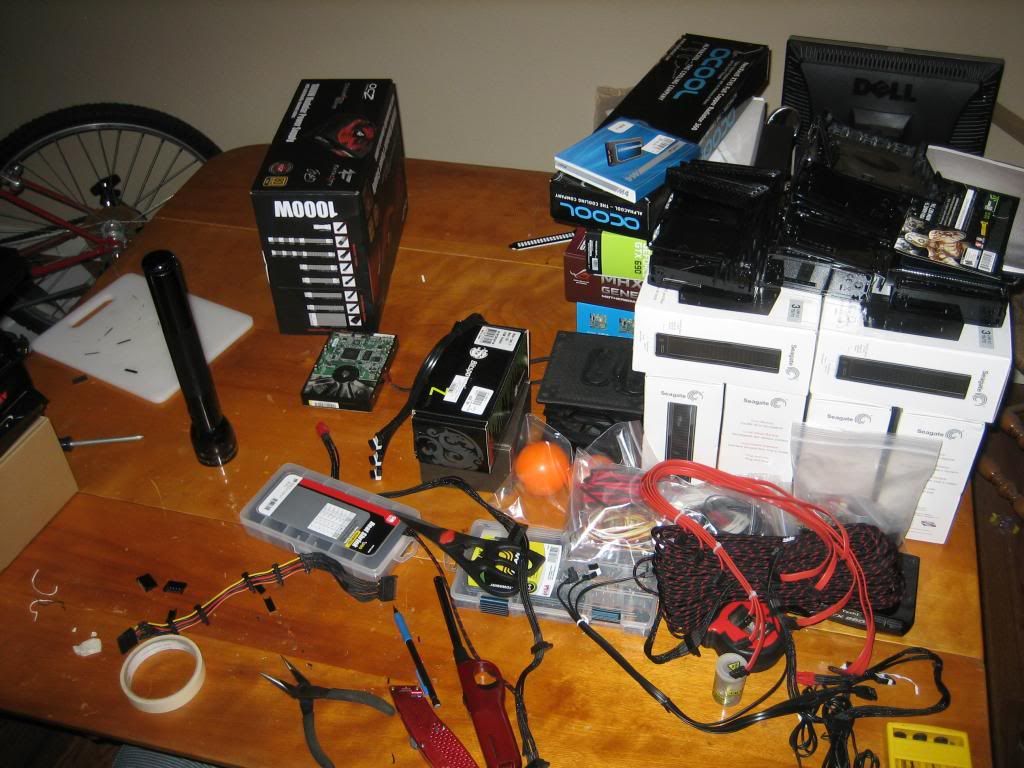
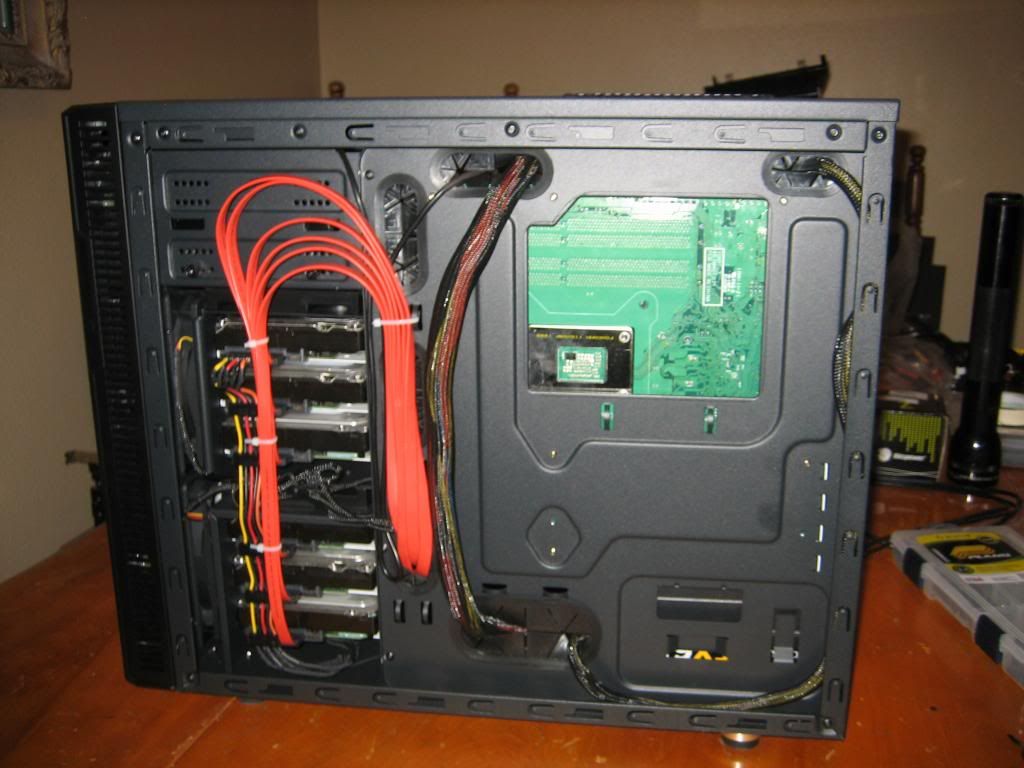
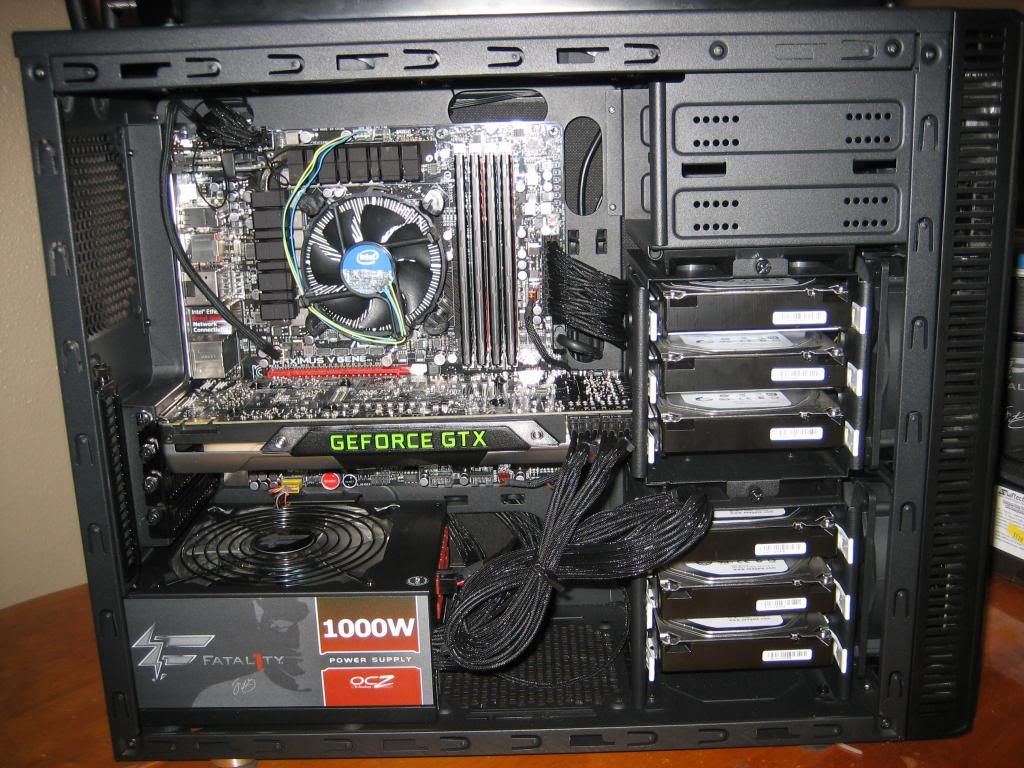
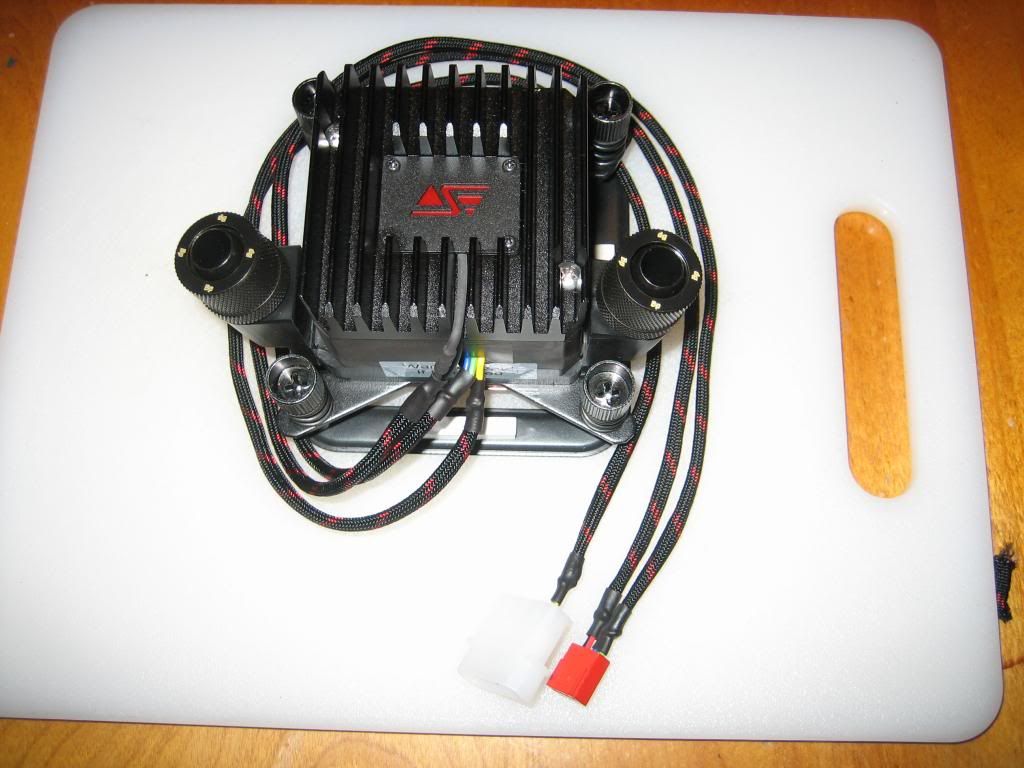
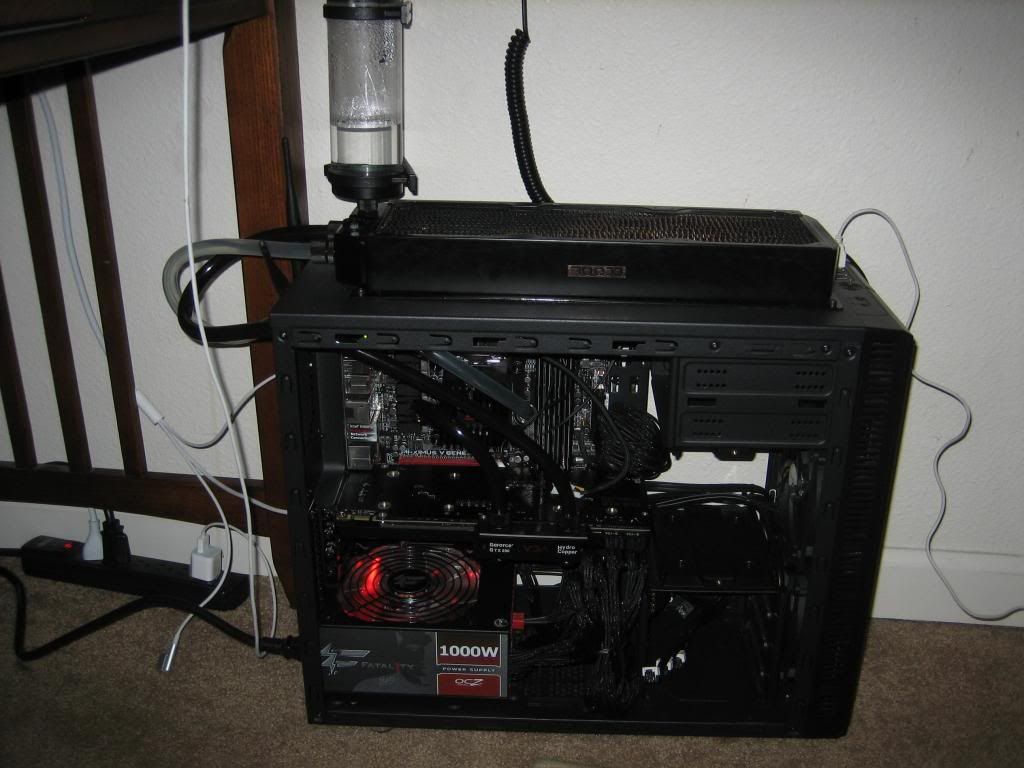
Sometimes, all you need is that extra quarter inch. I've got a Fractal Design Define Mini, and I'm thinking about a GTX 690. That's an 11 inch card, and according to Fractal Design, this case only supports video cards up to 260mm (10.23") in length with the HDD-bay in place. Well, bringing out the measuring tape shows that there's actually room for a 10.8" or so card. It seems silly to ditch a case I love because it's a bit under a quarter inch too narrow in one direction. So I decided to try and modify it to fit. I started by investigating the issue. (Ignore the server motherboard - I measured on my NAS, but the new drive tray will be going into my gaming rig.)
IMG_1821.jpg


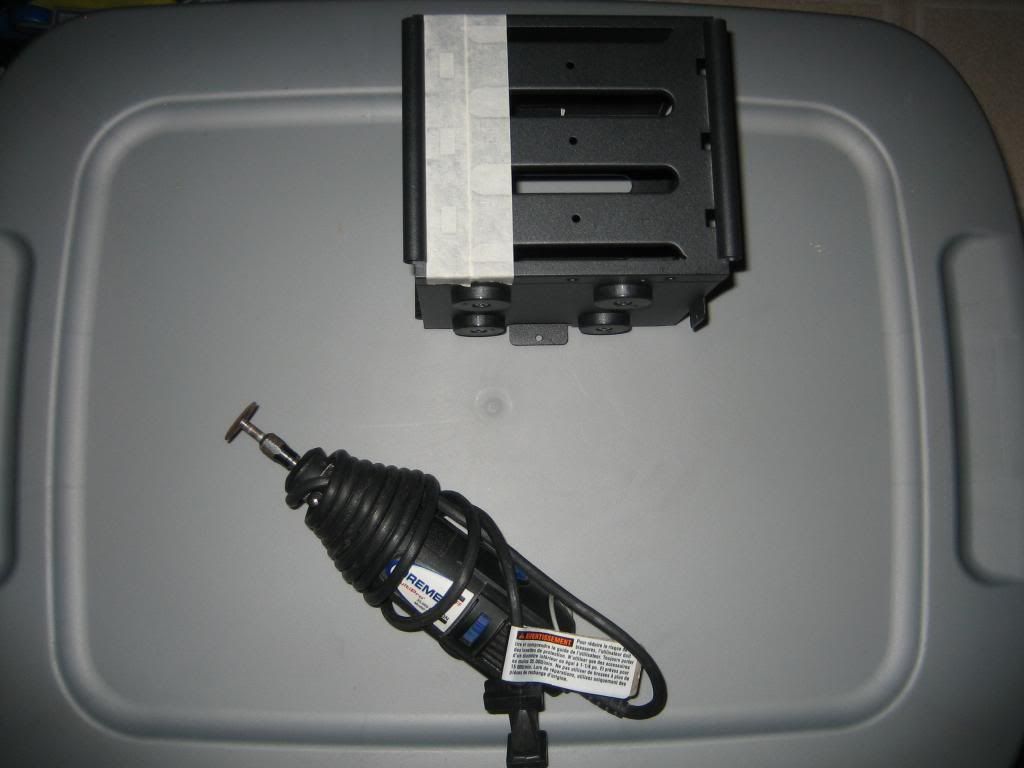
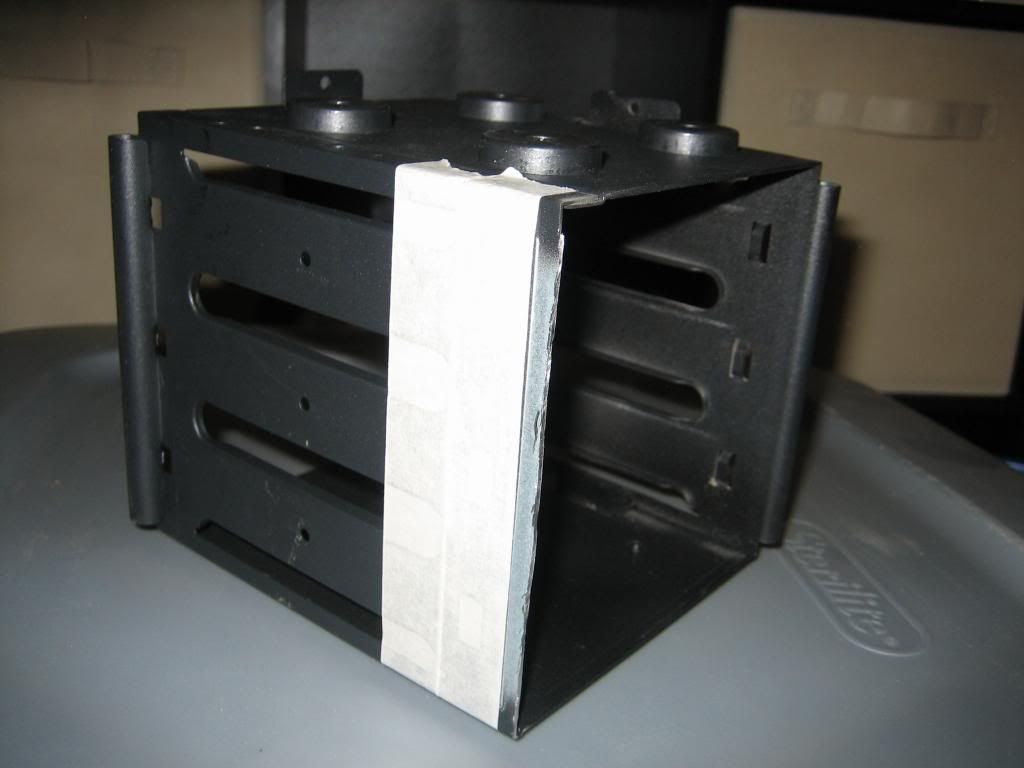
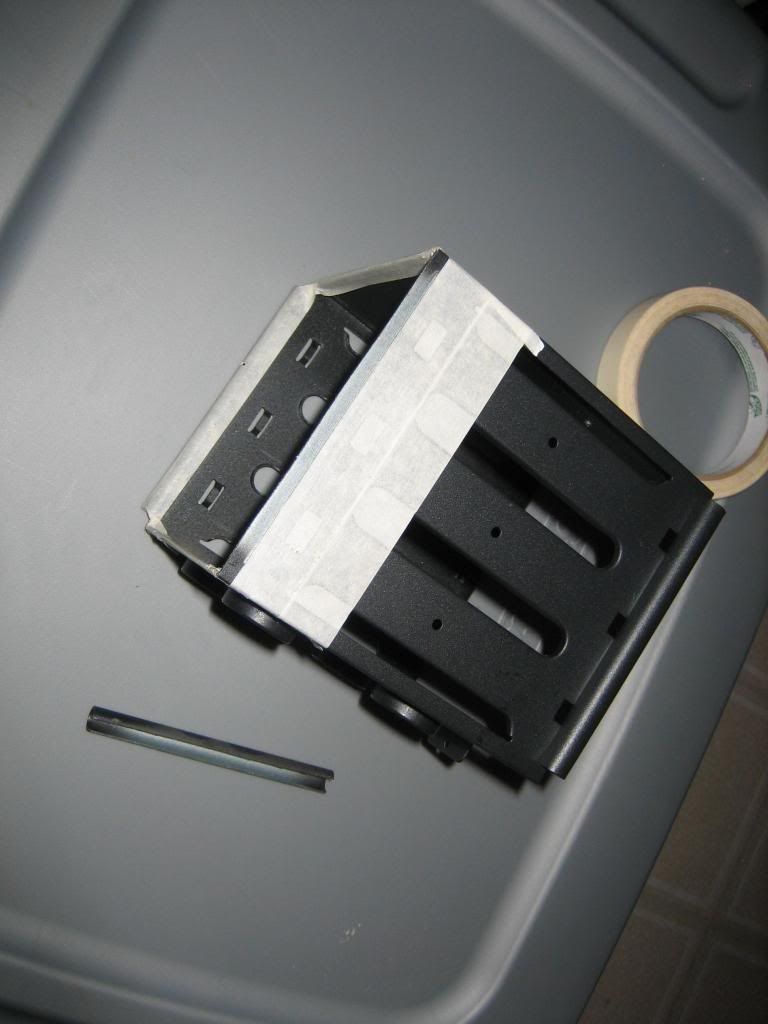
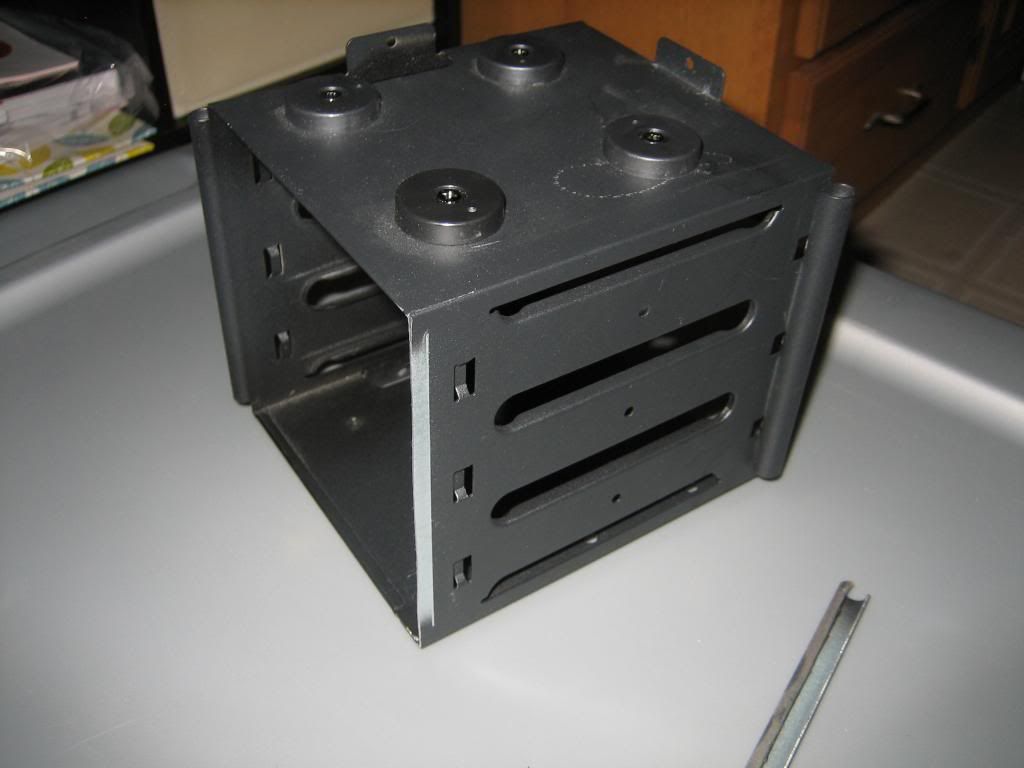
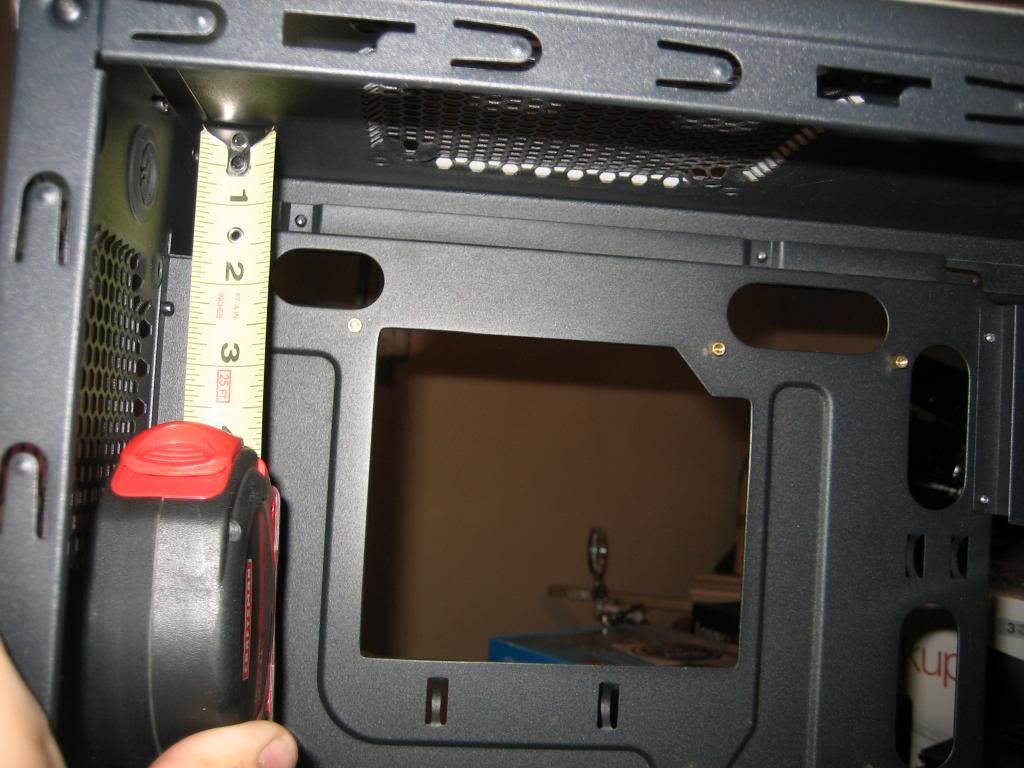
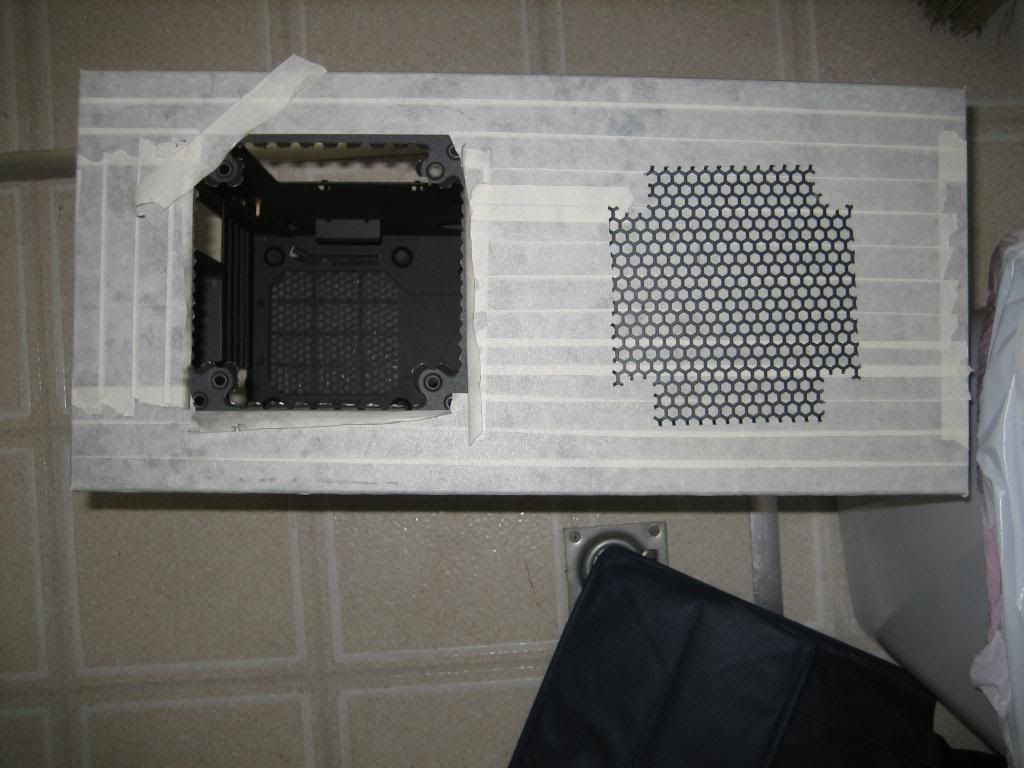
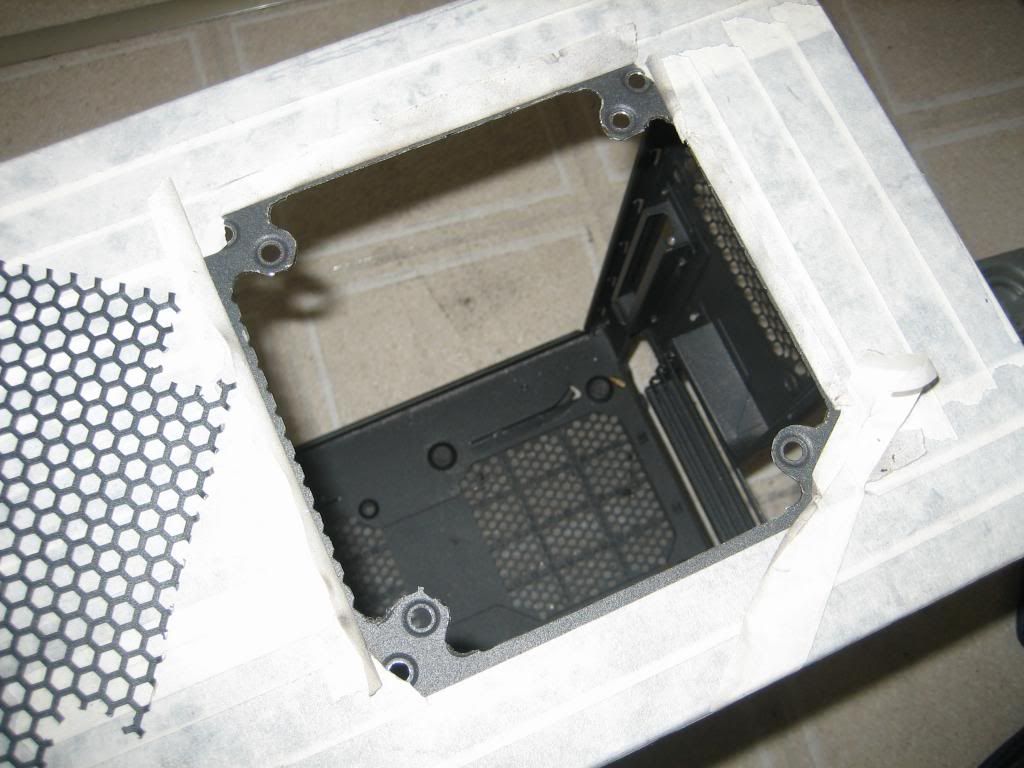
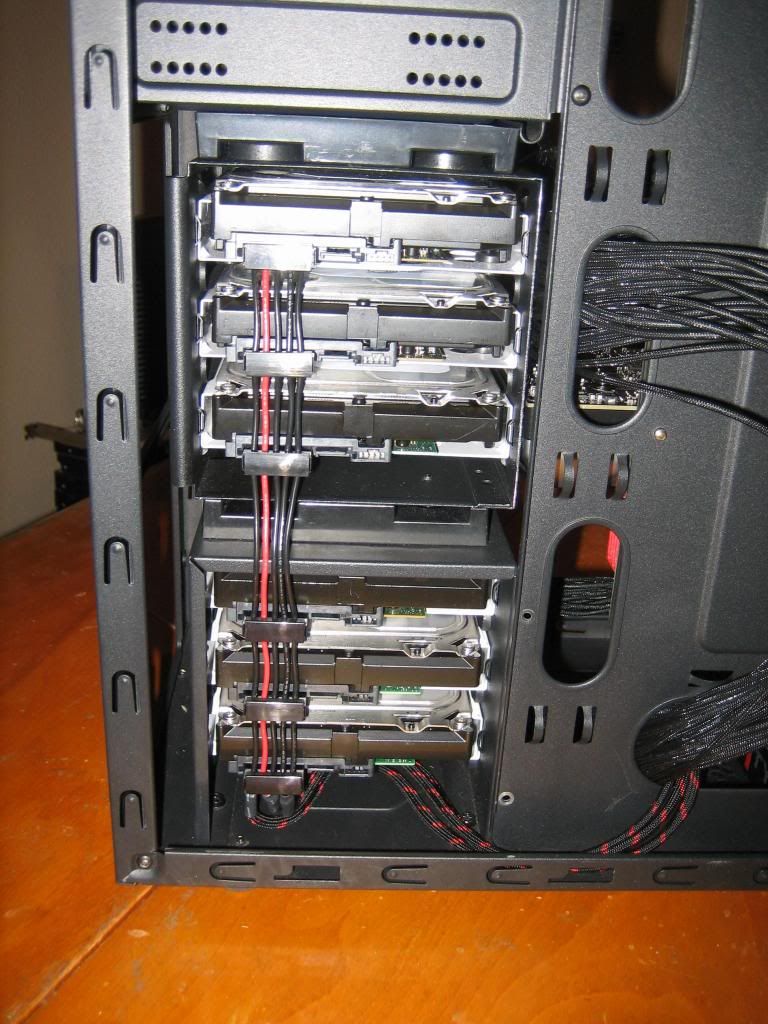
Okay, it looks like there's two ways to go about it. If I drill new holes, I can move both drive cages about a tenth of an inch closer to the fans. That MIGHT get me the space I need. The alternative is to remove the pleasantly rounded lip on the drive cage. That would gain me a bit more room. Well, I loves me some Dremel, and trying to cut a hole for a screw at an angle would be a pain, so… Drive cage it is! I start by removing the cage and taping off everything:
IMG_1824.jpg


Tape makes a nice guide line along the inside for me to cut.
IMG_1826.jpg


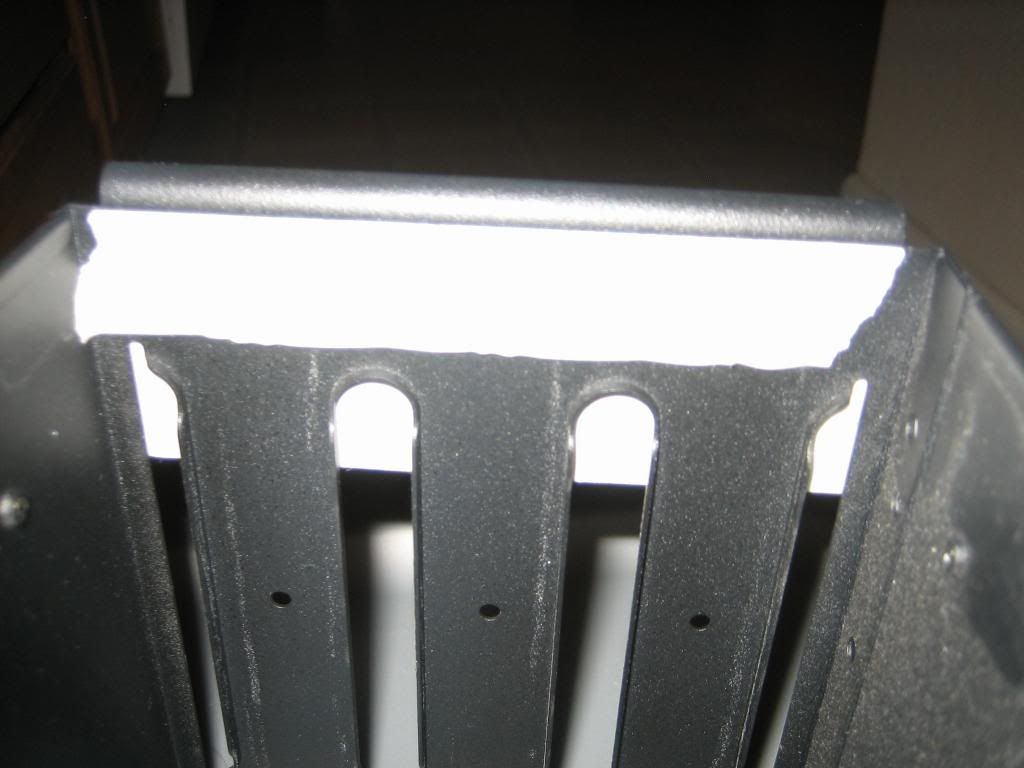
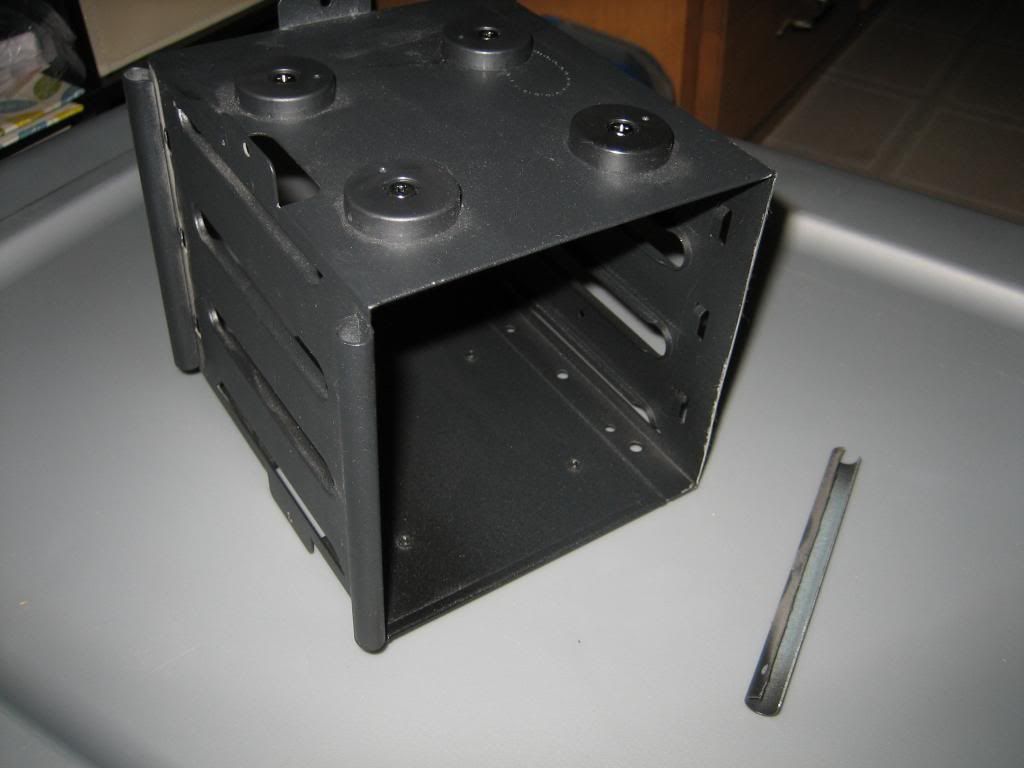
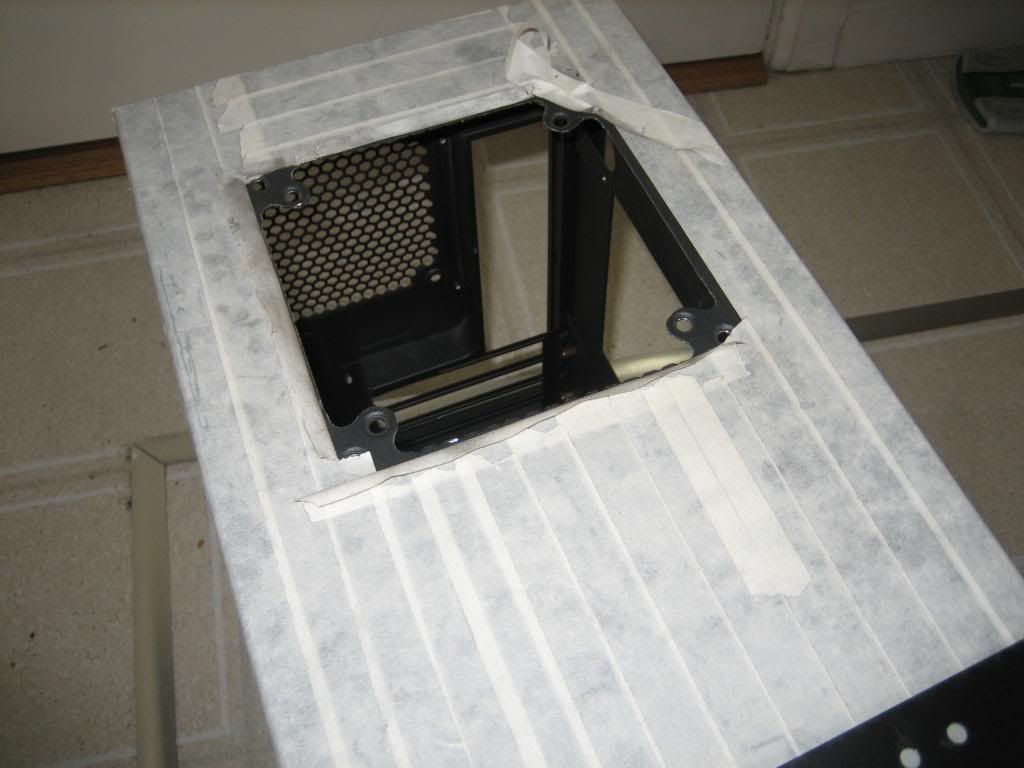
A few minutes with the dremel later, I end up with this:
IMG_1827.jpg

IMG_1829.jpg


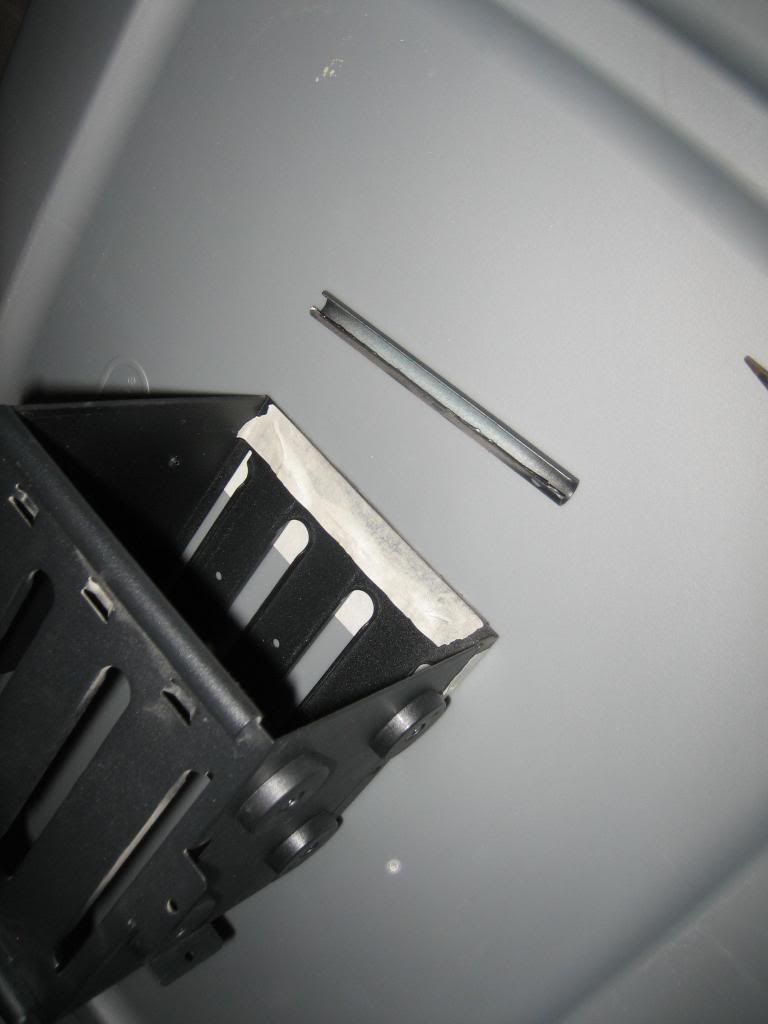
That's one jagged line! Stupid shaky hands. A few minutes with a file should clean that right up, though!
IMG_1830.jpg

IMG_1837.jpg

IMG_1838.jpg


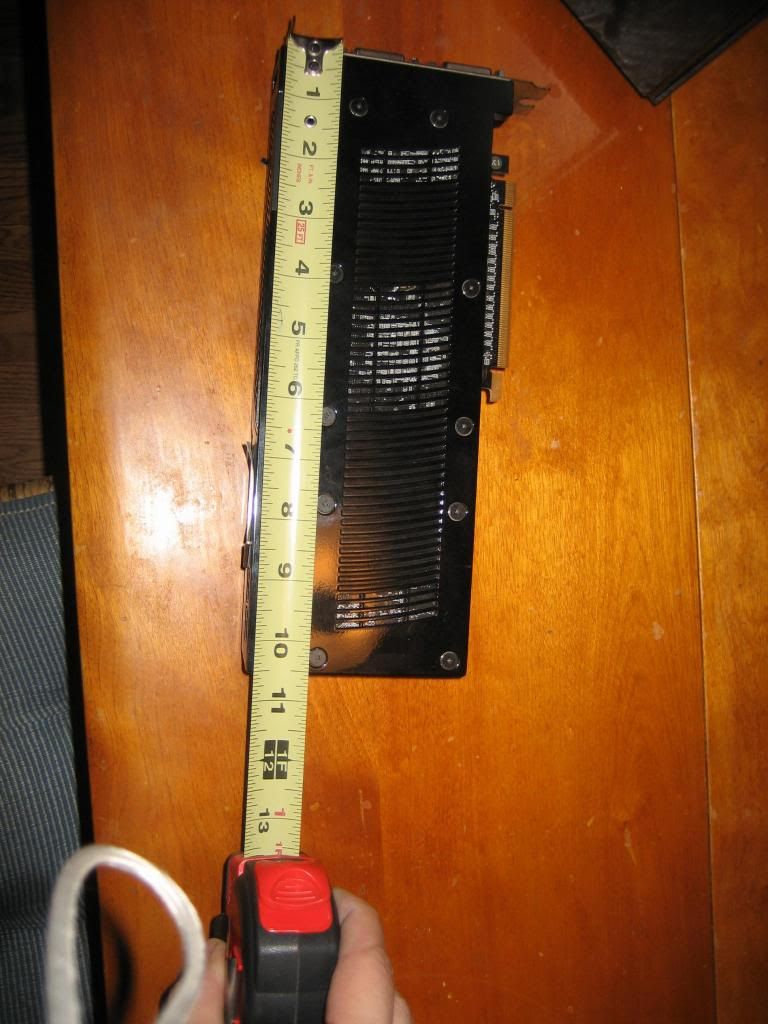
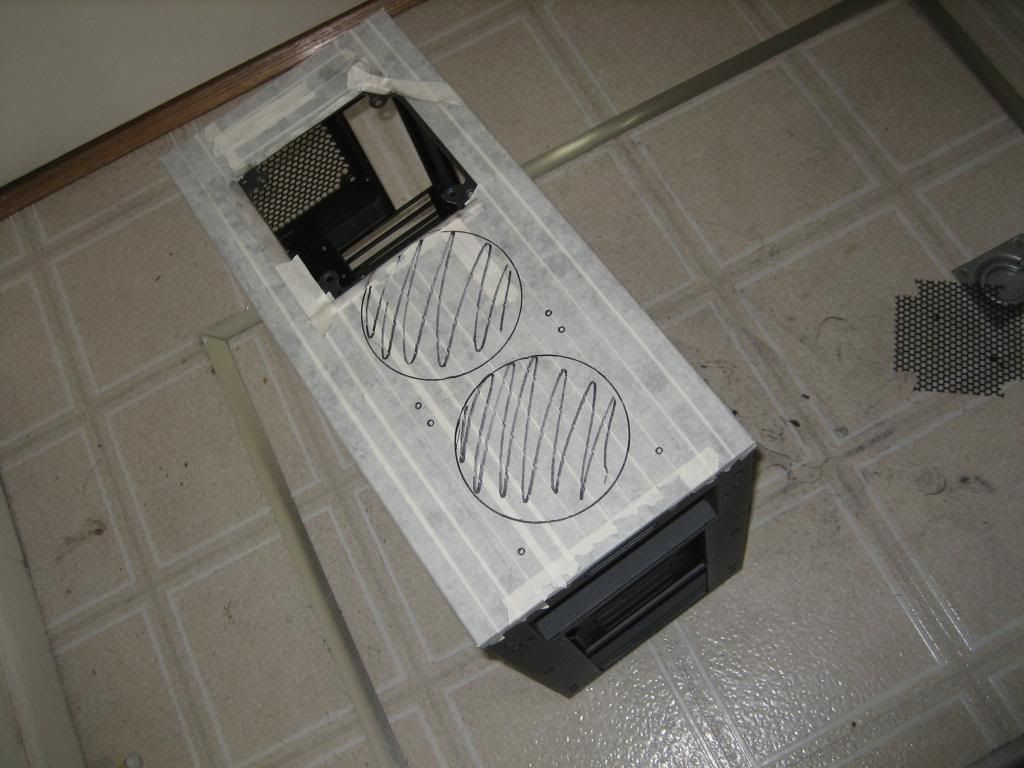
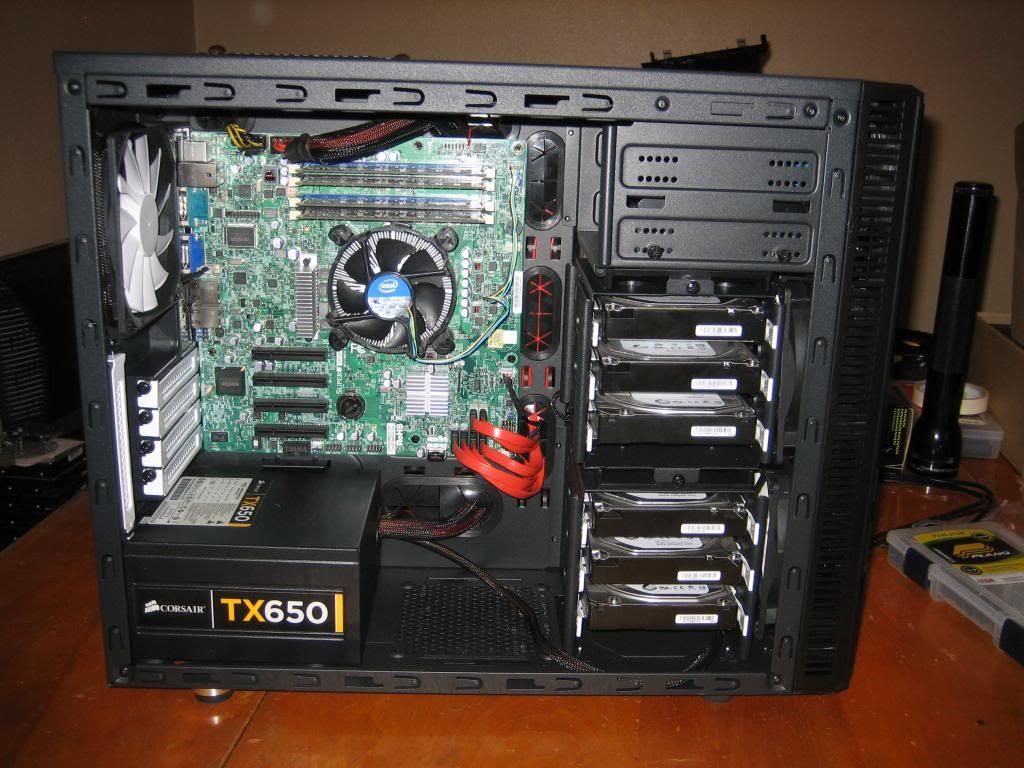
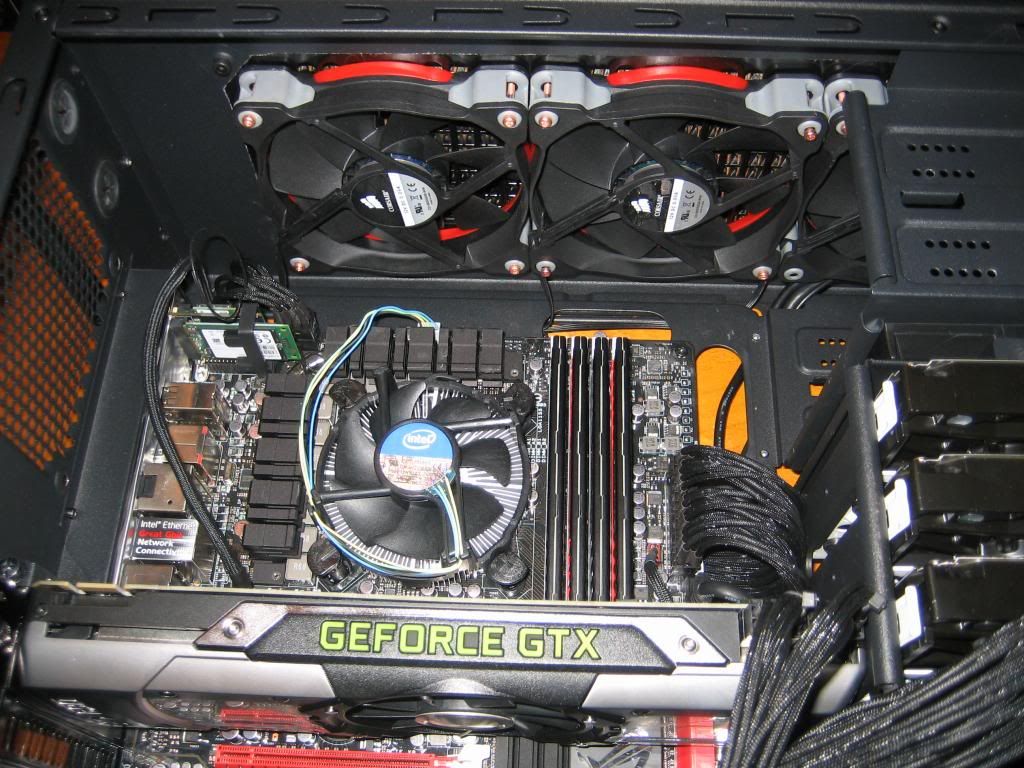
And now, I have a touch over 11" to play with!
IMG_1841.jpg


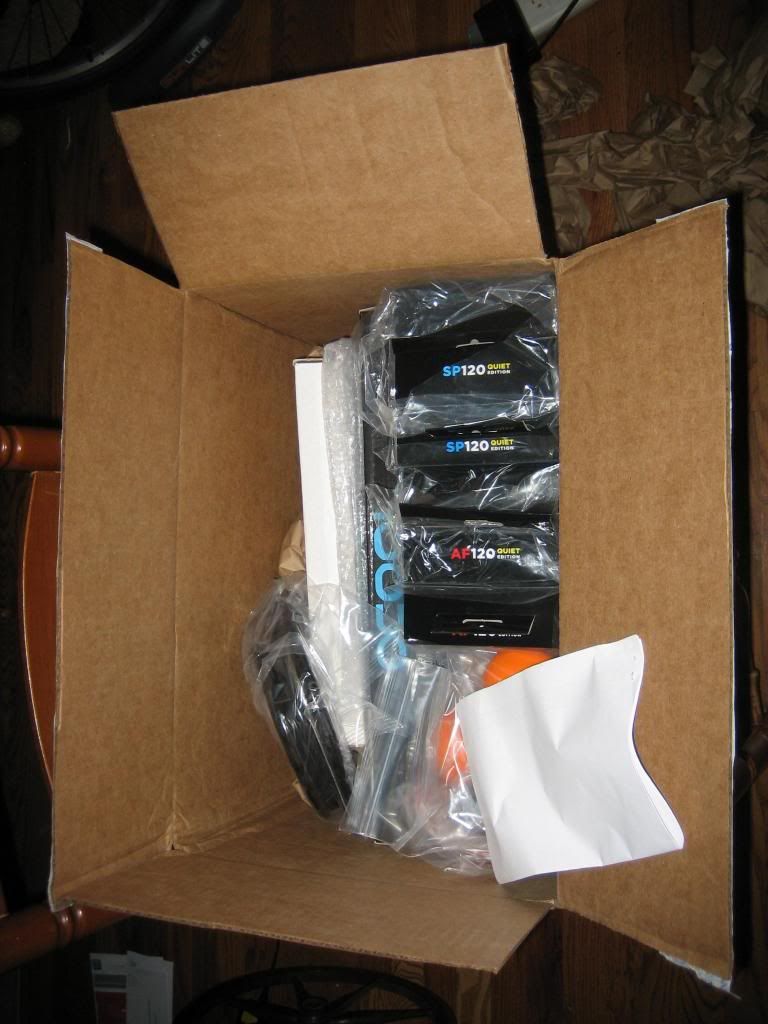
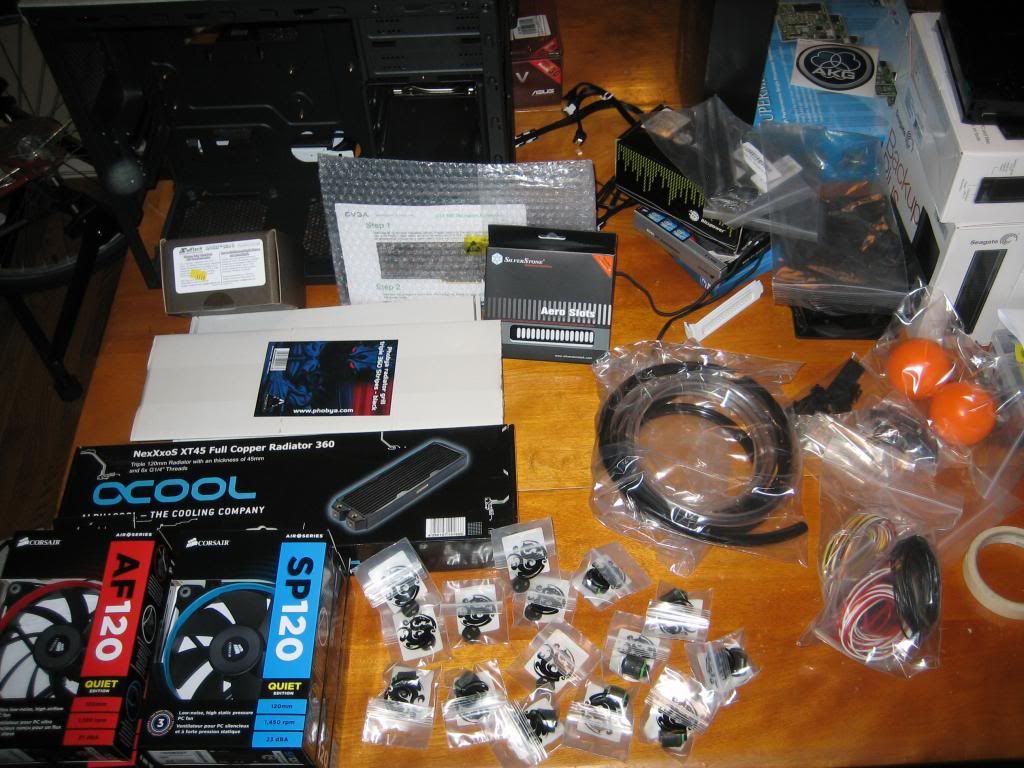
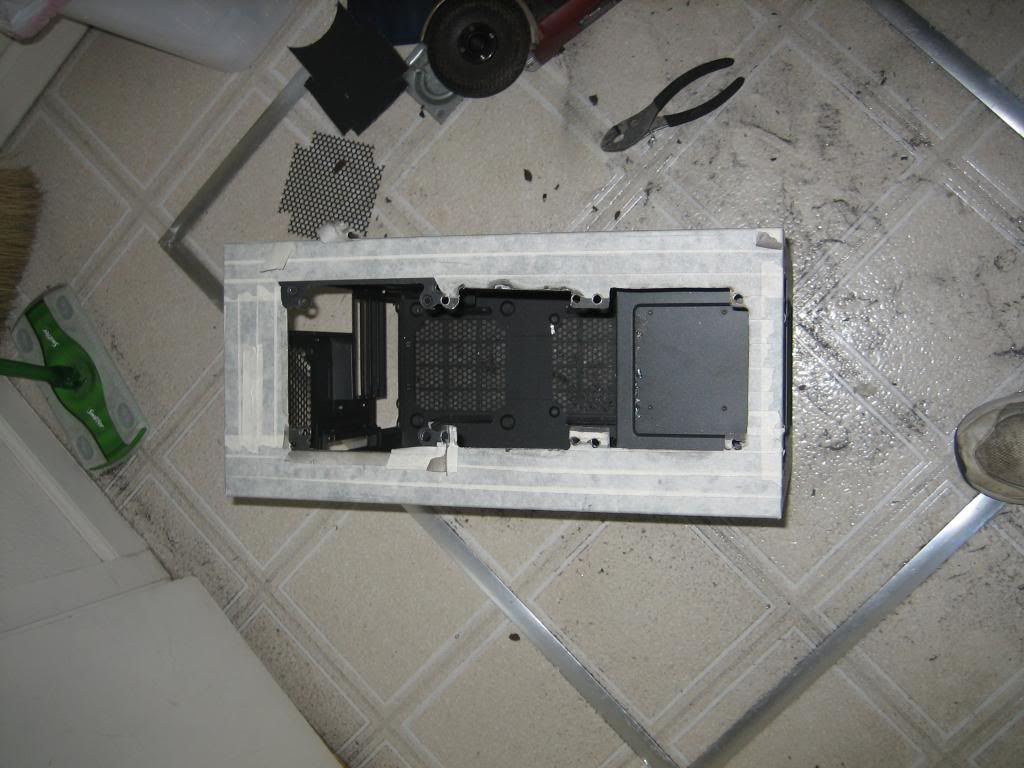
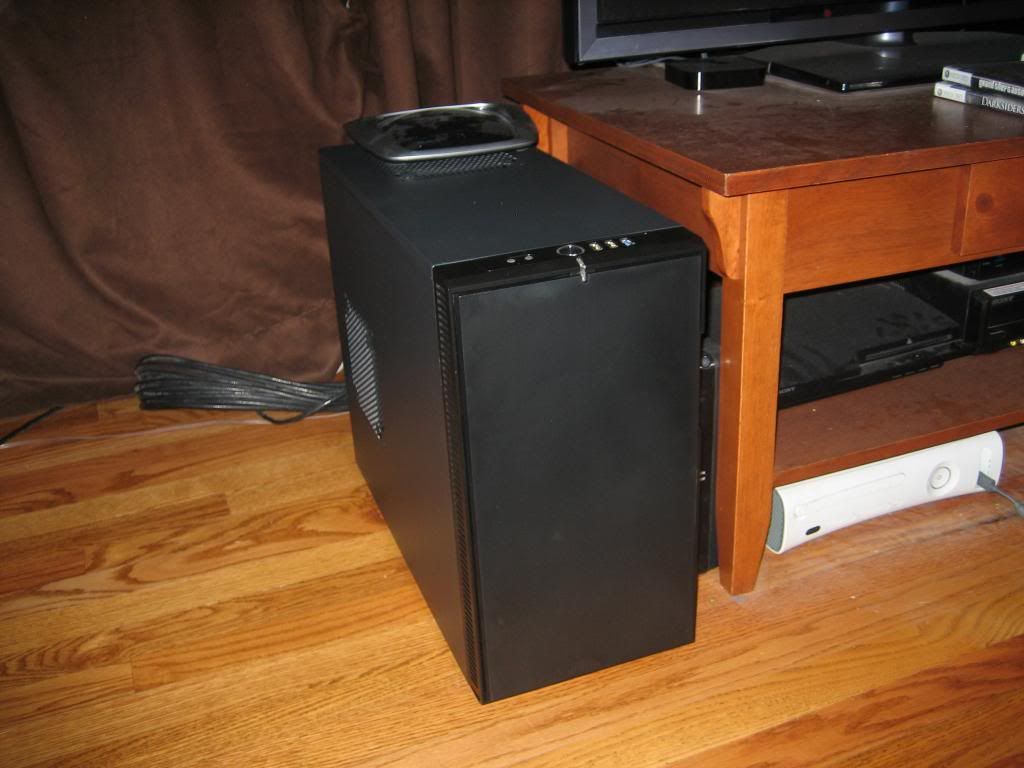
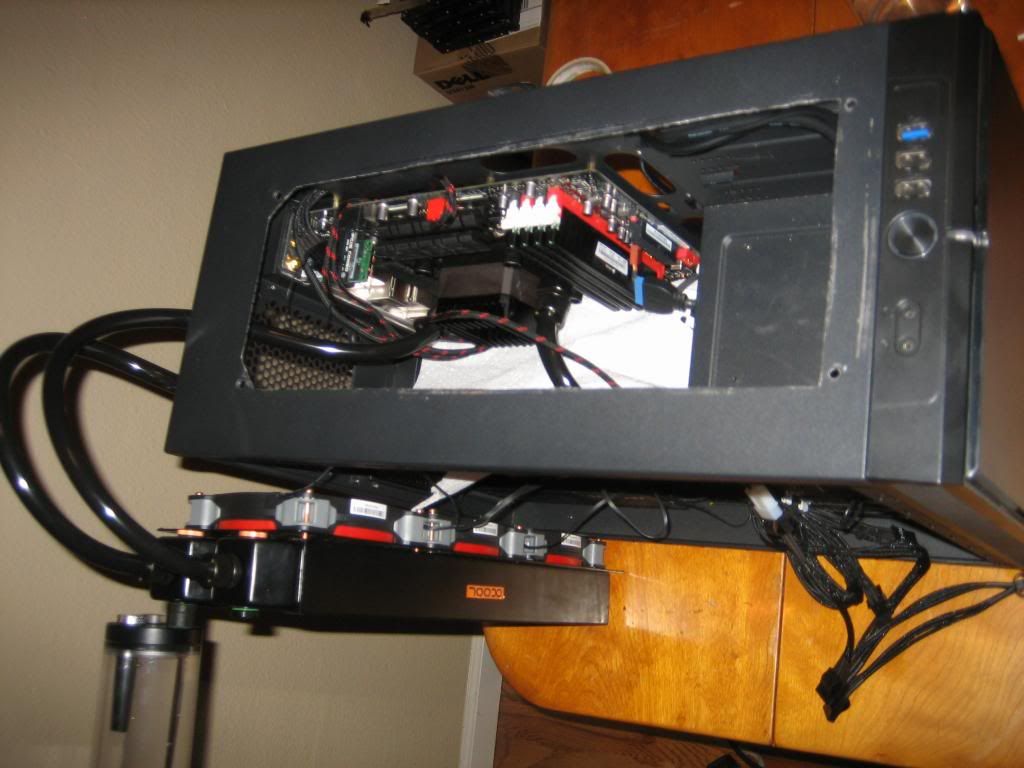
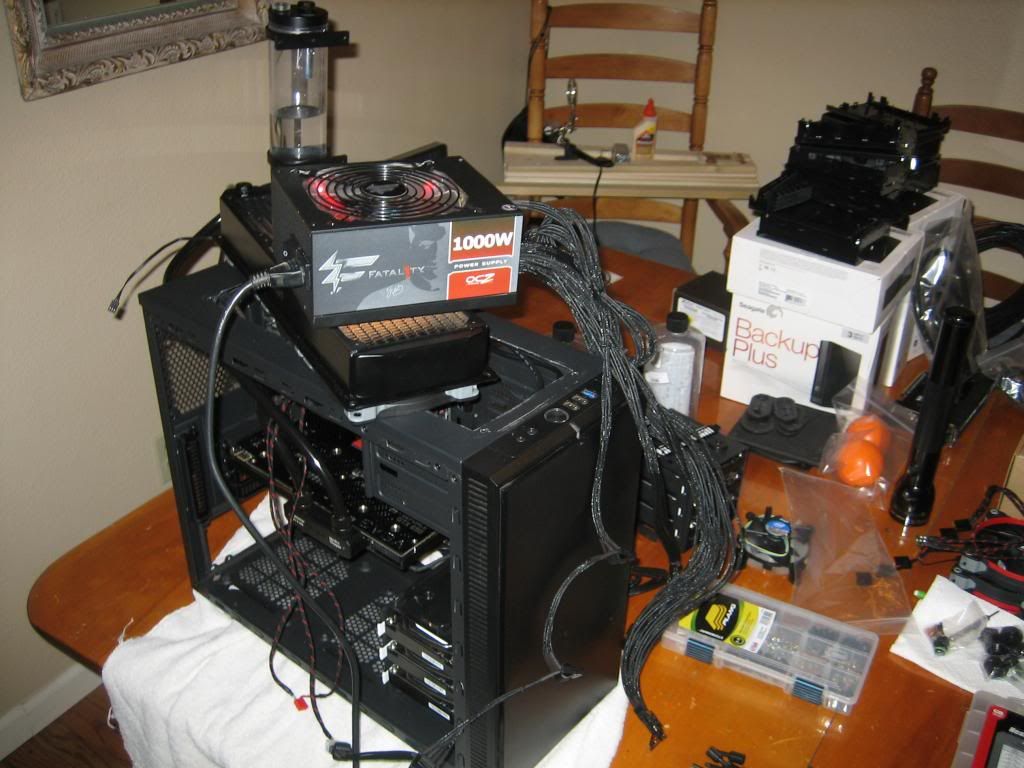
I'd love to show ya what the card looks like in the case, and rather or not it was successful, but unfortunately, I don't quite have all the components yet! I'll drop back by and update this once my parts come in. Going to do my best to fit a 3x120mm radiator up top and water cool it all!
 
Getting a 360 rad in the roof, internally, is going to be awkward. Aside from having to cut out pretty much the entire top, you're going to have to use 12mm thick fans for the portions of the rad that are over the motherboard, not to mention use a relatively thin rad. The distance from the top of the motherboard to the top of the case is just not that far and heatsinks and plugs on the board get in the way. I've got a single, 34mm thick, 120mm rad in the top of my Mini with a single 12mm fan and it only barely fits.
 
Getting a 360 rad in the roof, internally, is going to be awkward. Aside from having to cut out pretty much the entire top, you're going to have to use 12mm thick fans for the portions of the rad that are over the motherboard, not to mention use a relatively thin rad. The distance from the top of the motherboard to the top of the case is just not that far and heatsinks and plugs on the board get in the way. I've got a single, 34mm thick, 120mm rad in the top of my Mini with a single 12mm fan and it only barely fits.
The fans will actually be located outside the case. I've got a 45mm 3x120mm radiator coming in. My hope is that I can put it in the top of the case, pushed far enough towards the front that the fittings can sit in the gap between the default 140mm fan hole on the top and the rear of the case. From my measurements, if I recall correctly, there's 50mm between the top of the case and the top of the motherboard. Things should "just" fit. I hope! If not, the radiator will be on top of the case, and the fans will be inside. I'd just rather have it the other way around. I think it looks cooler!
 
Well, I've got a couple of the parts, and I couldn't resist assembling and testing the system! I also wanted to see what the wiring would look like, so I tried to lay it all out. Turns out the back panel doesn't like to close with all that hubbub back there. Oh well, I'm going to be creating custom-length cables in early December anyway. It will do until then.

Blah, blah, blah. Pictures!

My friend's GTX260, the longest card we could find, for testing of the previous "mod":
IMG_1877.jpg


Installed:
IMG_1880.jpg


Without my hand in the way (Ignore the SSD, it's just replacing the 6th 3TB drive until my mSATA one comes in):
IMG_1878.jpg


Tower of backup drives:
IMG_1873.jpg


Computer without video card:
IMG_1876.jpg


Best I could do, without custom cabling:
IMG_1882.jpg


Everything removed after testing, prepping for the radiator cut:
IMG_1883.jpg


How much room I have for the radiator:
IMG_1887.jpg
 
Looks like a toy came in while I was in class! So, how well did my little snip work? I'll let the picture speak for itself!
IMG_1892.jpg


Looks like it was a close call, too!
IMG_1893.jpg
 
Everything tested out good. I made the cut for, and installed, the radiator and top fans. I then tossed everything together so that I can use it until I get time to install the watercooling loop (probably this weekend).

On with the pictures!

Yesterday, a present came from Santa a bit early!
IMG_1896.jpg


What could it be?
IMG_1897.jpg


Why, it looks like...
IMG_1898.jpg


Yay! My water cooling supplies!
IMG_1899.jpg


I guess that means that it's time to start hacking up the old Define Mini!
IMG_1900.jpg


Snip!
IMG_1901.jpg


Tidy Oop!
IMG_1902.jpg


One down, two more to go. Looks like it's time to try out my "reusable radiator template":
IMG_1903.jpg


And then the cutting starts!
IMG_1904.jpg


Now, something I didn't get a picture of... The template has the fan screw holes in a different location than the radiator! Actually, the Phobia radiator grill I purchased ALSO has them in a different spot! I think my radiator's a little on the wonky side. So, I had to make some... "adjustments" to the template. While I was at it, I also decided to widen the hole.
IMG_1905.jpg


That just looked awful, and worse, it didn't work! The radiator grill + the case thickness was too much for the included fan screws. I couldn't fit 'em in. I ended up cutting out the fan screw holes entirely, and making a nice big square hole. The radiator grill is attached at the 140mm fan hole marks on each site. Sorry, no picture of this!

Instead, how about a picture of my "mod table"? It's a dining room table graciously lent to me by my loving wife for the purpose of assembling and modifying my computers. I think she will probably want it back soon, though!
IMG_1906.jpg


Last night, the other Define Mini case came in as well, so I got a chance to put my server back together. Here she be, in all her... Glory?
IMG_1911.jpg

IMG_1910.jpg

IMG_1913.jpg


And finally, the gaming rig/backup server all put together... For now! I don't like how the radiator fan wires are sitting, and I'm seriously considering doing a single, custom wire for all three. I'm also waiting on the PCIe connectors so that I can shorten that cable considerably. And, actually, come to think of it... I need to buy a removal tool for the PCIe and PSU pins. The damned paperclip bit just isn't working for me.
IMG_1919.jpg

IMG_1918.jpg


I'm also rather proud of my little modular SATA power cable. I think it came out nicely!
IMG_1915.jpg


That's all for now! We'll see where I sit after the weekend. Finals are next week, so I may not have the time I want to work on the gaming rig!
 
And I heard a couple folks say that the Define Mini is a bad case for cooling large heat sources. They may have a point. Here's the results of my GTX690 (on air still) performing the FurMark Burn-in benchmark. I have the three Corsair Quiet Edition High Static Pressure fans (with the resistor in the line) blowing into the case and two Scythe Slipstream 800RPM fans set up for intake at the front. There is no exhaust fan currently installed. Ambient temperature is about 68*F.
FurMark_GTX690_AirCooled.png
 
Got a bit bored while waiting for some games to download, so I decided to resleeve my CPU block/water pump.

Before:
IMG_1920.jpg


Using a Molex tool to remove the pins (Easy mode):
IMG_1921.jpg


Cutting a piece of paracord to length:
IMG_1923.jpg


Attaching the heatshrink:
IMG_1924.jpg


Done:
IMG_1925.jpg
 
I also finally got around to installing the water cooling components. Not a lot of pictures here. Things of note:

It took me over an hour to get the Hydro Copper cooler and backplate onto the GTX690. At first, I tried to re-use the screws that were on the old cooler. Those didn't work. I then bothered to read the instructions... Well, the instructions tell me to use the "8 long black screws" to attach the cooler to the GPUs first. Only two black screws were included, and they were DEFINITELY the wrong thread. Counted out the number of silver screws - 18, not the 10 I was supposed to have. Okay, they're silver, not black. And they're not any longer than the other screws. I attach them all... And I have 6 left over? What the hell? Turns out that there's not a hole on the backplate for every screw you need affixed. So I end up removing them all, and attaching only the ones which the backplate doesn't use. Then I attach the backplate. Finally, finished.

My plan was, originally, to use the res for bleeding of the loop, then to remove it entirely. Unfortunately, if I put the radiator on the inside, the small hole I would need to cut for the res would also need to be cut through the radiator grill. Given how cruddy a job I do at chopping up circular holes, I decided against it. That means that the radiator goes on the outside of the case, and the fans on the inside. Which means, unfortunately, that you can't even see the red rings on the fans I bought:
IMG_1927.jpg


Well, enough test fitting. I put everything together. Time for a leak test. I created a jumper cable for the power supply, plugged in the CPU pump, and started testing. It made a god awful racket and didn't pump any water. Not just low flow. No flow. Well, shit. I added the res as an inline, and started looking for the restriction. Removed the video card from the loop. Nope. Removed the radiator. Nope. The damned pump just didn't pump. I removed everything from the case, and just held the res and pump. Still no flow. Took the pump apart, looking for an issue. It spins freely under power (and under water). Someone told me in another thread that it was very restrictive. Maybe it was TOO restrictive? Took a dremel to the CPU plate, making a channel for the water to flow through. Put it all back together. Nope. Looks like I got a bum pump. One last thing to try. I'll "prime" it. I held it by the intake tube, poured the liquid into it, and then turned it on. It pumped it out the other side. Then it got more powerful. Hrm. That seemed to work. Guess the pump's ok?

I put the pump and res back together into a loop, filled it, and shook the shit out of it. Once I was confident that everything was full, I turned it back on. Good pressure. Yay! I added one component to the loop at a time. Pressure dropped each time, but at least there was flow now. Once I got everything together, I put it all back into the case, managing to spill a great deal of liquid all over the table despite my attempts. Thankfully, I had towels everywhere, and none of the computer components got wet. When I got it all back in the case, though... It didn't work again! So I took off the radiator and started shaking again, hoping there was just a bubble in there somewhere.
IMG_1929.jpg


I then made a mistake. I put the rad/res back on top of the case, and took off the other plug, to try and watch the water flowing through the radiator. I didn't drain the reservoir first. Gravity pushed all the fluid in the reservoir out of the new hole in the radiator, and straight down into my computer. Nothing was connected, thank god, but it all got soaked. My power supply was turned so that the fan was upright... It got filled with water. There was a pop, and that was that.

I took everything out of the case and dried it with paper towels. I disassembled the PSU entirely and dried those components separately. I replaced one of the lines going to the external radiator with a clear one so that I could see what's going on inside. After several hours of waiting, I put everything back together and tested it one more time. The PSU wouldn't turn on. Shit.

I then made another mistake. I got frustrated, sat down with my laptop, went to FrozenCPU, and ordered another thousand dollars in water cooling supplies. I got a fitting in every angle, since I was sick of kinks. I bought quick disconnects, since I was moving the rad around all the time anyway. I bought an AquaComputer pump/res/rad combo, since the entire thing is external now anyway. I picked up the Seasonic PSU I intended to buy in the first place. New tubing, since 6 feet was just barely enough. New liquid, since I'd gone through most of the 2L I purchased prior. I bought a couple of little things I can't remember, too. Then I told them to rush it to me, next day air. $200 in shipping charges, the rush processing charge, etc. I didn't care. I wanted this freaking thing to work, work right, and work now.

Got all done with that, sat down on the couch to watch some TV, and couldn't get into it, so I went back to fiddling with the computer. I could take the power supply out of my file server and use that to get the loop working, or I could go back to air cooling and see if I damaged the components. Decided to give the Fatal1ty PSU one more shot. Flipped the switch, and it fired right up. Uhh... Okay. Can it do it again? Yup. Apparently, I just didn't wait long enough. Freaking wonderful. I put the PSU on TOP of the case this time, and tried again:
IMG_1930.jpg


I could see a trickle of water going through the transparent hose. I figured that was good enough. Bubbles were appearing in the res slowly. Most of the cooling loop would be replaced anyway when my package got here, so I left it alone. Fast forward to the next morning. I don't see any air in the hose at all. Looks like it bled itself overnight. Well... Let's see if I burned up anything. Turns out, my mSATA SSD and wireless card got a thorough dunking. Windows wouldn't boot. Format/reinstall, and everything's gravy. I lost a couple hours worth of Steam downloads, but that's it. And so, that's where it sits now... Waiting for that package to come in today:
IMG_1931.jpg
 
One last thing to note, for anyone who's interested.

The Corsair "Quiet Edition" fans are every bit as loud as any other fan I've ever used. The 1450RPM "high static pressure" "Quiet Edition" fans I have on my radiator can be heard in another room, over the ambient noise. They are NOT quiet in any way, shape, or form. They are fairly effective, though, taking me from 94*C in FurMark (on air) to 49*C. I'd like to compare them to the SlipStream 800RPM case fans I have, but I don't want to take the system apart again until my new bits get in.

FurMark_H2O.png


Ordered the bits on Friday night. It's noon on Monday, and this is what I'm getting when I try to track the package:
fedex.png
 
Last edited:
One last thing to note, for anyone who's interested.

The Corsair "Quiet Edition" fans are every bit as loud as any other fan I've ever used. The 1450RPM "high static pressure" "Quiet Edition" fans I have on my radiator can be heard in another room, over the ambient noise. They are NOT quiet in any way, shape, or form. They are fairly effective, though, taking me from 94*C in FurMark (on air) to 49*C. I'd like to compare them to the SlipStream 800RPM case fans I have, but I don't want to take the system apart again until my new bits get in.
Turns out that if you add the in-line resistor that's included with the fans, they run at about 900RPM, and they're actually fairly quiet. FurMark hovers at around 64*C in this configuration. Bit higher than I'd like, but still within the factory specifications, and quite quiet, so I'll leave it be. I tried to run without any fans, but plugged them back in when temps hit around 75*C. Definitely not passive!

...Now, when the AquaComputer 3x120 comes in, maybe...
 
Ordered the bits on Friday night. It's noon on Monday, and this is what I'm getting when I try to track the package:
fedex.png
Okay... So FrozenCPU didn't get my package to FedEx until about 7PM eastern time on Monday. So much for rush processing. Looks like Santa will be coming today, instead!
fedex-2.png


I'm tempted to keep the 3x120mm I have, and install it internally. If I could just find a way to route the hoses... 6x120mm should be MORE than enough radiator to run some very silent fans, or maybe even run it passively?
 
Since no-one else is commenting on this - you should always have your res directly connected to your pump even when bleeding, from your pictures it doesn't look like you have it this way.

Doing the above might alleviate some of your headaches and greatly reduce the risk of burning up your pump. I have the same pump and past priming it's always been solid minus a time when SpeedFan decided to stop controlling it and turned it all the way off requiring a reboot.

Good luck with your build, keep us updated.
Always glad to get advice! I assume the reason for going Res->Pump is to ensure that the pump always has plenty of water, right? Right now, the res is... Sitting as far away from the pump in the loop as possible. Damn. Thought I had those the other way around! Good eye!

Anyone know how much it costs on average to have a computer panel laser-cut? I'm thinking that, instead of taking a dremel to things on my next build, I'm going to have it cut by waterjet or laser. Should result in a much cleaner appearance. I'd also like an idea on powder coating costs. I'm thinking that the drive trays need to be turned red, and maybe one or two parts of the Seasonic PSU.

I'm rather pleased with the pump aspect of the Apogee Drive II. The waterblock part, though? It's not doing a very good job cooling. During IntelBurnTest, CPU temps hit 105C and then the clock speed drops like a rock. Running it simultaneously with FurMark results in GPU temps of 65*C (With the rad fans at 900RPM)... And they're stable there. So somehow, the heat from the CPU is not being transferred to the water. I'm thinking either I screwed up the block, or it's mounted very poorly. It was nifty to see little bubbles come out into the res while it was heating up, though. I'd thought that the system would have been fully bled by now. Maybe it's like normal tap water when it starts to boil, and it was some sort of impurities instead?
 
Hey no problem, glad I could help and yes res->pump is to ensure pump always has liquid, dry runs could damage the pump very fast.

Also, if you didn't already, make sure you rinse out all the wc'ing components before using them in a loop. Radiators often have solder, flux etc from the manufacturing process and if they get in the pump it could damage the pump as well.

As far as your temps go, 3570k CPU is getting way too hot for being under water, I would venture to say you've got these possibilities:

1) Bad pump
2) Bad pump mount on cpu
3) Air pockets in thermal paste (did you use the paste that came with the pump? How did you apply?)
4) Air in pump
5) Pump surface isn't flat (highly doubt as Swiftech is usually top notch)
6) CPU IHS surface isn't flat
7) Bad cpu IHS application by Intel

Have you run this CPU on air before applying wc'ing parts to it? It appeared you had, if so, what temps did you normally experience? If they were fine then we can rule out #6, #7 as a possibility.

If you take your pump off the cpu you should see a nice coverage of flattened paste all along the cpu, if it's all blotchy where there is clean looking IHS - that could indicate poor paste application or uneven mating surfaces.

First thing I would do is take pump off, throw back on air and run the same stress test and see what the temps are - if they are fine then re-apply Apogee pump and re-run same stress test again. If your temps are screwed on either of those them perhaps CPU is bad, IHS isn't making contact with the chip die or lastly the IHS has an uneven surface.

It's a process of elimination unfortunately at this point but none of this stuff is that hard to try.

You did say you modified the block or pump in some way in a previous post, any chance you could post some pictures of that so we can see what might be the cause?

You will see bubbles in the res sometimes just from turbulence of the water and pump, that's a good indication that the pump is flowing okay - which is good.

Also, I'm going to assume you've not overclocked this CPU right now due to temps.

What speed are you running the pump at? At idle I have my pump running around 800rpm, under extreme temps it scales with temps reaching full speed although I don't think it ever does unless I'm in a BF3 64 player large map match with tons of crap happening.
 
Last edited:
Also, if you didn't already, make sure you rinse out all the wc'ing components before using them in a loop. Radiators often have solder, flux etc from the manufacturing process and if they get in the pump it could damage the pump as well.
Do I flush the components with deionized water, or tap water?

As far as your temps go, 3570k CPU is getting way too hot for being under water, I would venture to say you've got these possibilities:

1) Bad pump
2) Bad pump mount on cpu
3) Air pockets in thermal paste (did you use the paste that came with the pump? How did you apply?)
4) Air in pump
5) Pump surface isn't flat (highly doubt as Swiftech is usually top notch)
6) CPU IHS surface isn't flat
7) Bad cpu IHS application by Intel
1) Possible. It moves water, at least!
2) Possible. All four screws are poking out the other side. I suppose I COULD tighten them more, but that would require additional case modification, since they're bumping into the motherboard backplate.
3) Possible, and likely. I used the paste that came with the pump. Half a BB in the middle, did not flatten. I honestly can't recall if I applied any paste when I put it back together!
4) Possible, and likely. I don't understand the bleeding process. I can shake the whole computer without bubbles popping up, so I assume that it's properly bled.
5) It looked flat to me!
6) See #5.
7) Intel's normally pretty good with their QC.

Have you run this CPU on air before applying wc'ing parts to it? It appeared you had, if so, what temps did you normally experience? If they were fine then we can rule out #6, #7 as a possibility.
Yup, but I wasn't watching temps since I know how bad the stock cooler is. It ran Civ V at max settings without crashing, if that's anything to go by.

If you take your pump off the cpu you should see a nice coverage of flattened paste all along the cpu, if it's all blotchy where there is clean looking IHS - that could indicate poor paste application or uneven mating surfaces.

First thing I would do is take pump off, throw back on air and run the same stress test and see what the temps are - if they are fine then re-apply Apogee pump and re-run same stress test again. If your temps are screwed on either of those them perhaps CPU is bad, IHS isn't making contact with the chip die or lastly the IHS has an uneven surface.

It's a process of elimination unfortunately at this point but none of this stuff is that hard to try.
Thanks for the how-to. I'll give it a shot. Thinking about putting the Apogee + acool 360 rad on my server.

You did say you modified the block or pump in some way in a previous post, any chance you could post some pictures of that so we can see what might be the cause?
If you take apart the block, there are a series of small cuts in a criss-cross pattern in the copper. I took a dremel to the middle of those cuts and made a channel for water to flow through. I'm 100% certain that I reduced the effectiveness of the block. I don't know by how much, though!

You will see bubbles in the res sometimes just from turbulence of the water and pump, that's a good indication that the pump is flowing okay - which is good.

Also, I'm going to assume you've not overclocked this CPU right now due to temps.

What speed are you running the pump at? At idle I have my pump running around 800rpm, under extreme temps it scales with temps reaching full speed although I don't think it ever does unless I'm in a BF3 64 player large map match with tons of crap happening.
CPU gets to 105*C at stock clocks under IntelBurnTest only. My pump is going at about 1100RPM.
 
... I took a dremel to the middle of those cuts and made a channel for water to flow through...

Ruined. Order an Apogee HD, and move the cold plate from it to your Drive. You can also buy another Drive without the pump.

Taking a Dremel to the cold plate was a poor idea.
 
Do I flush the components with deionized water, or tap water?

Best results would be using deionized water, or vinegar I've heard people use - I used filtered hot tap water which really isn't good and probably not the best idea as it could leave deposits in there although they'd be a lot smaller than flux, solder etc.

2) Possible. All four screws are poking out the other side. I suppose I COULD tighten them more, but that would require additional case modification, since they're bumping into the motherboard backplate.

This could be the majority of your problem, if the motherboard backplate is interfering with the mounting of the cooler that could cause uneven pressure as well as gaps.

For contrast, running my 3570 OC'd to 4.5GHz running Prime95 with 90% memory utilization I would reach ~85c using the same pump as you but on a single 120 rad 80mm thick in push pull configuration. You, being at stock clock with your 3570k, should not be coming close to 105c no matter what program you're using on air or water.

Heck I could turn off all my fans and just run a pump and still not hit 105c.

3) Possible, and likely. I used the paste that came with the pump. Half a BB in the middle, did not flatten. I honestly can't recall if I applied any paste when I put it back together!

Well I cannot stress how much you need to pull stuff apart and look at everything, no paste would be a bad thing - the builtin Intel throttling should keep the CPU alive even without a waterblock or HSF (heat sink and fan) but it will wear out a lot faster at the temps you're getting to.

4) Possible, and likely. I don't understand the bleeding process. I can shake the whole computer without bubbles popping up, so I assume that it's properly bled.

Bleeding is simply working the bubbles out of the system, much like bleeding brakes on a car, if you have a bubble floating inside your pump that is trapping hot air and will cause misread temps among other things.

Shaking things madly will not help and could make things worse because you're sloshing things about and could cause more bubbles to form. There is much needed finesse in the process of bleeding - if you want to speed up the process you need to gently tilt the loop in each direction holding it there for a short while before changing the angle. This should be done with the res cap off so that air has some place to escape to.

Also, are you bleeding with the PSU jumped and running only pump? If you need help on how to jump your PSU let me know.

5) It looked flat to me!

Looking flat to the naked eye isn't much of a help, an easy test to do is put something known to be flat up against it and shine a light through the surfaces and inspect for light leaks... it's still not perfect science but will show any glaring issues with the surfaces in question. A metal ruler will work great for this purpose.

7) Intel's normally pretty good with their QC.

No one is perfect :p 
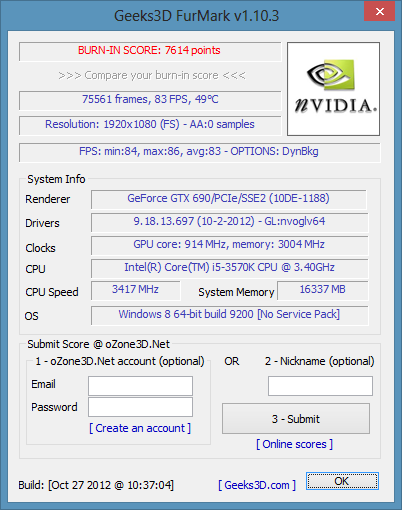
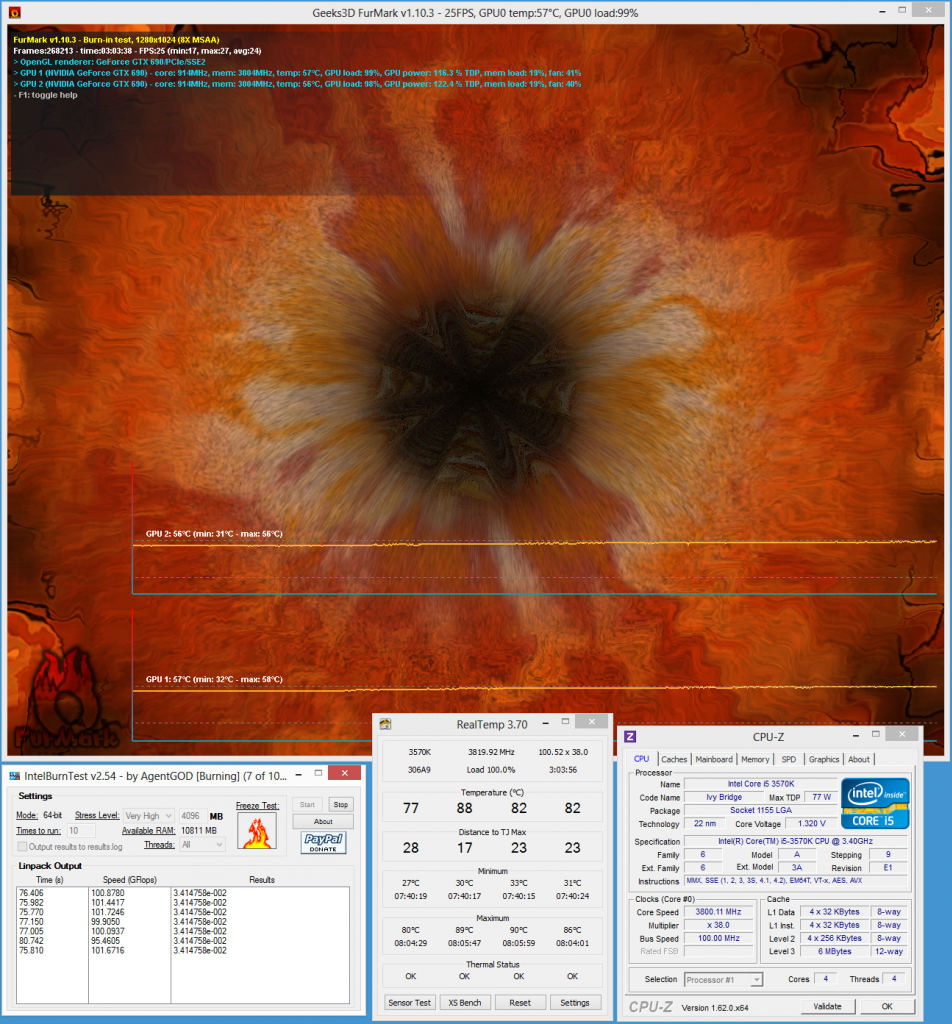
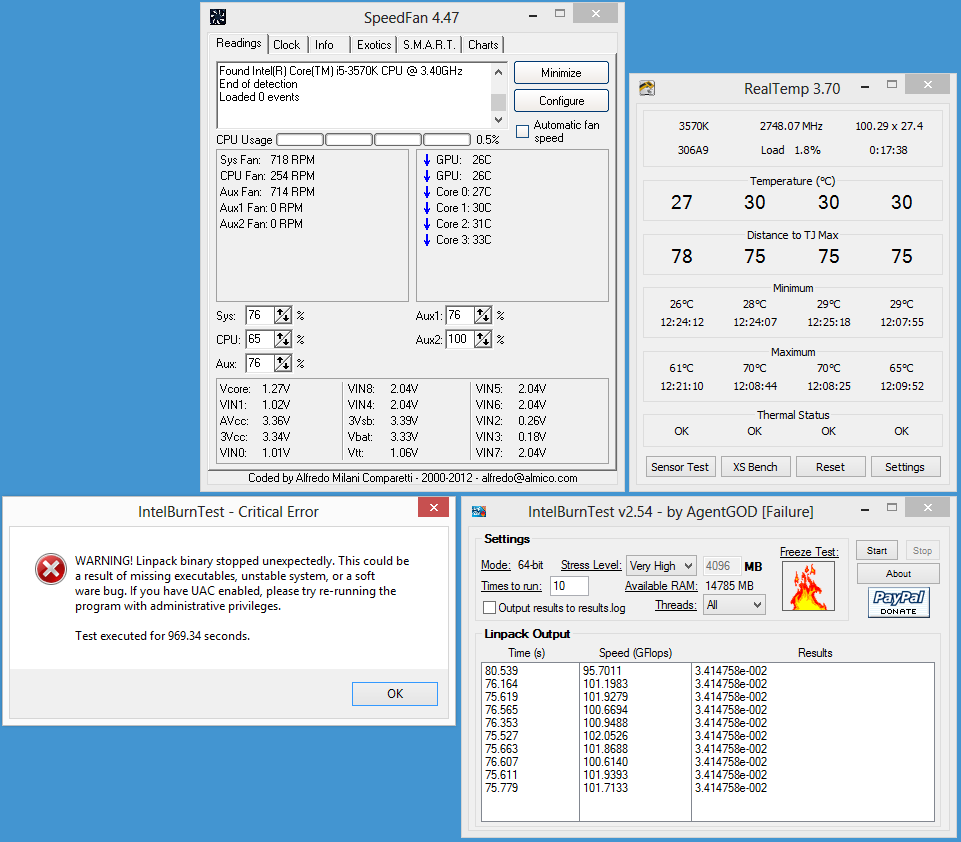
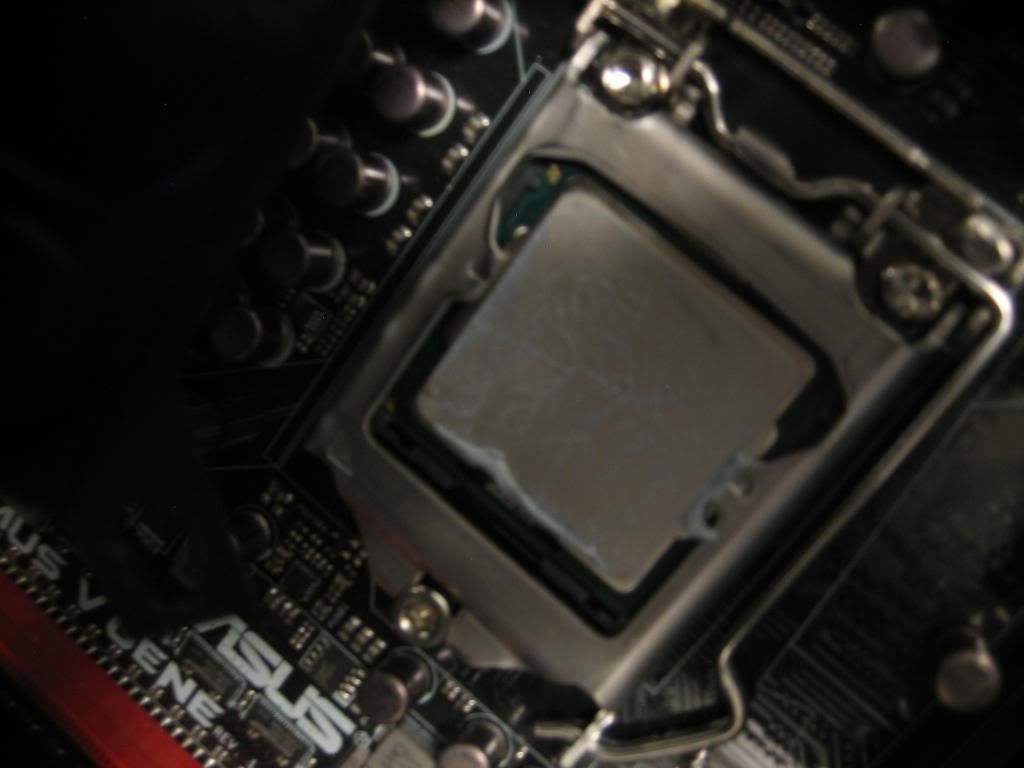
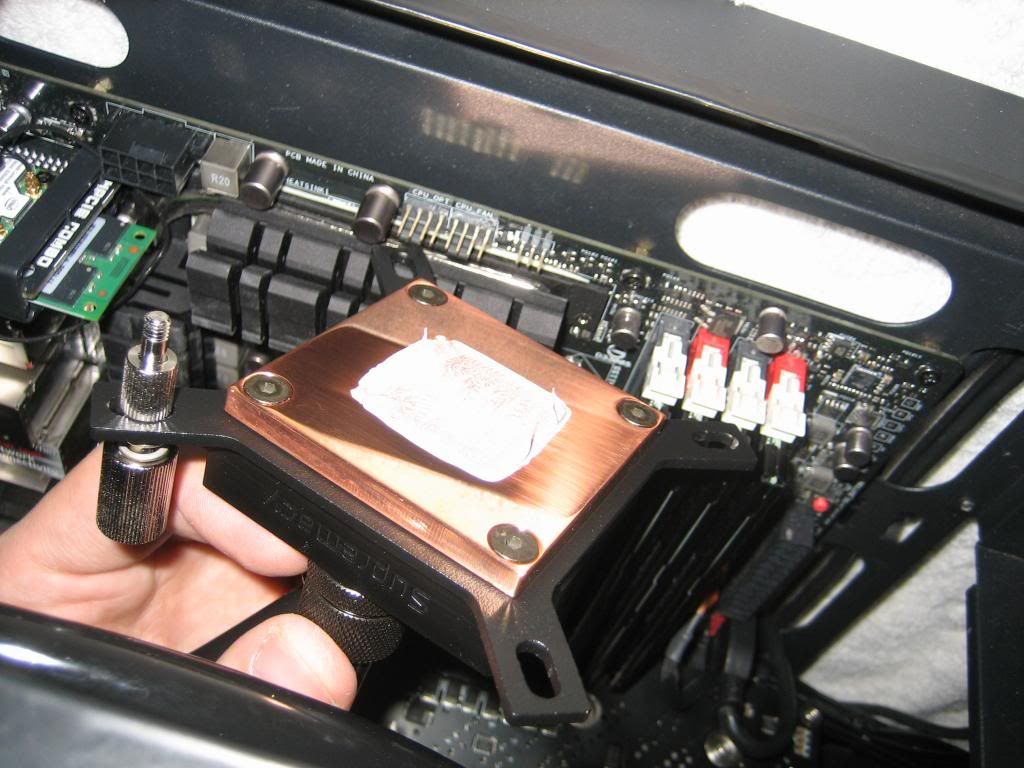
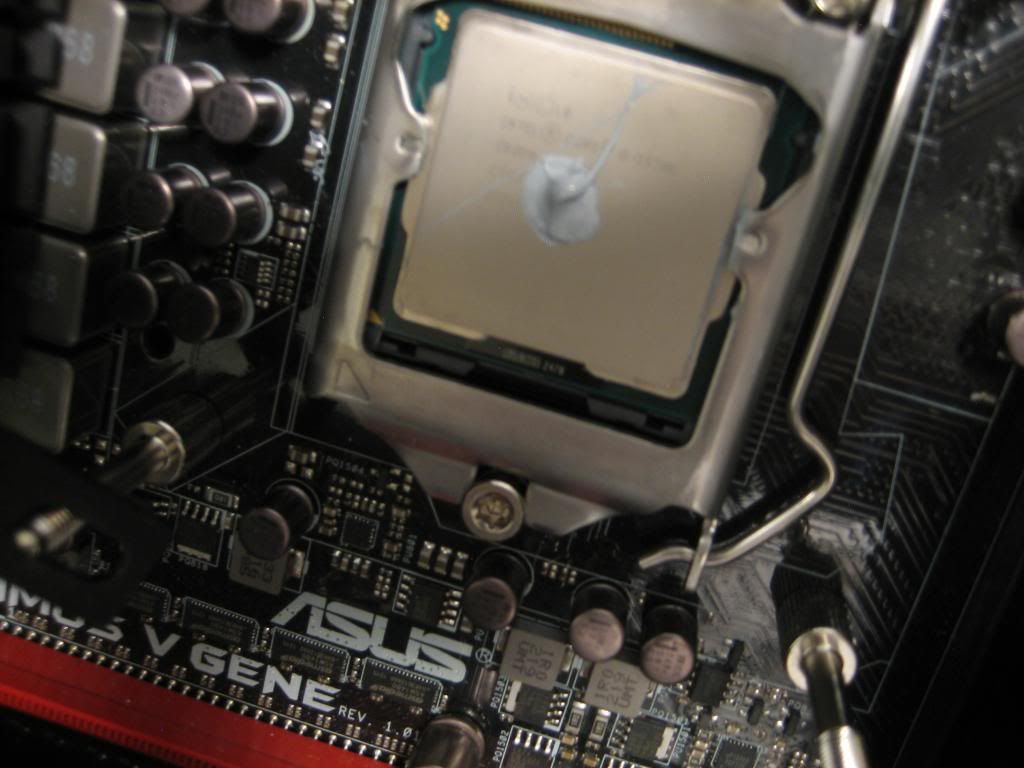
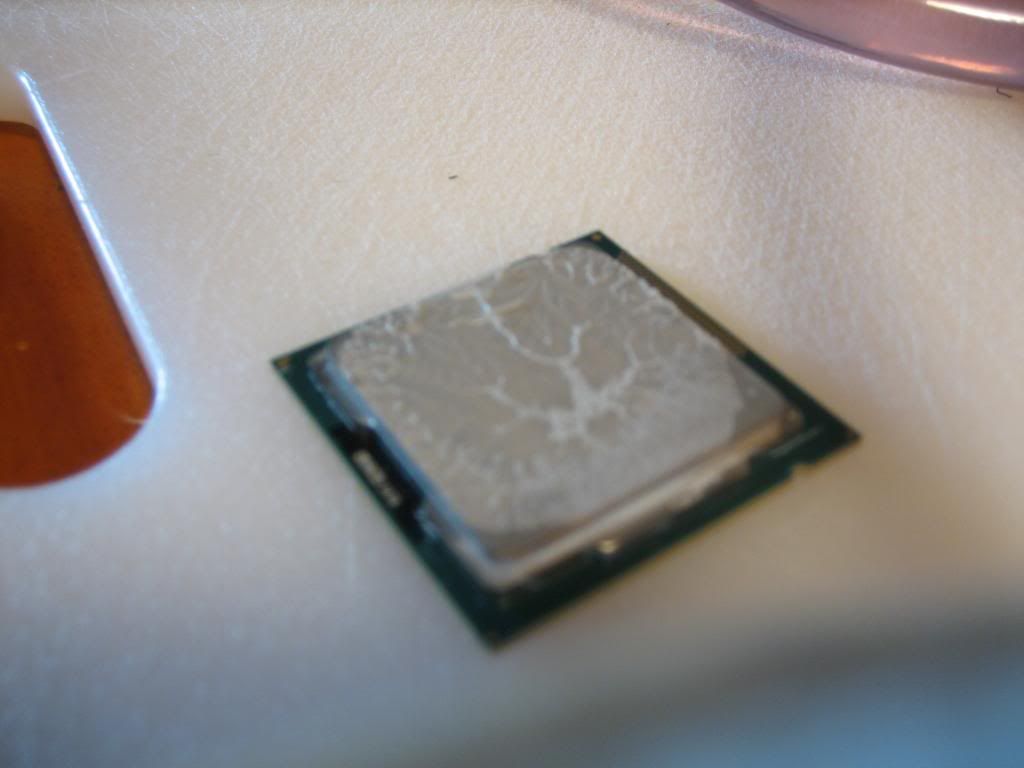
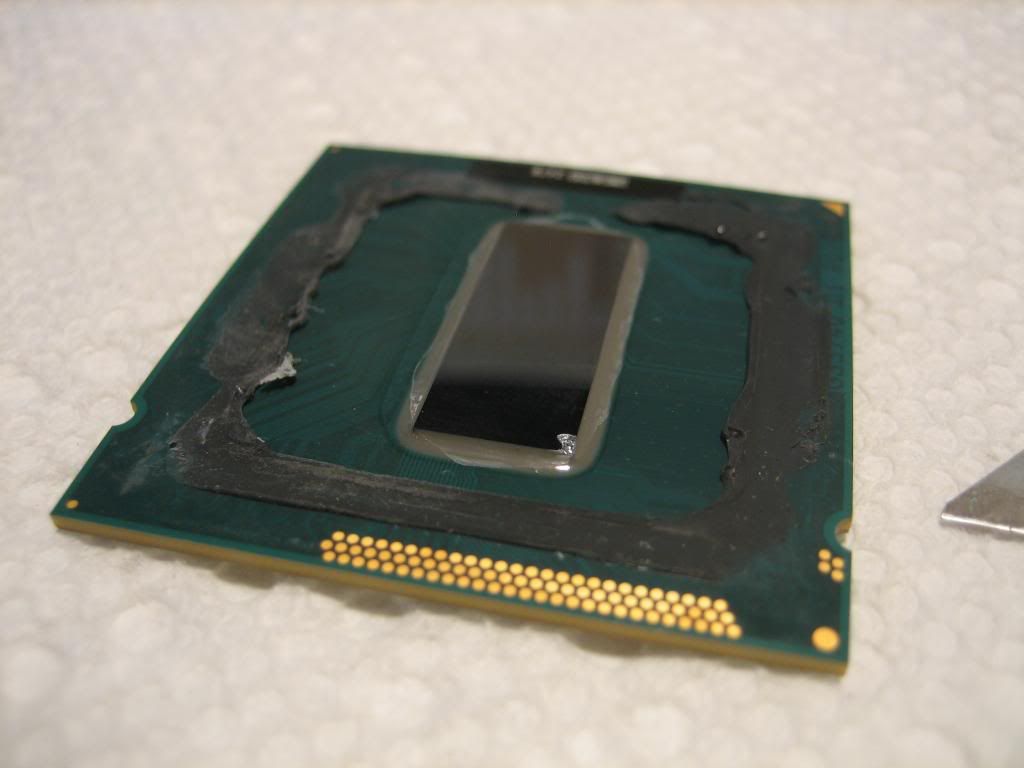
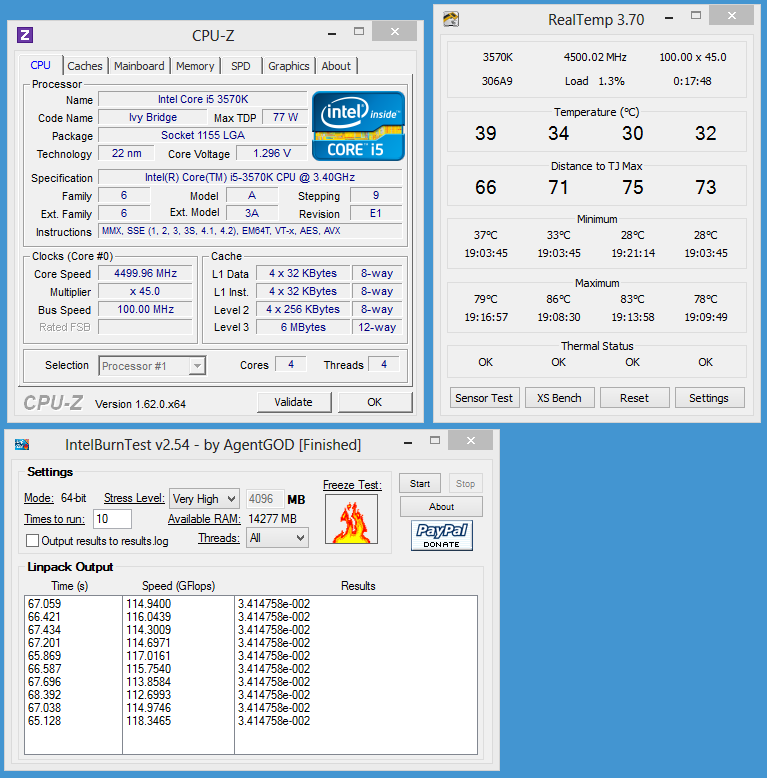
The 3570k's are notorious for their improper IHS mount and also with the change of hard solder to inadequate thermal paste for IHS to die contact heat issues are even more prevalent. I've heard lately that some of the newer 3570ks have improved although no proof or information was provided on this.

Yup, but I wasn't watching temps since I know how bad the stock cooler is. It ran Civ V at max settings without crashing, if that's anything to go by.

The stock cooler isn't bad per-se it's just not for overclocking which is 100% of the purpose someone should be buying the 3570k in the first place. At stock clock and voltage the fan would work well enough, better than 105c :D

CIV V is definitely CPU intensive but without ambient temps and cpu temps it's not going to tell us much.

If you take apart the block, there are a series of small cuts in a criss-cross pattern in the copper. I took a dremel to the middle of those cuts and made a channel for water to flow through. I'm 100% certain that I reduced the effectiveness of the block. I don't know by how much, though!

I didn't take my block apart as I didn't want to void my warranty unless necessary, I'm not sure if these blocks are solid copper, maybe someone could chime in on this? I'll look around but if you don't have any copper plating floating in your water then I'd say it's solid copper.

CPU gets to 105*C at stock clocks under IntelBurnTest only. My pump is going at about 1100RPM.

What are you using to monitor/control your pump/fans? I recommend SpeedFan to most people I speak with and I use it when needed to control fans and their speeds.

Also what motherboard are you using, I'd like to see the backplate that is on it and how it could interfere with the AD II setup.

If there is one thing most important I could tell you is, and I hope you don't take offense to it because I mean none, I would take more time planning and being patient.

From reading everything it seems as though you're wanting to speed through it to get to the fun stuff, which I can't blame you for - this stuff is a blast. However, water-cooling (as the name implies) is mating water components to electrical components which, as you've experienced, can cause a huge headache when things don't go correctly.

I can't stress enough that when you get stuck on something, (like when you thought you weren't getting pump pressure), to go and ask a community for advice before you take action - otherwise you'll end up spending a ton of cash and at the end have an expensive paperweight.

You're actively seeking advice now so you're on the right track, just felt like something I should say; again, I hope you don't take offense to what I've said because I'm just trying to help.
 
Last edited:
temps.png


On an EK Supremacy and an AquaComputer AMS 3x120 with D5 pump at 1100RPM, fans at 900RPM. Still seems rather hot to me. Note the difference between CPU and GPU temperatures. Is the new waterblock not transferring heat very well either?
 
not a fan of EK blocks myself...long story, but 11C across the die makes me want to revisit your mount, looks like you may have a loose corner
 
not a fan of EK blocks myself...long story, but 11C across the die makes me want to revisit your mount, looks like you may have a loose corner

I think I'm going to rip it all apart and build it back up from scratch. Temps are too damned hot for my tastes.
 
If revisiting the mount brings them all to 77 you are good
 
Don't compare temps between gpu and cpu, watercooling doesn't mean all the components will be the same temp, there will be large variances between components and that's fine, the issue is that processor temp at stock clock under water.

None of the cores should be hitting 90c imho running stock clocks during a stress test, not sure my 3570k hit that with stock Intel cooler lol.

I got to thinking that I had a bad chip. It failed IBT at stock temps!
fails_at_stock_speeds.png


So, I took it apart to check the mount AGAIN.
IMG_1969.jpg


Looks like it was spreading the thermal paste evenly:
IMG_1971.jpg


On the waterblock, too:
IMG_1973.jpg


So I reapplied, and tested again:
IMG_1980.jpg


Result: Failure. Again. Between the huge amount of heat produced, and the failure at stock speeds (Even at 1.325V!), I figured something was wrong with the chip. I did a bit of research, and found others that experienced similar issues dropping their temps by as much as 20*C by delidding the CPU. Apparently, replacing Intel's thermal paste with something else helps. What the heck, I'll give it a shot.

Remove the processor... Again.
IMG_1985.jpg


During my attempt to carefully and SLOWLY remove the IHS, the IHS suddenly gave in. The razor blade sliced through my index finger, and worse...
IMG_1988.jpg


Yup. My new paperweight. I haven't even bothered to try it. Worried it might somehow short out my mobo or some other component.

Bought a new one. So far, much better:
13V_45GHz.png
 
And here's how she sits, for now:
IMG_1990.jpg


Future plans:

Powdercoat the top and sides of the radiator. Everything silver should become black.
Powdercoat the drive trays. I think red would look nice.
Purchase and powdercoat (black) standoffs for the radiator, since it's external anyway.
Find a way to make those fan wires look good.
Purchase sleeving that looks like the PSU sleeving, and resleeve my SATA power cable.
Replace fan in OCZ PSU with something that's not LED. Maybe a San Ace like the Seasonics use.
Consider a custom USB3 cable. The existing one is rather long.
Find an excuse to add a second GTX690 to the system!
Remove the AC97 audio and resleeve/lengthen the HDAudio cable.
Find a way to clean up the hole in the roof, or replace the case with a non-cut one.

And the one my wife probably wants:
Call it good so I can quit spending money on it! Including gas, shipping, a ton of screws, adaptors, connectors, wires, fans, and who knows how many other things I didn't end up using, I have $5,169.07 into this build. WAY more than my original $4,000 budget! Looks like it's time to sell the MBPr and start recouping some of my losses!
 
I just finished reading your thread. Good job so far, but man you remind me of myself. I haven't bricked a CPU (yet) but you seem to be very impatient when trying to get something sorted out, I am the exact same way. I was drilling new holes in my switch 810 today and didn't really do any preparation, needless to say the holes are much larger than they could've been if i had taken my time and measured things out properly. I could go on and on with shit I've screwed up because of my tendency to rush things through
 
Back
Top