Navigation
Install the app
How to install the app on iOS
Follow along with the video below to see how to install our site as a web app on your home screen.
Note: This feature may not be available in some browsers.
More options
You are using an out of date browser. It may not display this or other websites correctly.
You should upgrade or use an alternative browser.
You should upgrade or use an alternative browser.
Completed: Project Nighthawk: Skunkworks F-117A
- Thread starter CrimsonSky
- Start date
SpangeMonkee said:are you gonna mod the joystick in any way? maybe ruffing it up or changing the shape?
That's be pretty sweet if you could make it look combat rugged.
SpangeMonkee
[H]ard|Gawd
- Joined
- Dec 18, 2001
- Messages
- 1,435
uzor said:Go back and re-read the part where it says the USAF trains on these. What is there to be improved? The only "mods" I can see being necessary for this might be mounting them appropriately into the rest of the rig. IMO, modding it just for the sake of modding it would be a disservice to this build.

you shouldn't be so quick to shoot someone down. I just wanted to know what his plans were, asshat.
SpangeMonkee said:you shouldn't be so quick to shoot someone down. I just wanted to know what his plans were, asshat.
OMGOMG!!! ANYONE WHO DISAGREES WITH YOU IS AN ASSHAT!!

It's not like he was being an ass.....just stating his opinion.
CrimsonSky
Gawd
- Joined
- Jun 14, 2003
- Messages
- 711
Here are some production pics I took last week showing the interior of the "shell" and aluminum framing. Can't resist polishing the metal so there will be a combination of painted and polished metals on the frame--even though you wont see much of it from the outside, its the small details that scream "custom"

.jpg)
The Antec Neo PSU was a perfect fit. Having a paper model of the PSU was a great help in construction.
.jpg)
The canopy and control surfaces are in the works, and once these are finished and wired up, the interior of the shell will be reinforced with resin and fiberglass, then the rig will be painted and assembled. This entire shell breaks down into smaller parts, and can be 100% disassembled if needed. When creating a complex project like this, you really need to make everything accessable--and not build yourself into a corner by creating hardware/component roadblocks that prtevent the rig from being altered or repaired easily.
.jpg)
I really like the angles of this shell. Fitting all the components inside was a challenge!~
.jpg)
The Antec Neo PSU was a perfect fit. Having a paper model of the PSU was a great help in construction.
The canopy and control surfaces are in the works, and once these are finished and wired up, the interior of the shell will be reinforced with resin and fiberglass, then the rig will be painted and assembled. This entire shell breaks down into smaller parts, and can be 100% disassembled if needed. When creating a complex project like this, you really need to make everything accessable--and not build yourself into a corner by creating hardware/component roadblocks that prtevent the rig from being altered or repaired easily.
I really like the angles of this shell. Fitting all the components inside was a challenge!~
This entire shell breaks down into smaller parts, and can be 100% disassembled if needed. When creating a complex project like this, you really need to make everything accessable--and not build yourself into a corner by creating hardware/component roadblocks that prtevent the rig from being altered or repaired easily.
Heh, I know exactly what you are talking about... I just hope I dont have to take apart and rebuild my PC too often.
By the way great mod (again) I could not see where you were going with the case design, but it is starting to make sense now.
KickAssCop
[H]F Junkie
- Joined
- Mar 19, 2003
- Messages
- 8,329
Dude you rock. That's all I have to say to you.
CrimsonSky
Gawd
- Joined
- Jun 14, 2003
- Messages
- 711
Since the canopy will be on a hinge and open up for folks to peek inside the rig, I decided to pimp it out and install a Linear actuator with a 6" stroke to open and close it. Pics to come soon

KodiakStar
/'s by 0
- Joined
- Dec 13, 2004
- Messages
- 12,730
Wow, as always.. great work
You should polish up that PSU as well... or else "stealth" black it
You should polish up that PSU as well... or else "stealth" black it
- Fold [H]ard -  - Or go [H]ome -
- Or go [H]ome - Copenhagen69
2[H]4U
- Joined
- Apr 25, 2005
- Messages
- 2,290
i agree....you cant just polish everything....aand then leave that dull grey on the PSU....just doesnt work out goodKodiakStar said:Wow, as always.. great work
You should polish up that PSU as well... or else "stealth" black it- Fold [H]ard -
CrimsonSky
Gawd
- Joined
- Jun 14, 2003
- Messages
- 711
This portion of the rig is the back panel. made from .0080 styrene, its very intricate in the way it fits on the case as you can see.
.jpg)
.jpg)
.jpg)
.jpg)
.jpg)
.jpg)
CrimandEvil
Dick with a heart of gold
- Joined
- Oct 22, 2003
- Messages
- 19,670
I've never been a fan of the 60mm Vantec Stealths, they've always been too loud for my ears although this is coming from usage in an HTPC so the rules are a bit different for "silent operation." The 60mm Panaflos have always been a good choice and I've seen these NMB fans at Xoxide that I'm going to have check out.
Anyways thats some really awesome work, I really going to need to start using some styrene sheets for stuff like that.
Anyways thats some really awesome work, I really going to need to start using some styrene sheets for stuff like that.
CrimsonSky
Gawd
- Joined
- Jun 14, 2003
- Messages
- 711
Not using the stealth fans at all--they are too loud--going with Panaflos. The one in the pic was just for photo op.
SpangeMonkee
[H]ard|Gawd
- Joined
- Dec 18, 2001
- Messages
- 1,435
CrimsonSky said:This portion of the rig is the back panel. made from .0080 styrene, its very intricate in the way it fits on the case as you can see.
[.IMG]http://www.thebestcasescenario.com/projects/nighthawk/stealth_back_pane-(10).jpg[/IMG]
[.IMG]http://www.thebestcasescenario.com/projects/nighthawk/stealth_back_pane-(11).jpg[/IMG]
[.IMG]http://www.thebestcasescenario.com/projects/nighthawk/stealth_back_pane-(4).jpg[/IMG]
[.IMG]http://www.thebestcasescenario.com/projects/nighthawk/stealth_back_pane-(26).jpg[/IMG]
[.IMG]http://www.thebestcasescenario.com/projects/nighthawk/stealth_back_pane-(21).jpg[/IMG]
[.IMG]http://www.thebestcasescenario.com/projects/nighthawk/stealth_back_pane-(33).jpg[/IMG]
nice. what did you use to adhere the pieces to each other and how did you treat it after that. it looks pretty seamless.
CrimsonSky
Gawd
- Joined
- Jun 14, 2003
- Messages
- 711
CrimandEvil said:I
Anyways thats some really awesome work, I really going to need to start using some styrene sheets for stuff like that.
Styrene fabricating is a lot more difficult than I make it look--but def give the material a try
CrimsonSky
Gawd
- Joined
- Jun 14, 2003
- Messages
- 711
SpangeMonkee said:nice. what did you use to adhere the pieces to each other and how did you treat it after that. it looks pretty seamless.
cyanoacrylate adhesive, hand files and some sand paper. Lots of practice
Bones117 said:Wow looking great! CA does a number on the hands! I used to build model aircraft and getting that stuff off sucks!! Keep up the great work!
Yeah. That CA Zap-A-Gap stuff is basically super glue. When I was building model planes I got into the habit of wearing latex gloves when using that stuff.
1337m0dd3r
[H]ard|Gawd
- Joined
- Jun 26, 2002
- Messages
- 1,553
looking great
CrimsonSky said:Styrene fabricating is a lot more difficult than I make it look--but def give the material a try
Yeah, I did the Styrene route when I was in Design School. Results can be great if you take your time, measure a LOT and keep your edges true. I found that to be the most difficult part, keeping nice 90 degree cuts. A machinist's stand-up metal square helps immensely. We used Methylene Chloride from a syringe as our solvent. CA is much easier but hell on the sinuses and fingers. Watch those Zap-a-Gap fumes guys, they'll knock yer ass on the floor.
Of course, once I started working, I discovered the much easier world of "subtractive" model making using Ciba-Geigy "Renshape" solid modeling material. A lot easier, especially if there's to be nothing inside your form. You just mill,saw,sand,prime and paint it. Awesome (but expensive) stuff. Sheet styrene is an "additive" modeling method, but the best way to go for hollow forms.
Your work on this... scratchbuilt PC (you haven't really modded it) is just amazing. Attention to detail and planning are really paying dividends. Cannot wait to see the final.
BTW, are you going to put a diamond-dimpled surface on the final exterior? Was wondering how you'd do it if you do. A store near where I live sells Diamond patterned black rubber sheeting.
CrimsonSky
Gawd
- Joined
- Jun 14, 2003
- Messages
- 711
knaSen said:any updates on this cool project?
Nope--I'll post some pics of the finished piece when I get back from delivering it to the customer next week
CrimsonSky said:Nope--I'll post some pics of the finished piece when I get back from delivering it to the customer next week
Cool cool! I wish I had skills like this...
Or the workplace for it...CrimsonSky
Gawd
- Joined
- Jun 14, 2003
- Messages
- 711
Ok here's some pics I took before final construction and painting:

.jpg)
.jpg)
.jpg)
.jpg)
Looks cool, but I still don't understand what the #!$(&* is it supposed to be. Doesn't resemble the shape an F-117, really... other than some similarities, but you have a V-stabilizer on top of the cockpit for some strange reason. Perhaps, you could draw a quick sketch of what the finished product is supposed to look like?
CrimsonSky
Gawd
- Joined
- Jun 14, 2003
- Messages
- 711
iddqd said:Looks cool, but I still don't understand what the #!$(&* is it supposed to be. Doesn't resemble the shape an F-117, really... other than some similarities, but you have a V-stabilizer on top of the cockpit for some strange reason. Perhaps, you could draw a quick sketch of what the finished product is supposed to look like?
It's not supposed to look like (or be exactly shaped like) an F117A at all--its just the shape of the machine (and some elements, .ike the stabilizer) inspired me when designing this gaming computer. Free your mind! And no sketches--sorry.
CrimandEvil
Dick with a heart of gold
- Joined
- Oct 22, 2003
- Messages
- 19,670
That is so cool.
CrimsonSky
Gawd
- Joined
- Jun 14, 2003
- Messages
- 711
EnderXC said:It would be pimp if you could get the HUD to display data like CPU temp, fequecy, etc.
would be, but its not happening
--that would be kinda pricey to produce from scratch, or to purchase for that matter. Just below the HUD-like structure is a Crystal Fontz 635 display Hinokagutsuchi
Limp Gawd
- Joined
- Jul 8, 2003
- Messages
- 371
Bones117 said:are you going to like etch anything into the hud plexi to make it look like it says something? btw its looking amazing as always!
Maybe etch a generic sort of crosshair/tracking thing into it? I dunno what it's actually called, but they show 'em in movies all the time.

Something like that.
TSS Modder
2[H]4U
- Joined
- Jun 29, 2004
- Messages
- 2,316
^^^ excellent idea. just scratch the details into the acrylic. that should illuminate and make it look like a HUD.
CrimsonSky
Gawd
- Joined
- Jun 14, 2003
- Messages
- 711
There's actually a hi-res decal that goes in between the two plates of plexi
TSS Modder
2[H]4U
- Joined
- Jun 29, 2004
- Messages
- 2,316
well then hurry it up and get us pics!!!CrimsonSky said:There's actually a hi-res decal that goes in between the two plates of plexi
|oR|Spetsnaz
2[H]4U
- Joined
- Jul 20, 2004
- Messages
- 2,797
I really like the idea of etching a faux hud into the plexi glass. That would be hella trick.
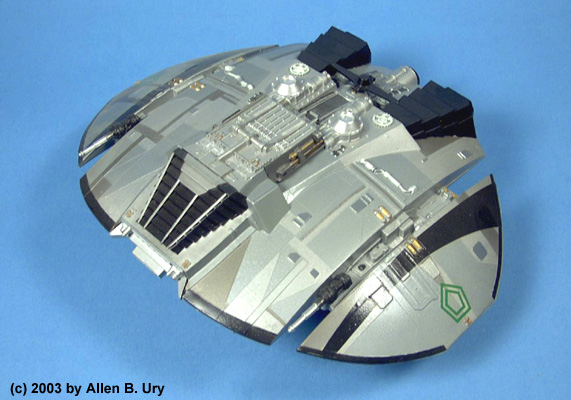
Gibbage said:I agree. ITs looking hella cool, but I dont see F-117. I see Cylon raider from the old Battlestar Galactica.
LOL!!!!!!!!!! agree
CrimsonSky
Gawd
- Joined
- Jun 14, 2003
- Messages
- 711
Yeah becaus its SO disk shaped
Anyway its completed and delivered!...There are a few details that were not completed in time for the Paris Airshow, like the laser etching for the HUD and some insignia....I'll get to this when its in my hands again for a LAN event soon. The owners of Cableorganizer.com were thrilled with the project and are having fun playing with it. They are some awesome folks at that company, a real role model for the small to medium sized business, and I can't wait to work with them again. Anyway I just got in the door but here is a first pic. I'll put more up later. Thanks to all for following along with the project!

Anyway its completed and delivered!...There are a few details that were not completed in time for the Paris Airshow, like the laser etching for the HUD and some insignia....I'll get to this when its in my hands again for a LAN event soon. The owners of Cableorganizer.com were thrilled with the project and are having fun playing with it. They are some awesome folks at that company, a real role model for the small to medium sized business, and I can't wait to work with them again. Anyway I just got in the door but here is a first pic. I'll put more up later. Thanks to all for following along with the project!