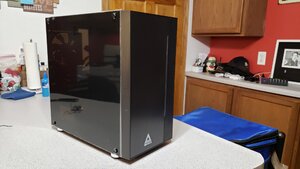
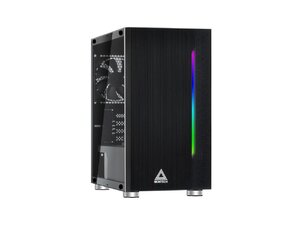
Bought myself a Montech Flyer!! Edit: Review Inside

jimthebob

Gawd
Joined
Mar 23, 2013
Messages
889
In looking for a no bigger than MATX case for as cheap cheap cheap as possible (while not looking like it's a wart or from 2001), this is what I settled on. This case is to simply house the hardware from a pfsense build I did that is currently running on my desk next to me. However, I've never heard of Montech and this case has zero reviews sooooo is this a new case on the market? Your guess is as good as mine. A quick google search doesn't reveal much if anything so I figured I'd post here to see if anyone is interested in my thoughts and opinions once I get the case and get my build done in it.

It's looks, from the pics, are decent and hey, it includes RGB which will add at LEAST 100mbps to my internet connection speed! The insides seem clean looking, it's all black, airflow seems like it'll be good for what it is (a total of 7 120mm fan mounts), and again, it's cheap; I nabbed it for $39.99 on sale. Seeing as how this whole build came around by "accident", I wasn't really planning on building a pfsense router even though I've been wanting to, I am trying to keep it as cheap as possible.

So far with this build, counting this case, I've got a grand total of $125 invested. That includes the MITX motherboard, 8gb of DDR3 memory, a Xeon E3-1225 CPU, dual GbE Intel NIC, and the case. I'm also recycling some parts I had lying around including a 120gb Kingston SSD and a very dated but still solid PC Power & Cooling Silencer 470. It's an overpowered pfsense setup for my household but hey, this is [H], right?!

Anywho, if anyone is interested in seeing how this build turns out, comment and let me know. If there's some interest, I'll post pics and my initial impressions once the case arrives next week.

Edit: Case review can be found in this post:

https://hardforum.com/threads/bought-myself-a-montech-flyer.1987471/#post-1044364592
AK91_132110180048675827aqu3fANgnz.jpg AK91_1321436969748309963GkEfMmk35.jpg AK91_132143696970246850usFJWjh1cX.jpg
 
Last edited:
Is this a house brand case?

I honestly couldn't tell you. I didn't do more research into the brand then finding there website and checking out the case specs there. If I had to guess, since it has it's own website, I'd venture a guess that it's not a house brand but I could be wrong.
 
We ALWAYS like pics.

Post them up!!

Scheduled delivery is Thursday but between the normal 9-5 job and harvest being in full swing in my area, it may be a few days after but you can rest assured I'll be getting some pics and thoughts up.

P.S. Don't be expecting too much out of the hardware that's going in it. This is a pfsense build for a relatively simple home so no high end stuff. That being said, I am a stickler for wiring and overall build quality so hopefully I'll have some interesting stuff to report.
 
Seems there's two reviews now but one I wouldn't count, he complained that the mid-tower he bought was a mid tower and would only fit MATX or smaller...like it says in the description. Reading comprehension, people!

In fairness to the first review, they must have updated the listing because it said "ATX" the other day. Granted the buyer should have double checked, but on a quick glance I can see making the mistake.

It does look like a nice case if you're building mATX though. For the price, you can take a flyer on it.

Hmm I wonder if there were multiple listings, the review were talking about shows it was posted 10/8/19 and when I bought the case on 10/11/19 there were zero reviews listed on newegg for it (unless there's a delay between writing a review and it being approved to be posted on a product). I want to say I'm 99% sure the listing, at least when I bought, specified MATX or smaller compatibility. Either way, if u didn't look close at the pics of the case, I could see it being a mistake I guess.

In either case (no pun intended), a combination of price and lack of choice in my price range finally led me to look at small mid-towers and for the price, I couldn't not give it a shot.

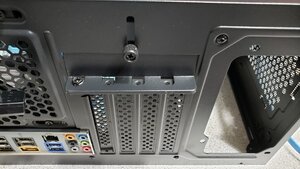
I'm mostly curious to see how the fit and finish of it is; are the steel edges sharp or rolled? Is the airflow really choked off? Is the machining quality solid or are the panels and components poorly fitted? Are the pci covers breakaway or held in with screws? Speaking of screws, are the side panels held on with regular or thumb screws? Hell, is there going to be a protective plastic on the clear (not glass) side panel for that matter? I'm getting excited to check it out.

Nice looking case! Nice find! Based on zooming in on the pics it does indeed look like the PCI covers have screws. I could be wrong, but that's what it looks like. IMHO. Good Luck with the build.
 
Only 2x 3.5 drive bays :(

IT looked really nice but it really needs to have more drives for me
 
Only 2x 3.5 drive bays :(

IT looked really nice but it really needs to have more drives for me

I could see that being a problem for some, especially if you're trying to build a compact storage or Plex server. However, in my case I'm just going to have one SSD in there as a boot drive and that will probably be it for it's life. I have a separate Plex/Storage server for the other duties (y)
 
Only 2x 3.5 drive bays :(

IT looked really nice but it really needs to have more drives for me

2 x 3.5 and 2 x 2.5 (on the back side) is pretty standard for a small MicroATX case. No real surprises there.
 
Well here we go, I finally got the case and had a chance to get my build setup in it. I'll try to get through my thoughts and impressions on the case as quick as I can but I have a decent amount that I want to cover so let's get started.

Packaging

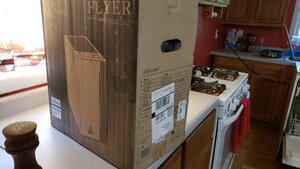
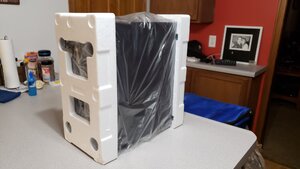
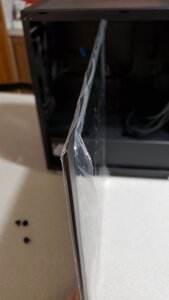
The case box came pretty unscathed despite having traveled from California to Northern Illinois via UPS. Once opened, the case had pretty basic packaging including some stiff foam at either end of the case along with a clear protective bag over the case itself. It got here in one piece with no damage so that's a good start.

20191017_164157.jpg 20191017_164705.jpg

Initial Impressions

Once unboxed, I got a look at what I had to work with. Initial aesthetic impressions were good: clean lines, no dings or scratches, and the acrylic side panel (don't expect to get a tempered glass side panel with a case at this price point) even had protective plastic on each side. Who doesn't enjoy some good peel porn!

TL:DR: Decent packaging, protective plastic where it should be.

20191017_164806.jpg20191017_165019.jpg

Included Accessories

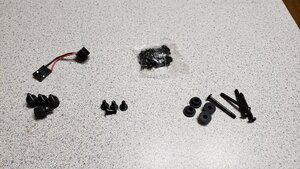
This is where things start to get a little bit interesting. As you can see, you get a decent assortment of case screws but as I would find out once I started building, the choices they made as to what screws to include were a bit...confusing. For starters, you get a PC speaker. Umm, ok? I had always thought that was a motherboard accessory and not a case accessory but hey, I will never turn down extra parts. You also get a few extra motherboard standoffs to compliment the ones they have pre-installed in the case itself. FYI the ones that are pre-installed cover your basic ITX/MATX motherboards. You also get four additional thumbscrews (that I didn't end up using) as well as an ok selection of screws to mount your SSD's and HD's. This where it gets confusing, though; they didn't include enough of either type of screw to fully populate all of your SSD & HD bays in the PC. You also get four coarse thread screws with a non-threaded section and four rubber grommets that I can only assume are to install your HD and try to keep noise down. Again, this case can hold 2 HD's and they give you enough screws and isolaters to mount one drive. And finally, you get four long screws that are for...a 120mm radiator? Because, as we'll later discover, they aren't for mounting a fan.

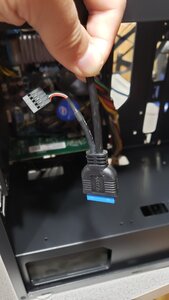
On the plus side, the included USB 3.0 header has an additional USB 2.0 adapter coming out of it so in the event the motherboard you are using doesn't have USB 3.0, you can still use the port as an additional USB 2.0 port. I consider that a nice option to have.

Two 120mm case fans are included which is a nice addition, especially at this price point. They are relatively quite and move a decent amount of air but they connect with MOLEX which should be illegal in today's day and age. Still, I'll take em as they are nice to have included.

TL:DR: Decent, if not a bit confusing, selection of included accessories. There's enough to get any build started but if you pack the case, you may need to hunt for a few additional screws to finish things up. USB 3.0/USB 2.0 header a nice option to have. Two included 120mm case fans.

20191017_164902.jpg20191017_172253.jpg

Interior/Fitment

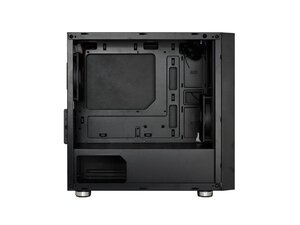
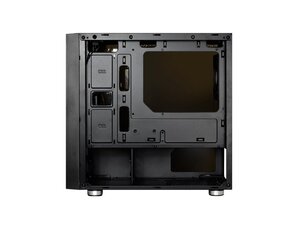
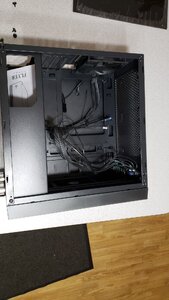
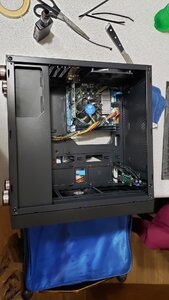
Again, a few head scratchers here and the interior is where I found what I consider the biggest flaw of the case. To start (forgive my flipped pics, I don't have access to the originals to rotate where I'm writing this "review" at), the case interior is overall a nice, clean layout. It's all black, all the metal edges are rolled so I didn't find any area where I came back with a bloody knuckle, and there's a good amount of places on the back-side to do cable management along with several tie-down points. We're off to a good start here, right? Weeellllll....

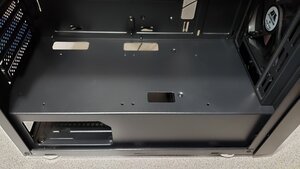
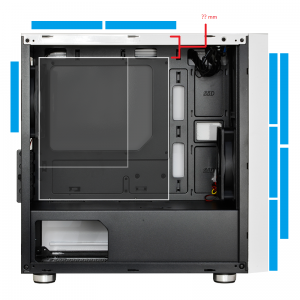
This is where my biggest gripe of this whole thing comes in. In the adverts for the case, they show you can install two 120mm fans on the inside of the case on top of the power supply basement. This appealed to me as in my case, I have an Intel dual GbE NIC that runs a bit warm so I was going to put a low speed fan on top of the PSU basement to help keep it cool. Well, if you look at the pics, you CAN technically install two fans on the PSU basement but there's two teeny tiny little problems with that: there is no cutout for any airflow for these fans so you might as well install them flat on your desk. Second, they give you zero screws to install fans here even if you wanted to. That's a big mark against this case in my book. This is an obvious oversight so big that I don't understand how it could have happened.

20191017_165032.jpg20191017_165452.jpg

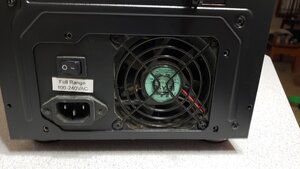
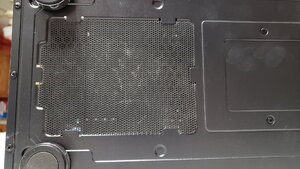
Moving on from that, let's continue looking at the PSU/PSU shroud area. If you look at the back of the case, you can see that your PSU will only be able to install one way (not that you'd want your PSU drawing air in from inside the case with little to no ventilation). Then if we lay the case down to see the dust filter on the bottom, we can see that yes, there is a filter. But in what I can only assume is a cost saving measure, the filter isn't very easily accessible. You won't be sliding this filter out the back of the case for cleaning. The filter is held in by 6 metal tabs so you must bend the filter to remove or install it. The filter material seems to be a flexible plastic so it's not the worst job in the world...once you put your case on its side to get to it.

20191017_171214.jpg20191017_165857.jpg

This brings us to the PCI slot covers. They are removable, which is a plus (I can't stand one time use covers you have to snap off). However, the system they use for retention is a bit...different. In order to install a card, you must loosen the thumb screw, slide the cover up, install the card, slide the cover down, tighten the thumb screw, then install a screw to the case to actually hold the card in place. To uninstall a card, do the reverse: remove the screw that holds it to the case, loosen thumb screw, lift the cover, remove the card, install a slot cover, lower the cover, tighten thumb screw, and finally install a screw to hold the cover in place. Not deal breaking in my book considering how often most people change out cards but not my ideal retention solution, either.

Also, since I don't know where else to put it, some of the screws such as the thumb screws on the side panel and the PCI cover screw, have some rough threads the first couple times you turn a screw in them but seem to smooth out as you use them. Just thought it worth mentioning.

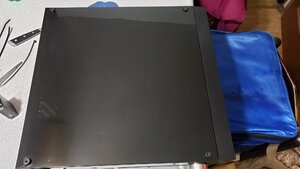
And finally, the acrylic side panel installation: four thumb screws, one in each corner, hold the panel on. Nice, right? Not so much. When you remove the four screws, the panel comes off but when you go to put it back on, since it's not perfectly square you have to make sure it's facing the right direction because there's no clips or guides of any kind to hold it in place while you screw it on. So, you have to hold the panel the right way and line up the first screw. Get that started then move to the opposite corner and get that screw lined up and started. The next two go easier but it's a kludgy solution for a side panel mount. For how often I remove the side panel it's not a huge deal but still very annoying and worth mentioning.

20191017_170235.jpg

TL:DR: Case interior is black, has clean edges, and good cable routing/tie down options. However, while you can install two 120mm fans internally, they won't do jack squat as there's no holes for them to breath. (n):facepalm::banghead: PSU can only go in one direction and PSU dust filter is a PIA to get to but it's nice that it's there. Some of the screw threads are a bit rough at first but seem to "work themselves in" and smooth out after the first couple screws. Side panel installation sucks.

Building In It

Now that all that's out of the way, let's get some hardware in this thing! Today, I'm building this box to be my pfSense router. So, for this build I am using the following parts:

Gigabyte GA-H67N-USB3-B3 motherboard
Intel Xeon E3-1225 CPU
8gb Corsair DDR3
Intel Dual GbE NIC
120gb Kingston SSD
PC Power & Cooling Silencer 470 (don't hate, it still works great)

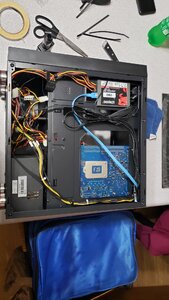
Using the pre-installed standoffs, the motherboard went in without issue. PSU installation was easy as there was ample room to slide it in, and the SSD went in just fine although I did notice one thing: they have a cutout in the case between the SSD mounts for...reasons. I didn't care for this cutout as it allowed the cables for my SSD to be seen from the other side of the case. Again, not a huge deal but still...why?

Overall, the build went very smooth and didn't cause me any headaches aside from, again, the stupid 120mm fan mounts inside the case you can't really use.

Also of note: please ignore the UGLY 24pin PSU connection blasting it's way through the center of the case like a fat kid at a buffet. The PSU is obviously older and doesn't have as long of a 24 pin connector as more modern PSU's so this was the only way I could make it fit. It bugs my OCD, too, don't you worry.

I also feel this case would look a bit better with a MATX board in it to help fill it out but as it sits with my ITX board in it, it feels a bit empty. I don't consider this a strike against the case as an ITX board will make any case larger than an ITX case look empty.

Before I forget, one thing that bugged me is the fans as well as the front LED strip all use the aged and should be gone MOLEX connector. Most PSU's will still accommodate this but that also means extra cable clutter with either SATA to MOLEX adapters, having to plug in another cable to modular PSU's, etc. These should all be SATA power connectors.

TL:DR: Easy to build in, good cable routing, good spacing between the motherboard tray and back side panel to allow cables to be routed without bulging the side panel. One downside is the fans & LED lighting use MOLEX connectors. :banghead:

20191017_174230.jpg20191017_174218.jpg

Final Thoughts

Overall, this is a fine choice for a case if you're looking to spend as little as possible on a case but still have it be decent to good looking (subjective, I know) with some more modern/refined features like black interior, bloody knuckle free build construction, cable routing options, cable tie down points, acrylic side panel, etc.

However, this case doesn't come without it's headaches as any $30 case would. I won't rehash what I've already mentioned about the 1st grade mistake of advertising two internal 120mm fans on the PSU shroud but somehow omitting screws to install the fans as well as ventilation holes for the fans. No, I won't beat the dead horse with the overly complicated PCI card installation nor will I rag on it any more for not allowing you to flip your PSU in either orientation which could be done by simply drilling a few more holes at manufacturing. And I certainly won't go over the annoying to get to PSU dust filter.

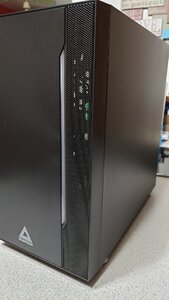
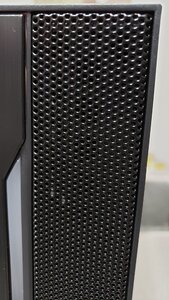
Instead, what I will do is point a few more shortcomings and a few more nice points. First, the case seems to not be very restrictive on air intake on the front. This is something I had in mind when I bought it. Taking up shy of 1/4 (maybe closer to 1/8) of the front is ventilation for the front fans (so they DO know what fan ventilation is, after all). The front fans have no removable dust filter which, while it would be nice, I don't feel is totally necessary in this case. As you can see in the pic, the ventilation holes are sized such that they allow acceptable airflow while also acting as a crude dust filter. Based off my experience with cases, this will eventually get built up with dust requiring cleaning but that means that it is at least doing some filtering.

One other thing I didn't notice until I had the build done, peeled the plastic off the acrylic side panel, and powered on the system was that the side panel wasn't just tinted, it was damn near black. You cannot see into the case with this side panel. If you had some LED lighting on the inside, you would be able to make it out but only at the brighter spots. This isn't a case you will be able to easily do mood lighting in.

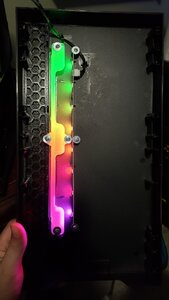
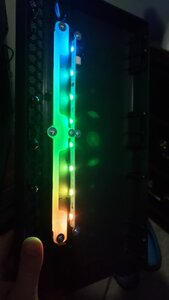
Also of note is the front LED strip. This is actually well done, I feel. No, it doesn't have one MILLION options for what the lights do but you do get a good selection of basic functions from solid color to rain effect to color changing and quite a bit more. The light is well diffused so there's no real LED hotspots to speak of and it's not overly bright which means it's not overly distracting. I feel they got this just about right.

20191017_165239.jpg 20191017_165247.jpg20191017_174528.jpg 20191017_174614.jpg

Conclusion

So that's about it; this case is a mixed bag of nice features with a few small rookie mistakes/cost saving features marred by one fairly large, to some, design flaw.

I feel this case would be a good first case, a good cheap option if you're doing a simple build like I am, or even for a light duty gaming PC as they say you can fit a 240 rad in the top (which does have a nice magnetic dust filter if you choose to use the top fans as intakes). With good cutouts for cable routing, plenty of cable tie-downs on the back side, a PSU shroud to make things look nice and clean, LED's on the front, and room for up to 5 120mm fans (not counting the PSU shroud situation) for cooling to give good airflow, this case has several of the big boxes checked for me. While there is the obvious big flaw of two fan mounting points you can't use, not everyone, not many for that matter, use the PSU shroud as an intake/exhaust so for most this won't be a huge issue. What bugs me is when a manufacturer advertises a feature then it fails to deliver.

You also have the small nit-picks of one direction PSU mounting, awkward PCI card installation, inconvenient PSU dust filter access, odd cutout location between SSD mounts revealing hidden cabling, cludgy side panel installation, and an included screw selection that can fall a bit short. These nitpicks won't all matter to everyone but they are something to keep in mind. Overall, I don't regret my purchase and look forward to seeing what systems make their way into this case over the years. Thanks for checking in, guys!
 
NIce writeup.

The oddities you mentioned (random screws, the PCI slot cover bracket lock, shitty filter or no filters, shitty molex fans) are all commonplace in bargain cases. I'm glad you didn't encounter any razor sharp edges, usually another trademark of cheap cases.

For this reason I don't buy bargain cases any more. I used to build quite often to sell systems as a side biz, and sometimes to help the bottom line it meant buying whatever cheap case was on sale that week. The phrase "you get what you pay for" is never more evident than with cases and power supplies. Many times I got stuck building with decent looking externally but cheap and crappy inside.

Anyway hopefully it works out for you in the log run and you don't have to be in and out of that case more than necessary.

Cheers!

PS - oh those longish screws you didn't think were for a fan, they actually are. The long screw just threaded at the end goes in the long way then screws in. based on the pic I'd say another front fan or maybe a top exhaust.
 
Last edited:
NIce writeup.

The oddities you mentioned (random screws, the PCI slot cover bracket lock, shitty filter or no filters, shitty molex fans) are all commonplace in bargain cases. I'm glad you didn't encounter any razor sharp edges, usually another trademark of cheap cases.

For this reason I don't buy bargain cases any more. I used to build quite often to sell systems as a side biz, and sometimes to help the bottom line it meant buying whatever cheap case was on sale that week. The phrase "you get what you pay for" is never more evident than with cases and power supplies. Many times I got stuck building with decent looking externally but cheap and crappy inside.

Anyway hopefully it works out for you in the log run and you don't have to be in and out of that case more than necessary.

Cheers!

PS - oh those longish screws you didn't think were for a fan, they actually are. The long screw just threaded at the end goes in the long way then screws in. based on the pic I'd say another front fan or maybe a top exhaust.

Thanks for the feedback, I'm glad you took the time to go through my ramblings! :D

In regards to the bargain cases getting what you paid for, I guess you could look at it two ways; you could either look at it and go sure, it's doesn't support custom water cooling, or come with every option possible, etc. Or, the way I look at it, you get a hell of a lot more for your money now than you used to. Used to be bargain cases were all knuckle bustin, plain steel on the inside, no radiator supporting POS's. You at least get more for your money now than you used to. That being said, my main rig will never (hopefully) be in a bargain case. I like my nice spoil me features too much.

Also, with the long screws: I still don't think they are for fans for the simple reason that I tried (believe me, I tried :D) to thread them into the fan mounts on the bottom of the case and they were a no go. Actually, let me rephrase that: I don't think they are for fans meant to be installed in the case. I will double check when I get home but I believe the front fans are mounted with standard think coarse screws you'd use for most any fan. Plus if you do slide them into a standard 25cm thick fan, they just barely and I mean just barely stick out the other side with what I don't feel is enough thread to even start threading into a hole. I may have happened to grab a fan with rubber isolaters on it to try sliding the screw through in which case that could account for not enough thread on the other side. I'll check that when I get home. Either way, I feel like they are the type of screw that should go through a fan into a radiator which is why I mentioned they may be for a 120mm rad but even if that's so, that's a very odd thing to include.
 
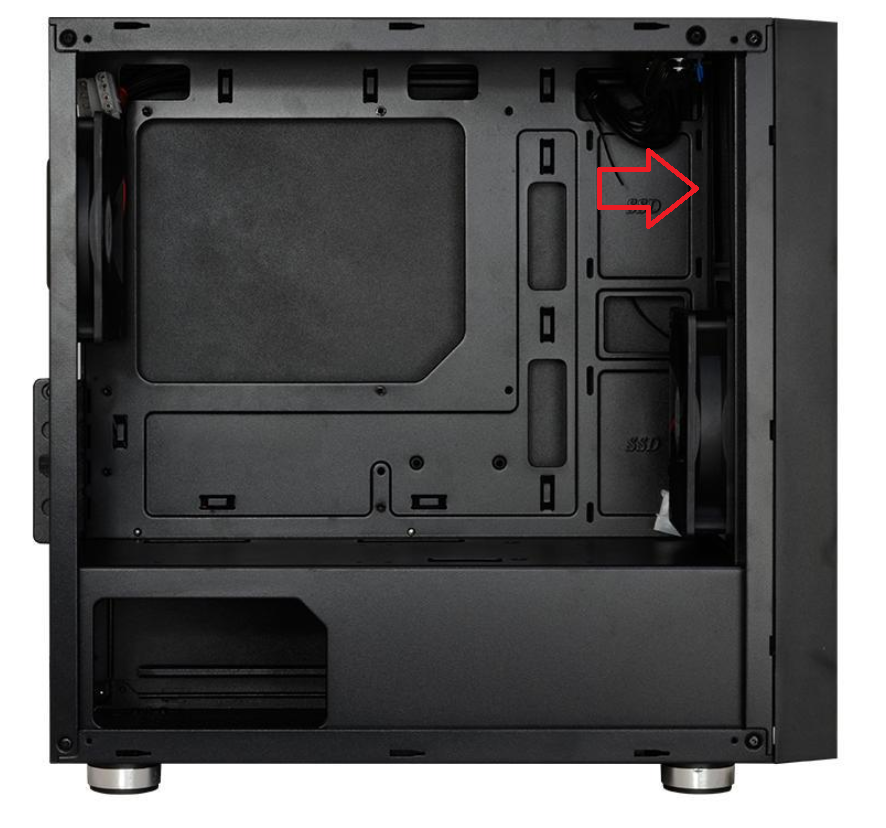
Based on the pic and the thousands of cases I've built in, #2 intake fan would probably go in the front on top of the 1st one, not on the bottom by power supply shroud. Or an inside mounted top intake/exhaust fan if the case is open vent on top (can't tell from pics but I assumed it was).

The long skinny screw goes into the fan from the outside in, which is why it just needs threading at the tip. I've seen plenty like this, and probably goes with those little rubber grommits to cut down on vibration noise.

But based on your tiny ITX mobo you likely don't need it anyway

upload_2019-10-18_16-1-19.png
 
Based on the pic and the thousands of cases I've built in, #2 intake fan would probably go in the front on top of the 1st one, not on the bottom by power supply shroud. Or an inside mounted top intake/exhaust fan if the case is open vent on top (can't tell from pics but I assumed it was).

The long skinny screw goes into the fan from the outside in, which is why it just needs threading at the tip. I've seen plenty like this, and probably goes with those little rubber grommits to cut down on vibration noise.

But based on your tiny ITX mobo you likely don't need it anyway

View attachment 193845

I'm going to post a quick updates post in a minute but suffice it to say, the screws are not for fan installation on this case. Come to find out, at least on mine, the screw holes on the PSU shroud are not even threaded :banghead::banghead:
 
Updates Post

So, as time goes on and more questions come up or as I discover things, I'll add that info to this post.

10-18-19

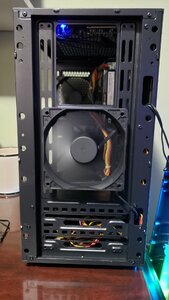
Let's start with the front panel fans and those pesky long screws. First off, the long screws are not for fan installation in the front, top, or rear of the case. Period. They are possibly for installation of a 120mm radiator by going through the fan into the radiator but as I don't have a 120mm AIO, I can't confirm. I CAN say that the long screws thread perfectly into a 240mm AIO that I have so that further proves to me that the long screws are for an AIO. Still an odd decision to invlude only 4 of them but still, that's what I believe they are for. Second, the front fan mounts will actually allow for installation of a single 140mm fan or dual 120mm fans. A nice option they should have mentioned somewhere in the advertisement. I have opted to installed a single 140mm fan in front to cut down on noise a bit (pic is of a single 120mm installed between the case and front panel as it is from the factory).

20191018_165548.jpg

Next, for those interested, I have taken a few pics of how they set up the LED strip and why the diffusion is so spot on. They have installed a solid LED strip light with 8 LED's on it facing into a diffusion plate/strip. This is a somewhat elegant way to do what they did on the cheap. The effect works, and I do like it quite a bit. The only downside is since there is a solid perpendicular strip on the front panel, it could potentially interfere with airflow. I, however, am not seeing this. I am not seeing this because I have opted to mount my 140mm fan interior to the case as opposed to between the case and case front panel. This gives more breathing room. I am not seeing any notable restriction in airflow with the front panel on vs off with the fan mounted internally vs between the case and front panel.

20191018_165856.jpg20191018_165859.jpg
 
Looks like a pretty typical case, probably the same OEM as some of the more popular ones. I'd say it looks similar to my Versa H17 but then again, a lot of cases do.
 
I'm doing a bit of thread necro here, but I have a question for you jimbob200521
I'm repurposing my old system to give to my wife and she's dead set on the white version of this case. I want to retain as many components as possible and I'm wondering if you might be able to help me measure how much clearance is available for the top of the case for a 240mm radiator + fans. I need about 51mm to fit properly. I couldn't find any review or spec sheet that provides this info at all.
Thanks!

I don't mind helping where I can but I guess I'm a bit confused; from what it sounds like you're asking, a rad and fans should fit up top but it'd be tight depending on motherboard. If you can illustrate what exactly you'd like measured, I'd be happy to do what I can to accommodate. That being said, I'd probably suggest putting a 240 rad in this case up front as opposed to up top because compatibility should be better.
 
I don't mind helping where I can but I guess I'm a bit confused; from what it sounds like you're asking, a rad and fans should fit up top but it'd be tight depending on motherboard. If you can illustrate what exactly you'd like measured, I'd be happy to do what I can to accommodate. That being said, I'd probably suggest putting a 240 rad in this case up front as opposed to up top because compatibility should be better.
Sorry I wasn't clear. I have a microATX motherboard that I would like to install on it and I was wondering how much space is there from the top of the case to the PCB of the motherboard. I wanted to repurpose a H100i with 2 Scythe Gentle Typhoon fans. I've attached a photo for reference:

Thanks!
_nc_ohc=5qLd_TaWK6QAX99bOqr&_nc_ht=scontent-sjc3-1.png
 
Sorry I wasn't clear. I have a microATX motherboard that I would like to install on it and I was wondering how much space is there from the top of the case to the PCB of the motherboard. I wanted to repurpose a H100i with 2 Scythe Gentle Typhoon fans. I've attached a photo for reference:

Thanks!
View attachment 240559

That's what I thought you wanted, just wanted to make sure. There's just over an inch, or I'd say about 28-29mm of clearance from the top of the motherboard to the case. However, the mounting is offset about 45mm to the opposite side of the motherboard so depending on your motherboard's memory placement, vrm heatsinks, etc, it MAY work. Going to be a trial kinda think...

I personally feel this case would be better for front intake with the rad the way it's set up. Even if you could get a rad and fans up top, it doesn't leave much room to work with for cable management if your, say, 24pin ATX happens to be at the top of your motherboard. Just my two cents but I'd plop that rad at the front, put an exhaust fan in back, and call it a day.
thanks! i'll definitely keep that in mind. I am used to mounting the radiator up top but tbh, I might switch it over.
 
Back
Top