Navigation
Install the app
How to install the app on iOS
Follow along with the video below to see how to install our site as a web app on your home screen.
Note: This feature may not be available in some browsers.
More options
You are using an out of date browser. It may not display this or other websites correctly.
You should upgrade or use an alternative browser.
You should upgrade or use an alternative browser.
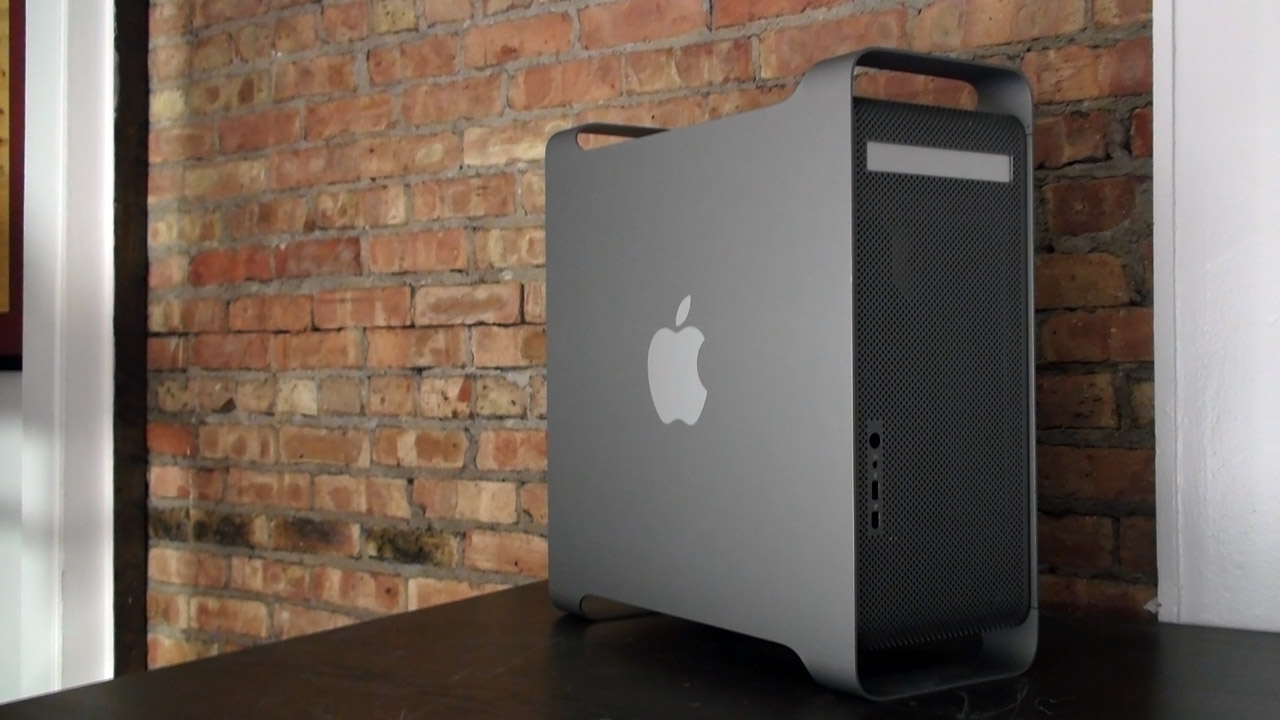
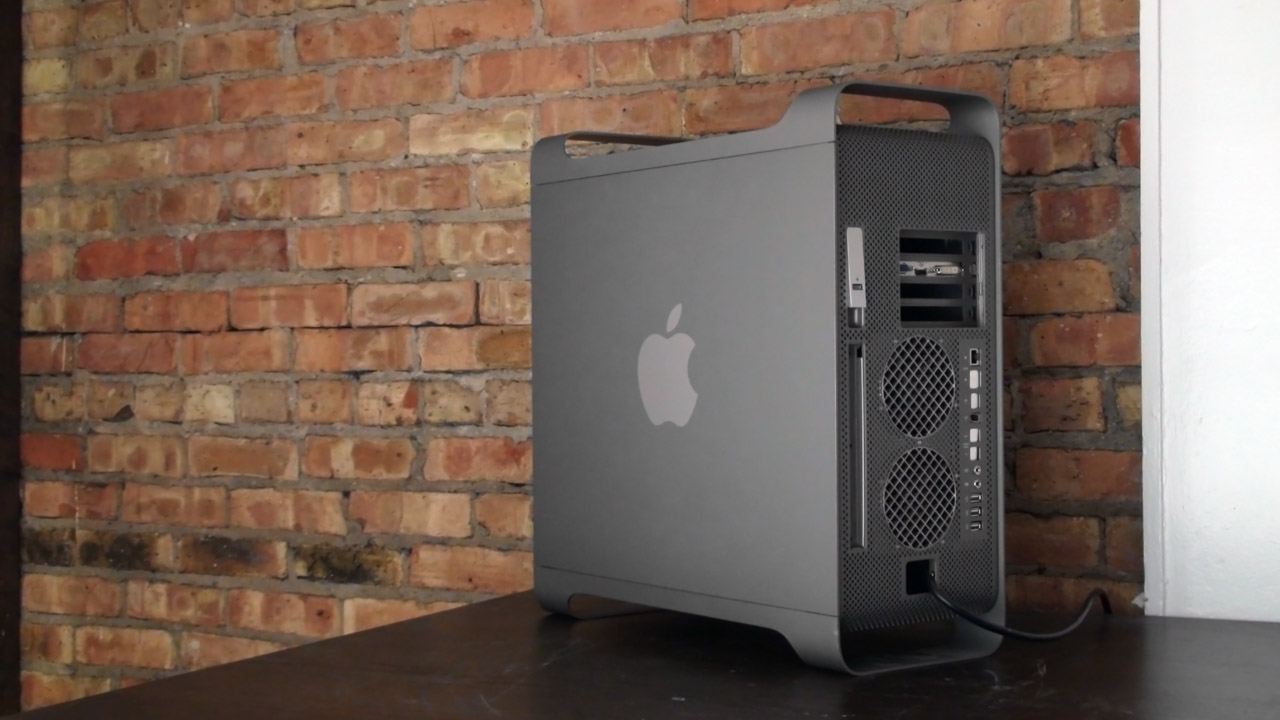
Apple G5 modded with a twist
- Thread starter toddfx
- Start date
darkboricua921
n00b
- Joined
- Apr 13, 2010
- Messages
- 9
This thread is awesome. G5 retrofits are always nice to see.
Colonel_Panic
Limp Gawd
- Joined
- Oct 5, 2009
- Messages
- 328
Just found the thread, and it is bad ass. Great work!
I say keep the Apple logo with the dark anodizing. That way if anyone sees the rig and knows the G5 platform, they'll know something's up. And at that point you explain all the bad-ass-ness you've done to it.
I say keep the Apple logo with the dark anodizing. That way if anyone sees the rig and knows the G5 platform, they'll know something's up. And at that point you explain all the bad-ass-ness you've done to it.
GREAT NEWS! Finally made some massive leaps...
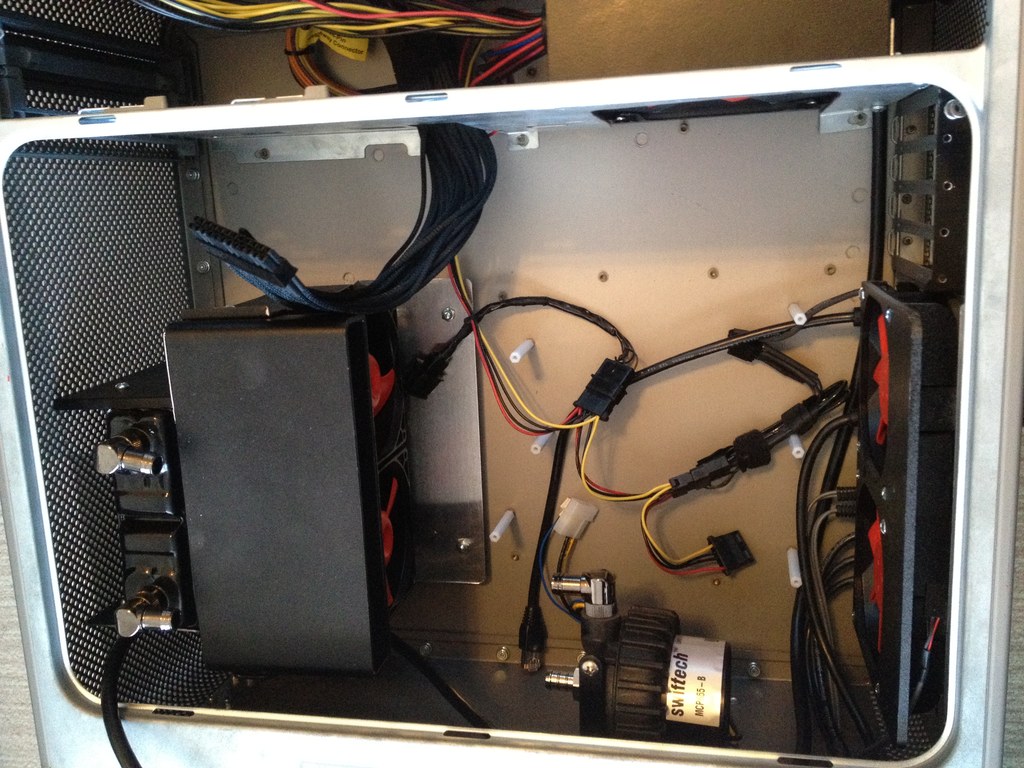
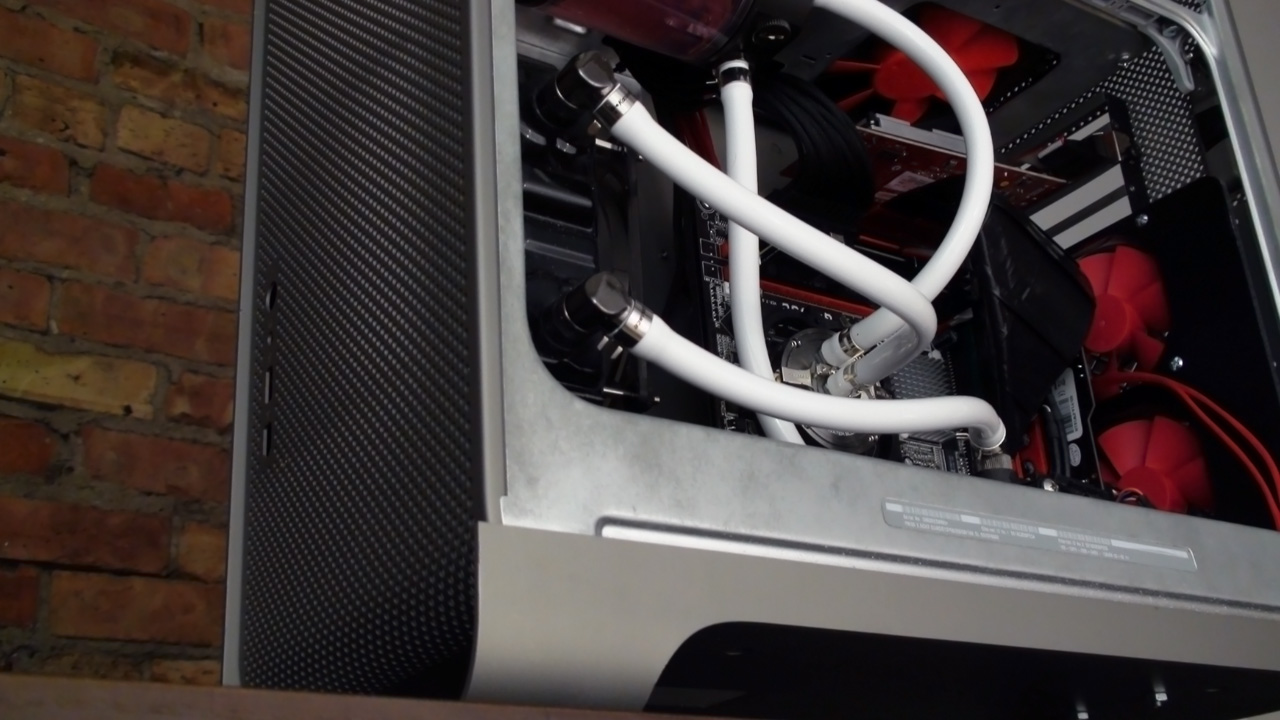
Looks like last time I posted I hadn't even mounted the radiator fans. I wired them up using the info and diagrams on this forum thread, and same goes for the rear exhaust fan. I hit a wall when I discovered that only one of the two rear exhaust fans are operating, but decided to move forward with the build for now. I will troubleshoot that issue later.
I also intended to sleeve the PSU wires, but I was really dragging my feet on that and finally decided to just plow forward with assembly. Most wires will be hidden in the end , and the ones that are visible will get treated later on.
Anyway, here are the fans mounted and some of the wiring that will all be hidden under the motherboard tray:
By the way, I am rocking my new iPhone 4S here, so hopefully the quality of the photos here will appear marginally improved... I am sort of flipping back and forth between HDR and non HDR mode.
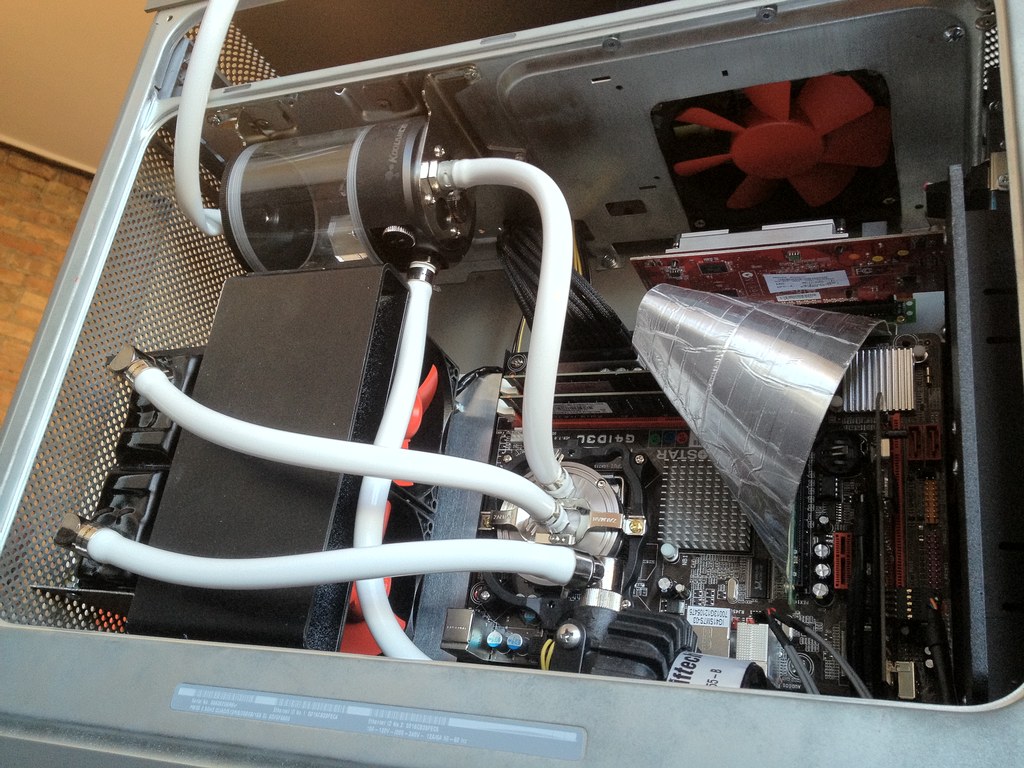
And the tray mounted:
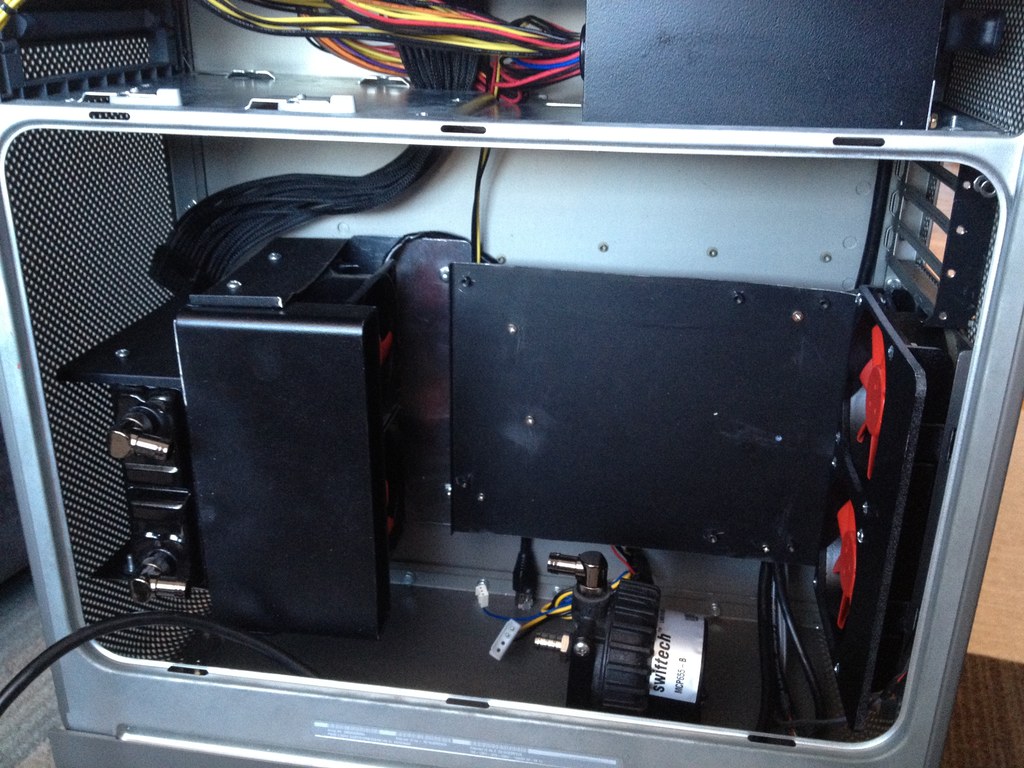
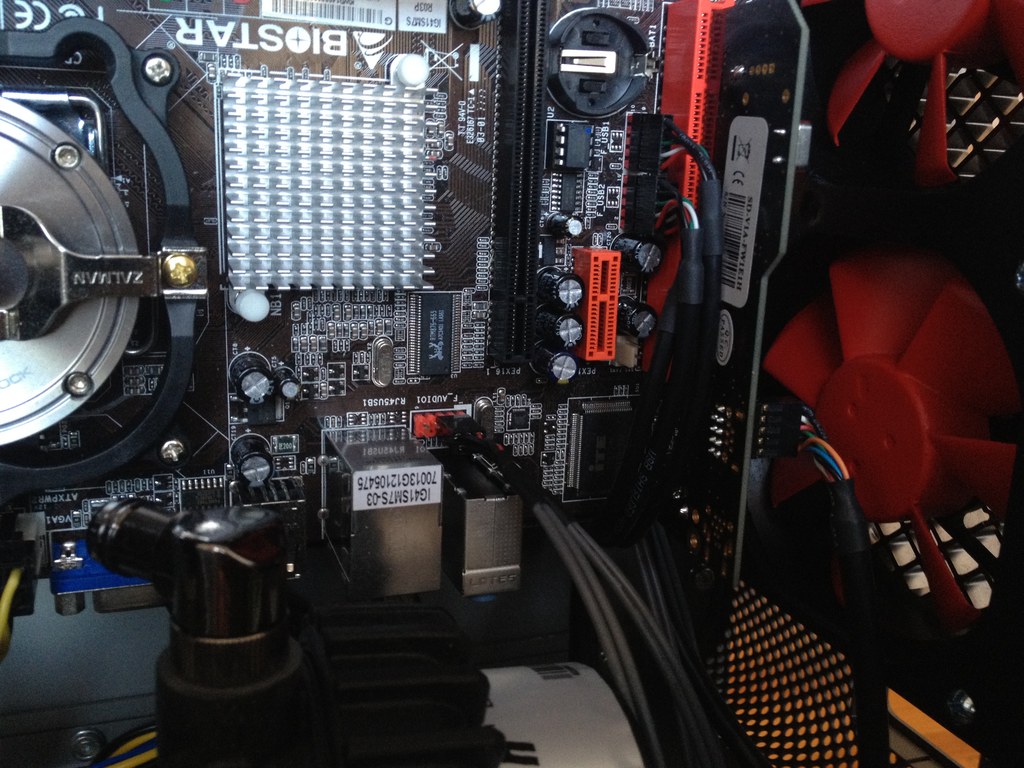
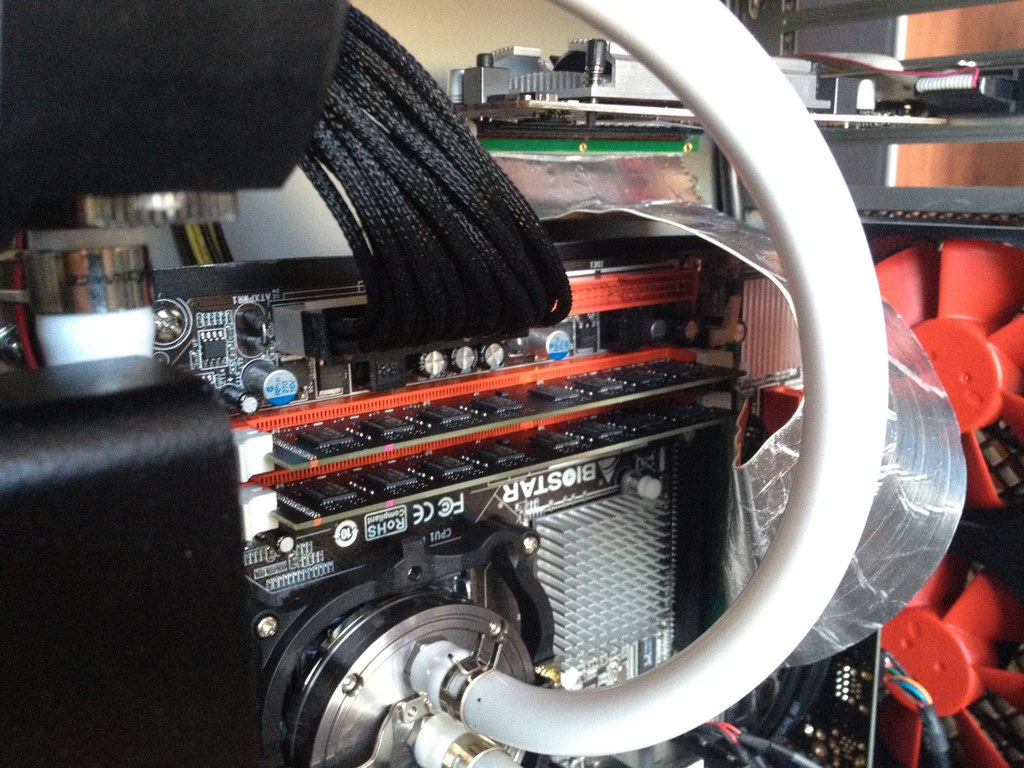
Motherboard attached:

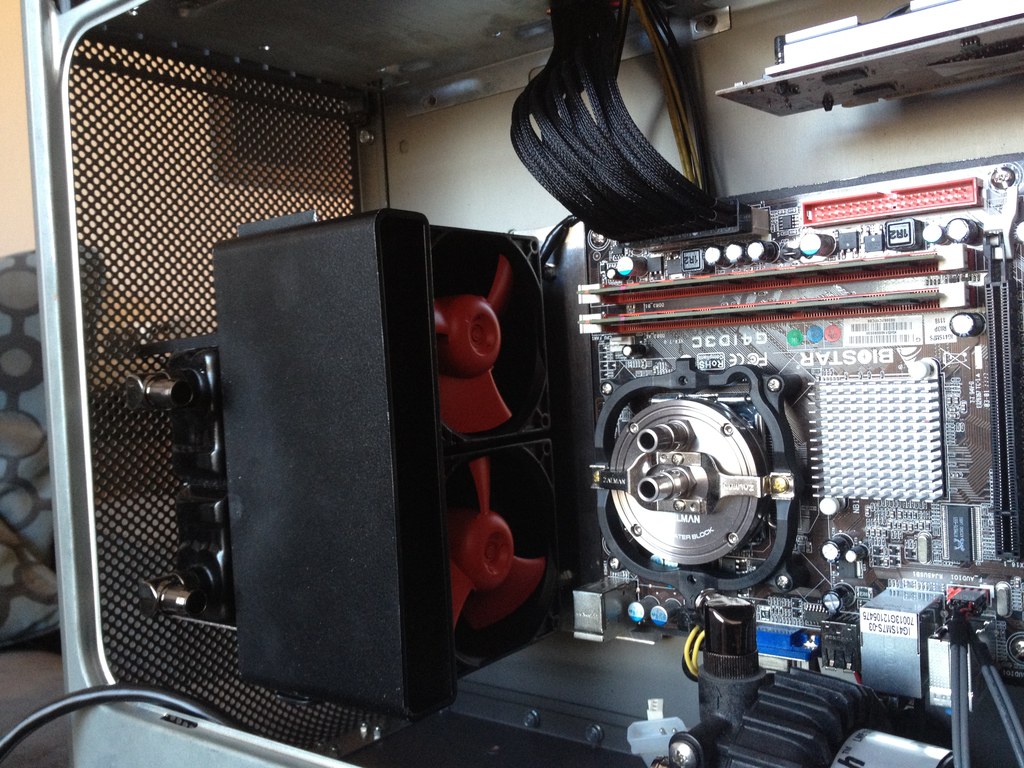
A few more shots of the motherboard:
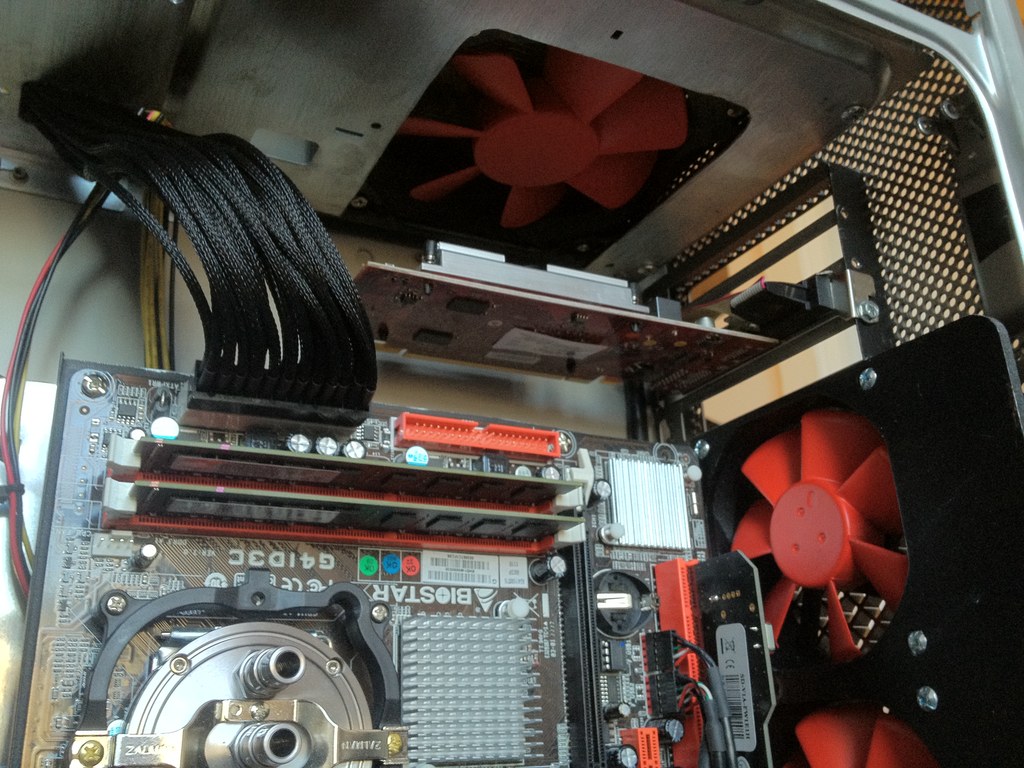
The rear I/O panel all gets plugged in via motherboard headers, with the exception of ethernet which is plugged right into the CAT5 port.
Just a little comparison with the other G5 (which I began stealing parts from)
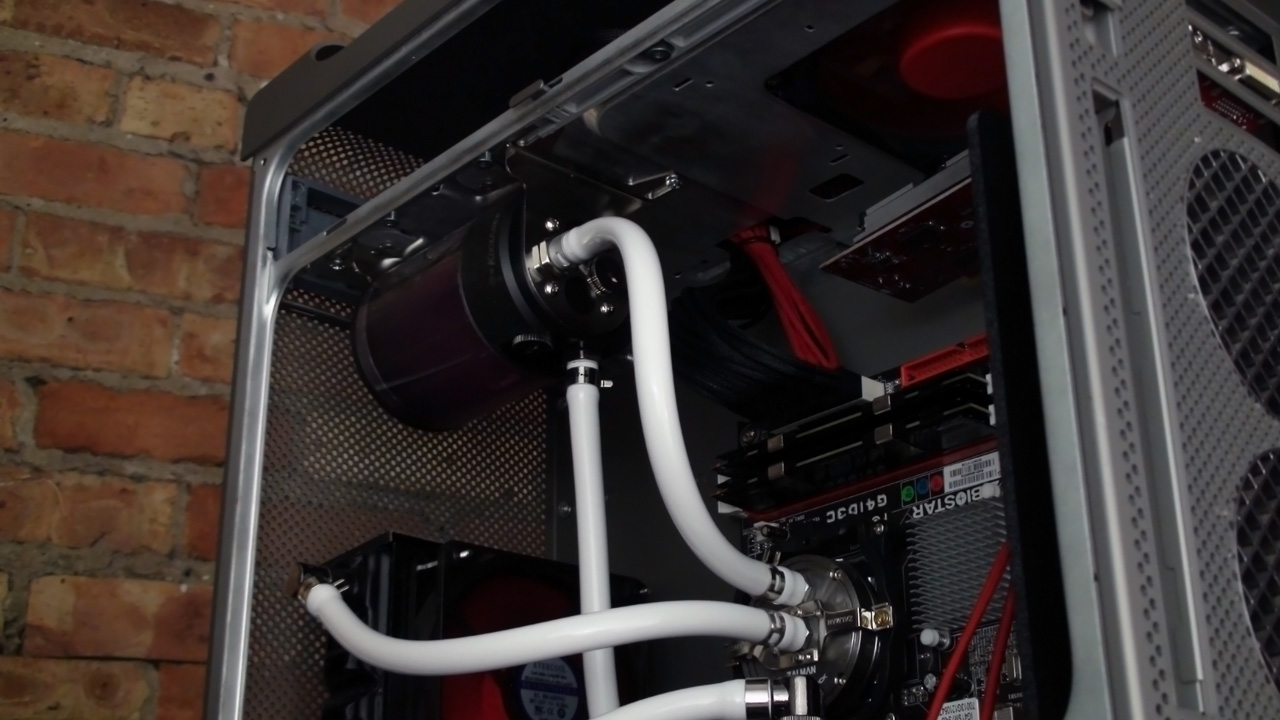
And now FINALLY the part which I have been waiting for since day 1 of this build....
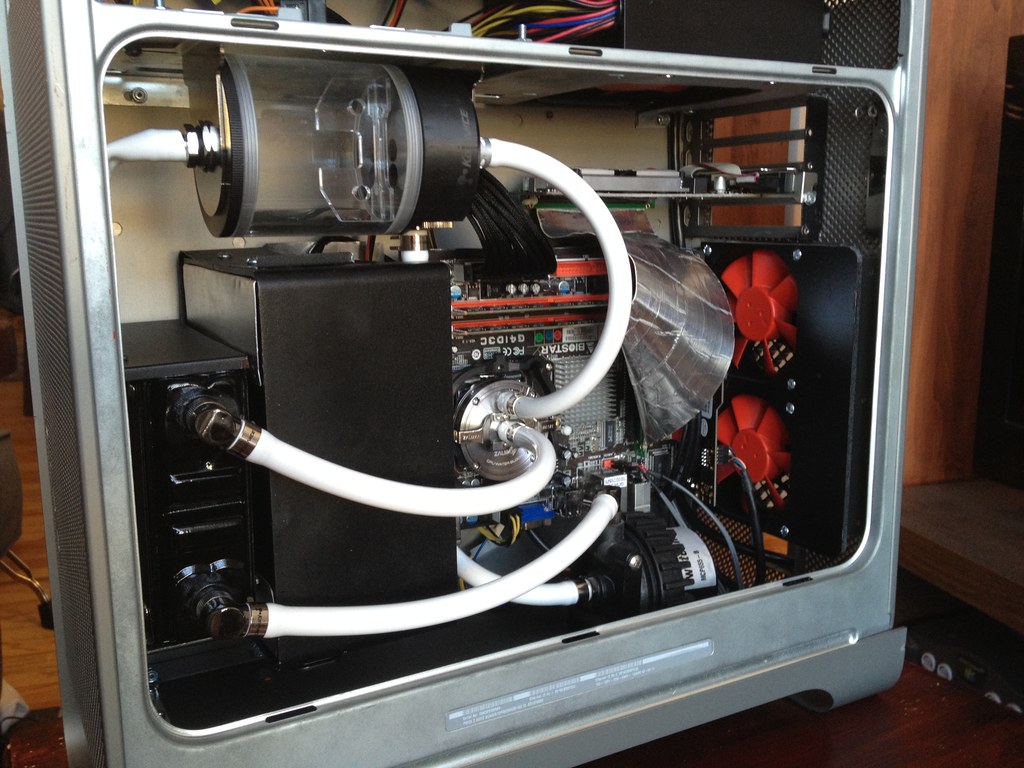
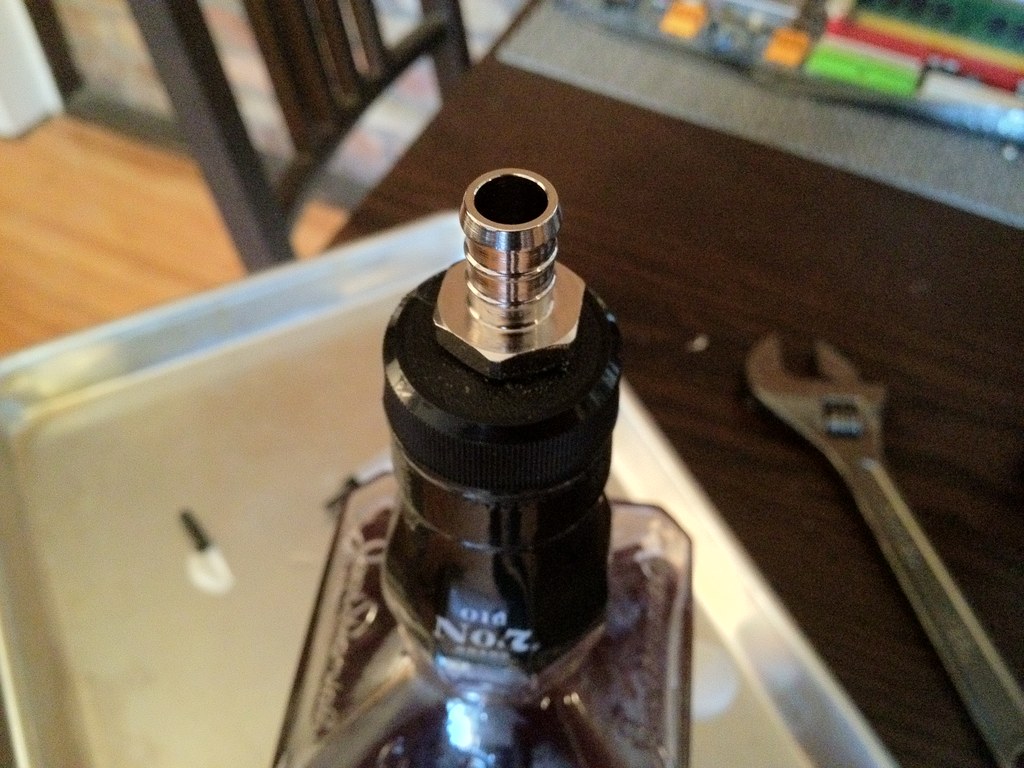
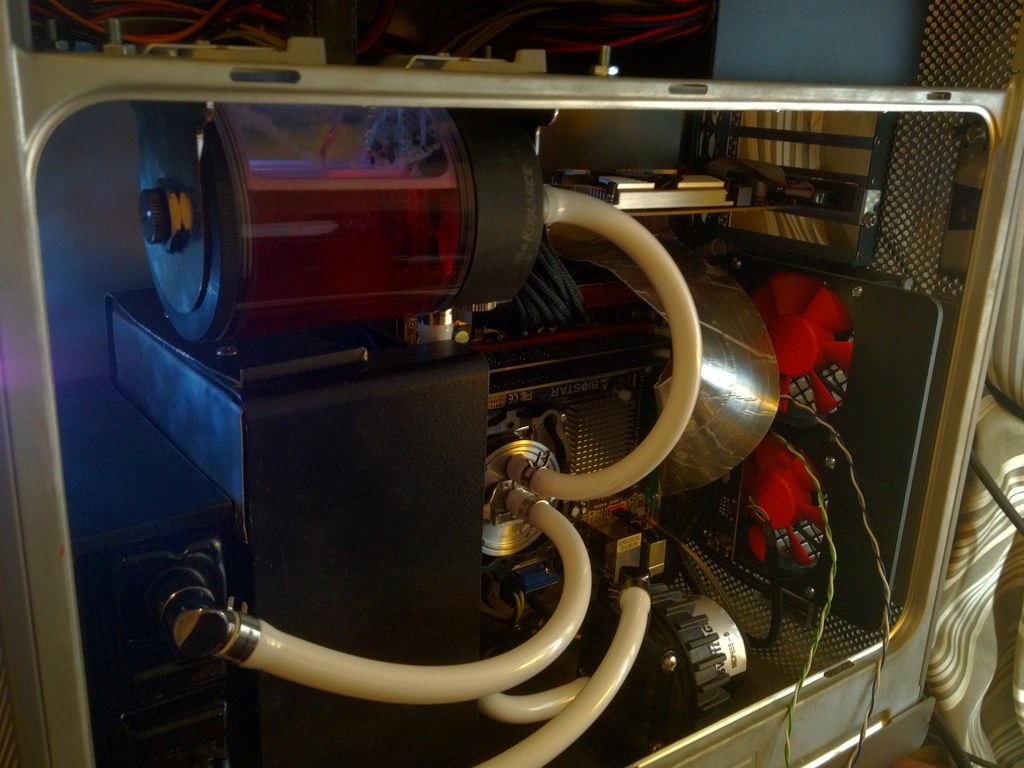
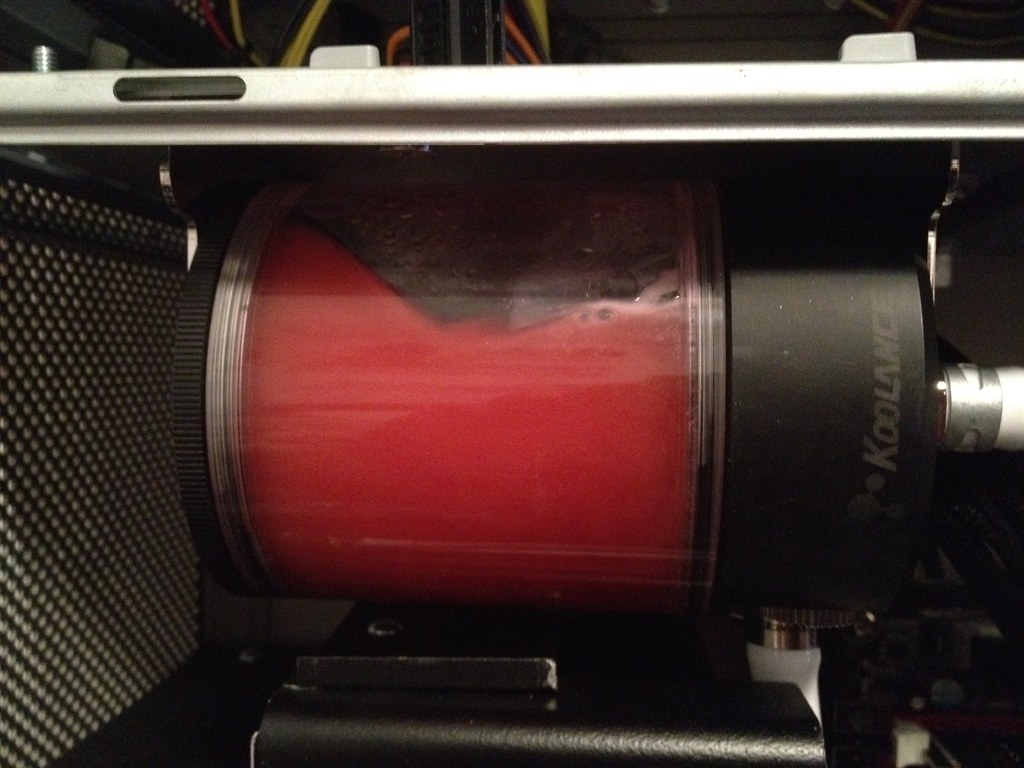
The tube coming out of the LEFT side of the reservoir is my filler port. More on that in a moment.
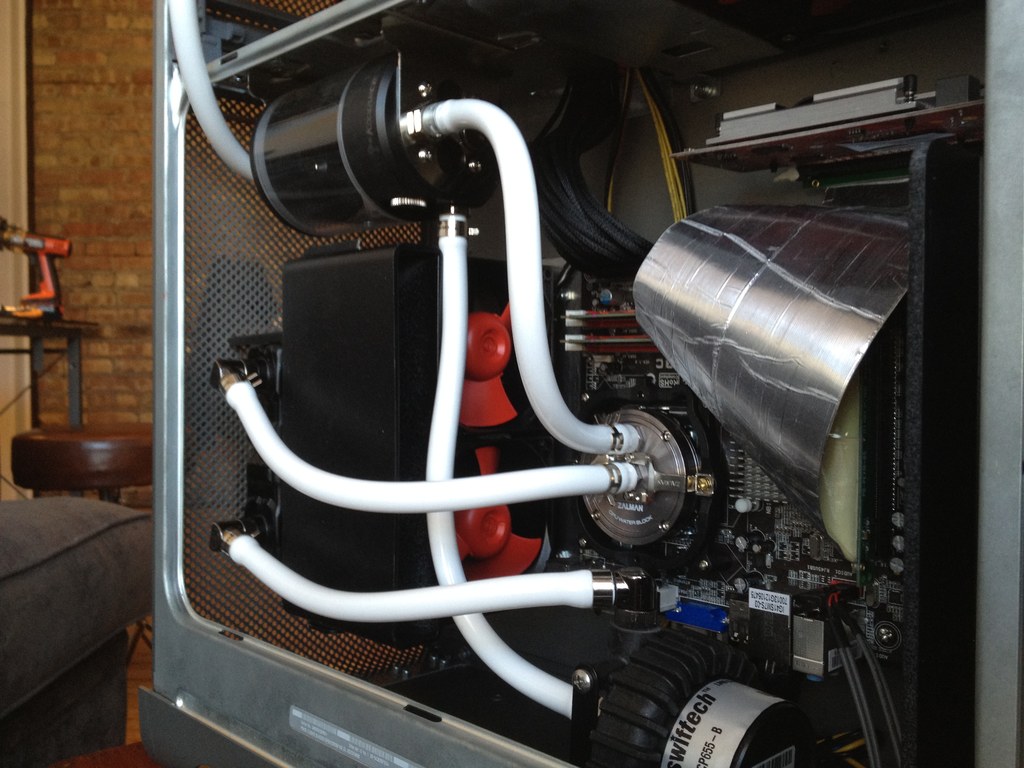
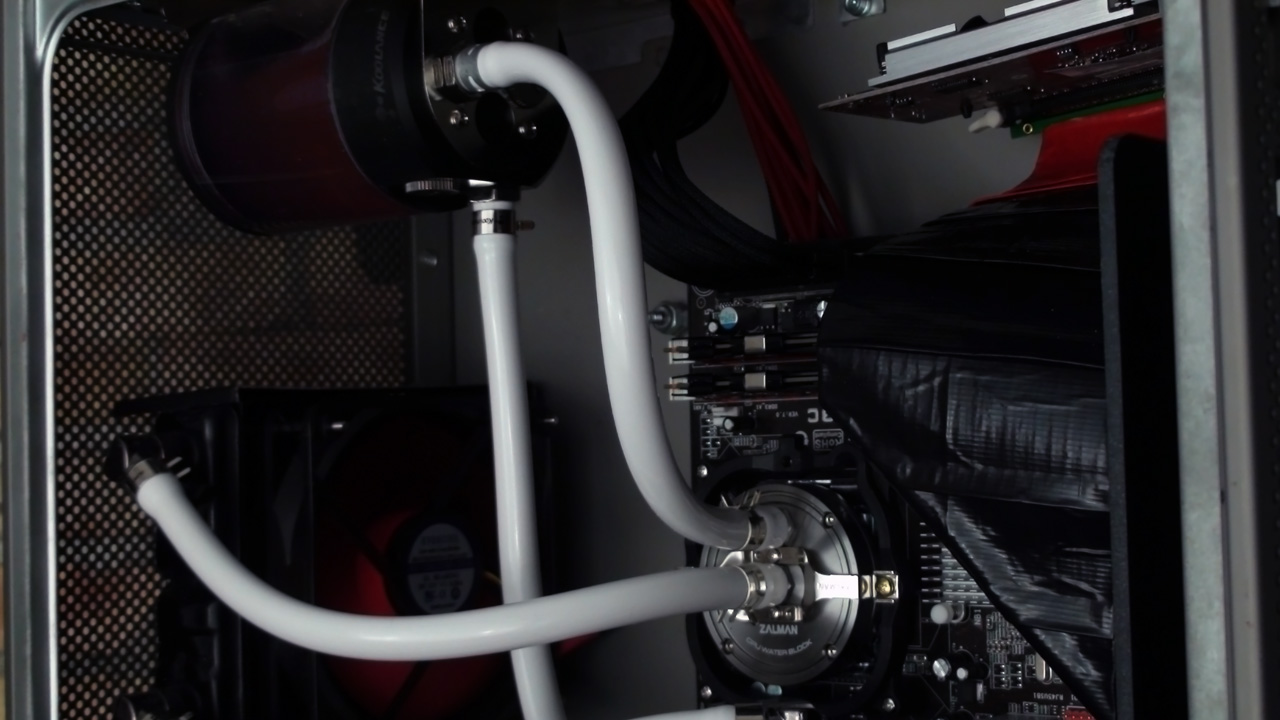
Again, that kinked tube on the LEFT of the reservoir is the temporary filler port...
Prepping for a blood transfusion...
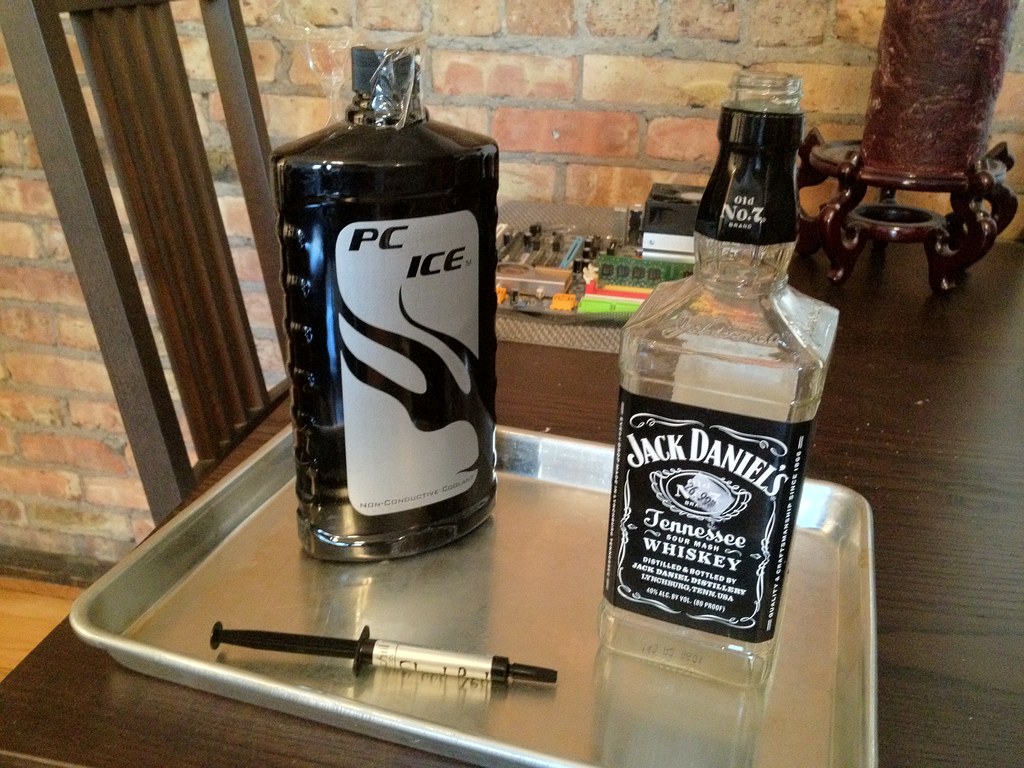

Here is my make-shift filling nozzle:
Let the filling commence..
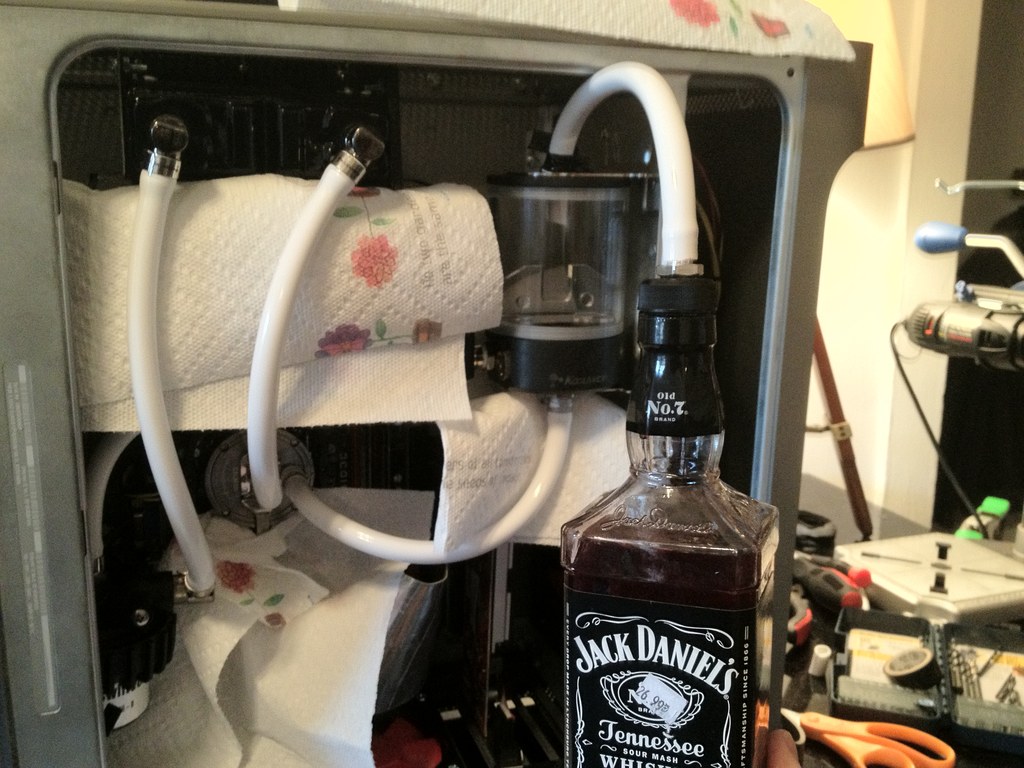
No leaks.
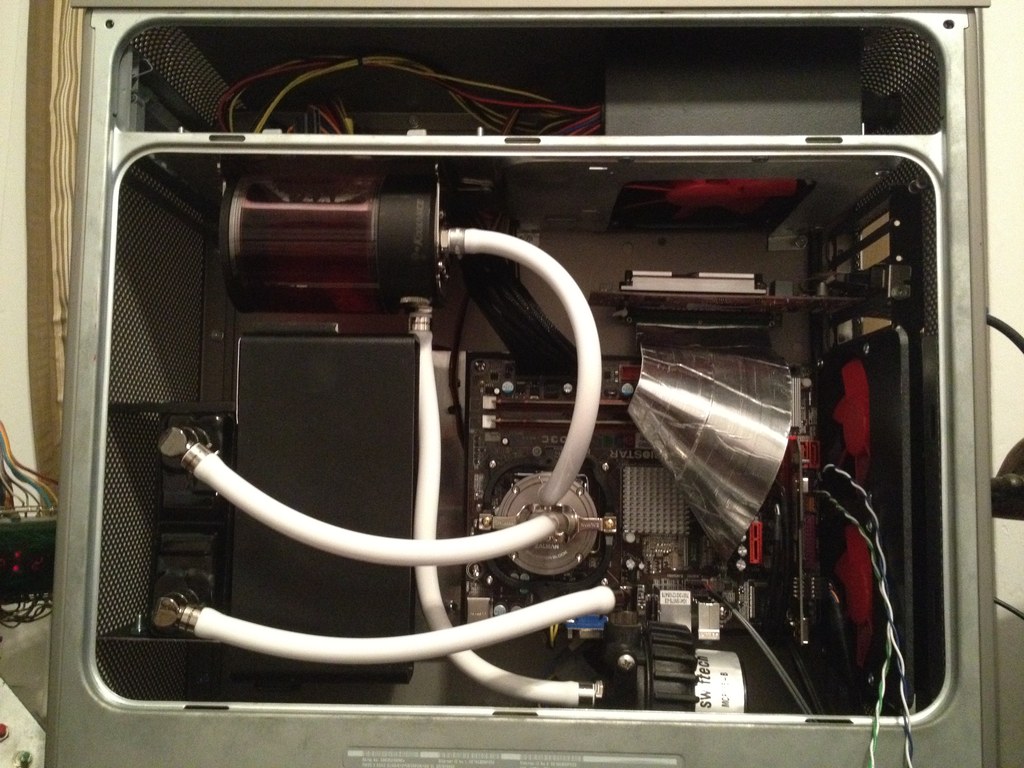
Here is some funky lighting...
At this point I was still a little nervous because I had not yet tested any of the new components. Pump, motherboard, RAM, and video card had never been even powered on (dumb I know, but that is that way it went down). Most packaging had been lost in the shuffle of my apartment over the last few months, too. So needless to say, if I encountered an error at this point I would be up sh*t creek!
HOWEVER, the computer gods were on my side today...
SHE LIVES!;
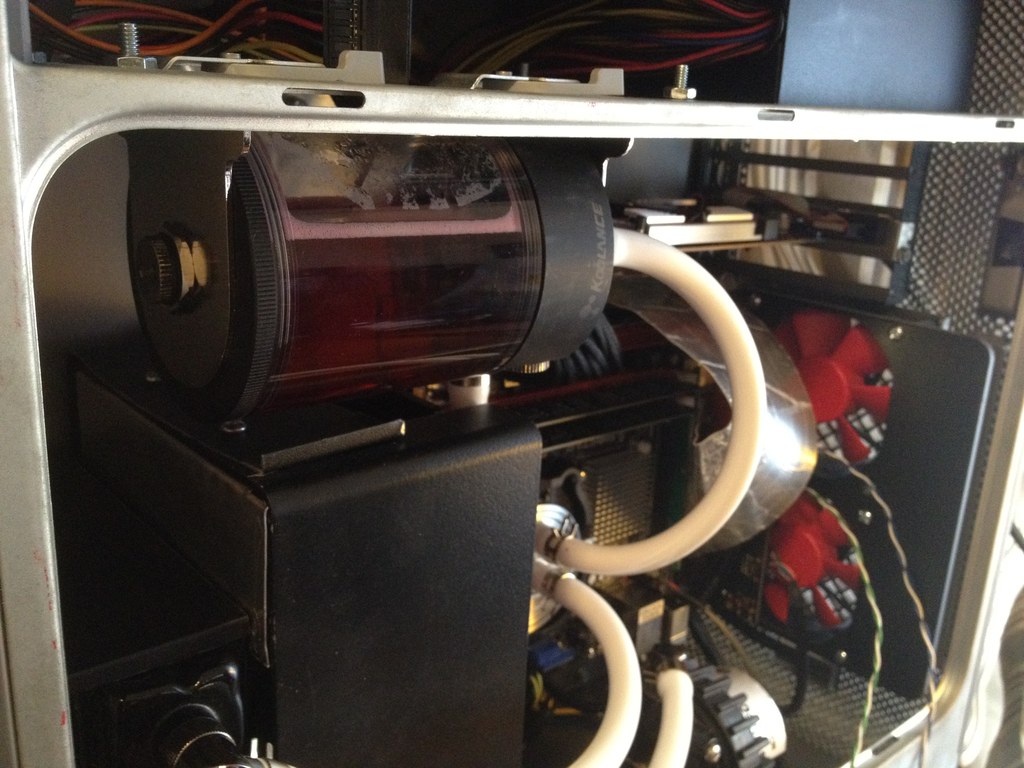
The pump is really powerful, hopefully these air bubbles will calm down:
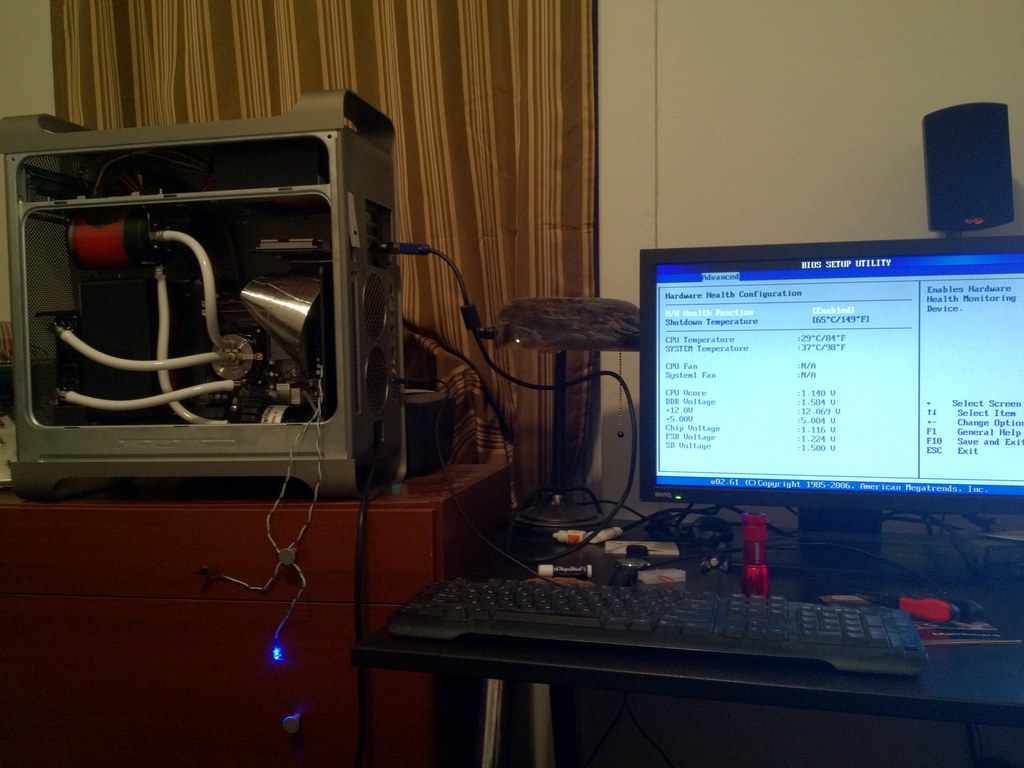
Here are the testing grounds, sitting side by side with my Sandy Bridge workstation.
To be honest, the cooling system in this G5 kind of trumps my workstation's. After seeing how powerful this Swiftech MCP655 is, it makes me feel like I should upgrade the dinky XSPC pump/reservoir combo I currently have in my 700D.
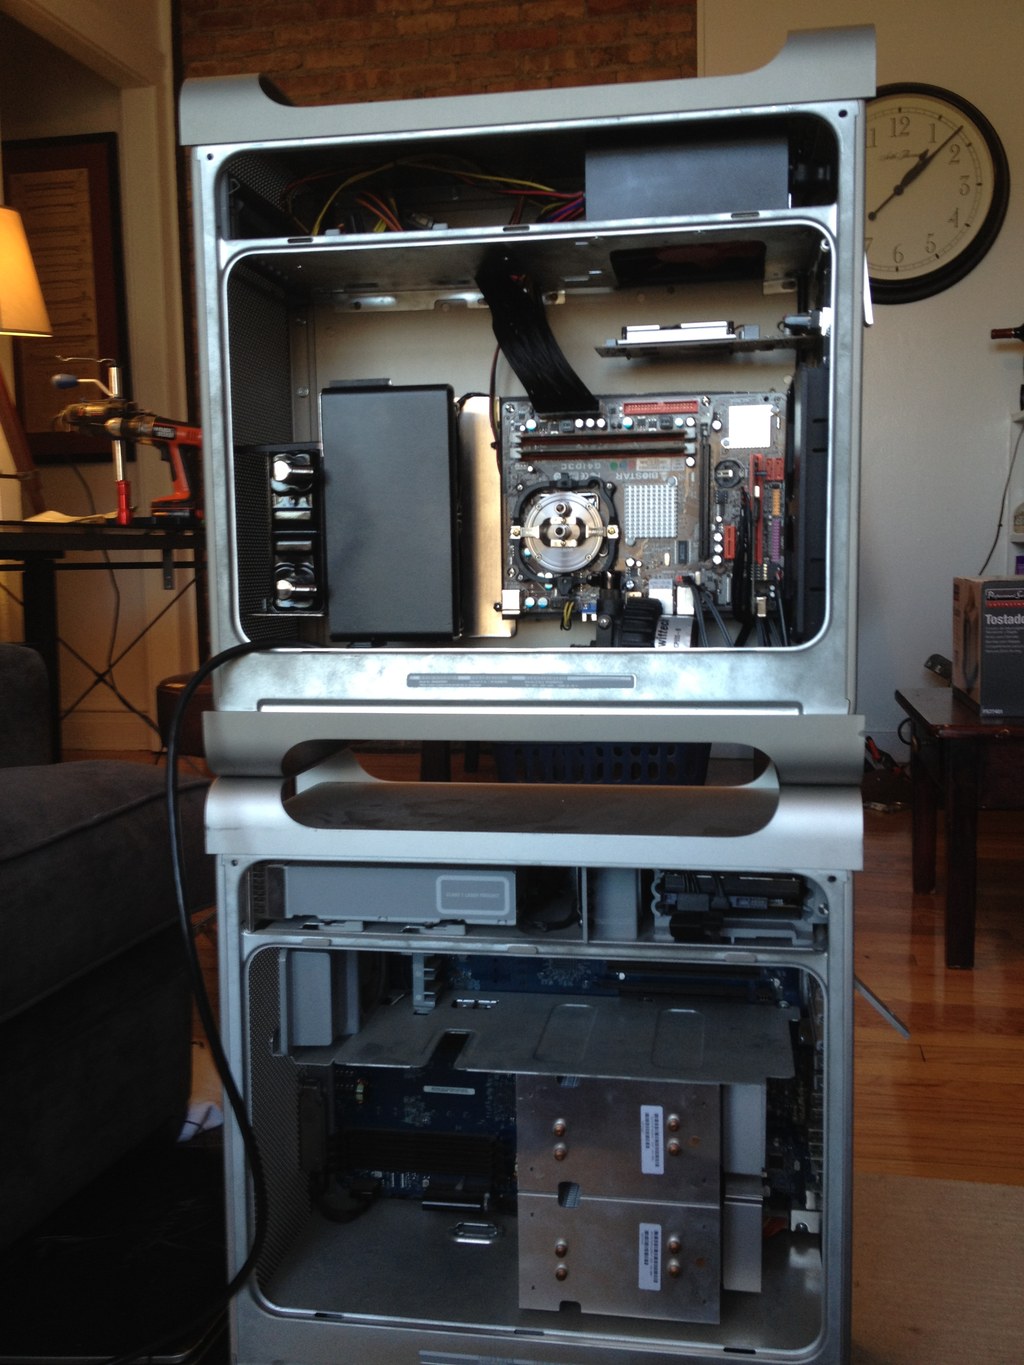
Anyway, I am really glad to finally have something to show for all the time and cash I have poured into this. I was not tracking the budget, and I do not really care to know to be honest! My tiny 1 bedroom apartment has been one big work-desk over the last 3 - 4 months. Even while the project was on hold, all kinds of parts and junk were scattered all over. Finally I can start to clean up a little bit, now that I have it all jammed into the case.
That said, this mod is NOT complete still! A few big things still remain on the list:
-PSU cable is not properly mounted. I am running an extension from the PSU at the top of the case down to the outlet plug at the bottom. The extension will need to be trimmed to length and securely mounted in the case's socket.
-Internal PSU wires need to be sleeved or something. I don't want to have any off-colored wires showing. Right now there are a ton of extras jammed up in the top, but I definitely need to organize that.
-No optical drive yet. Fortunately I still have the original G5 optical mounting points and the functional optical bay door, so all I need to do is buy a cheap-o one, paint it's case black, and slide it in. I have two spare ones already but they are both IDE and I definitely prefer SATA.
-Same goes for the HDD. I have a bunch of spare IDE hard drives, but I want to get a 2.5'' SATA drive.
-Troubleshoot rear exhaust fan. I mentioned earlier that only 1 of those 2 rear exhaust fans are functioning. Most likely it is something to do with my custom wiring (I hope), so I just need to pull them off and take a look.
-Mount INTAKE fan. Currently the air flow is ALL negative pressure. Both sets of fans are in exhaust mode, so I need to work in an intake fan. I had planned all along to put one under the reservoir, so I just need to take the steps to get it in there. My original plan was to use another one of the 92mm G5 fans, but for times-sake (and ease of wiring), I am just going to buy one.
Anyway, that is my progress. Will post more photos of the completed assembly under more natural lighting.
Looks like last time I posted I hadn't even mounted the radiator fans. I wired them up using the info and diagrams on this forum thread, and same goes for the rear exhaust fan. I hit a wall when I discovered that only one of the two rear exhaust fans are operating, but decided to move forward with the build for now. I will troubleshoot that issue later.
I also intended to sleeve the PSU wires, but I was really dragging my feet on that and finally decided to just plow forward with assembly. Most wires will be hidden in the end , and the ones that are visible will get treated later on.
Anyway, here are the fans mounted and some of the wiring that will all be hidden under the motherboard tray:
By the way, I am rocking my new iPhone 4S here, so hopefully the quality of the photos here will appear marginally improved... I am sort of flipping back and forth between HDR and non HDR mode.
And the tray mounted:
Motherboard attached:
A few more shots of the motherboard:
The rear I/O panel all gets plugged in via motherboard headers, with the exception of ethernet which is plugged right into the CAT5 port.
Just a little comparison with the other G5 (which I began stealing parts from)
And now FINALLY the part which I have been waiting for since day 1 of this build....
The tube coming out of the LEFT side of the reservoir is my filler port. More on that in a moment.
Again, that kinked tube on the LEFT of the reservoir is the temporary filler port...
Prepping for a blood transfusion...
Here is my make-shift filling nozzle:
Let the filling commence..
No leaks.
Here is some funky lighting...
At this point I was still a little nervous because I had not yet tested any of the new components. Pump, motherboard, RAM, and video card had never been even powered on (dumb I know, but that is that way it went down). Most packaging had been lost in the shuffle of my apartment over the last few months, too. So needless to say, if I encountered an error at this point I would be up sh*t creek!
HOWEVER, the computer gods were on my side today...
SHE LIVES!;
The pump is really powerful, hopefully these air bubbles will calm down:
Here are the testing grounds, sitting side by side with my Sandy Bridge workstation.
To be honest, the cooling system in this G5 kind of trumps my workstation's. After seeing how powerful this Swiftech MCP655 is, it makes me feel like I should upgrade the dinky XSPC pump/reservoir combo I currently have in my 700D.
Anyway, I am really glad to finally have something to show for all the time and cash I have poured into this. I was not tracking the budget, and I do not really care to know to be honest! My tiny 1 bedroom apartment has been one big work-desk over the last 3 - 4 months. Even while the project was on hold, all kinds of parts and junk were scattered all over. Finally I can start to clean up a little bit, now that I have it all jammed into the case.
That said, this mod is NOT complete still! A few big things still remain on the list:
-PSU cable is not properly mounted. I am running an extension from the PSU at the top of the case down to the outlet plug at the bottom. The extension will need to be trimmed to length and securely mounted in the case's socket.
-Internal PSU wires need to be sleeved or something. I don't want to have any off-colored wires showing. Right now there are a ton of extras jammed up in the top, but I definitely need to organize that.
-No optical drive yet. Fortunately I still have the original G5 optical mounting points and the functional optical bay door, so all I need to do is buy a cheap-o one, paint it's case black, and slide it in. I have two spare ones already but they are both IDE and I definitely prefer SATA.
-Same goes for the HDD. I have a bunch of spare IDE hard drives, but I want to get a 2.5'' SATA drive.
-Troubleshoot rear exhaust fan. I mentioned earlier that only 1 of those 2 rear exhaust fans are functioning. Most likely it is something to do with my custom wiring (I hope), so I just need to pull them off and take a look.
-Mount INTAKE fan. Currently the air flow is ALL negative pressure. Both sets of fans are in exhaust mode, so I need to work in an intake fan. I had planned all along to put one under the reservoir, so I just need to take the steps to get it in there. My original plan was to use another one of the 92mm G5 fans, but for times-sake (and ease of wiring), I am just going to buy one.
Anyway, that is my progress. Will post more photos of the completed assembly under more natural lighting.
Last edited:
PointandClick
Limp Gawd
- Joined
- Dec 6, 2008
- Messages
- 383
Looking good ") can't wait to see it all cleaned up.
can't wait to see it all cleaned up.
I just picked up a G5 last week for this project. Finally decided it was time to replace my ancient case since airflow is virtually non existent in it. I haven't had the heart to start tearing it apart yet tho.
I'm hoping to do minimal cutting (that's what they all say) but I don't know how its going to work with how close the rear fans are to the io panel.
can't wait to see it all cleaned up.I just picked up a G5 last week for this project. Finally decided it was time to replace my ancient case since airflow is virtually non existent in it. I haven't had the heart to start tearing it apart yet tho.
I'm hoping to do minimal cutting (that's what they all say) but I don't know how its going to work with how close the rear fans are to the io panel.
sortableturnip
Limp Gawd
- Joined
- Aug 12, 2011
- Messages
- 213
Now that is some 80 proof liquid cooling
Looks like everything is coming together real well.
Looks like everything is coming together real well.
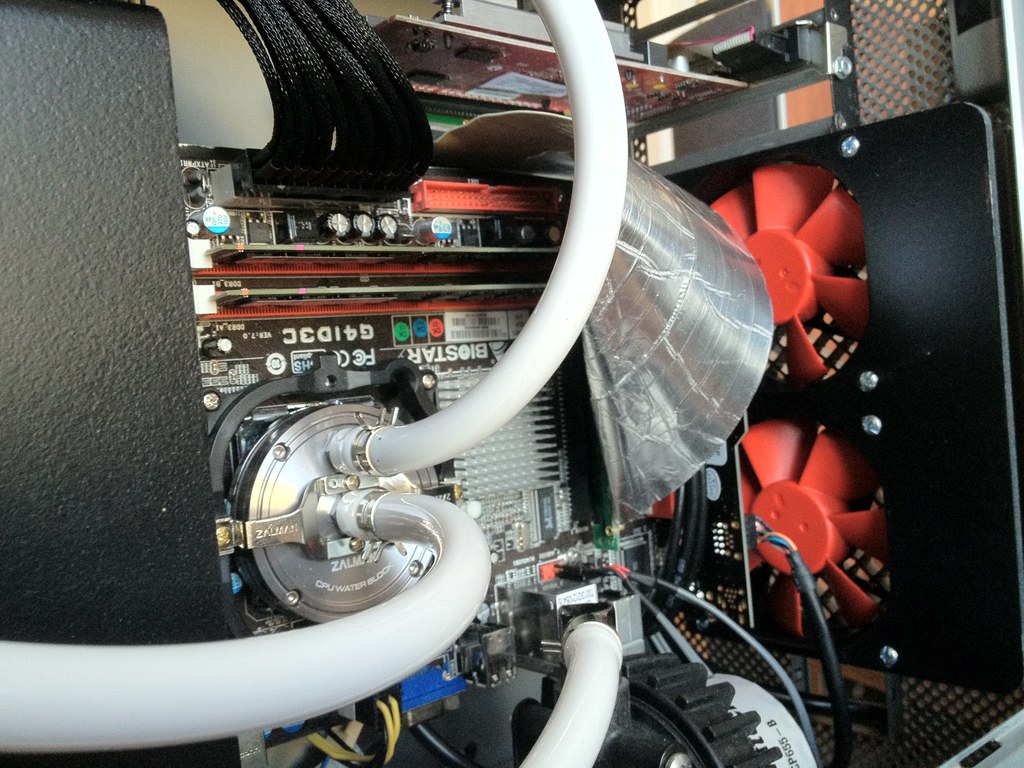
Very nice build man. Only thing is that the silver ribbon is rather ugly, couldn't you spin the mobo so the ram is facing the rad and the expansion ports are right under the vid car and tuck the cable around the firewire card and cover it with something?
Very nice build man. Only thing is that the silver ribbon is rather ugly, couldn't you spin the mobo so the ram is facing the rad and the expansion ports are right under the vid car and tuck the cable around the firewire card and cover it with something?
I agree that that cable really puts down the total look of the build.
I too am not a huge fan of the ribbon cable. My original thought was to "round" the cable but even still it might look odd, and I am worried about signal interference.
At this point in time, I will not be rotating the motherboard. However, what I could do instead is move the graphics card to plug directly into the motherboard, then run extension cables from the DVI / VGA / HDMI ports from there up to the PCI slot. The cables would route beneath the motherboard and look cleaner than having the PCI-E extender.
Thanks for the feedback guys!
is there enough room under the motherboard that you could desolder then resolder the pcie slot onto the bottom of the motherboard?
This would be the ultimate solution indeed, but I I would rate myself with a D- in soldering skill. The motherboard was only $40 so there wouldn't be TOO much at risk, but still I guarantee I wouldn't succeed:

honestly, the better solution would be to just put the card in the slot, and make/buy an adapter and run the port to the back of the case, then you are only dealing with a cable the size of a dvi cable, or as small as a display port cable, depending on what you decide to use... might have to move your pump around just a tad to get it to work...
blazarcher
Weaksauce
- Joined
- Oct 31, 2011
- Messages
- 65
Someone sell me a G5!!! =)
starwa1ker
Weaksauce
- Joined
- Jan 3, 2011
- Messages
- 69
Wow this the best G5 mod I've seen, always wanted to do it but never had the time.
omegatotal
Gawd
- Joined
- Mar 15, 2002
- Messages
- 672
pretty awesome, I would have gone more of a sleeper route and kept all the stock parts. you could have reused nearly all of it, including the ports on the original motherboard (would have needed a desoldering setup and a custom pcb made, or just cut the pcb out and solder jumper wires to the individual pins of the ports)
The machine you tore down appears to be the fastest G5 ever made, the 'Quad' 2.5. It's a dual processor, dual core machine. Not terribly fast by todays standards, but definitely a neat machine. Those G5's were really quite hardcore, and more or less 'on the edge' all the time. The Quad 2.5 was actually one of the most reliable G5's, but they are still fairly unreliable.
UPDATE NOTE: This computer now has a XFX 5850 graphics card installed, not pictured here.

Still on the to do list:
01) Build a cover for the upper section which is currently where the PSU and a wad of cables reside. I'm wanting a simple brushed metal plate with a logo design cut into it, back lit by red from inside.
02) Get a larger GFX card. I'm buying a couple HD5850s for a future project, one of which will go in here for the time being I think. It's red & black, so should fit perfectly.
03) Figure something else out for the GFX card ribbon. Some nice bike handle grip tape might look better than black duck tape.
04) Power button! I still need to figure out how to re-wire the G5's power button or just find something new that will fit in the space. Also I'll just be capping the two front USBs & audio jack, similar to what I did on a few of the rear I/O ports.
05) Get some lighting going. I'm considering placing either a white or red cathode, or maybe just a few subtle red LEDs throughout.
06) You can't see it in these photos, but the power cord extension is still just kind of dangling out of the back. I need to trim it to length and install a permanent plug.
Still seems like there is a lot to do, but it's all relatively minor things. I just want to finish this up so I can move on to a couple of new projects I have on the drawing board
Last edited:
- Joined
- Jun 27, 2001
- Messages
- 15,814
Ditched ALL the original G5 fans. One of the rear ones was not functioning and the two on the rad were just not cutting it. Replaced the rears with two brand new 92mm, and put a matching 120 on the rad. Much better now!
the G5 fans have a speed pin, I think its the 4th wire? if you ground it they will go to 100% and push a LOT of air... or you can put a trimpot between it and ground and adjust the speed
nice mod... only thing I would have done different is instead of using a PCIe extender it probably would have been easier to just leave the card on the mobo and use VGA/DVI extenders?
Yeah I didn't spend much time tweaking the G5 fans wiring. Aside from the speed of the fans, I was concerned that the way I had the big shroud positioned in there (not aligning perfectly with the rad) was causing extra air turbulence & resistance. Regardless of even that though, I had a change of heart about the big honkin' shroud anyway. I decided to open the space up a little more by just removing it.
As for the positioning of the GFX card, that is something I am still going back and forth on. I just don't know what I would put up in the PCI slots if I were to re-position the GFX card and use DVI extenders. Before I resort to that though, I want to take one more stab at covering up the PCIe extension
Thanks a lot for the comments and feedback guys!
Hey guys. Sorry for the bump, but I wanted to announce that I am selling this machine, if you're near Chicago.
The motherboard can easily be swapped out with any MicroATX of your choosing, and the CPU water block is compatible with most Intel & AMD sockets (full list here)
Here are the specs as currently equipped:
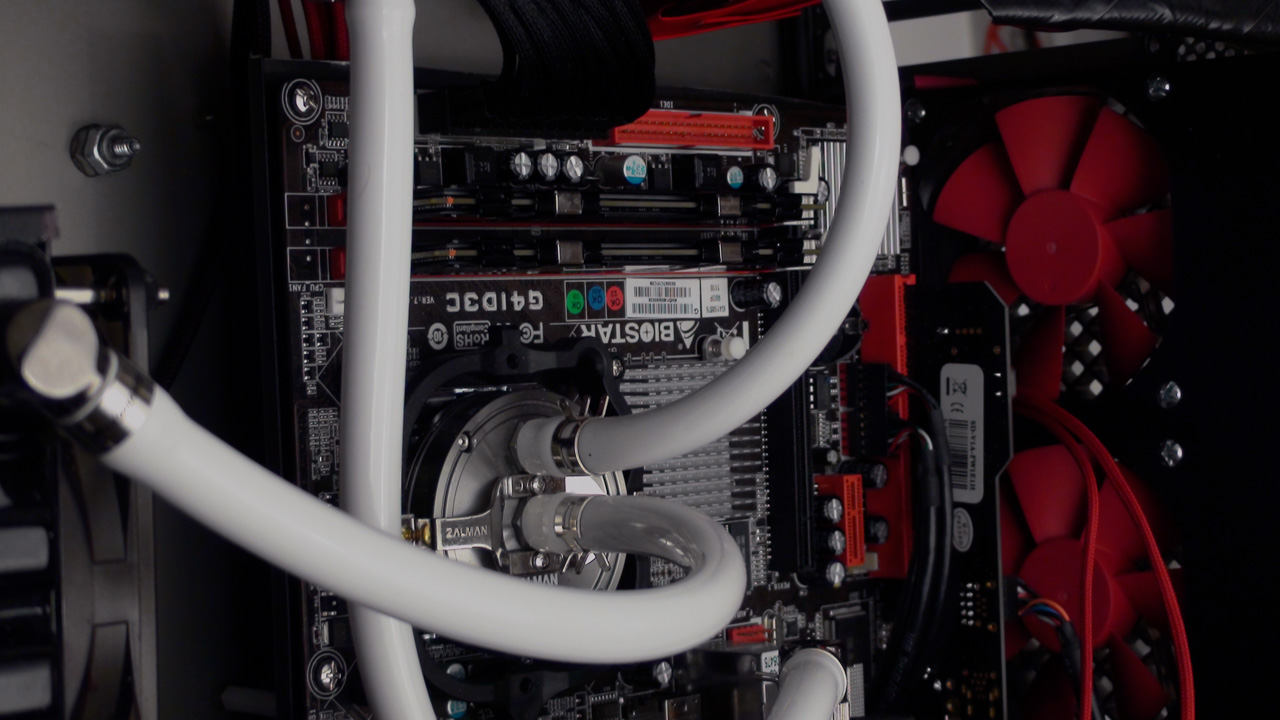
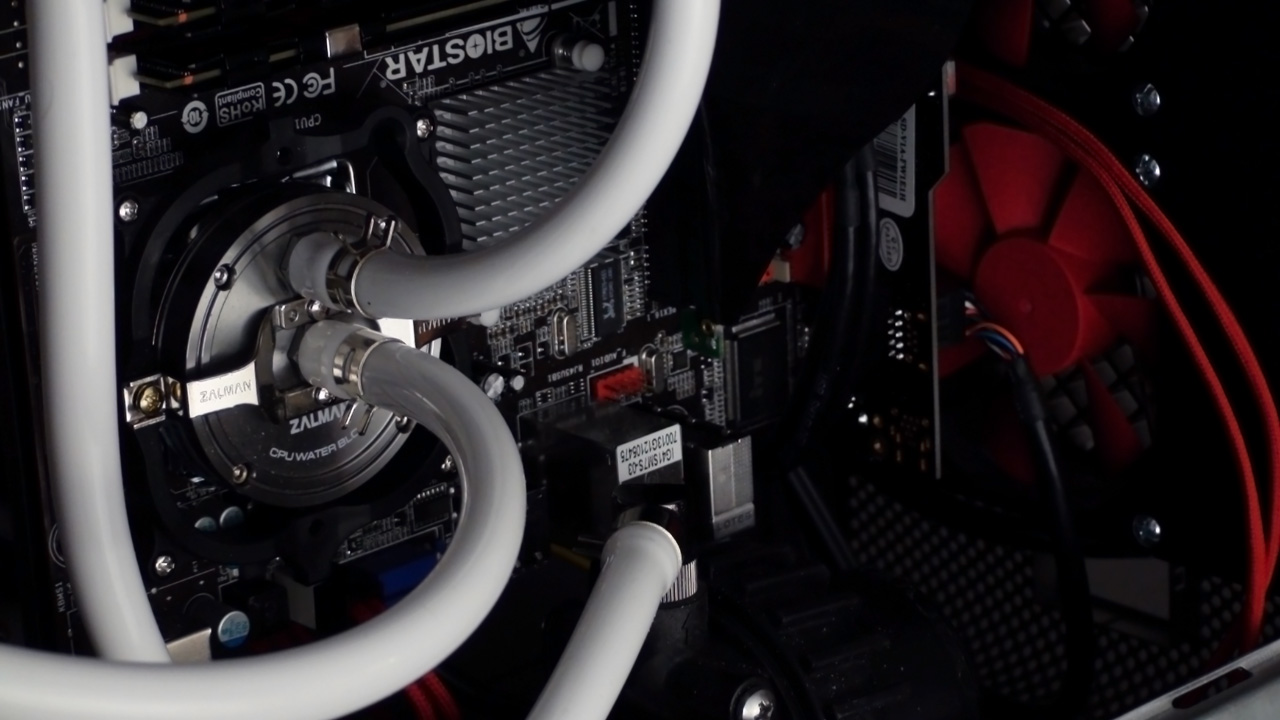
Biostar G41D3C Motherboard (LGA 775)
Intel Q9550 Quad 2.8ghz
4GB G.SKILL RAM (expandable to 8GB)
XFX HD-5850 Radeon GPU (not pictured)
No HDD included.
No optical drive included.
Swiftech MCP655 pump
Koolance 1x120mm copper Radiator
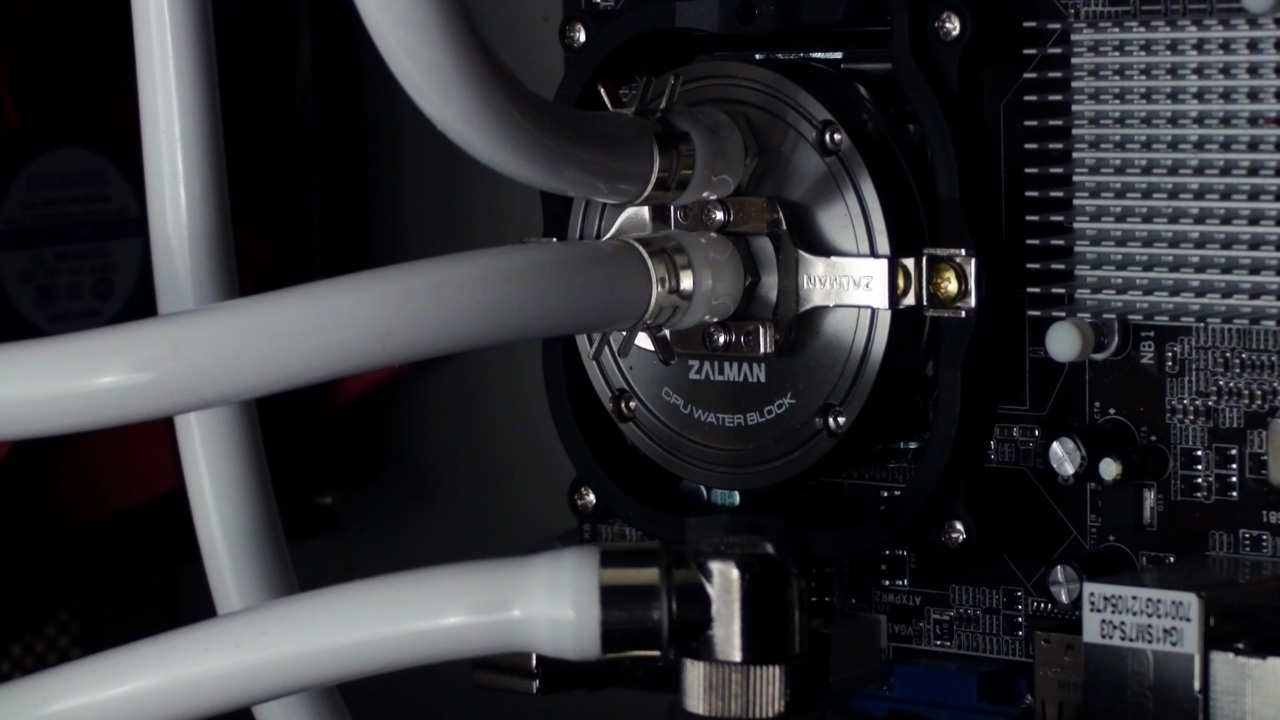
Zalman ZM-WB5 water block
Bitspower Z-Multi 80 Water Tank
3/8" ID tubing
EK Fittings
Also included is a bunch of extra water-cooling materials I have on hand (extra matching tubes, fittings, coolant, some fans, etc.)
This purchase would be best for a PC modder who would like to further this project. There is currently no power switch integrated into the case (standard push-button switch is included, but it's not mounted), and there is currently no mounting points built for a HDD. Plenty of room for one where the optical drive would normally go, if you choose not to install an optical drive. In regards to the optical drive, standard mounting holes are present, allowing the possibility for a drive to be bolted in. The original Apple G5 flip-down optical bay drive door mechanism is fully functional, opening automatically when an optical tray presses against it.
I'm asking approximately $500 but will consider offers & trades. Local pickup only (Chicago, 60657). I also have some mice/keyboard/19" monitor combos I would be willing to include for an additional cost. Please e-mail me if you're in Chicago and are interested in making an offer, as I can't guarantee I will see PMs here in a timely fashion: [email protected]
The motherboard can easily be swapped out with any MicroATX of your choosing, and the CPU water block is compatible with most Intel & AMD sockets (full list here)
Here are the specs as currently equipped:
Biostar G41D3C Motherboard (LGA 775)
Intel Q9550 Quad 2.8ghz
4GB G.SKILL RAM (expandable to 8GB)
XFX HD-5850 Radeon GPU (not pictured)
No HDD included.
No optical drive included.
Swiftech MCP655 pump
Koolance 1x120mm copper Radiator
Zalman ZM-WB5 water block
Bitspower Z-Multi 80 Water Tank
3/8" ID tubing
EK Fittings
Also included is a bunch of extra water-cooling materials I have on hand (extra matching tubes, fittings, coolant, some fans, etc.)
This purchase would be best for a PC modder who would like to further this project. There is currently no power switch integrated into the case (standard push-button switch is included, but it's not mounted), and there is currently no mounting points built for a HDD. Plenty of room for one where the optical drive would normally go, if you choose not to install an optical drive. In regards to the optical drive, standard mounting holes are present, allowing the possibility for a drive to be bolted in. The original Apple G5 flip-down optical bay drive door mechanism is fully functional, opening automatically when an optical tray presses against it.
I'm asking approximately $500 but will consider offers & trades. Local pickup only (Chicago, 60657). I also have some mice/keyboard/19" monitor combos I would be willing to include for an additional cost. Please e-mail me if you're in Chicago and are interested in making an offer, as I can't guarantee I will see PMs here in a timely fashion: [email protected]
Last edited:
Hey guys. Sorry for the bump, but I wanted to announce that I am selling this machine, if you're near Chicago.
The motherboard can easily be swapped out with any MicroATX of your choosing, and the CPU water block is compatible with most Intel & AMD sockets (full list here)
Here are the specs as currently equipped:
Biostar G41D3C Motherboard (LGA 775)
Intel Q9550 Quad 2.8ghz
4GB G.SKILL RAM (expandable to 8GB)
XFX HD-5850 Radeon GPU (not pictured)
No HDD included.
No optical drive included.
Swiftech MCP655 pump
Koolance 1x120mm copper Radiator
Zalman ZM-WB5 water block
Bitspower Z-Multi 80 Water Tank
3/8" ID tubing
EK Fittings
Also included is a bunch of extra water-cooling materials I have on hand (extra matching tubes, fittings, coolant, some fans, etc.)
This purchase would be best for a PC modder who would like to further this project. There is currently no power switch integrated into the case (standard push-button switch is included, but it's not mounted), and there is currently no mounting points built for a HDD. Plenty of room for one where the optical drive would normally go, if you choose not to install an optical drive. In regards to the optical drive, standard mounting holes are present, allowing the possibility for a drive to be bolted in. The original Apple G5 flip-down optical bay drive door mechanism is fully functional, opening automatically when an optical tray presses against it.
I'm asking approximately $500 but will consider offers & trades. Local pickup only (Chicago, 60657). I also have some mice/keyboard/19" monitor combos I would be willing to include for an additional cost. Please e-mail me if you're in Chicago and are interested in making an offer, as I can't guarantee I will see PMs here in a timely fashion: [email protected]
Hello Todd,
So I been married to both Mac's & Pc's since Lias.
Mac for Adobe Creative Suite, Pc's as Autocad industry standard.
Pretty much have every other year of each - many, (Still have Quarda 650 + 850VI) + PowerBookPro 17" Santa Rosa + latest Imac ipones, yada yada
(I kept Quadra 850 avi. Apple own ethernet prior to industry standard, what is remarkable with regard to it is/was it's video - I felt the pinnacle for them)
Anyhoo, I have 2 Power Mac's G5 Early 2005 - I refuse to let go of. To me still major work horses. Just prior to them going w/intel chip, not upgradeable,
essentially becoming obsolete very soon
On one I need 80mm fan w/speaker - looked @ images on web, clicked yours --- landed here.
WOW! I could not believe what I was looking at, what you did
I felt compelled to join here just to tell you.
You are AWESOME!!! You re-designed it way better that Apple initially designed it .... or ever could.
I was blown away.... Totally .... and so clean, efficient and elegant. WOW!
Steve Jobs would have loved you... seriously Totally clean - & extension chords.. ha ha, ok maybe not those. Although extra credit for originality.
I found it amazing, you never dove in to one, much less 2, despise OS. Yet re-designed it so clean. WOW!
Again, I was just blown away.
Incidentally, if you did pencil renderings - you have a great hand. if electronically, you have great electronic hand.
Though, excellent taste, and incredible mind to conceive of the concept.
I wish I could ask you a question or 2 regarding mine.
Lastly, I recall your question regarding little screws. They are either from Bluetooth mount, modem filter board cap, antenna mount, f there were 5 they are from the logic board, If there are 3 it's PCI divider, 4 go under processor standoff. It looked identical to what fell when I repaired the EMI shield, I mean below the ambient board, the metal cap area, that covers the front panel board EMI shield. (Because I broke 1/2 earphone plug there) . I initially thought, OH looks just like rear interface for DVI ports.
Sorry, I am not specific, I just glanced at it, those areas came to mind.
In any event, I was seriously impressed, In my limited opinion, I felt/thought you did a superb Job, I never though it could be that clean.
Great Job
gregory.jeselnick@verizon .net
Thank you