NCASE M1: a crowdfunded Mini-ITX case (updates in first post)

I noticed the EKWB heatsink on the rear-mounted M.2 SSD in the third photo. On my son's computer I had to remove it because the height of the M.2 socket was too low and the heatsink's clips were making contact with the motherboard and the computer wouldn't boot. Afterwards, EKWB added a minimum M.2 socket height specification of 4.2 mm to the product's information. The webpage includes a link to images of M.2 sockets of 3 different heights, 4.2 mm, 3.2 mm, and 2.25 mm.

You have to drill the back cover :)
 
I mentioned the Rockit 88 because that is what I used, I know the der8auer is a good kit. I just meant I think they are worth the money for peace of mind.

All good!

For those that have delidded. Did you bother to re-seal ?? Or just put the IHS back on whilst the CPU sat in the socket and let the pressure mount do the work? I feel like i'd rather re-seal but also maybe not??! lol.
 
I’d delidded my 6700K using a razor blade, and the 8700K with the Rockit kit. Definitely much easier to reseat the IHS with Rockit kit. I’ve resealed both of them using silicon gasket glue, but the 6700K was sort of crooked, so I removed the IHS again but didn’t bother gluing it again. The 6700K and it’s IHS are probably held in by the motherboard socket and clamp now.
 
All good!

For those that have delidded. Did you bother to re-seal ?? Or just put the IHS back on whilst the CPU sat in the socket and let the pressure mount do the work? I feel like i'd rather re-seal but also maybe not??! lol.

I used black RTV silicone to re-seal mine, I was uncomfortable with leaving it loose plus if I ever decide to sell it I want it sealed. Just make sure you leave a gap in the silicone like Intel did.
 
Okay thanks guys.

Still need to weigh up the cost, given I want to upgrade this rig eventually anyway (2600x or something). and the 4690k will be moved to my HTPC to replace a G3258. Though given the fact it will be re-used, means I can run the fans super low speed for silent operation in my HTPC if I can drop the temps significantly... XD

I'm not sure if the improvement is as good with Devil's Canyon as with Coffee Lake but I lowered my temps 20C at 1.35v and 15C at 1.20v on my 8700k. Well worth it for me since I switched cases to a MI-6 that only has 65mm clearance for CPU cooler, with the delid I have no problem cooling the 8700k with a Scythe Big Shuriken 2. If you will be more limited in cooling options in your HTPC you should still not have any problems.

I used to have a 4690k, damn good CPU.
 
All good!

For those that have delidded. Did you bother to re-seal ?? Or just put the IHS back on whilst the CPU sat in the socket and let the pressure mount do the work? I feel like i'd rather re-seal but also maybe not??! lol.

Looks like I'm a bit late with my reply. Anyway, I recommend you read the discussion I had just after my old post that I linked to above.

After delidding I didn't have any liquid metal so I used Noctua's thermal compound. I did not relid, but I did remove all of the old adhesive. I let the socket and heatsink pressure keep everything in place. Initially, my temperatures we're lower, but over time they slowly crept backup to my pre-delidding values.

I bought the Rockit 88, some Thermal Grizzly Conductonaut, and some clear silicone adhesive. I cleaned my CPU and the IHS, applied the Conductonaut as thinnly as possible to the CPU die and the underside of the IHS, and applied a very thin bead of the adhesive with a very small gauge syringe to the rim of the IHS. Oh, I also covered the small surface-mounted components adjacent to the CPU die with a few thin layers of clear nail polish to eliminate any chance of the liquid metal causing a short circuit. The Rockit 88 made it very easy to center the IHS on the CPU package and I kept it clamped (not too tightly) for 2 days to cure.

Since then my temperatures have been about 20 degrees Celsius lower and stayed there. Take your time and you should have good results too.
 
I'm not sure if the improvement is as good with Devil's Canyon as with Coffee Lake but I lowered my temps 20C at 1.35v and 15C at 1.20v on my 8700k. Well worth it for me since I switched cases to a MI-6 that only has 65mm clearance for CPU cooler, with the delid I have no problem cooling the 8700k with a Scythe Big Shuriken 2. If you will be more limited in cooling options in your HTPC you should still not have any problems.

I used to have a 4690k, damn good CPU.

My CPU is a 4790K, also a Devils Canyon model. When it was released Intel claimed the TIM was improved, but my temperatures were very high before delidding. And that's with an NH-C14 cooler. Nothing I tried reduced my temperatures to what other owners of this cooler were getting. Only delidding helped.
 
  • Like
Reactions: Jspr
like this
Looks like I'm a bit late with my reply. Anyway, I recommend you read the discussion I had just after my old post that I linked to above.

After delidding I didn't have any liquid metal so I used Noctua's thermal compound. I did not relid, but I did remove all of the old adhesive. I let the socket and heatsink pressure keep everything in place. Initially, my temperatures we're lower, but over time they slowly crept backup to my pre-delidding values.

I bought the Rockit 88, some Thermal Grizzly Conductonaut, and some clear silicone adhesive. I cleaned my CPU and the IHS, applied the Conductonaut as thinnly as possible to the CPU die and the underside of the IHS, and applied a very thin bead of the adhesive with a very small gauge syringe to the rim of the IHS. Oh, I also covered the small surface-mounted components adjacent to the CPU die with a few thin layers of clear nail polish to eliminate any chance of the liquid metal causing a short circuit. The Rockit 88 made it very easy to center the IHS on the CPU package and I kept it clamped (not too tightly) for 2 days to cure.

Since then my temperatures have been about 20 degrees Celsius lower and stayed there. Take your time and you should have good results too.

Yeah I did read that part about your mounting issues and slow rise in temps. 2 days! 2 days without my computer!? :p. (i'd be fine haha).

Sounds like a good weekend project I should commit to and stop dancing around the idea XD
 
Yeah I did read that part about your mounting issues and slow rise in temps. 2 days! 2 days without my computer!? :p. (i'd be fine haha).

Sounds like a good weekend project I should commit to and stop dancing around the idea XD

I probably only needed to wait one day, but I decided to give it extra time.

Many people use an instant glue in 4 corners instead if adhesive along the edges of the IHS. I don't know if this helps with stiffening the entire CPU package or just keeps the IHS in place. Others scrape off the old adhesive from the IHS and count on the adhesive around the CPU die (or vice versa) to hold the IHS in place.
 
If I did it again, I'd try without any adhesive at all.

I used a liquid electrical tape product that was a bit messy but quite fast to become tacky. Overall probably a few hours to set so quite convenient.

That said, I just started to use the CPU immediately anyway after the first few goes. After thinking about it, I just don't see any significant benefit in letting the adhesive cure. In my mind, any significant mounting pressure on the PCB would quickly overcome any bond that set beforehand. If you're letting the glue cure whilst mounted, then everything is being held in place anyway and CPU coolers seldom put any significant lateral pressure on the IHS which would otherwise move the interface around.

With all the of the above in mind and the fact that I rarely un-mount my CPU, I'd just let it be.

Hardware Nexus also suggest that no glue at all results in temperatures a few degrees lower. It's pure speculation, but the increased mounting pressure without the gap provided by the glue probably causes the substrate to flex in a way that promotes a flatter contact with the IHS. Perhaps the glue would interfere with letting the substrate flex appropriately?

It's amazing how many theories and suggestions there are about what to do with the IHS after relidding. I am not an expert, but I've read a lot about this on many hardware sites and forums. I have no idea which method is best or which theory is correct. I did what Intel does, but with a much thinner layer of adhesive, based on Kyle Bennett's testing.

I was following Kyle's article "Intel Kaby Lake i5-7600K CPU De-Lid & Re-Lid Temp Results". This article contains a video of the entire process that was done 3 times, once with Noctua's NT-H1 and twice with liquid metal. He did it twice with liquid metal because the first time the cooling results were lower than expected. Kyle theorizes that applying only a small dot of adhesive in the corners did not apply enough downward force on the IHS to minimize the gap between the CPU die and the underside of the IHS. For the final relidding he applies adhesive all along the edges of the IHS, leaving a small gap, as Intel did so equalize air pressure under the IHS at all temperatures. Now, the first time using the corner dots method, he hadn't allowed the adhesive to cure for 24 hours and the final time he does. So unfortunately, there are two factors changed.

In Kyle's review of the Rockit 88 is a video that shows him using a very small syringe needle allows the application of a very thin line of adhesive to the edges of the IHS. That is exactly what I did using an insulin needle which allowed me to leave an even thinner line of adhesive than in Kyle's video. Kyle mentions elsewhere that the Kaby Lake and Coffee Lake processors have thinner PCB substrates and he thinks that gluing the IHS down on all 4 sides stiffens the entire package to prevent it from flexing due to the mounting pressure of a cooler. His theory is that the flexing could increase the gap between the CPU die and the IHS.

Not using any adhesive at all is easiest. Applying 4 dots of instant glue or any other adhesive is next easiest. Applying lines of adhesive along the edges of the IHS takes more care and time, but I was in no rush and I didn't want any reason for second-guessing what I had done later. If you decide to glue the IHS down, I would trace its outline on the CPU substrate with indelible ink before delidding so that you know exactly where it goes. Kits like the Rockit 88 make placing the IHS correctly very easy, but if you don't have this kit an outline would be helpful.
 
Last edited:
I delidded my i7-8700K yesterday with the Rockit 88 kit, and that made the process very simple and easy to do, and the results are great when I'm testing now.

Before delid: CPU maxed at 90c with all fans running at max, CPU fan was doing 2000rpm and the system was very loud.
After delid: CPU maxes out at 68c with all the fans running at ~ 60% and CPU fan doing about 1400rpm and the system is barely audible.

Now my system is even better in this amazing case!
 
7700K here, delided w/ razor, no adhesive, Conductonaut.

It's been pretty amazing, I encourage those who are willing to be careful and take their time, to do it.
 
It's amazing how many theories and suggestions there are about what to do with the IHS after relidding. I am not an expert, but I've read a lot about this on many hardware sites and forums. I have no idea which method is best or which theory is correct. I did what Intel does, but with a much thinner layer of adhesive, based on Kyle Bennett's testing.

I was following Kyle's article "Intel Kaby Lake i5-7600K CPU De-Lid & Re-Lid Temp Results". This article contains a video of the entire process that was done 3 times, once with Noctua's NT-H1 and twice with liquid metal. He did it twice with liquid metal because the first time the cooling results were lower than expected. Kyle theorizes that applying only a small dot of adhesive in the corners did not apply enough downward force on the IHS to minimize the gap between the CPU die and the underside of the IHS. For the final relidding he applies adhesive all along the edges of the IHS, leaving a small gap, as Intel did so equalize air pressure under the IHS at all temperatures. Now, the first time using the corner dots method, he hadn't allowed the adhesive to cure for 24 hours and the final time he does. So unfortunately, there are two factors changed.

In Kyle's review of the Rockit 88 is a video that shows him using a very small syringe needle allows the application of a very thin line of adhesive to the edges of the IHS. That is exactly what I did using an insulin needle which allowed me to leave an even thinner line of adhesive than in Kyle's video. Kyle mentions elsewhere that the Kaby Lake and Coffee Lake processors have thinner PCB substrates and he thinks that gluing the IHS down on all 4 sides stiffens the entire package to prevent it from flexing due to the mounting pressure of a cooler. His theory is that the flexing could increase the gap between the CPU die and the IHS.

Not using any adhesive at all is easiest. Applying 4 dots of instant glue or any other adhesive is next easiest. Applying lines of adhesive along the edges of the IHS takes more care and time, but I was in no rush and I didn't want any reason for second-guessing what I had done later. If you decide to glue the IHS down, I would trace its outline on the CPU substrate with indelible ink before delidding so that you know exactly where it goes. Kits like the Rockit 88 make placing the IHS correctly very easy, but if you don't have this kit an outline would be helpful.

Couple of good points you make - the idea of using a marker to trace the outline is smart. As is using a syringe! I used a rather risky oiler to do the job (Basically just a sharp metal point dipped in glue = very easy to scratch something with that guy...)
 
Fellow geeks, initially I want to say THANKS to all of you contributing to knowledge about components and building philosophy around this magnificent case :)

Has anyone of you tried to use the old Noctua NH-L12 in this case? In my country (Sweden) the L12 is very hard to buy as it's a discontinued product. Reading the #1 forum over here (SweClockers) the Louqe Ghost S1-thread, the founder states that Noctua is bringing the L12 back to life, and probably even in a Louqe Special Edition.

I built my M1 last month and I'm very pleased with it, but it's still not perfect. I use the Fractal Design Celsius S24 for the i7 8700 (mounted on Asus H370i) and it maxes out at 66 degrees on the highest core temp after one hour in Aida64 (no FT). However, it's occupying very much (all) available space which make airflow hard, especially to my GTX 1080 FE. The tubing and radiator is literally everywhere!

So, plan B would be to try the L12 (if it fits and can be acquired) and also go down the Arctic Accelero Xtreme III route.
The M1 is a completely different layout from the Ghost, and supports CPU coolers up to 130mm tall, so using a 60mm tall NH-L12 would be massively underutilizing the available space. Are you sure you're not thinking of the NH-C14? Totally different, much bigger cooler than the L12. If you want a minimum of fuss, just grab an NH-U9S.

That said, is the tubing from S24 routed under the GPU? Because otherwise it shouldn't have a big impact on it. Blower GPUs only need the area immediately around their fan to be clear, which shouldn't be a problem in the M1. It should get air from through the bottom vents easily on its own, but you could always add an additional 120mm fan right under it to force feed air to it.
 
IIRC people have used the NH-L12. It works but I think the general concensus is that there are better HSF units. And as far as I know the NH-L12 never went out of production. The NH-C14 has gone out of production for almost two years now.
 
IIRC people have used the NH-L12. It works but I think the general concensus is that there are better HSF units. And as far as I know the NH-L12 never went out of production. The NH-C14 has gone out of production for almost two years now.

The NH-L12 was recently replaced by the NH-L12S. Similar to what Noctua did with the NH-C14 they raised the height by 4mm and replaced the 120 & 92mm fans with a single 120mm slim fan.
 
The M1 is a completely different layout from the Ghost, and supports CPU coolers up to 130mm tall, so using a 60mm tall NH-L12 would be massively underutilizing the available space. If you want a minimum of fuss, just grab an NH-U9S.
That said, is the tubing from S24 routed under the GPU? Because otherwise it shouldn't have a big impact on it. Blower GPUs only need the area immediately around their fan to be clear, which shouldn't be a problem in the M1. It should get air from through the bottom vents easily on its own, but you could always add an additional 120mm fan right under it to force feed air to it.

My S24's tubing is coiled in there now, it was the "only" way to get it in place without having too much tension in the ends. I built a Node 304 with a NH-U9B SE2 a few years back and I'm quite pleased with that, wouldn't hesitate to use Noctua again :)

My real problem is that the GTX 1080 FE is throttling under load, even got two NF-F12 pwm:ed under it as intakes. Still reaches 84 degrees after some 10-ish minutes in Heaven. However, an Arctic Accelero Xtreme III is ordered now. Mr Optimum Tech from Australia managed to get nice temperatures in his project.

Without the original fans (he couldn't fit it otherwise) but two 120mm Vardar fans as exhausts, he measured max 60 degrees in Heaven in 2,000 rmp fanspeeds. That's amazing! Even at 1,500 rpm it was decent temperatures.
 
Last edited:
I say the working temps of a FE card is around 84 degree with a fan speed around 60% ...... i had a titan , titan x , 1080ti fe , in a big case in a small case and the temps are every time the same 82-84 degree Celsius and the clock speed it’s every time under load a little bit higher then the boost clock had never seen it below
 
I probably only needed to wait one day, but I decided to give it extra time.

Many people use an instant glue in 4 corners instead if adhesive along the edges of the IHS. I don't know if this helps with stiffening the entire CPU package or just keeps the IHS in place. Others scrape off the old adhesive from the IHS and count on the adhesive around the CPU die (or vice versa) to hold the IHS in place.

I didn't realise rockit had an AU store, so I ordered the delid/re-lid kit with their glue (7 bucks whatever) and my partner will give me some of her clear nail polish lol. also went all out and bought the copper IHS replacement XD. Then bought kyronaut/conductonaut from an alternative store.

Fun times on the way!

Nice, I found the Rockit kit to be high quality and worked really well. Those copper IHS weren't available yet when I did mine or I would have definitely ordered one. Good luck and let us know the results.
 
Nice, I found the Rockit kit to be high quality and worked really well. Those copper IHS weren't available yet when I did mine or I would have definitely ordered one. Good luck and let us know the results.

Yeah I'm keen! The re-lid kit sold me on the rockit. I want it to be as painless/easy as possible lol. I have a 4690k and G3258 that'll work with a delid, so I can try on the cheaper pentium first if i really want to do a trial run. Though if I kill it i'll need a new HTPC cpu lol.

Waiting on delivery for it all though. Probs won't get to it til next weekend.
 
I didn't realise rockit had an AU store, so I ordered the delid/re-lid kit with their glue (7 bucks whatever) and my partner will give me some of her clear nail polish lol. also went all out and bought the copper IHS replacement XD. Then bought kyronaut/conductonaut from an alternative store.

Fun times on the way!

I look forward to your results. Take your time and everything should be fine.

Watch out when you dispense the Conductonaut. It's too easy to have too much spurt out. I saw a video where the narrator (can't remember who it was) shook or tapped a small drop out of the Thermal Grizzly syringe instead of pressing the plunger. I think for that to work he must have some of the liquid metal already inside the tip of the needle.

Good luck!

(P.S. It was either Kyle at Hard|OCP, Steve at Gamers Nexus, Bryan at Tech Yes City, or Jay at JayzTwoCents.)

And then you have LinusTechTips who squirted it all over a laptop PCB. LOL.

Thanks! I'll definitely do a before and after check.
 
Those guys always use the black plastic tip instead of the angled needle that comes with the conductonaut. Google "conductonaut tips" and you will see both examples within the first couple pictures.

PSA, use the needle. Squeeze a tiny amount into a bottle cap, then dab the Q tip with that. You can spread super thin layers that way. Completely removes the threat of spewing liquid metal on components and produces better, thinner layers.

That is a good idea, I found that it is hard to squeeze out just a small amount and even a little bit goes a long ways.
 
Yeah I'm keen! The re-lid kit sold me on the rockit. I want it to be as painless/easy as possible lol. I have a 4690k and G3258 that'll work with a delid, so I can try on the cheaper pentium first if i really want to do a trial run. Though if I kill it i'll need a new HTPC cpu lol.

Waiting on delivery for it all though. Probs won't get to it til next weekend.

The copper IHS is a good buy in my book. I had a work colleague who is building his first computer and might give delidding a try - might combine and split the cost of the delid tool with him. I don't think he will be brave enough to go with the razor blade method.
I might get an IHS for myself at the same time.

I'm interested in how to rate both the tool and the IHS replacement!

I won't be doing any IHS comparison tests, but they're well documented online anyway. Just a simple before and after. XD.

Given how hot mine seems to run + the copper IHS swap, I'm hoping for 15+ degrees drop easy. In fact I'm keen for 20+ but hey let's not count our eggs.. lol
 
It's going lower than the base clock (1607mhz)?

The throttling was only an assumption really, as it sounded like the 1080 FE had asthma when I ran Heaven.
Tried Skyrim for a while yesterday, and the FE behaved really good! Didn't breath heavily at all. Weird.
Something back in my mind tells me that W10 Spring Creators Update might have something to do with it as well, been messing with updates a few times over the past week.
Well well, the Arctic Accelero Xtreme III will probably make the thermals better anyhow.

Might try to use my oldest son's 1440p monitor instead of the wife's 1080p to increase GPU load in games just to see if the "asthma" comes back in games.
Or maybe just add a bunch of mods in Skyrim.

I've also had some strange issues with my graphics driver after the spring update, I have installed the same driver, 397.31, 3 times so far. Keeps telling me needs to upgrade. Hopefully it sorts itself out. I rolled back to 388.13 and will wait for the next update.
 
I searched for"Conductonaut tips" and it led me to the video I was thinking of by Steve from Gamers Nexus titled "Skylake-X i9 Delid and Liquid Metal Application Tutorial".

I should have specified. Google images search for "Conductonaut Tips."

This will show you the two different tips within the first two images. Use the second one. The silver needle. Using a bottle cap or piece of cardboard or hard plastic or anything else to apply the LM to first, then rub it with a Q tip and apply will get much thinner results. If someone decides to ignore that completely and they put too much on the die, they can always insert the needle tip into the biggest glob and pull back on the syringe and grab up the leftovers. I once emptied an entire tube on my 7900x just to see how much was in the tube. It's a ton by the way. Then I grabbed it all back no problem. I should make a video about this because there hasn't been a single one I've seen that looks right to me.

Thanks for the clarification. I checked both of my Conductonaut packages, included the unopened one, and neither included the needle tip. They only had the thin black conical tip.
 
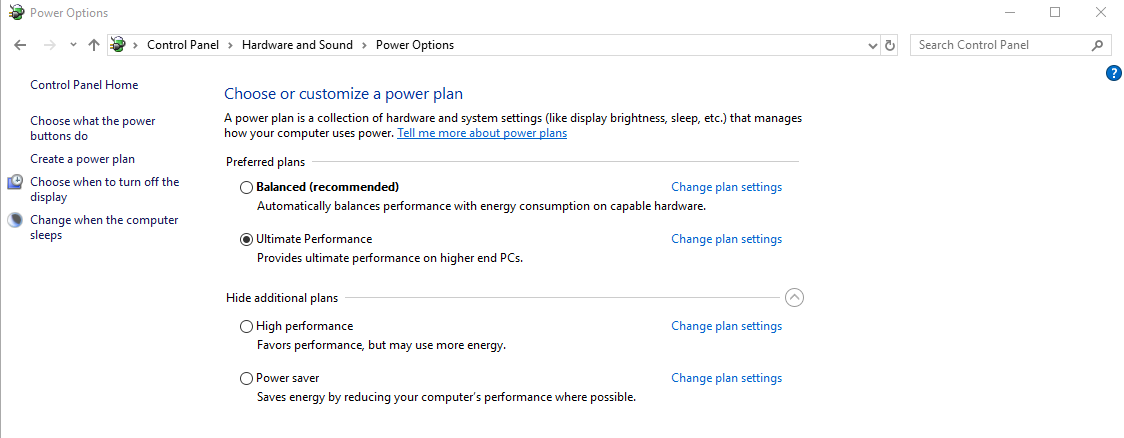
Anyone notice this? They added an "Ultimate Performance" to the power options with the spring update. Not sure if it does anygood but I checked it.

94d03cb395.png
 
Thanks for the clarification. I checked both of my Conductonaut packages, included the unopened one, and neither included the needle tip. They only had the thin black conical tip.

I used the Coollaboratory Liquid Pro and mine only had the needle tip.
 
Back
Top