Watercooling... ??? (noob here)

Yes, it's the one on the bottom right in the thumbs-up section.

The alternative is the one on the left, which would have the window facing the divider in the case (facing the back of the motherboard) which would have been a pain just to check the water level.

Edit: It didn't occur to me to mount it with the window facing up, but apparently that's an option too. Matter of fact, I think I'll do that because the pump is behind it, so if the water level gets low it will still stay at the pump - the one on the right looks like the pump would be at the top of the reservoir so maybe window up would be better?

Edit 2: Thinking about it, window up might make it difficult to tell how full it is...
Window up would also make it difficult to fill to the top. I'm betting, too, that window up would draw air into the pump even when mostly full. Think of the vortex effect when emptying a sink: that will apply here.

The best way to mount this thing from a fill and bleed standpoint is with the window facing out and the fan in the back; as you would if it were exhausting out the back of the case. That places your fill port at the highest level, and your pump inlet at the lowest level, relative to the reservoir. Unfortunately it doesn't seem like that's an option for you.

Just to give you some ideas, here's the lengths I had to go to to get my system to be bubble-free:

https://hardforum.com/threads/laughably-cheap-pump-that-works-project-completed.1920090/

I used quick-disconnect fittings and an external pump/reservoir so that I could tie into the loop, prime it, let it work most of the bubbles out, then close the loop with the quick disconnects.

Given that you've already purchased and opened up the H140x, my recommendation to avoid these kinds of headaches is still to buy a small, inexpensive reservoir that you can locate physically higher than the H140x unit. The H140x is a competent unit in terms of the pump, but it's so difficult to get all the air out if you're filling from the included port.

If you have a bunch of air in that system, it's gonna be noisy and hydraulically inefficient.
 
Given that you've already purchased and opened up the H140x, my recommendation to avoid these kinds of headaches is still to buy a small, inexpensive reservoir that you can locate physically higher than the H140x unit. The H140x is a competent unit in terms of the pump, but it's so difficult to get all the air out if you're filling from the included port.
Excellent idea! Performance-PCs sells a number of brackets for mounting reservoirs to fans, both 120mm and 140mm. A small 50mm-150mm reservoir attached to a bracket attached to a fan above the H140x should work great.
 
Excellent idea! Performance-PCs sells a number of brackets for mounting reservoirs to fans, both 120mm and 140mm. A small 50mm-150mm reservoir attached to a bracket attached to a fan above the H140x should work great.
Also worth noting: the included pump in the Swiftech unit looks like a DDC and will even mate up with a common DDC pump top, but it will NOT work. The Swiftech pump relies on a small plastic "keeper" post on the pump top that prevents the impeller assembly from becoming unstable on the shaft. A typical DDC pump top will not have this post and the pump will destroy itself without one.

Ask me how I know... ;)
 
Well, during the planning process I realized what a pain in the ass this is going to be to fill so I went ahead and ordered a reservoir. It's a Phobya Balancer 150mm, which should be plenty big considering there will be two reservoirs. I got this because it has connections on the side and the bottom. This way I have some versatility (since I'm not sure where I want to put it yet) and I can (hopefully) use the silver plugs I bought, even though it sounds like it's not really necessary.

Also, my dumb ass didn't even look at the mm measurements on those other clamps I bought, and they're not really 5/8" (see here: https://smile.amazon.com/gp/product/B01621YNTE/ref=oh_aui_detailpage_o04_s01?ie=UTF8&psc=1). It says 5/8" but the smallest it clamps is 16mm. Somebody's math skills suck worse than mine.

So I got some that clamp down to 15.5mm (15.5 to 17mm, 5/8" is 15.875) so they should be good to go. That still doesn't explain why the tubing's outer-diameter measures small on my caliper, but the first clamps were JUST short of tightening, so these should be good.

I'm done with this for now; it'll either all work out or it's all getting put in a closet for a while. I'll start a new thread with pics if it ever gets finished. lol
 
Just make sure you mount the Phobya reservoir higher than the H140-X. Since the H140-X has the pump attached to it you want to make sure it always has water in it. Feed the rest of the loop into the Phobya res and the Phobya then feeds the H140-X.

Don't get too frustrated with it. Water cooling is more challenging than regular air cooling. It takes more time and patience. Just step away from it for a day or two if you start getting frustrated. I was having flow issues with my new build. I was getting frustrated because I couldn't figure out why. Stepped away for a day and when I came back to it I was looking at it with fresh eyes and mind. Found potential problems, figured out how to resolve them and got to work. I had to drain the loop and disassemble about half of it. It was a fair amount of work but in the end it only took me about 90 minutes start to finish. Result was significantly better flow in the loop. Just keep plugging at it man, you'll get there!

Now if I can just figure out why my temps are still so high...
 
Last edited:
Okay, one last question before I finish this: Is it alright to run the system while the Sysprep fluid is running in it?

It says to run it through the loop for at least 12 hours, drain, and repeat if necessary. Should I run it with the motherboard power disconnected? I'm not sure if added heat would have an effect on it.

Thanks
Well, depends. Is this run of Sysprep also going to be your leak test? If it is, best practice is to run ONLY the pump for the leak test, ideally using a separate power supply located outside the case. This way if there's a leak, nothing energized = nothing destroyed.

If you've already leak tested the system and you're just doing a run of Sysprep to clean it, it won't hurt anything. Your coolant mix is still primarily distilled water, so it'll cool just fine.
 
Ahhh, ok... leak test! I forgot about that. lol Yeah, I guess it is going to be my leak test. I guess that will be better so I can keep the block away from the motherboard a bit. The rest of the tubing connections, the reservoir, and the pump are far away from anything. I was hoping to assemble it outside of the case, but I can't get the waterblock over the case's divider with the hosing attached.

Well, two more tubes to connect and off I go. Wish me luck, I'm gonna need it! lol

Thanks :)
You don't need to worry about separating the block. If there's a leak and your motherboard gets wet, as long as it's not powered, it'll be okay. You'd just have to take it out and put it under a fan and give it a good 48 hours to dry.
 
It's all hooked up, and so far I'm getting no leaks, but this getting rid of air bubbles seems to be a tricky business. It seems like it's going to take all day. Is that normal?
 
It's all hooked up, and so far I'm getting no leaks, but this getting rid of air bubbles seems to be a tricky business. It seems like it's going to take all day. Is that normal?
Every system is a little bit different, some are easier to bleed than others. Just depends on where your specific components like to trap air in the orientation they're in.

Did you wind up adding a small res to the system, or are you just using the 140X-Drive for now? A picture would help me advise you. =)
 
I can't upload a picture just now because I haven't found a place to upload pics (I used up all the free trails). Know any free pic hosts?

But here's how it's set up: The reservoir is mounted vertically using the two 120mm fan screw holes at the top-rear of the case----> This feeds straight down to the H140-X's inlet which is mounted two 140mm fans down at the bottom of the case--->this goes out over the top of the case divider to the CPU block--->the CPU block then goes to the bottom of the case (CPU side) and feeds the 420mm radiator---->the 420mm then goes back up over the divider back to the reservoir.

I would seem I have to alternate between tipping the case sideways and upside down to make any progress. It's as though the pump isn't powerful enough to overcome gravity (it's running full speed I'll assume since the PWM connector isn't connected).
This forum doesn't require third-party image hosting! You can upload pictures straight from your phone and insert them inline with your post. If you're on PC, you can just drag and drop images into the message box and it'll upload them for you. =)

It's tough for me to picture what you mean with your description, because as I recall the Swifty unit has more than one port that could be used as an inlet. Please post a pic if you can.
 
Ohhh ok, I'll give that a go. Be warned: it's a mess in there, I have lots of cable management n' whatnot to take care of. lol be back in a few...
 
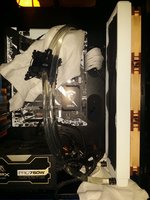
Ok, on the left (I think, they're side by side on my screen) there is the waterblock feeding down to the 420mm Radiator, and is being fed directly by the H140-X.

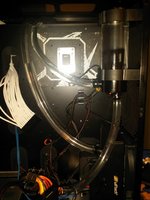
On the right is the other side of the case with the H140-X at the bottom being fed by the reservor, then going back up and feeding the waterblock.

So... Reservoir--->H140-X--->CPU block--->420mm radiator--->reservior

P.S. I'll be mounting the reservoir on the back of a fan in that spot but I need to get some longer bolts.

Motherboard side - Copy.jpg Drive side - Copy.jpg
 
P.P.S. I did end up using zip ties in some places. They seem to be just as tight as the clamps that came with the H140-X and I had a hell of a time finding the right clamps. Since the tubing is almost impossible to get off the XSPC barbs (they come off the H140-X barbs just fine) I'm confident they will hold.
 
Ok, on the left (I think, they're side by side on my screen) there is the waterblock feeding down to the 420mm Radiator, and is being fed directly by the H140-X.

On the right is the other side of the case with the H140-X at the bottom being fed by the reservor, then going back up and feeding the waterblock.

So... Reservoir--->H140-X--->CPU block--->420mm radiator--->reservior

P.S. I'll be mounting the reservoir on the back of a fan in that spot but I need to get some longer bolts.

View attachment 42566 View attachment 42567

If you flip that radiator over, you can shorten those tubing runs and make the system a lot easier to bleed...
 
If you flip that radiator over, you can shorten those tubing runs and make the system a lot easier to bleed...
I was thinking that, but I'm gong to avoid it if I can, it was a real pain in the ass to install. I don't know if it's the case or the radiator, but some of the screw holes barely lined up.
 
Okay. Here's my suggestion:

Clean up anything big and heavy or dangling, (remove your GPU for this step if you can), fire up that pump, grab your case and shake it like a Polaroid picture.

The H140 has lots of little flat pockets and cavities where bubbles like to get trapped. You want to dislodge those. Your initial goal should be to get it so that there are no bubbles traveling down the line from your res to your pump unit.

Be careful, be safe, tie everything down and don't jostle it harder than you feel comfortable with, but I'm guessing that there's some air trapped in the impeller of the pump and it's hampering the pump's performance. It should quiet down to an almost inaudible hum once all the air is out.
OK! This seems to have helped. I'm getting a flow now at least. There are very tiny bubbles constantly flowing through and out the reservoir. I'm going to let it run for awhile and see what happens. I'm still hearing a lot of water noise in the pump, but I'll run it until the bubbles stop flowing and do it again.

Edit: It seems to be getting faster now with some really big bubbles occasionally. The reservoir is emptying now too. It's not getting much quieter yet, but I'll give it awhile.
 
OK! This seems to have helped. I'm getting a flow now at least. There are very tiny bubbles constantly flowing through and out the reservoir. I'm going to let it run for awhile and see what happens. I'm still hearing a lot of water noise in the pump, but I'll run it until the bubbles stop flowing and do it again.
That should be good. Some systems take weeks to fully bleed and they slowly do it by themselves. Your initial bleeding efforts are just to make sure the pump is properly primed and all the giant air pockets in your components are addressed. The little microbubbles will circulate through the loop, and eventually be caught and rise to the top in your res. =)
 
One thing that might help is to get those two tubes that run over the divider down lower and shorter. It looks like they run up higher than the water level in your reservoir. That will make it harder to fill and bleed. As Bandalo mentioned, flipping that front rad would help a lot to shorten them. Since that seems to be an issue, you could re-route those two runs through one of the cable pass-thrus which would lower them and shorten them. I would route them both through that lower vertical pass-thru. Unless you plan on running a ton of video cards and hard drives there should be plenty of room for those tubes and a few cables.

That's good advice VanGoghComplex gave you about shaking the system. That can help dislodge big air bubbles. Don't sweat the little ones - they will dissipate over time. One other thing I like to do when using longer (150mm or over) reservoirs is to put the inlet at the top and outlet at the bottom. This helps to trap microbubbles and keep them from forming. The anti-vortex divider you have in your reservoir will also help to mitigate this.

And now that you know how, do post more pics! These forums are like techie porn - you start talking about a hot chick and everyone wants to see under her skirt! Like the way Kyle has been making videos of the new Threadripper blocks. Takes her coat off, then her panties, then zooms in on the good bits. 8)
Well, it turns out, if I sit the case on it's side while the pump is off, with the H140-X's window facing down, and let it sit for awhile, then put it back upright, it pumps all the air out. I still have mirco bubbles sticking to the sides of the tubing, and the reservoir, but there doesn't seem to be anymore big bubbles so I'm not worried about it.

However, if I shut it down, when I start it back up I can hear water rushing through the H140-X for about 1-2 minutes, then it goes quiet again. Is that normal?

I'll be posting pics when it's finished. I de-lidded my CPU (as per Kyle's video, for the most part) so I'll be posting those too. It'll probably be a few more days if I don't have any bad parts this time.
 
By the way, WTF Swiftech? When trying to unscrew the thumbscrews (if that's what you want to call them, you can't really loosen or tighten them by hand) they are so tight that they instantly strip the cheap plastic nuts on the back of the backplate so they just keep spinning around. There's no way to get a socket or wrench on those nuts, so I have to use needle nose pliers. What a paint in the ass...
 
Well, it turns out, if I sit the case on it's side while the pump is off, with the H140-X's window facing down, and let it sit for awhile, then put it back upright, it pumps all the air out. I still have mirco bubbles sticking to the sides of the tubing, and the reservoir, but there doesn't seem to be anymore big bubbles so I'm not worried about it.

However, if I shut it down, when I start it back up I can hear water rushing through the H140-X for about 1-2 minutes, then it goes quiet again. Is that normal?

I'll be posting pics when it's finished. I de-lidded my CPU (as per Kyle's video, for the most part) so I'll be posting those too. It'll probably be a few more days if I don't have any bad parts this time.
That's pretty normal. Any air that's in the pump, even just micro bubbles, when it shuts down, will make noise when you start it back up. As time goes on and the loop bleeds itself more completely, the pump will see less and less air. Eventually it'll be quiet from startup to shutdown.

Congratulations! =D
 
Sweet! I'm glad it's almost over. This has been the most stressful computer build I've ever done (and not just because of the watercooling).
 
Well, it turns out, if I sit the case on it's side while the pump is off, with the H140-X's window facing down, and let it sit for awhile, then put it back upright, it pumps all the air out. I still have mirco bubbles sticking to the sides of the tubing, and the reservoir, but there doesn't seem to be anymore big bubbles so I'm not worried about it.

However, if I shut it down, when I start it back up I can hear water rushing through the H140-X for about 1-2 minutes, then it goes quiet again. Is that normal?

I'll be posting pics when it's finished. I de-lidded my CPU (as per Kyle's video, for the most part) so I'll be posting those too. It'll probably be a few more days if I don't have any bad parts this time.
I disagree with VanGogh :) in that in my experience micro bubbles make very little noise in the pump and only last a few seconds. Sounds to me like you still have a significant amount of air trapped in the pump, probably from the 140 rad.

Give this a shot: Make sure your big reservoir is full. Lay the computer over on the side with the res. Prop up the top of the computer a couple of inches to make sure the air bubble in the res does not reach the outlet. Fire up the pump and let it run for a few hours or overnight. This should help push the rest of the trapped air out. Also, the longer you let it run, in any position, the more trapped air will get bounced out. I just went through this with my new build and I ended up letting the system run for almost 24 hours before I got the pump quiet on start up. It took a few more days before the micro bubbles in the tubing and reservoir to dissipate. As I said before patience is the key. :)
 
Good news! I had the pump running overnight and I just shut it off and let everything settle. When starting it back up I heard the water rush for about a half a second and it went quiet again. Good to go.

Now I just need to do it two more times. lol
 
Good news! I had the pump running overnight and I just shut it off and let everything settle. When starting it back up I heard the water rush for about a half a second and it went quiet again. Good to go.

Now I just need to do it two more times. lol
See, there you go my man. Patience. Now after you do the final assembly and fill it with fluid you'll know what to expect and how to deal with it. Congratulations!
I just noticed that there is a water cooling subforum here. Oops...
No problem. It's still related.
 
Just a minor update: I turned the H140-X so the window is facing up, and it took half the time to bleed it the second time.

One more drain and fill and good to go. I hope this 7700k still works because I haven't been able to test it after the delid. lol
 
Finally fill is complete and it's working the bubbles out. I should be doing the finally assembly tomorrow.

I have the horrible feeling that I killed the motherboard or CPU, but I shouldn't make any assumptions. lol
 
Finally fill is complete and it's working the bubbles out. I should be doing the finally assembly tomorrow.

I have the horrible feeling that I killed the motherboard or CPU, but I shouldn't make any assumptions. lol
Why would you think that? Everything is probably fine. You've been doing a good job so far so I wouldn't anticipate any trouble.
 
Why would you think that? Everything is probably fine. You've been doing a good job so far so I wouldn't anticipate any trouble.
I don't know... The motherboard has me worried because it's the third one (although, I'm pretty sure the 2nd was a broken return sold as new) and the 7700k is the highest-end CPU I've ever bought, and I took the chance on delidding it, and I have no money to replace it if it's broke. My luck says there's a good chance they're both dead. lol
 
I don't know... The motherboard has me worried because it's the third one (although, I'm pretty sure the 2nd was a broken return sold as new) and the 7700k is the highest-end CPU I've ever bought, and I took the chance on delidding it, and I have no money to replace it if it's broke. My luck says there's a good chance they're both dead. lol
Don't stress. You seem like the careful sort to me. This stuff isn't rocket surgery, and you've been asking the right questions. Everything will be good, my man. =3
 
Last edited:
Don't stress. You seem like the careful sort to me. This stuff isn't rocket surgery, and you've been asking the right questions. Everything will be good, my man. =3
Exactly what he said. I'll bet everything fires up and runs fine. Just take your time.
 
I'm not getting a display and no error beeps, but everything is lit up and the HDD LED has activity.

If I start it and press the power button again right away it shuts off immediately, but if I wait, there is a delay before it shuts down, so, I think Windows might be booting.

I have some troubleshooting to do. I'll get back to you.

P.S. The debug LED's are all dark, so everything seems to be fine as far as CPU, RAM, VGA, and boot device go, so that's good.
 
Last edited:
WOOHOO! Everything is up and running, except I think I have a dead GPU. It'll give me a display using the IGP, but no display from either when the GPU is in. That sucks, but it is still under warranty. Is ASUS's support any good? It took 2 months to get a keyboard back from Corsair. lol
 
WOOHOO! Everything is up and running, except I think I have a dead GPU. It'll give me a display using the IGP, but no display from either when the GPU is in. That sucks, but it is still under warranty. Is ASUS's support any good? It took 2 months to get a keyboard back from Corsair. lol
Dead GPU? What is it?
 
Just a quick initial result (all at 5Ghz, 1.3V set in UEFI):

With an NZXT Kraken X61 AiO, before delidding:
Prime95 (v25.9, build 4, in-place large FFT) 74C pretty solid
Realbench Stress test (v2.54): 71C peak (can't remember average)

Current setup after delidding:
Prime95: 57C pretty solid
Realbench: 56C peak, 50C average (it's jumping a lot between 46C and 51C)

These were both really quick results; maybe 10 minutes of each test.

I don't think I could be happier. This calls for a sixer of Heineken. :)
 
Last edited:
Back
Top