Project "SL5t"

CapTen

Weaksauce
Joined
Aug 27, 2016
Messages
71
Project „SL5T“

"SL" as you already know from Mercedes Benz, is to make the first impression what this project stands for. Elegance, luxury and simple forms.

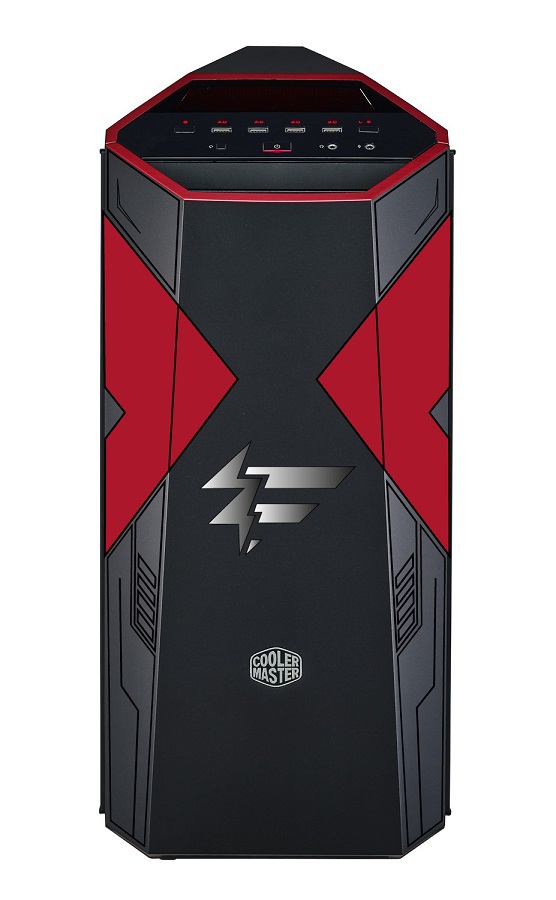
The MasterCase Maker 5T is used.
The interior is as discreetly as possible cleared of all unnecessary elements.
The walls are clad with Plexiglas and multi-layered in the design of the mainboard.
An elaborate water cooling system is installed which, however, is kept as minimal as possible.
A cover is made for the cable area, which provides a window for the PSU and on which the ASROCK logo is placed in case size.
The logo is framed with the design of the X99 Gaming I7 as well as I would like the elements of the mainboard to continue the whole case. (The red racing arrows between the lower two PCIe slots)
All cables are sleevedin the hardware colors.
From the outside the contours of the Maker 5T are emphasized by Plexiglas, where also sponsor logos will be found.

So much for the formal part.
The Maker5t will be my next Rig, since I have not yet a good portable Gaming PC.
So I have now also evasive possibilities when my table times problems and above all I can finally also times my table new hardware miss.

Actually, I wanted in this project not so much effort to operate but again will grow the mod again tremendous.

Since I now the first time on a separate X99 board change, I dedicate this mod to the

ASROCK X99 Gaming I7

And let the whole project be inspired by the mainboard.​

Hardware

CPU: Intel Core I7 6850K
Mainboard: Asrock Fatal1ty X99 Professional Gaming I7
Ram:
SSD:
GPU: Nvidea Geforce GTX970
PSU:MasterWatt Maker 1200
Case:MasterCase Maker5t

Watercooling

Bitspower NGTX970MGV2 Acrylic (Clear) BP-WBVGNGTX970MGV2NPAC
Bitspower Leviathan Xtreme 240 4xG1/4" Radiator BP-NLX240-F4PB
Bitspower Leviathan Slim 280 4xG1/4" Radiator BP-NLS280-F4PB
Bitspower DDC Plus Pump BP-DDCPLS
Bitspower DDC TOP Water Tank Integrated Kit 300 (POM Version With Z-CAP II) BP-DDCTOPWTIK300PC3-BKCL
Z-Tube 250( ICE Red) BP-WTZACT250-IRD
Bitspower DDC Pump Cooler Bracket (Red) BP-DDCPCBT-RD
Bitspower Pump Cooler For DDC/MCP355 (Red) BP-DDCPC-RD
Bitspower CPU Block Summit EF (Intel) (Acrylic Top Version) BP-WBCPUIAC-CUMBKWH
Bitspower CPU Block Plate For Intel CPU (Deep Red) BP-CPUIPT-DRD
Bitspower G1/4" Deluxe White Enhance Multi-Link For OD 12MM BP-DWEML
Bitspower G1/4" Deep Blood Red Enhance Multi-Link For OD 12MM BP-DBREML
Bitspower Deep Blood Red Enhance Rotary G1/4" 90-Degree Multi-Link Adapter BP-DBRE90RML
Bitspower Deep Blood Red Enhance 90-Degree Dual Multi-Link Adapter BP-DBRE90DML
Bitspower Deluxe White Enhance Rotary G1/4" 90-Degree Multi-Link Adapter BP-DWE90RML
Bitspower Deluxe White Enhance 90-Degree Dual Multi-Link Adapter BP-DWE90DML
G1/4" Deluxe White Rotary 90-Degree IG1/4" Extender BP-DW90R
G1/4" Deluxe White Mini Dual G1/4" Extender BP-DWWP-C42
G1/4" Deluxe White Rotary G1/4" Extender BP-DWRG
G1/4" Deluxe White Muti-Transfer Adapter BP-DWWP-C03
G1/4" Deluxe White IG1/4" Extender-15MM BP-DWWP-C60
Deluxe White Mini Valve With Black Handle BP-MVV-DWBK
Deluxe White Q Plus-Block BP-DWFMB
G1/4" Deluxe White Stop Fitting BP-DWWP-C06
Bitspower None Chamfer Brass Hard Tubing OD12MM Deep Red - Length 300 MM BP-NCBHT12DRD-L300
G1/4" Deluxe White Aqua-Pipe I BP-DWWP-C17
G1/4" Deep Blood Red CaseTop Water-Fill SET BP-DBRWP-C04
X-Station Mini Power-Extension I Female Version BP-MINIXSP1F-RD
Bitspower Logo Aluminum Thumb Screw For 632 (Deep Red BP-LATSC632-DRD
Bitspower Logo Aluminum Thumb Screw For 632 (White) BP-LATSC632-WH
Bitspower Metal Tubing Cutter BP-CMMTC
Bitspower Flow Indicator BP-FI-CLBKWH
Red Blade For Bitspower Flow Indicator BP-BFI-RD
Control: Aquacomputer Aquaero 6 XT

equipment

Fan:2 x NB eLoop B12-1 ,3 x NB eLoop B14-1
Headphone:MasterPulse
Keyboard:MasterKeys Pro M

Sketches

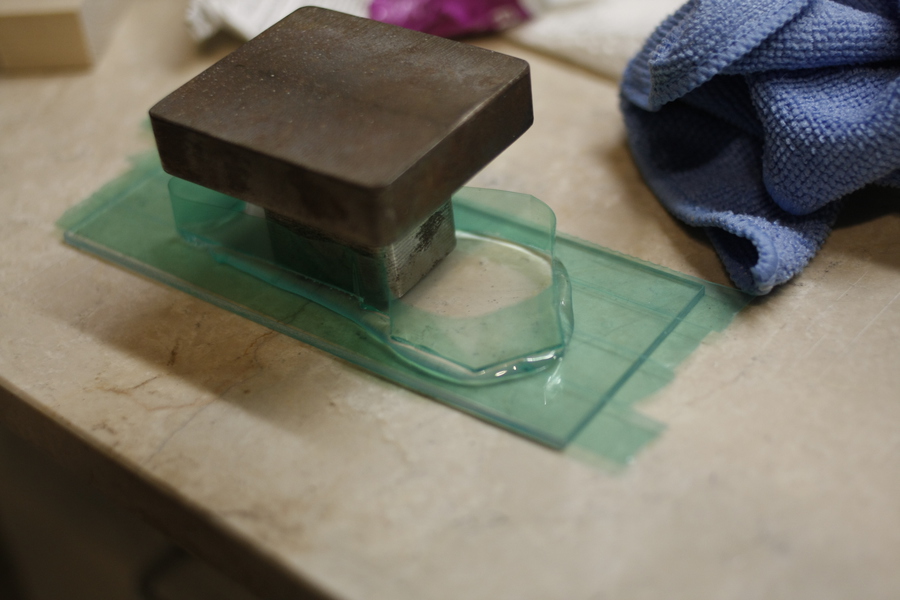
In order to bring the project as smoothly as possible, I took this time a bit more time on the computer and already times sketches for the different covers created.
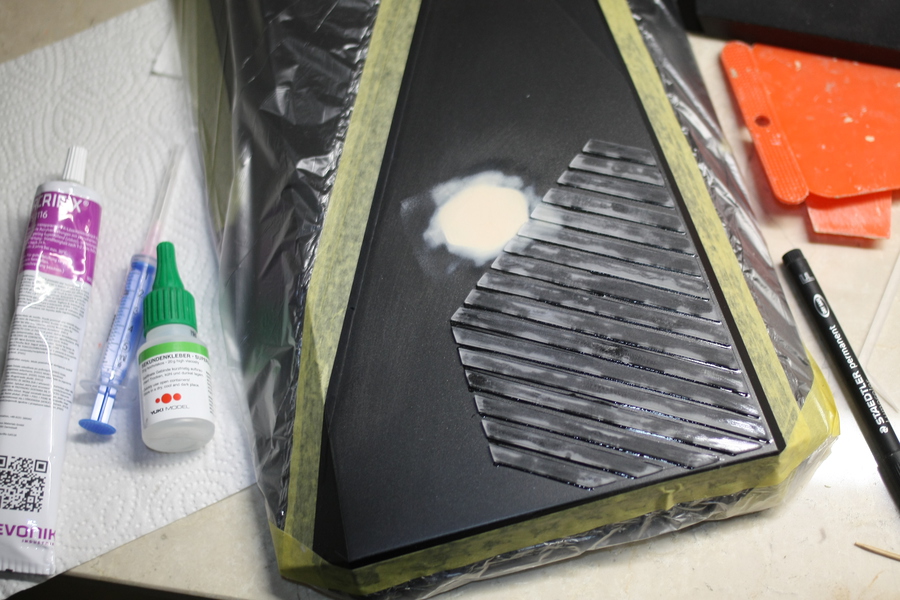
The elements are glued together in several different colors.
Partially varnished, partially foil and partly (only) polished.
For use comes Plexiglas in various colors and thicknesses, aluminum foils and varnishes.

This is only the rough basic idea, should expect again but not look good I let myself think of something else: thumbup:

This cover comes on the right side in the case inside where the drive bays sit.
To the right the original pattern and to the left the lighting effect.


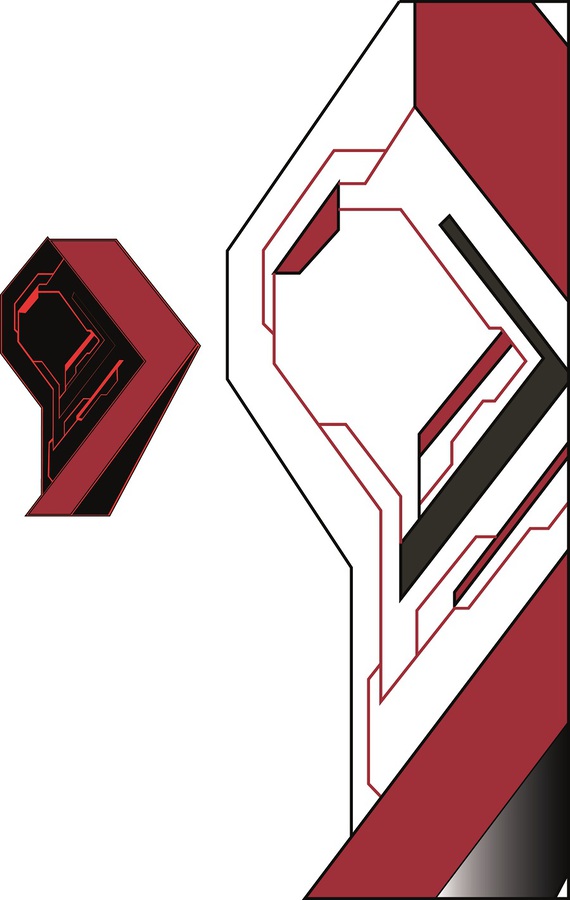
Here the front, whether the red arrows will really work well, we will see


Here the front of the PSU cover, the design on the left will frame the window to the PSU


And here the elements for the Windows, not completely in red but as template it is enough


Hardware pic´s

The majority of all components are already there, but see for yourself:


A big thanks goes to all who support me with this project:

ASROCK

COOLERMASTER

BitsPower

Blacknoise


Avexir
 
Last edited:
  • Like
Reactions: Derf
like this
Hi!

After the case was made naked, I had to realize that my radiator constellation was not as fit as I wanted.


After a long time, I had to saw.
The 280er does not fit above and the 240er comes extremely far down then the piping then the mainboard would cover, so the 280er upwards.
The yellow taped points I will cut first.
The second marking is for the 8Pin Atx cable which is exactly centered with the Gaming I7. Sloping cable routing is not my thing, so I will enlarge the cable lead.


In order to work there clean, I had to remove only the rear handle from the case.


And then everything clean, in the taped condition, cut open


With the radiator bracket I had only the rear wall cut off


The ATX cable bushing I cut up well on the double size and of course, once slipped off and the paint damaged.
Since I have already tried massively in different colors it meets this here with best but wanted to use and I will not continue it.


Then I riveted the handle from the case immediately and the rivets painted black (right), all interfaces of course also ..


Then I once cut all possible materials, cut patterns created, plotted and transferred to the material.

0,75 Alu for the Midtray
2mm Plexi for the HDD Cover Designs
3mm plexiglass red fluorescent as base plate for HDD cover and The X99 Arock arrows for the Windows.


Now it was also starting with the sawing, first the 2mm Plexiglas


Then the aluminum sheet


And the Decals for the Windows


After the sawing of the 2mm strips I have now all these on neat gaps, straightened and sanded.
The still black stripes come then in 3mm Plexi


Which I have sawn out next


Now I fixed all strips with double-sided tape and the dimensions for the base plate marked


Then I have the 2mm Plexiglas again completely ground, cleaned and with double-sided tape on a sheet glued so that it does not fly away from the paint.


The base plate is now also tailored


The edges I have all slanted to the half to 45 degrees. The outer edges with the top cutter and the inner edges by hand


The sheet metal for the Midtray was now completely cut and then folded.(bent)


Now I have cut 2mm aluminum for the PSU cover and cut a few small angles as a bracket and soldered together (also here: does not ask how, absolute disaster but it holds)


Now I have transferred the designs to the PSU cover


The Aquaero must be a bit deeper, so I have now torn all the surfaces to be sawed


Everything still nice straight cut


And the section for the PSU still slightly bevelled


So that would be status quo.
Next, I'm trying to create an inlay for the PSU window, hope it works out the way I've seen it with some others. Is indeed something angular.
And for the front of the case I'm still looking for inspiration. I just can not think of what I do best under the arrows, where the Cooler Master logo sits. Something has to be there because otherwise it looks boring.


So many thanks for reading, until the next update!;-)​
 
Hi Guys!

Go on.
After transferring the designs to the Plexiglas, I also cut these out


then tailored for the small strip on the far left a few times 2mm strips


Actually the red plexiglass should be polished but these small 2 x 20mm strips all the same to grind brought me to white heat. So I glued the small stripes with epoxy glue to the aluminum and just sanded them after curing.
The Red Plexiglas later foiled everything anyway. I just wanted the UV effect of the polished edges. But in this one place I will be able to cope with it. These strips are then painted with. ;-)


Two aluminum brackets have now been cut for the holder of the Aquaero


In this form, the entire cover did not fit into the PSU bay anymore. I thought I had to shorten the whole aperture still a bit but the angle adjust has also helped.


Since I have failed with the actual midtray miserably as far as the soldering, but it left me no rest,
I still had to practice and test something.
Screws I wanted here actually very reluctant.
Somehow it worked then, I believe at least.
It looked quite ok for a few remnants


So I now ventured to the correct angle.
Everything with as little contact with other surfaces so that the heat can not be dissipated as quickly and as a base a granite slab. Last but not least, the veneer of the workbench flown around my ears, they gave a loud bang XD!
So everything neatly sanded and degreased and then everything for soldering eigespannt.


I am really satisfied with the result. In the sample I did not have such good capillary action.


The window for the PSU I now cut from 2mm Plexiglas and polished all edges.


I have now completely glued on a 1cm larger plate


Is a little bubble but I like the effect. Thanks to the brass pipes of the water cooling you will not see any water in the system anyway.


The holes for the PSU aperture were still set at an angle behind I cut thread


The patterns for the front I have all transferred to 2mm Plexiglas and sawn.
Who knows?
Here I have already made the first changes to the original file?
I have here, incidentally, two 2mm slices glued together and both with a dishwashing cut;)


The two elements above the arrows I have cut from 2mm aluminum because I want to bend here a small rod


I have now marked these rods and cut them with the fine-boring grinder, which, by the way, did not say goodbye after two years. Man again buy new machine grrr
These I then clamped between two steel strips and worked something with the hammer until I was satisfied


Jooooo, So beautiful I could not even imagine it :D


Oh so on Sunday I wanted to spare my neighbors times a bit so I began to polish some parts of the red plexiglass


All these here
I cut off all cutting edges with a Cutta blade, then polished from 320 (400, 600,) to 800 paper wet and finally polished with two polishing pastes on high gloss.
Pagan work, man man and that was not even half


In order to see slowly times to go forward I began yesterday with the paint.
Will finally also see whether it all acts as I imagine it before it goes with the other surfaces.
Aluminum got a special 1 / K aluminum primer and the Plexiglas I primed with plastic adhesion mediator.
Then continue working with spraying spatula.


My workshop is definitely too small :|

So then, let's see how far I come next week.​
 

So it goes, after I had to grind all parts again and rework


Everything was painted


Afterwards, all parts were fixed to the base plate and glued with Acrifix 1S 0116.


As expected, of course, I slipped a few times with the syringe, damn grrr


The attempt to paint it was not particularly satisfying. I will foliate the places later


Despite all this, I am very satisfied with the color concept. I like it(y)


After a long time, I think a good design for the front and the top. It is a mixture of 2mm and 3mm Plexiglas combined in high gloss and matt.
So now I began to transfer all the patterns to the Plexiglas and cut them out
The front


and the top


Besides, I disconnect a graphics card from Light Glass, it hurt: heul
and this converted to Bitspower.
For that, the PCI bracket had to be folded again and painted black


For the HDD Cover I now still cut a second plate in white and for the strip of the front plexiglass 2x6mm


All parts for the top and the front are now bevelled (is there a term for this in English?)


Now the Coolermaster logo away with 2x polyester 2 / K spatula


And then I glued the 6mm strips on the front, fixed with seconds glue and the outer edges all closed with Acrifix, really complicated because the front is slightly bent.

img_2850yxqio.jpg


after the glue was dry, I then again revised the ends of the strips until all straightened with hand and power file, minor damage were 2 / K spatula


Then everything again primed and varnished


Now the edges of the white plate are polished and


So the result.
Here everything is already positioned for the water cooling and measured whether everything fits so far.
Therefore only the pipes have to be cut.


so then, see you soon!​
 
Tanks thanks! :)


Here is the next update!
I could last night unfortunately only 3h sleep then work 9h and 20.00 we have to take a night shift so I shall be brief

There is not much to say, the pictures speak for themselves.
Since the red film is a little translucent, I decided to double everything with film, so first black and then red.
Here are the small items around the PSU Window.


Then I the last week only polished


The black plexiglass was only frosted with 600 wet abrasive paper.
Is hardly recognizable in the photos.


Then it went to filming, first everything with black foil and then with red foil


Comes cool 8)


The small elements of the PSU window were made of burgundy foil which fits perfectly to the mainboard, the red foil is matching the case


Then everything was glued with transparent silicone to the Windows


And then lettering with white foil


Here the PSU window, glued with silicone, the small varnished strip I have previously covered with the burgundy foil


At the front there were some problems, as the front is slightly arched, the plexiglass was under tension and did not hold.
So everything had to clean again and paint again.
The plexiglass I have still slightly warmed and bent before the second attempt before I have attached it with epoxy glue.


With the other elements I am exactly the same.
Yeah !! I like it :D


Unfortunately, I had occasionally epoxy glue on the hands and the many cleaning of the surfaces, the paint was so strongly attacked that I had to paint everything again.
I really wanted to avoid it, but I could not let that happen.


Soo I like it better


Short and sweet ;-)
This week comes the top and hope also the cable sleeving or tubing. 8o​
 
Thank you wra18th


It's Monday, time for next update;)

Now I've upgraded the backplate visually.
For this I have two red 3mm plexiglas plates cut and glued together


Then I cut these a few days later in shape and from 3mm to 6mm slanted obliquely, it unfortunately got badly photographed


Then everything completely matted and glued to the GPU.
I've also added some of the motherboard's design.


Then it went with the foiling of the parts of the top


Because then I noticed that the foil to little is. Well sometimes you have to see it all before you.
I then began to edit the parts again


Besides, I have cut a new logo for the front and painted this silver


Now I finally finished all the parts and glued to the case with epoxy glue


Then it was time to lay pipes


Also here a few holes had to be set


matching the honeycomb design I have two spacers built so that the case does not protrude throughs so far inward


And here the finished loop


As you can see in the last picture, all PCI Thumscrews were exchanged for white, and others were used at PSU


Somehow I thought the PSU cover was too unstable, the gap around the Aquaero have often changed. I thought 2mm Alu would be enough but so I now have two aluminum angles cut, primed, painted and glued to the PSU Window


Yesterday I started already with the sleeving of the cables. Actually already last week but with the Masterwatt is a sleeving 1: 1 not possible so I had to reject the plan and create now only Extension.
The pump I have already finished :rolleyes:


So it is slowly coming to an end, but it still remains exciting as the cables all can be optimally laid and above all as I bring everything to the Aquaero:vain:​
 
Now the next update.
Before the Cebit did not have much time and now I wait for the mod to come back again:D

So ..... what had to be done:
For the correct installation of the front radiator a few holes had to be changed


The HDD cover got to fix still angle


The Aquaero has now finally its black aperture


The Flexlights for the interior and the PSu Window were soldered and sleeved


In the midtray was still a hole for a few MB cables and the GPU lighting set


The Sata cables I have shortened to a single connection. This is also quite easy. From the last Sata connection simply the cap carefully lever off and then the cable over the required plug as scarce as possible cut off. Now put the cap back on exactly this plug and done


At the MB tray was as always exactly there a strut where the ATX cable should run, so also had to be helped here again.


Since I no longer need the grommets of the midtray I could make a new execution for this big hole


At the top there was still a vacancy which looked a bit dull, so I cut a little bit of aluminum, painted it and then covered with the red foil


The extensions are now all ready


Since one under the IO-Shield the radiator saw had to be made for this still a small aperture
First the pattern taken


Then cut out the appropriate piece from the front grille


On this grid are two stripes which I originally wanted to leave in red.
First sawn a 3mm strip and then ground in shape


In red but it did not really fit so I painted black with two layers of clear lacquer


The whole I then somewhat offset to the front fixed and with silicone glued


Shortly before I have still two red LEDs set so that the slots in the front light


All cables tidy hidden under the insulation


The GPU got red LEDs


The headset I have now also an individual touch given


Since the mussels are slightly arched, the Plexiglas had to be slightly bent


The PSU Window left me no rest. I then found a good tutorial for cementing plexiglass.
Important is polyester adhesive tape. So again a small window cut, adjusted, polished edges.
Apply the polyester adhesive tape completely to the surface to be glued, then place the window on it and gently cut it with the scalpel once. So I now have a perfectly mashed surface.
Remove the center tape now, of course. Then apply abundant to full acryfix and press the window gently free of bubbles.

_mg_2973m5s94.jpg


This time I have accelerated the drying process additionally with UV light, just in bad weather, the sunlight simply does not matter. I think it was also often to bubble formation so that the glue usually after 24h was not 100% hard. With the UV light I could break off the glue easily after 3 hours with a chisel.


Stupid, I have the window on the wrong side glued XDXD but you can recognize the difference to the first attempt. No more bubbles and full glue on it ;-)


So all good things are 3. Unfortunately, 4-5 photos from the window have not changed anything but I will finish it in the final pics in detail.


So, because I did not like the burgundy foil on the PSU cover with the red Plexi behind it, I painted it all black. Also the honeycomb covers of the Bitspower housing feedthroughs


And then with the case colored red foil.


The radiators were also painted in white and the slats with a red metallic lacquer


In order to make the back a bit more photogenic, I have also continued here the red arrows


Also these holes in the case did not please me


then everything foiled red again


Now again a dangerous matter. The Windows had to be adjusted something so I can continue to use it. Since some covers were closing in the way, I had to separate something from the steel of the Windows.
Since glass can crack quickly with the sudden contact with heat I am very cautiously proceeded and have repeatedly inserted breaks at the cutting.


But first I have the whole window with foil protected and then still an old rag for the protection against spark hung before it.


So that was it! The memory and SSD has now finally arrived. So once I have the case again I can finally make the final photos :phat:

 
It's an interesting design and well executed, but I don't see any real Mercedes influence here. Their cars tend to be reserved and sleek, this is over the top and very gaming/tech oriented with the black/red/white color scheme and hard edges. Again, not bad at all, just not what I would have imagined given the title.
 
Hi! Thanks.
Okay silent-circuit thats right but i say not i´m building a "SL". I say: Elegance, luxury and simple forms.
I find thats it, maybe a Little bit overkill but it´s clean and discreet.
I live my mod :p


All right, and here the first final outdoor pictures.


indoor pics with lightning comming soon :wink:​
 
thats amazing... and to think that I cant hang a shelf on the wall properly
 
Nice work sir. I always like checking these build logs out for tricks to do better builds. I don't know why I never thought to tape my tubing when cutting with a wheel. Thanks for the idea!
 
Back
Top