Navigation
Install the app
How to install the app on iOS
Follow along with the video below to see how to install our site as a web app on your home screen.
Note: This feature may not be available in some browsers.
More options
You are using an out of date browser. It may not display this or other websites correctly.
You should upgrade or use an alternative browser.
You should upgrade or use an alternative browser.
NCASE M1: a crowdfunded Mini-ITX case (updates in first post)
- Thread starter wahaha360
- Start date
IncubusBob
n00b
- Joined
- Dec 30, 2013
- Messages
- 25
Have you heard any clicking noises coming from the noiseblocker in the psu? I am getting the PSU and am wondering if the fan mod is worth it. In the PSU mod thread I thought I remembered a few guys mention the ticking noise and if that counteracts the noise reduction of the swap it seems kind of pointless to go through with it.
I was one who complained about the NB fan. It seems that some units are either louder than others or some people are more sensitive
") I'd suggest if you decide to get the NB fan, get it from somewhere that will take returns, and run the fan so you can listen to it before you go to the trouble of installing it in your psu.
I'd suggest if you decide to get the NB fan, get it from somewhere that will take returns, and run the fan so you can listen to it before you go to the trouble of installing it in your psu.Have you heard any clicking noises coming from the noiseblocker in the psu? I am getting the PSU and am wondering if the fan mod is worth it. In the PSU mod thread I thought I remembered a few guys mention the ticking noise and if that counteracts the noise reduction of the swap it seems kind of pointless to go through with it.
No ticking here. The loudest parts are my nb fans on the bottom.
drklu
2[H]4U
- Joined
- Jul 15, 2013
- Messages
- 2,892
Did you guys just get the adapter and plug it in or did you solder ?
wahaha360
Gawd
- Joined
- Sep 8, 2012
- Messages
- 943
Have you considered hiring a fulfillment company in Taiwan so you won't have to deal with the physical boxes anymore? I have a feeling people will be more than happy to pay a little more for that.
It's in the works.
wahaha360
Gawd
- Joined
- Sep 8, 2012
- Messages
- 943
Campaign 2 and M1 rev2 in the works, may take a few month.
*Review the design to see how we can improve, don't have a list of changes yet.
*Review the design to see how we can improve, don't have a list of changes yet.
Last edited:
Did you guys just get the adapter and plug it in or did you solder ?
First i soldered and then bought an adapter. Vga fan to fan adapter.
im_so_retro
n00b
- Joined
- Mar 1, 2014
- Messages
- 2
Great news! Thanks for the update, wahaha360!
AFD
2[H]4U
- Joined
- Aug 7, 2013
- Messages
- 2,154
Any clues to whats different?
Now fits micro ATX boards, but physical size is that of a NUC!!
My only v2 suggestion at the moment would be to include extra clips and extra screws (they seem to round-off easily using different screwdrivers). And not sure if this is possible, but I'd much prefer that the case screws used nuts, instead of having the case and brackets being tapped.. though, I'm sure most would probably hate this idea.
Everything else about the case seems fine, imo.
How about sending cases to review sites before you start another campaign. I'm sure you'd get loads of requests after that and it'd be interesting what reviewers thought about it.
Seems like a good idea, but I'd strongly suggest only sending review units to guys that have done SFF builds in the past, and that would appreciate such a lilliputian design.. someone like LinusTT would probably enjoy doing such a build for review. Have a feeling many others would just bitch about the M1's known limitations.
EDIT: Oh, and I betcha Lauren at TastyPC would def find the M1 to be "sexy"
AFD
2[H]4U
- Joined
- Aug 7, 2013
- Messages
- 2,154
Ugh, nuts! Countersunk hex screws would be a good compromise, no?
Yeah, I'd be much happier with hex screws.
My only reason for wanting nuts, is to avoid the chance of ever damaging the threads on the case and brackets (using wrong screws, cross-threading, or heads rounded too badly). Would definitely be a "fiddly" solution, but for the most part, shouldn't be impossible to install (not sure about the mainboard mounts.. don't think they'd be accessible for nuts with the current design). But yeah, really didn't think anyone else would like the idea
Aibohphobia
[H]ard|Gawd
- Joined
- Nov 16, 2013
- Messages
- 1,340
Yeah, I'd be much happier with hex screws.
My only reason for wanting nuts, is to avoid the chance of ever damaging the threads on the case and brackets (using wrong screws, cross-threading, or heads rounded too badly). Would definitely be a "fiddly" solution, but for the most part, shouldn't be impossible to install (not sure about the mainboard mounts.. don't think they'd be accessible for nuts with the current design). But yeah, really didn't think anyone else would like the idea
What about threaded inserts? Not sure how much it costs to do that but it would eliminate threading into soft aluminum while avoiding the hassle of separate nuts.
Nachogineres
n00b
- Joined
- Feb 23, 2014
- Messages
- 4
It is great news for those who have not had access to even Ncase. Thank you very much for the update, wahaha360!
regards
regards

damaging the threads was one of my negatives too. that and i wished there were less screws to deal with overall. probably impractical, or would take up more space, but i'd have preferred some sliding/locking caddy system for mounting the psu bracket, maybe some other areas too, which would eliminate the need for some of those screws. i also didn't like the thin panels, but i understand that was a limitation of the manufacturing process.
Last edited:
I Agree that the reviewers need to be people who appreciate small cases, and are very comfortable working in them, but most importantly!! Understand fully the principles behind a mini case, a case which means COMPROMISE.
The NCase is such a case. It is Not made for the masses, it is made for a specific audience who are after single GPU performance in a small case with dual 120 rad support (and likes sexy). Everything else that comes with the case design/layout is for the user to pick and choose to achieve the best compromise to his or her liking, such as bottom fans to feed the GPU cool air OR hdds for storage, but not both.
Sometimes this seems to be a concept that is not understood by many users (and reviewers), and having a case go out to reviewers who cannot appreciate this design concept can result in some unnecessary negative publicity. I have seen mATX cases (such as the arc mini, one very spacious mATX case IMO as I have one) being bashed and given low review scores because it was "cramped and difficult to install components". A matter of perspective, and legitimate if your coming from monstrous E-ATX cases with big hands, but unnecessarily negative as it misses the concept of a compact case. I personally complain that the arc mini is not mini enough, with more space than it needs.
Reviews can be helpful to get the news out, but as I am sure we all know, caution is recommended for this particular case as this is a very niche market which needs to be appreciated in the right way.
External opinion is excellent, but I would hate to see it go out in the wrong light. I guess another example is the average office computer user who sees my NCase build and their first opinion is, why is it soo big! My dell/lenovo/hp office desktop is thinner than your box. The significance of having a GPU (let alone, Dedicated GPU) is not appreciated.
On another note, I am on the "NB fan is still ticky and noisy" bandwagon. A fan that is not silent, a quiet listening environment and a high sensitivity to noise puts me into this group.
Interms of powering the fan, I snipped the wires to the stock fan at the fan itself, and then soldered a normal 2 pin 0.1" plug to the end, to which I can connect any of my normal fans. This gave me flexibility to experiment with fans and combinations.
I ended up using a LNA from Noctua for my Scythe Kama 2 120mm, as well as a LNA for a Noctua B9 fan, directly off this header. Fan control is innate to the PSU itself. I do not want to use a MB header as it would not safely control the fan with respect to PSU temperatures.
Last edited:
And as I was asked about how I power the PSU fan, here are a few photos that somewhat illustrate how I did it. Not the greatest, but its there.
This first photo shows the original fan cable. I snipped it at the base of the stock fan, leaving me with some wire to use. I did not bother with playing around with the PSU fan connector and finding an adapter because the stock 80mm fan was going straight into the spares bin. I threaded this wire through the little hole above the middle modular connector and then soldered a 3 pin 0.1" pitch plug to the power cables. This is a standard connector normally found on your motherboard.
http://www.altronics.com.au/index.asp?area=item&id=P5493

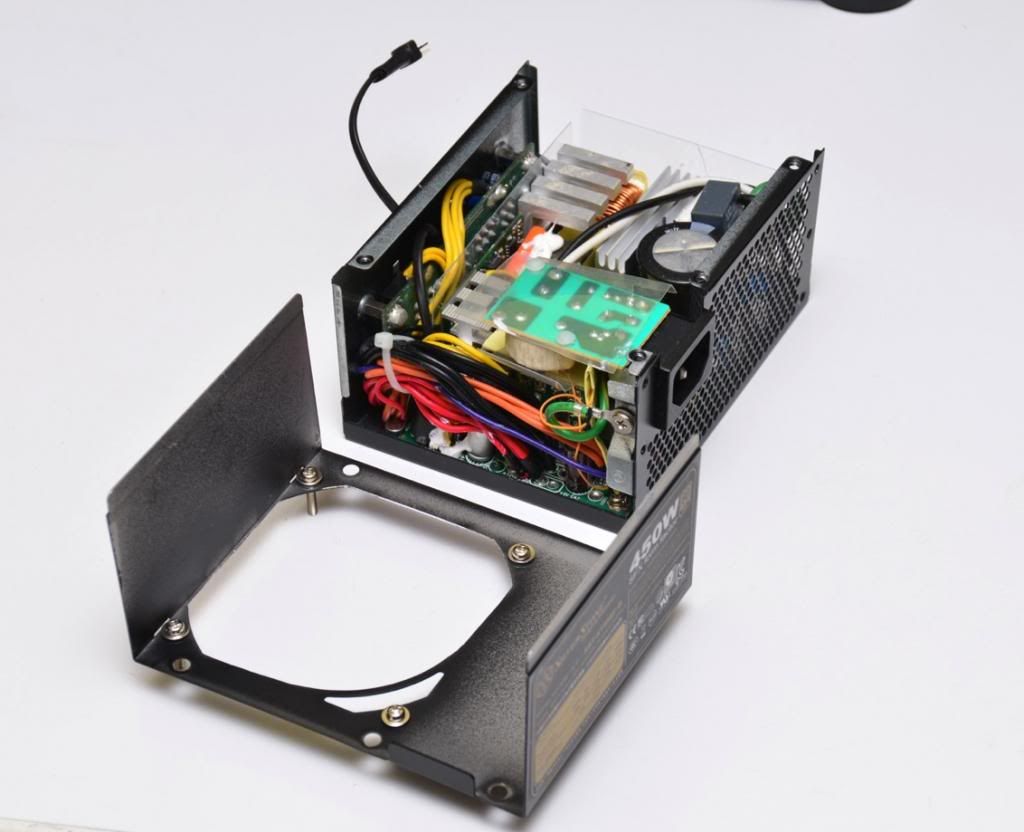
This second photo shows where the plug comes out. Ideally I should have made another hole for it to pass through, as this disables the ability for the middle modular plug to be installed, but I was not going to be using this one so it was not a concern. I was more keen to get this PSU up and running first.
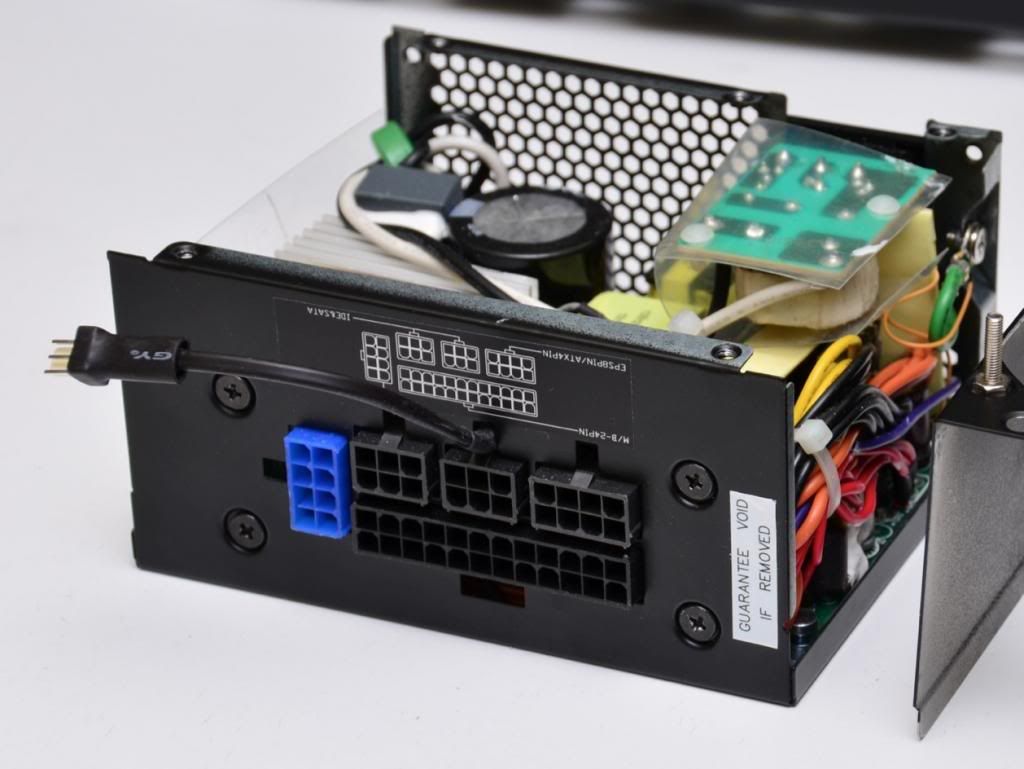
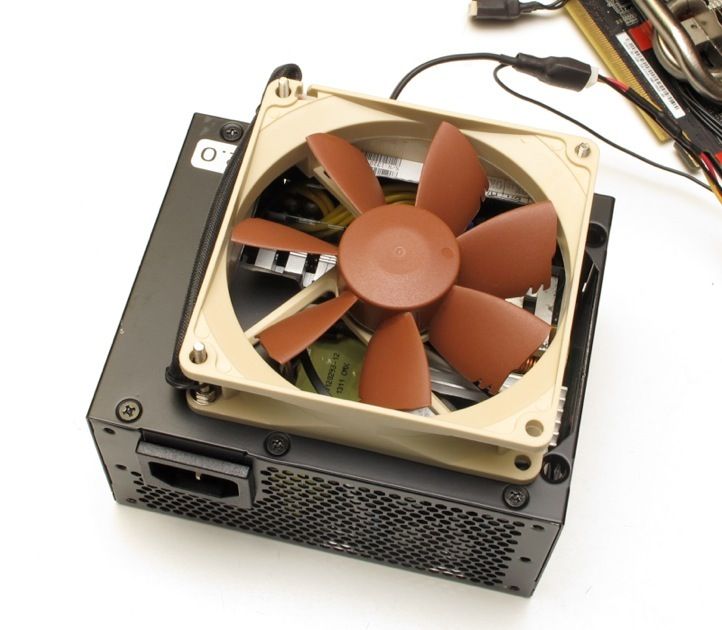
In this third photo, this is a more recent one where I have increased the fan hole to suit a 92mm B9 fan. The connector is visible here, except I have also added a larger heatshrink to help insulate and protect the exposed connector pins when no fan is connected. Last thing you want to do is short out these pins and fry the internal fan controller circuit. Also note that there is the main power cable from the PSU, and then an extra wire that comes out. This is the third wire, the RPM sense wire which goes to my motherboard header, so I can monitor the RPM of the PSU fan. Lets me know what the PSU is doing.
This first photo shows the original fan cable. I snipped it at the base of the stock fan, leaving me with some wire to use. I did not bother with playing around with the PSU fan connector and finding an adapter because the stock 80mm fan was going straight into the spares bin. I threaded this wire through the little hole above the middle modular connector and then soldered a 3 pin 0.1" pitch plug to the power cables. This is a standard connector normally found on your motherboard.
http://www.altronics.com.au/index.asp?area=item&id=P5493

This second photo shows where the plug comes out. Ideally I should have made another hole for it to pass through, as this disables the ability for the middle modular plug to be installed, but I was not going to be using this one so it was not a concern. I was more keen to get this PSU up and running first.

In this third photo, this is a more recent one where I have increased the fan hole to suit a 92mm B9 fan. The connector is visible here, except I have also added a larger heatshrink to help insulate and protect the exposed connector pins when no fan is connected. Last thing you want to do is short out these pins and fry the internal fan controller circuit. Also note that there is the main power cable from the PSU, and then an extra wire that comes out. This is the third wire, the RPM sense wire which goes to my motherboard header, so I can monitor the RPM of the PSU fan. Lets me know what the PSU is doing.

Last edited:
Ace of Six
n00b
- Joined
- Jul 13, 2013
- Messages
- 57
And as I was asked about how I power the PSU fan, here are a few photos that somewhat illustrate how I did it. Not the greatest, but its there.
This first photo shows the original fan cable. I snipped it at the base of the stock fan, leaving me with some wire to use. I did not bother with playing around with the PSU fan connector and finding an adapter because the stock 80mm fan was going straight into the spares bin. I threaded this wire through the little hole above the middle modular connector and then soldered a 3 pin 0.1" pitch plug to the power cables. This is a standard connector normally found on your motherboard.
http://www.altronics.com.au/index.asp?area=item&id=P5493
This second photo shows where the plug comes out. Ideally I should have made another hole for it to pass through, as this disables the ability for the middle modular plug to be installed, but I was not going to be using this one so it was not a concern. I was more keen to get this PSU up and running first.
In this third photo, this is a more recent one where I have increased the fan hole to suit a 92mm B9 fan. The connector is visible here, except I have also added a larger heatshrink to help insulate and protect the exposed connector pins when no fan is connected. Last thing you want to do is short out these pins and fry the internal fan controller circuit. Also note that there is the main power cable from the PSU, and then an extra wire that comes out. This is the third wire, the RPM sense wire which goes to my motherboard header, so I can monitor the RPM of the PSU fan. Lets me know what the PSU is doing.
Awesome, looks like I'm going to have to grab a a dremel and soldering iron sometime in the near future to do this.
AFD
2[H]4U
- Joined
- Aug 7, 2013
- Messages
- 2,154
i also didn't like the thin panels, but i understand that was a limitation of the manufacturing process.
I'd be more okay with the thin panels, if they were the style that slide into place and then are each held at the back with a couple thumb screws (or even the smaller screws).
Popping on and off such thin panels only increases the chances of them getting bent or warped.. a conversion to sliding panels would also eliminate the issue of plastic clips breaking (though the front panel might still be better off as a pop-style).
Dremel is optional to changing the fan, but certainly highly recommend if you intend to go with a 92mm fan. I personally think changing the fan to a 92mm fan alone would do the trick for most silent needs. It is a HUGE difference to the stock 80mm. Even the Noctua 80mm fan is a bit louder than the 92mm version for the same airflow.
Last edited:
If W360 is actually considering doing review units for the next batch of cases, I'd recommend trying to get Tek Syndicate and Hardware Canucks to do the reviews. Both have a good following on Youtube. Tek Syndicate love to do small builds and would probably appreciate the idea of having a case made by two dudes who saw a need in the case market. Hardware Canucks do solid case reviews and even had a video recently that focused on the best ITX cases out in the market.
vipz
Gawd
- Joined
- Apr 11, 2005
- Messages
- 818
I'd be more okay with the thin panels, if they were the style that slide into place and then are each held at the back with a couple thumb screws (or even the smaller screws).
Popping on and off such thin panels only increases the chances of them getting bent or warped.. a conversion to sliding panels would also eliminate the issue of plastic clips breaking (though the front panel might still be better off as a pop-style).
Sliding panels would necessitate folding the panel edges over. It would take away the nice and sharp edges we currently have. The area where the front cover meets the top would also be a nightmare.
Notice how with all cases with sliding side panels, the panels never reach the very top of the case?
Right. The way the case is designed doesn't lend itself to that type of attachment method.Sliding panels would necessitate folding the panel edges over. It would take away the nice and sharp edges we currently have. The area where the front cover meets the top would also be a nightmare.
We're aware of the panel flex issue, and it's one of the things I'm looking at addressing for rev 2 of the M1. The options are a bit limited, but one method I'm looking at would most likely require a modest increase in dimensions. Lian Li has also been looking at the issue and may have a solution for us, we'll see. As with folding the panel edges, there are aesthetic considerations to take into account.
AFD
2[H]4U
- Joined
- Aug 7, 2013
- Messages
- 2,154
Sliding panels would necessitate folding the panel edges over. It would take away the nice and sharp edges we currently have.
The panels and seems on my Lian Li look just as nice as the ones on my M1, imo.
Instead of increasing M1 dimensions any, perhaps encroach slightly into the open parts of the interior (a few mm) using another piece of aluminum bent and tacked to the inside of the panel to reinforce them. Maybe similar to the inner reinforcements added to car doors, hoods, and other body panels?
Just an idea.. never said it was a good one
Yeah, it's one idea I've had. There are a couple issues with it though: the welded fixtures to attach the aluminum strips to the inside of the panel protrude 5-10mm, which there currently isn't clearance for all around; there would need to a folded tab on the back end of the panel to screw it to the case, and the back of the case has little space available.Instead of increasing M1 dimensions any, perhaps encroach slightly into the open parts of the interior (a few mm) using another piece of aluminum bent and tacked to the inside of the panel to reinforce them. Maybe similar to the inner reinforcements added to car doors, hoods, and other body panels?
I have a list of minor improvements (including the one you mention), as well. But nevertheless, I want to at least make an attempt to address some of the more difficult issues. We would need to have an updated sample made to confirm the changes before proceeding with a full production run, of course.I'd suggest minor improvements, like correct length screws for the SSD stack pieces. Doing major overhauls could turn into problems.
On the topic of screws, maybe at least 7 screws instead of 5 for the 2.5" HDD mounting screws, would be a better number for those who intend to mount 2.5" drives on both the inside and outside.
edit, im sure this is one of those things on your minor adjustments list!
edit, im sure this is one of those things on your minor adjustments list!
Yes, and the number I had in mind was higher than that, even.On the topic of screws, maybe at least 7 screws instead of 5 for the 2.5" HDD mounting screws, would be a better number for those who intend to mount 2.5" drives on both the inside and outside.
edit, im sure this is one of those things on your minor adjustments list!
vipz
Gawd
- Joined
- Apr 11, 2005
- Messages
- 818
While we're on the topic of rev 2 wishlist items, I hope you don't mind:
1. Remove the top panel screw (at least for the no-ODD option). I personally never came close to lifting the M1 near the top.
2. This is a lot more far fetched - but maybe there's a way it can be done. I'd like to see a one-piece, U-shaped side/front panel option. With the line between the side and front panels gone, the vents can extend forward a little.
3. Last but not least, non-painted frame and hardware. It's just too easy to scratch the black finish on both the frame and the hardware.
I'll make a note of it.While we're on the topic of rev 2 wishlist items, I hope you don't mind:
1. Remove the top panel screw (at least for the no-ODD option). I personally never came close to lifting the M1 near the top.
This is very unlikely, and I doubt you'll find many people would want this. Assuming some method of attaching the whole piece could be worked out, it would be massively less convenient than the current method.2. This is a lot more far fetched - but maybe there's a way it can be done. I'd like to see a one-piece, U-shaped side/front panel option. With the line between the side and front panels gone, the vents can extend forward a little.
Why do you want the vents to extend forward, out of curiousity? The only thing I can think of is to reduce the blockage of the ST45SF-G intake, which honestly doesn't seem like a big deal to me (it's, what, 20% blocked or so?). Also, by the time rev 2 production rolls around, Silverstone's updated SFX will likely be out, which has the fan moved back to the center (assuming the pics on Enhance's site represent that model).
I'm not sure how great the demand is for it, but I'll make a note. I'd probably only want to do it on cases with silver panels, though.3. Last but not least, non-painted frame and hardware. It's just too easy to scratch the black finish on both the frame and the hardware.
Screw holes for 3x80mm fans wouldn't play nice with the bottom drive mounts, unfortunately. You think they'd work better than 2x120mm?I think it would be nice to have screw holes for 3x80mm fans at the bottom to imitate the 3xGPU fans found commonly in non-reference GPUs nowadays. If that is at all possible.
vipz
Gawd
- Joined
- Apr 11, 2005
- Messages
- 818
Why do you want the vents to extend forward, out of curiousity? The only thing I can think of is to reduce the blockage of the ST45SF-G intake, which honestly doesn't seem like a big deal to me (it's, what, 20% blocked or so?). Also, by the time rev 2 production rolls around, Silverstone's updated SFX will likely be out, which has the fan moved back to the center (assuming the pics on Enhance's site represent that model).
Yes, the ST45SF-G fan placement was on my mind as well, but I was more thinking on the aesthetic front.
With the no-ODD top on, there's a pretty big distance between the front of the top vent and the top of the front panel, compared to the back. It's not a big deal, but I figure if the gap between the side and front panels could be eliminated (which is its own reason, for the sake of minimalism), the vents might as well extend forward to keep the distances roughly equal.
Screw holes for 3x80mm fans wouldn't play nice with the bottom drive mounts, unfortunately. You think they'd work better than 2x120mm?
If it doesn't work, then it's too bad because I think the 120mm fans and HDD holes are more useful in most situations. But the non reference heatsinks are generally narrower than the 120mm fans. In the case that the shrouds + GPU fans are removed and only the bottom fans are used, 80mm fans might possibly yield better temperatures. I haven't done any tests to prove that though. But I'm currently running 2x120mm bottom exhaust with non-reference GPU with shroud + GPU fans removed and I'm getting pretty good temps. All the hot air from the GPU is exiting the bottom of the case keeping the rest of the system cool.
Last edited:
AFD
2[H]4U
- Joined
- Aug 7, 2013
- Messages
- 2,154
80mm fans might possibly yield better temperatures.
It's possible, but I really don't see how 3x 80mm fans could be any better than 2x 120mm as bottom exhaust (possibly more focused as intake). With 3x 80mm, it's also possible that the exhausted heat might just bounce back up into the case through the opening beside the fans (unless dammed off). Interesting idea, but just seems like a louder solution imo. I could be wrong though.. there's always a first for everything
If any new holes are added, I'd much rather see additional 2.5" drive slots added to the bottom front. Should be able have a 3.5" drive or 120mm fan at the back, and then double stacked 2.5" drives mounted sideways at the front (90° of rear 3.5" drive's orientation, 20mm to spare for connections). This would give the M1 a maximum of 5x 3.5" drives (with additional side HDD bracket), plus a maximum of an additional 6x 2.5" drives (or 16x 2.5" drives with adapters!).
And yes, I know that nobody would ever have 11 to 16 drives in their M1, but having the additional 2.5" mounting point would allow for a few extra configurations.
It's possible, but I really don't see how 3x 80mm fans could be any better than 2x 120mm as bottom exhaust (possibly more focused as intake). With 3x 80mm, it's also possible that the exhausted heat might just bounce back up into the case through the opening beside the fans (unless dammed off). Interesting idea, but just seems like a louder solution imo. I could be wrong though.. there's always a first for everything
I thought the same thing actually. More focused flow, and possibly a higher pitched noise at load. But non-reference GPUs are also using 80mm fans - the heatsink width are also catered for 80mm fans.
Now I'm not sure about the exhausted heat bouncing back. Airflow is always more complicated than we imagine it to be.
Most changes are going to be minor but one major change i would like is for the SFX PSU mount to be lowered just a tad and a 80mm fan mount added over it, I have my whole system under water but that doesn't stop my PSU from overheating after long hours of gaming, They create way to much heat and have no way to exhaust it well enough, I've looked into ways to add the 80mm fan but don't feel like cutting up my M1.Necere
PS this isn't my system and is just to show the idea.

All this talk about changing the panels to avoid bending and broken clips has me wondering how people are actually pulling their panels off. I always do mine from the long edges of the panels and they pop off really easily with only a small bit of force.

All this talk about changing the panels to avoid bending and broken clips has me wondering how people are actually pulling their panels off. I always do mine from the long edges of the panels and they pop off really easily with only a small bit of force.

Its not just that me and others got bent panels with the case, It doesn't bother me I'm not fussy. I would love some black acrylic panels
it's one of the things I'm looking at addressing for rev 2 of the M1.
Necere, are you currently just focused on refining M1, or are you thinking about designing something different?