Got my Cooler Master HAF XB!

AT-AT28

Limp Gawd
Joined
Nov 23, 2012
Messages
180
So, for over the past 3 years since buying my Antec mini P-180 for my build back in 2009, iv'e been content with it as I've yet to see any case maker come out with a replacement that really makes me go "ooooh and awwwww". I gave my Mini p-180 facelift last year with my my system upgrade and I still do rather like it, but its getting a bit "aged" and I have certain things like front USB, more flexiblity and something new to play with and mod thats been knawing at the back of my mind.

However, Corsair, Antec, Silverstone have lacked in anything that really catchs my eyes for my needs and desires. Mostly, I'm REALLY picking with my cases. I've tried a couple of silverstones over the last few years in the SUGO line up and Temjin as I don't want full sized ATX cases anymore since going with my mATX build back in 2008, I just don't need all that tower space, its a waste but I still wanted something flexible so I could experiment and mod, but something that had great cooling, but looked cool, but could also keep the noise down but something that just screamed "cool" that would maybe make me shell out to replace my aging mini P-180

Well, I spent the last hour or so last night surfing around newegg and google seeing what was new in the case world and I had just about given up hope when I saw this from Coolermaster, and I nearly had a case modders hard on....


HAFXB_banner.jpg


Well figures, I get my new toy and someone already claims before I even get to open it lol! But its here!

coolerreturn-1.jpg


Even the box itself is sexy and rich feeling, has a smooth, slick texture to it! The case is well protected by the stiff cardboard box and plenty of styrofoam padding all around, UPS/FedEX would have to try hard to damage the case

cm1.jpg


Oooh very nice! First thing I noticed is that the cases paint texure has a very durable feeling to it, almost like a spray on truck liner, you will have to try to scratch it! The unit feels incredibly solid when I took it out, gotta freaking love cold rolled steel, aluminum can never beat the tight, strong and firm built of a quality steel case!

cm2.jpg


The handles feel GREAT and makes moving the XB is so SMOOTH and easy! They are supported by the steel chassis behind the panel, so even fully loaded, this sucker aint gonna fall apart on you transporting it around, LAN partying with this thing in the future is gonna rock!

cm3.jpg


I didnt' realize exactly HOW big this XB was until I put it next to "Night Fire" my Antec mini-P180. The pictures speak for themselves! Thats a 20'' Viewsonic monitor for comparison sake to give you an idea of this bad boys size


cm4.jpg


cm5.jpg


cm6.jpg


cm7.jpg


cm8.jpg


Moving inward, my faithful furry assistant decides this cases needs a complete check through with cat senses!

Again, the interior paint job feels awesome, VERY solid and well done! Again, it reminds me a spray on truck lining, thats how tough it feels, it has a very nice rough feeling to it but not sandpaper like. Corsair could learn something of how to paint/powerdcoat their cases from coolermaster, their interior paint jobs are easily damaged/scratched in my experience with them


cm10.jpg


cm9.jpg


cm20.jpg


Yep, looks kitty approved!

cm21.jpg


Ok, time to take it apart and see the inside of this ultimate bady boy cube!

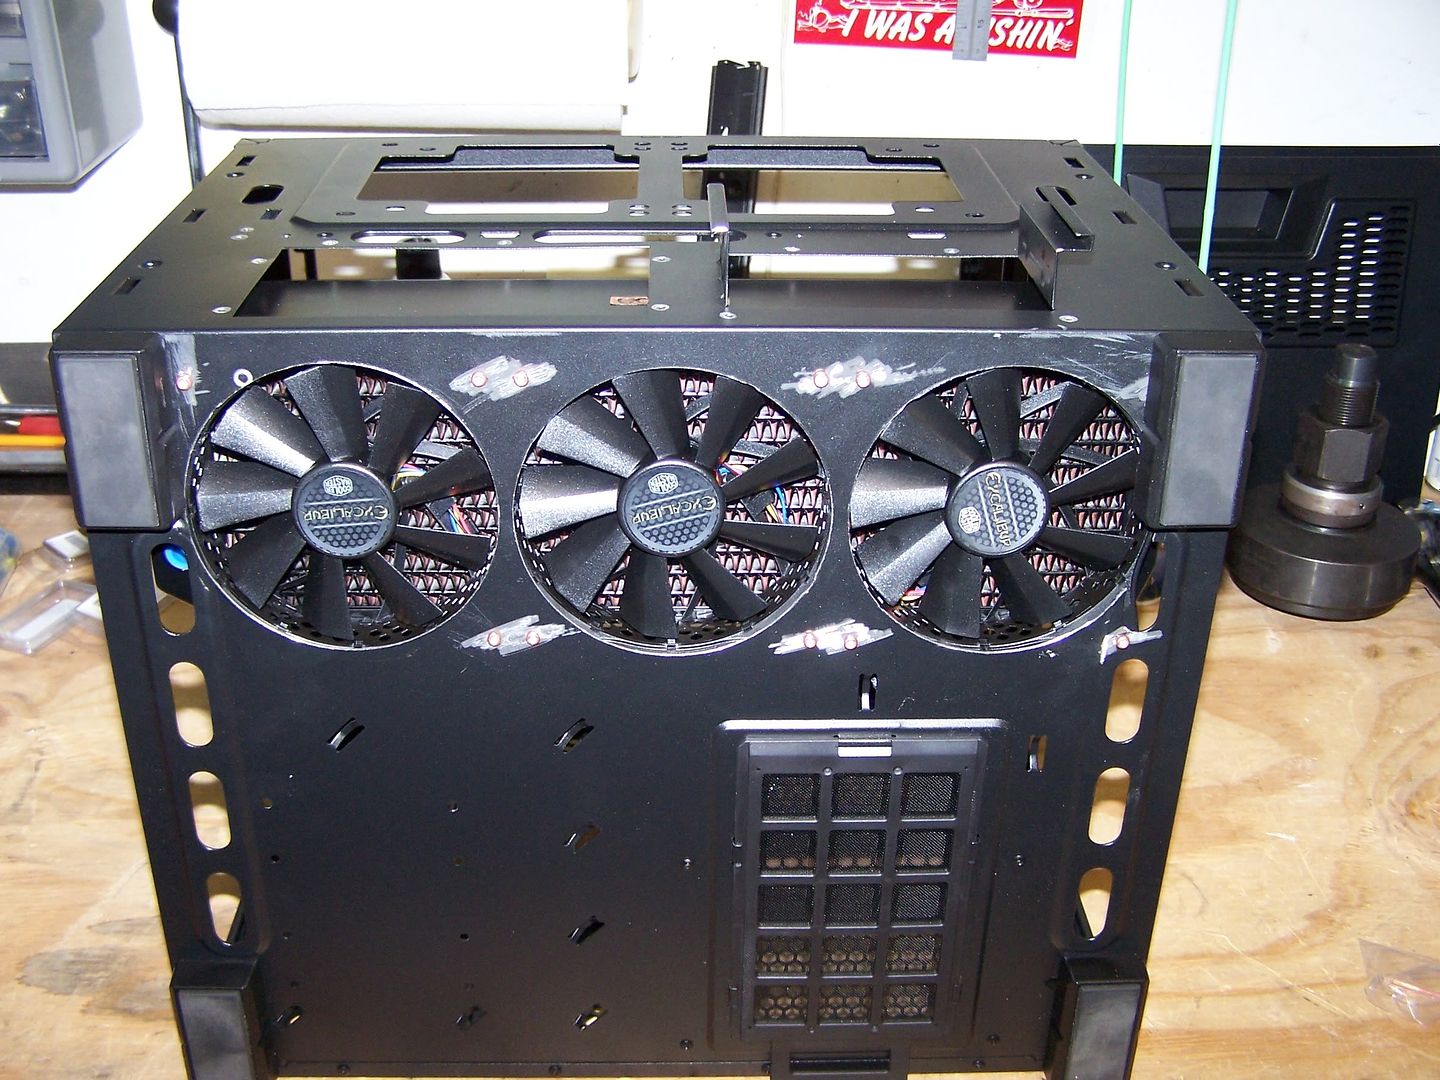
With the side panels removed, the front comes off with 7 tabs fairly easily. The plastic feels durable enough the front benzel doesn't flex much, but be mindful, it feels like it could be easily scratched. The front panel Power and reset buttons ARE NOT spring loaded, they are more modern "tap" style button which you find on todays tablets and smartphones and frankly, I like this as a nice change from decades of spring loaded buttons on computer cases, time for a change.


cm11.jpg


Weird, how they have enough room for a PCB to have 4 USB jacks, but only went with 2 *shrug* Owell, I never use more then one at a time in my usage.

cm12.jpg
 
Last edited:
Moving on, the typical part bags, screws andzip ties are here, but a rare thing, an optional speaker for those who really want to hear the troubleshooting mobo BIOS beeps. You can see the insulation foam to keep PSU vibration down into the case, a simple but nice touch, stuff like this helps case makers and their products stand out from the competition and we, the case consumers really look for this kinda stuff.

cm13.jpg


The case panels like the rest of the case chassis have a tough powder coating all over. They slide on and off with a nice smooth feeling and attach with a nice solid "thud" and are hard to flex, meaning the chances of vibration and reverberation in the case are low. Again, quality steel just flat out beats aluminum in this department, especially in the cost department and Cooler Master does a great job in this. Corsair, are you taking notes?


cm22.jpg


Outa curiosity, I wanted to see if recycling my Antec Big Boy was possible with the top panel mesh. Sadly, it was a no go. I looked into why the mesh panel didn't have mounts for 120/140mm fans for radiator setups and the CM rep stated because the weight of using radiators would cause the mesh panel to dislodge because its only using push down based tabs to hold it in place. So that basically means it would require installing nuts and bolts if you really wanted to use the top mesh panel for a radiator and modding the mesh as well.


cm15.jpg


And of course, I can't overlook something this rare in most cases nowadays, the removalable mobo tray. Some people truly desire/live for this *cough, 3DGAMERMAN* I personally have never cared or had use for them as I always chose cases over the years that makes it easy to install mobo's in and out. Last case I had with a removable mobo was a Lian Li PC-68 way back in 2002 and I think I used it "once" just cause I was bored.

Anyway, with 4 simple thumbscrews, the tray comes right out. Like the side panel, it feels very rigid and hardly flexes at all. Again, you can only get this very nice firm feeling with quality steel cases, aluminum just can't touch it. The tray fits in nice and snug with the thumb screws, so its not possibly for it to vibrate into the chassis itself at all.


cm14.jpg


Looking more into the interior, thankfully, all the cables are a nice even black, so no worried gawd awful rainbowed colored calors ruining the interior case look, well, except for that stupid legacy sound connector which im just gonna cut off personally. The stock front intake fans are 3pin with molex convertors. Dunno how great they are but i'll be replacing then with my Gentle Typhoon 120mm's anyway and or using a new 200mm intake fan on the top if I decide against ordering the top panel with built in window that I may end up making my own anyway. Decisons, decisons....


cm16.jpg


My furry assistance spotted something as I went along. Removing the exterior PSU holder reveals that you CAN NOT install a PSU without it as the chassis doesn't have any mounting holes without the extended bracket. This kinda sucks, considering I have a standard sized modular PSU, I wanted to keep the back flush but I guess not anymore, so keep this in mind.

cm17.jpg


Finally, I wanted to see how much spacing I had between the panels and mobo tray itself. Thanks to this chassis unique design, there is well over 1'' space between the side panels. I'm thinking of adding some sound insulation material for "Night Fire II" so this gives me plenty of room to add this. Also noting that if someone was really in the mood, you could easily cut out the side panel mesh and add your own side windows for a trick look. Hmmm........

cm19.jpg


To round this unboxing off, I asked some burning questions to the CM rep at the OCN boards about a few things on the case and I got a quick response back, major kudos to them!

http://www.overclock.net/t/1327014/various-cooler-master-haf-xb-reviews/90#post_18631574


Me: Why bother putting in a front fan filter when it requires the user to manually have to remove all 3 side panels and then unclip 7 freaking clips to remove the entire FRONT benzel to get at? Why was there no simple design to slide the filter in and out from the sides like Silverstones SG08 Tamjin?

CM rep: The reason why is we had to stay true to our roots as DIY enthusiast chassis. One of the mockup HAF Xb's last year had a removable filter frame that was in the front panel and pulled out the top, on paper it was great but in reality some of the mechanical engineers brought some issues to our attention. If we kept the front filter we would lose 140mm front fan support. Some of our international focus groups complained they needed much more space to mount fans outside the frame of the chassis. The people who complained the most used 27-30mm thick radiators which need fans on both sides for acceptable performance. So we kept the massive room for a radiator and 2 sets of fans on both sides. We had to put the filter on the front panel because there was nowhere else to put it.


1ce: I honestly don't see why you couldn't have made the secondary drive cage to hold 3.5'' and 2.5'' HDD's and simply give the user the OPTION to user either drive size with rails and or adapters. SSD's still aint cheap and most people still use standard 3.5'' HDD and will for the forseeable future.

CM rep: There isn't enough space to do two 3.5" drive cages in the area you mention. Once you get your HAF Xb, try to take some measurements. We reserved the space so you will have just enough cable management if you can't afford a modular power supply. As it is now, we had to make the 2.5" HDD cages removable because some PSUs have huge masses of cables.

1ce: More cable routting holes in the motherboard would have made obvious sense, so why only one?

CM rep: Its a TRAP!

Seriously, this cable management hole was added at the last revision before production by our engineers. Their reason was that if you never removed the motherboard tray, you could use the port for some audio or USB cable. Functionally, we have more than enough cable tie downs on the side of the rail that you should never need to use this. We joke its a trap because whatever you stuff through that hole, you have to unstuff it because it will block the motherboard tray from being removed. You should never be using this hole if you want to use the HAF Xb removable motherboard tray since it will cost you 5 mins of time.


1ce: Why not give users the option of just buying the window itself for the top panel instead of requiring people to pay for an entire front panel at a higher price?

CM rep: We're a big company and tiny pieces of acrylic wander off by themselves.


1ce: For the watercoolers, why didn't you allow the top panel mesh to have 120/140mm fan mounts like you have in so many other cases? I really don't find any reason to leave that out

CM rep: Its an issue of the strength of the mesh attachment. The top panel mesh attaches in the same way as an acrylic window would with plastic push pins. These pins could fail if you put a heavy weight on them like a radiator. There are plenty of other good places for radiators.


1ce: Couldn't you have thrown in some rubber seals so if people do use the rear water cooling holes after punching out the covers, the bare metal won't possibly cut the tubing?

CM rep: Nobody we surveyed wanted to pay for the rubber grommets on the holes in the back. Our research found people use these holes for things we don't intend, and don't use them anymore. Remember Olivia Munn and G4TV?

http://www.youtube.com/watch?feature=player_embedded&v=vBLVr6ZSFb8#
 
Well after over two hours of moving equipment, rewiring and tinkering, I got my guts moved over to this beast. Man, it swallows up my mATX setup with no issues, now I wish I was running a ATX board just to help fill up the case.


cm24.jpg


Working with the case was a real joy, the fact that the try was removable made it very easy to get the parts installed into the lower level. The power supply installation couldn't be easier and there is lots of nocks and crannies to put wiring in and the amount of wiring tie does makes cable management simply childs play

cm23.jpg


The 5.25" drive bay works decently albiet its a bit loose for my standards but because I rarely use my DVD drive, I'm not real concerned, it mostly stays put. The tray adapters for my SSD slid on easily enough, they don't "snap" on, so they can fall of really easily, but once you slide it into the 2.5'' tray, it fits firm and snug.


cm25.jpg


The LED's looks great in this case!


cm28.jpg


I tried out the stock intake fans. They do move a good amount of air but are pretty noisey and for someone who is used to a case with noise filtering panels all over including a front door, it was pretty loud to me. I'll be taking out the stock CM fans and putting in lower RPM Gentle Typhoons instead. USB ports work with no issues. I haven't tried out the X-dock so I can't comment on it at this time.


cm27.jpg


All in all, this was a fun case to play with and try out! I've got tons of modding ideas that I'm thinking over on what I wanna do with the case. I'm really pleased overall with what CoolerMaster has put out and with some modding and new toys, I think I found my favorite new case to play with!
 
Funny, I have a CM Storm Trooper and I want this case now lol. But I don't have the room for it sadly (width).
 
I have been looking at this case as well, for my rebuild in June, and this post really helped me picture it.

Nice lookin' cat, he seemed to enjoy himself. ~grin~ My Domino is very much the same with interesting new toys.

The lower 80mm fans, did you turn them as intake or exhaust? I was worried that the bottom section might be starved for air since there is no intake and I'm not sure the two 120/140's in the front top or the top 200mm would actually move air down there.
 
The lower 80mm fans, did you turn them as intake or exhaust? I was worried that the bottom section might be starved for air since there is no intake and I'm not sure the two 120/140's in the front top or the top 200mm would actually move air down there.

Didn't bother with them, only running a SSD and WD Cavier Black, nothing needing airflow and the PSU has its own airflow from bottom of case. If your good with dremel, you could mod a 120mm onto the bottom

hafxb14.jpg


Check out what this guy is doing with his.

http://themodzoo.com/forum/index.php?/topic/118-project-green-machine/

100_3958.jpg
 
Last edited:
Cute cat, nice case.
My Rottie loves to knock things over, so she doesnt get to inspect new merchandise anymore!
 
Is there a case of similar design with more 3.5 bays??

I was thinking of buying this case for a current build but I don't want to spend the $$ on multiple SSDs and will be using 4 HDDs already on hand. Cant figure out where to put them with this unit.
 
Last edited:
Ya lol, I dont want to spend that kinda cash on one either. I was thinking of adding an enclosed platform underneath were the case would rest that would hold the drives and run 12v molex and sata cables to it through the base....

Sry if I am cramping your thread... it is a very nice case though !
 
Well thats the very attractive thing about this case ATM, there really isn't anything else like it on the market. There have been cube style cases in the past but have long since been discontinued.
 
Ya lol, I dont want to spend that kinda cash on one either. I was thinking of adding an enclosed platform underneath were the case would rest that would hold the drives and run 12v molex and sata cables to it through the base....

Sry if I am cramping your thread... it is a very nice case though !

You could get 2 nice external hard drive cases that use USB 3.0 or eSATA and connect the ones that are just storage drives... don't know how you've got 'em configured, though.

You could just mount the external cases (one on either side) onto the PC case - there are some attractive ones out there that would make this a nifty little mod.

Or, get a 2x3.5" HDD adaptor for one of the 5.25 bays.
 
I'm thinking this might be a buy for sure! I do have a query though,what are the chances of putting a 240 Rad on either of the side panels beside the motherboard?
 
Or, get a 2x3.5" HDD adaptor for one of the 5.25 bays.

Considering how loose the toolless drive bay holds my optical drive in on only one side, I woudln't recommend that unless you screw it into place. I do wish CM did a better job of that, its pretty basic
 
Considering how loose the toolless drive bay holds my optical drive in on only one side, I woudln't recommend that unless you screw it into place. I do wish CM did a better job of that, its pretty basic

Ah, what's a few extra screws between friends?

:D:D:D
 
Well I wasn't happy with the original wiring job and I had some new fans to install so I set back to work tonight to make everything interior wise better.


As I said, the stock Cooler Master 120mm fans do move good air but they are loud as hell and its nothing I can stand with this case sitting next to me and try to web surf, email, work and listen to music with those twin turbines spinning. So, out they went and I replaced with with the now rare and no longer made AP-13 from Gentle Typhoons. Good airflow and MUCH more quieter at their stock 1150 RPM. I had to look all around the web for a single extra AP-13 as they are now discontinued, sad day.


cmdredo1.jpg


As stated earlier, I wasn't happy with out loose my optical drive was in the tooless drive bay in the XB so I wanted to see if I could do anything about it. The snap on adapters come off easily so you can screw drives or adapters into that side, but the other side has no attachment point.

cmredo2.jpg


Anything you put into the 5.25'' bays is held by nothing but tension bars from the steel cage itself on the right side. Well, with a moments bit of thinking, I simply flexed them inwards more by about 1/4'', put bay toolless clips back on and slipped my optical drive back in and now it fits very nice and snug, no modding required!


cmredo3.jpg


cmredo7.jpg


In case you were wondering/worried about my HDD sitting on that bare steel surface, I'm using a trick I thought up a few years ago for my old case. Using some very soft silicon grommets from my old Antec Sonata 2, I use heavy double sided tape and attached to the bottom of drive. This all but eliminates any noise and vibration into the case itself and works just as well in the HAF XB.

hardsili3.jpg


Some day im gonna have a fully modular PSU so I have no excess cables to deal with ever again. But thankfully, the XB with all its awesome crevices, nooks and wire tie downs, I can deal with it.

cmredo6.jpg


Again, the ability to make clean wiring in this case is just beyond easy and simple. I decided to route my GPU power leads into the front for a cleaner appearance instead of the mobo tray. Also redid all the SATA and fan cabling for cleaner look and this case makes is so easy, its actually fun to see how clean you can make your cables with this sucker!

cmredo4.jpg


The outside steel amazingly is a finger print/oil magnet on this case, so i'm constantly wiping it down after handling it. I decided to continue with my ROG color theme for now and added some simple outside bling to the case. I'll later be installing a window on the top panel and possibly more lighting along with painting some parts and adding plastic washers to the thumbscrews. I may look into replacing the Dark Knight for the new Night Hawk edition or possibly a Corsair H80i for the fun of it. The case is MUCH quieter with the Gentle Typhoon AP-13's and I dont bother removing the front benzel to dust, its a pain. I just use a swifter duster every other day and wallah, no more dust on front panel! I have other others floating in my head but for now, i'm a happy camper!


cmredo12.jpg


cmredo11.jpg


cmredo8.jpg


cmredo9.jpg


cmredo10.jpg
 
If your a hot female, i'm game :D

Sadly, no... :p

But extra screws here and there just don't bother me. The tool-less craze is of limited concern to me - I generally like my gear as securely installed as possible and don't mind busting out a screwdriver now and then. I do use thumbscrews wherever possible!

A hotswap bay or two is nice to have, but not mandatory for me.

I confess I didn't care as much for this HAF XB when I first saw it, but I am liking it more and more - but my next build will be going for less noise. My old modded Scout is a friggin' jet engine...

There's 4 case fans, 2 more in push/pull on my H60 rad, 3 GPU fans, and a PSU fan in there. It's LOUD - and still hot. Too much gear in too small of a case. No real fan speed control, either.

Next build will take care of all that.

I may still get a CM HAF XB in the future - initially I'll just move my current rig into a new quieter case with all-new high-grade fans and a fan controller. Later when I move to a current or upcoming CPU architecture I'll probably build it in the new case and might move this old gear into a HAF XB.
 
One things for sure, this guys sponsored build for his "Green Machine" on the HAF XB is gonna be insane


100_3991.jpg


100_4001.jpg
 
Is it just the lighting or did he fail to peel off the tan protective masking paper from the Lexan reservoir brackets?

Awesome, though...
 
Is it just the lighting or did he fail to peel off the tan protective masking paper from the Lexan reservoir brackets?

Awesome, though...


Yeah, they are on as he's still in middle of build, so its gonna be awhile before he fires it up. The entire case is going to powder coating soon
 
Last edited:
Really like this case

Would you put in a X79 chipset MB
64 gb ram
GTX 690
boot HD
Storage HD
Storage HD
Blu Ray Burner
EClaro Soundcard


Do you think it would overheat?
 
Really like this case

Would you put in a X79 chipset MB
64 gb ram
GTX 690
boot HD
Storage HD
Storage HD
Blu Ray Burner
EClaro Soundcard


Do you think it would overheat?

No as long as you have proper heatsinks and fans no modern case has no real problems with cooling. At least not any decent ones.
 
Really like this case

Would you put in a X79 chipset MB
64 gb ram
GTX 690
boot HD
Storage HD
Storage HD
Blu Ray Burner
EClaro Soundcard


Do you think it would overheat?


With the amount of cooling options in this bad boy? I think not....
 
Back
Top