Project MiniMe - Smallest (ever?) Watercooled mITX PC

oliverw92

Weaksauce
Joined
Sep 1, 2009
Messages
115
Intro

Banner.jpg


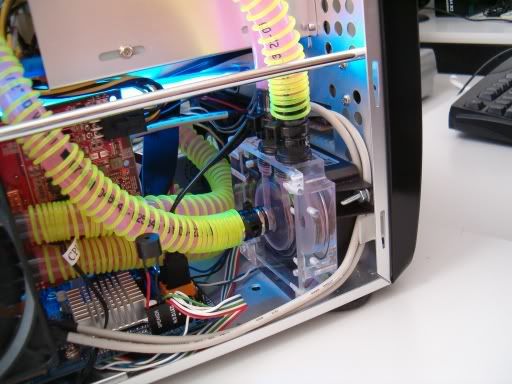
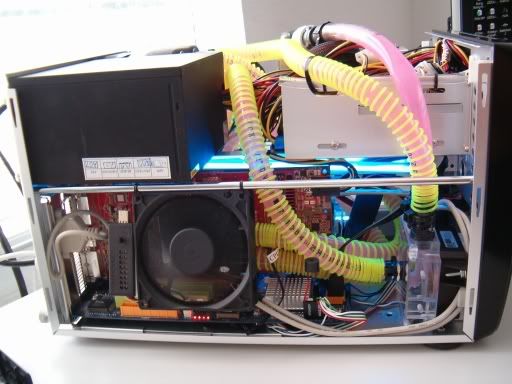
Hi to everyone at HardForum! My first time here! I thought i might run this scratch build on here, see what response i get! My main home is overclock.net so the first few updates are not really new! This is my second scratch build. My first was called Bloo Box, an acrylic mid tower case:

20-08-090001.jpg


20-08-090002.jpg


You can find a worklog with big pictures and a video here: http://www.overclock.net/case-mod-work-logs/510995-project-bloo-box-complete-24-6-a.html

Well I'm back again with another mod! I've caught the bug :wheee::wheee:

This time I am going small! My inspiration came from seeing someone on OCN make a tiny mITX case with a Zotac mITX MoBo. It looked so awesome I wanted one! So I researched hardware and found you could get really nice mITX socket 775 motherboards for not a huge amount of money, including a PCI-E x16 slot. With that in mind, I came onto the problem of cooling. To do any substantial cooling would make the case quite large. The low profile coolers normally do not give amazing temperatures, and making the case fit one of the giant HFS's would remove the point of the small case. It was then i saw an all-in-one liquid cooling system from SwifTech. And the idea clicked!

Build the world's smallest watercooled computer!


Components

2-11-2009%200001.jpg


Sponsors

I am delighted to introduct my first sponsor, AquaTuning.co.uk! They will be sponsoring me with my watercooling equipment.

Aquatuning_logo.jpg


Their website can be found here


ebuyer%20logo.png


Ebuyer are also sponsoring me with a motherboard, processor and graphics card!

Their website can be found here: http://www.ebuyer.com


I would like to introduce my 3rd sponsor for this project, MNPCTech!

mnpctech.web.banner.jpg


They will be sponsoring me with 1 of these:


http://www.mnpctech.com/Computer_Billet_Fan_Grills.html

and a set of these:


http://www.mnpctech.com/Aluminum_Computer_Case_Feet.html

Thanks very much to Bill :)

AC%20Ryan%20Logo.jpg


I would like to introduce AC Ryan! They will be sponsoring me with some materials like Aluminium sheet and CCFL's and such things. Thanks Guys!

wcuk-logo.jpg


WatercoolingUK will not be supplying me with watercooling equipment, they will be laser cutting metal and powdercoating for me! Thankyou to marcus there in particular!

Enermax_01.jpg


Enermax will be sponsoring me with 2 fans and a keyboard! Thankyou!

roccat.gif


Roccat will be sponsoring me with gaming equipment such as the Roccat Kone! Thanks!

Case Plans

The case will measure 20x20x20cm with everything inside, including radiator, fans etc. The case will be made out of a powdercoated steel frame with smoked acrylic filling the holes for the sides and top, and the front and back will be made out of powdercoated mesh. I am going for a blue and purple colour scheme inside (wiring, coolant, tubing etc). The metal will be cut on the CNC router at my school (it's tiny, about 30x30cm cutting area!). The plastic will be laser cut also at my school, and sponsor logos will be laser etched on during this process. All the cables will be sleeved in black and white sleeving.

Final Photos

22-03-2011%2018%20copy.jpg


22-03-2011%2021%20copy.jpg


22-03-2011%2026%20copy.jpg


22-03-2011%2028%20copy.jpg


Thanks for reading.
 
Last edited:
Update #1 - 31/06/09

Did a sketchup of the case. This was my first time using sketchup. Quite a few of the components I got off the database of models but i made several. The whole thing is precisely to scale (to the millimeter) so i can take measurements etc off it.

1.png


Front

2.png


Back

3.png


Front

4.png


Side

5.png


Empty Case

6.png


WC'ing loop

7.png


Components

8.png


Hope this gives you a good idea of what it is going to look like!
 
Update #2

This is what it would look like with the rad inside. I could do it like that, or make the box 3cm taller and have the fan inside too. I'm a bit worried about getting my tubing in at those angle though. Hmm....

9.png


10.png


11.png
 
Update #3

Redesigned again. Managed to get the whole thing down to 20cm x 20cm x18cm - that is including radiator and, well, everything!

12.png


13.png


14.png


15.png


16.png


17.png


Getting the Apogee Drive will mean i can make the bottom compartment smaller and ALSO means i can have 2 2.5" drives! So potentially 1tb of storage at this point in time (maybe more if larger 2.5" drives are made). Anybody got any advice on those tight bends there? Does it matter how i have T joint being used (L joint in the main loop)
 
Update #4

Ok so here is a price list!

Price%20List.jpg


I think what is going to differ this from other miniature watercooling rigs is the power. I have not seen any other mITX watercooled mini pc's with a Q9550 or even a dedicated graphics card. I was lucky to find the 4670, it is a perfect fit.
 
Update #5 - 20/8/09

20-08-090001.jpg


A box arrives! I wasn't even expecting it...

20-08-090002.jpg


Ebuyer sponsorship arrives :D

20-08-090003.jpg


This motherboard is ridiculously small... i couldn't believe it when i first saw it

20-08-090004.jpg


PCI-E x16 slot

20-08-090005.jpg


Wireless module for it. Plugs into a USB header

20-08-090006.jpg


GPU test fit

20-08-090007.jpg


Fits the board perfectly!

20-08-090008.jpg


My friend

20-08-090009.jpg


So glad i chose this card, the blue is perfect for my colour scheme.

20-08-090010.jpg


I never thought i would get to hold one of these...


So yeah not much of an update. But progress! I can now confirm all the measurements for the motherboard. I didn't expect to have the mobo so soon because eBuyer were out of stock. Somehow they managed to get me one though!

I would like to thank eBuyer again for their generous contribution, and especially thank my contact there, Charlie. She has been brilliant!

ebuyer%20logo.png


They really are the best computer e-tailer in the UK!
 
Update #6 - 30/08/09

The final sketchup model is finished! I spent ages on this. It is EXACTLY how it will be, everything is perfectly to scale. By doing it like this i have actually solved loads of problems i would have come across later when i had got items laser cut etc.

30-8-09%200001.jpg


Front

30-8-09%200002.jpg


Right side

30-8-09%200003.jpg


Top with 120mm rad and fillport

30-8-09%200004.jpg


Without the outer shell and cubes

30-8-09%200005.jpg


Back view without shell

30-8-09%200006.jpg


Back

30-8-09%200007.jpg


Left hand side with GPU. Will actually be nVidia but never mind...

30-8-09%200008.jpg


Profile shot of the right hand side.

30-8-09%200009.jpg


The loop! Yes i am now cooling the 9300 chipset. One of the problems i discovered by doing the accurate sketchup is that the apogee drive would hit the heatsink on the chipset. So duniek at OCN is making be a custom block that looks very similar to the one above (i.e. barb positioning is the same). Yes there is some VERY tight tubing to be done. But hey! I'm up for a challenge!

30-8-09%200010.jpg


The back of the loop. 45 degree fittings will save this project! Most of the models in the sketchup are downloaded, however i made the apogee drive and several other parts. It is precisely to scale from the swiftech site. Very pleased with it!

30-8-09%200011.jpg


Bottom compartment. The cd drive rests on an acrylic plate that is glued to the HDD bay. There is a 60mm fan at the back blowing across the hdds. This will be mounted to the base using a bracket, rather than mounted to the grill.

30-8-09%200012.jpg


HDD Bay

30-8-09%200013.jpg


Empty shell. The whole thign is held together with 10mm acrylic cubes. There will be purple LEDs mounted in them which will shine out of the corners displayed by the rounded corners of the aluminium frame.

30-8-09%200014.jpg


Moneyshot


So what do you think guys? I managed to get the 250W psu in, which i am very pleased about. I need to order things like the PSU, switch, CD drive and hdd before i can start milling out the aluminium.
 
Update #7

So i have been talking to radodrill at OCN about fan controllers. He showed me what he did for his Rad GT. So i have designed my own fan controller. It will only be 2 channel, unlike his insane 8 channel one. His was done on a soldering board (one with loads of pre drilled holes). I'm lucky enough to have access to PCB printing facilities at school so i will be making the PCB myself :wheee:

1-9-09%20001.jpg


PCB design (to scale). On the right of the big electrolytic capacitors you can see 3 pads. This is where the potentiometers will be attached. Middle-left you can see 2 pads where +12v and negative connects. At the top right of each section you can see a box with 2 pads in, this is where the fans connect.

1-9-09%20002.jpg


Real-world drawing of it

1-9-09%20003.jpg


The circuit design (this was NOT done by me! This was made by radodrill!)

My layout was done in PCB Wizard 3.50. Great little program!
 
Jesus that thing is tiny! I am looking forward to seeing the finished product. I subbed.
 
Thankyou very much! Yeh i still can't get over how big it is. The box the motherboard came in actually measures 20x20x8cm i found out today. Really puts it into perspective!
 
Looks awesome, can you provide more details on the software suite you used to preplan? Its almost exactly what I am looking for heh!
 
I used google sketchup pro. You need the pro version really, on the free one it lacks things like being able to type in dimensions. It is a dam good program and once you get used to it, it is really quick to use. I would say your best friend when using it is the parallel projection view + the different view modes for lining things up.
 
Looks awesome from the sketchup models, can't wait to see it take shape. Keep at it!
 
Suggestions:
1. use aftermarket clear top for the DDC pump so you can use aftermarket fittings If you use this one you can use the top port for a fill line and still use the front two ports for inlet and outlet which means no Tline needed. This setup fills and bleeds out air great.
image.php

http://www.dangerden.com/store/ddc-acrylic_pump-top.html
2. Use Bitspower rotary 90 degree fittings to eliminate the tight tubing bends
Link: http://www.performance-pcs.com/catalog/index.php?main_page=product_info&products_id=25644
Picture:
BP-90R3D_01.jpg

3. Use compression fittings throughout. They are very secure and better than barb type fittings.

I am using two of the same mobos in my Trek project. let me know if you want some layout pictures. Good luck on your project and congrats on getting sponsors
 
Thankyou very much. It is going to be a juggling act between this and school, but i think i can do it!

@Darthbeavis, i am no longer using a seperate pump, i am using the apogee drive. If you see my latest sketchup drawings, you will see i am using 90 and 45 degrees fittings. If i can afford compression fittings i am definately going for them.

Thankyou for the comments, i will consider the separate pump option. Space is the problem at this point though
want another sponsor?
 
Thanks very much! I am just waiting for the feet to get here and then i need to buy the PSU and slimline drive.
 
Thankyou very much. It is going to be a juggling act between this and school, but i think i can do it!

@Darthbeavis, i am no longer using a seperate pump, i am using the apogee drive. If you see my latest sketchup drawings, you will see i am using 90 and 45 degrees fittings. If i can afford compression fittings i am definately going for them.

Thankyou for the comments, i will consider the separate pump option. Space is the problem at this point though

Looks good. I'm glad you decided to keep the radiator internal. I hate seeing SFF water cooled rigs with external radiators...............kind of defeats the purpose of SFF.

If you do decide on the seperate pump with acrylic top, I mounted mine sideways and used the additional port as a fill port and it made bleeding the loop of air quick and painless. I do like the integrated pump and if I ever water cool again, I'll probably use it.

4thH20rig005.jpg


4thH20rig006.jpg
 
Thanks Massiveoverkill, i actually tried a sketchup trying to fit in a pump like that, but there just wasn't room. The tubing would be even more impossible.

Bill, i am not sure exactly yet, i am bidding on one on ebay its on £20 atm and my max bid is £25 cos i can get a new samsung off scan.co.uk for that price. The good thing abotu this ebay one though is that its all black which i quite like.
 
Update #8

9-9-09%200001.jpg

Stuff!

9-9-09%200002.jpg


Sponsorship from MNPCTech arrives! Thanks Bill!

9-9-09%200003.jpg


Anodized black aluminium feet

9-9-09%200004.jpg


9-9-09%200005.jpg


9-9-09%200006.jpg


9-9-09%200007.jpg


Anodized black aluminium fan grill :D This thing is awesome!

9-9-09%200008.jpg


9-9-09%200009.jpg


9-9-09%200010.jpg


9-9-09%200011.jpg


And yays bill sent me a free t-shirt :D

9-9-09%200012.jpg


9-9-09%200013.jpg


e-sata backplate. 99p off ebay! What a deal!

9-9-09%200014.jpg


9-9-09%200015.jpg


250W 1u power supply

9-9-09%200016.jpg


Soon to be sleeved

9-9-09%200017.jpg


9-9-09%200018.jpg


This psu is actually tiny...

9-9-09%200019.jpg


I bought myself a present :D Razer Deathadder :D

9-9-09%200020.jpg


9-9-09%200021.jpg


9-9-09%200022.jpg


9-9-09%200023.jpg


Oh what's this... another present :D Razer Lycosa Mirror Edition

9-9-09%200024.jpg


9-9-09%200025.jpg


9-9-09%200026.jpg


9-9-09%200028.jpg


Touch sensitive buttons. Can turn the keyboard lights on/off/just WASD, control media player and volume :)

9-9-09%200029.jpg


Keyboard approved

9-9-09%200030.jpg


9-9-09%200031.jpg


Back to the project! Decided to do some work at school today, these are some mock-ups i did on the laser cutter in black polystyrene sheet.

9-9-09%200032.jpg


9-9-09%200033.jpg


9-9-09%200034.jpg


Cube. These are 1cm cubes made on the laser cutter.

9-9-09%200035.jpg


9-9-09%200036.jpg


9-9-09%200037.jpg


9-9-09%200038.jpg


They are very very small

9-9-09%200039.jpg


Setup with the new keyboard and mouse

9-9-09%200040.jpg


9-9-09%200041.jpg


Still approves

9-9-09%200042.jpg


Omg where the sun go!

9-9-09%200043.jpg


9-9-09%200044.jpg


9-9-09%200045.jpg


9-9-09%200046.jpg


9-9-09%200047.jpg


9-9-09%200048.jpg


Back to the mod! I adjusted the sketchup model a little to make the gfx card fit well

9-9-09%200050.jpg


Fan controller V2

9-9-09%200054.jpg


9-9-09%200051.jpg


CAD design for the left hand acrylic side. The text will be engraved, not cut. The rest of the black lines are cut, the green is reference for the aluminium frame

9-9-09%200052.jpg


This is the right hand panel. Will be the only plain one

9-9-09%200053.jpg


Here we have the top of the box. Fillport hole top right, radiator mounts in the middle.


That is it for now! Time for some hardcore CAD design on the back, front and bottom.
 
holy crapballs, thats awesome dude.... I think this is defenitly going to be a major-crazy-good project. And that dog is creepy...... so the signs of approval is good! :)
 
Thanks so much guys! It really means alot.

Adidas it really just takes a little bit of practice and discipline when using sketchup. I am by no means a real expert, i can't do curvy things and rounded things that well.

Yeh Freaky the dog is a little odd :p Its so sensitive to movement, it's head keeps bouncing on my desk :p
 
AC%20Ryan%20Logo.jpg


I would like to introduce my newest sponsor, AC Ryan! They will be sponsoring me with some materials like Aluminium sheet and CCFL's and such things. Thanks Guys!
 
AC%20Ryan%20Logo.jpg


I would like to introduce my newest sponsor, AC Ryan! They will be sponsoring me with some materials like Aluminium sheet and CCFL's and such things. Thanks Guys!

Nice Oliver! You deserve it!, Now share hahaha :D ;) :p.
 
Thanks for the comments guys!

Update #9

I am very pleased to announce my latest sponsor, AquaTuning!

Aquatuning_logo.jpg


They are going to be my watercooling sponsors. Watercooled-pcs have lost contact. I am not sure what has happened. THanks so much to Pascal for bearing with me!

21-9-09%200001.jpg


My AC Ryan sponsorship has arrived! Yay for awesome brushed aluminium!

21-9-09%200002.jpg


21-9-09%200004.jpg


21-9-09%200006.jpg


Slimline CD Drive

21-9-09%200007.jpg


21-9-09%200008.jpg


21-9-09%200009.jpg


USB backplate

21-9-09%200010.jpg


More CAD work is done.

Black line = cut
Green = reference
Red = engrave

This is the bottom plate for the slimline drive. The screws are so dam small for the drive i have decided to glue an acrylic plate to the bottom of it and then screw into the plate.

21-9-09%200011.jpg


The aluminium base plate. The circular things are the feet, top left block is the psu, top right small block is the fan and fan mount, middle bottom box is the cd drive and bottom right is the HDD bay. You can see the amazing clearance of 1mm between the hdd bay and the PSU!

21-9-09%200017.jpg


Fan mount

21-9-09%200018.jpg


HDD Bay. There are 2 of each of the bottom pieces

21-9-09%200020.jpg


This is the motherboard tray. I promise all the crazy holes will make sense in the end!

21-9-09%200019.png


Finally, the masterpiece is unveiled! The completely redesigned fan controller and ccfl/led power board. This is the control hub of all the lighting. The board measures 8cm x 4cm.


So not a very big update. I have ordered the acrylic, should be here tomorrow. Then i can cut up some acrylic!


Oh wait i nearly forgot something...


21-9-09%200021.jpg


Custom made waterblock for the 9300 chipset FTW! Thanks so much to duniek, can't wait to get some money so i can pay him and get it shipped to me!

Ok that really is everything now!
 
Congratulations on the new sponsors. This is going to be awesome!
 
Back
Top