Navigation
Install the app
How to install the app on iOS
Follow along with the video below to see how to install our site as a web app on your home screen.
Note: This feature may not be available in some browsers.
More options
You are using an out of date browser. It may not display this or other websites correctly.
You should upgrade or use an alternative browser.
You should upgrade or use an alternative browser.
Cherry Wood case with Water cooling
- Thread starter Tale Gunner
- Start date
Tale Gunner
Limp Gawd
- Joined
- May 29, 2007
- Messages
- 141
oops
Tale Gunner
Limp Gawd
- Joined
- May 29, 2007
- Messages
- 141
VERY nice work....you have a great talent...")
Thank you again.
daytripper67mi
Limp Gawd
- Joined
- Feb 22, 2004
- Messages
- 364
subscribed...awesome work
Tale Gunner
Limp Gawd
- Joined
- May 29, 2007
- Messages
- 141
subscribed...awesome work
Thank you
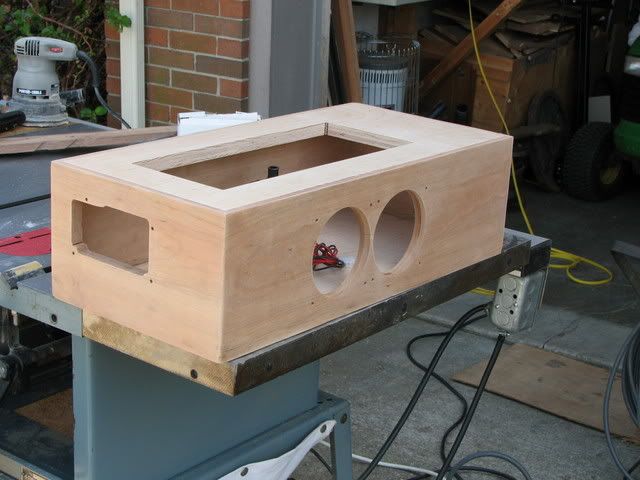
This is the view from the outside of the pump housing.
Seeing this one picture made me realize what i want: Just extra space to cram all of my water cooling gear that is separate from the case. I can construct something similiar and have my current case sit on top of it.
Hmm... i surprised that no manufacturer has ever offered an external unit like this that would sit under the case.
Adidas4275
Supreme [H]ardness
- Joined
- Mar 11, 2006
- Messages
- 5,986
nice skills.... you mave have just inspired me to do a wooden case as well.... not nearly as nice as yours but I will post it if I do end up making one...
Negative Decibel
2[H]4U
- Joined
- Dec 13, 2005
- Messages
- 3,588
This is the best worklog I've seen in a long time! Keep up the awesome work! I love all of the pics.
Tale Gunner
Limp Gawd
- Joined
- May 29, 2007
- Messages
- 141
Holy Mary mother of Jesus. The level awesome in this mod can only be surpassed by nothing. I bow to your awesome prowess.
Seriously, this is the sweetest thing I have seen to date. You have my vote! Hope to see the rest.
Thank you very much. I will be postiing some more this weekend.
Tale Gunner
Limp Gawd
- Joined
- May 29, 2007
- Messages
- 141
nice skills.... you mave have just inspired me to do a wooden case as well.... not nearly as nice as yours but I will post it if I do end up making one...
Hey if I can lend any asistance, all you need to do is ask. I will follow your worklog too. Thank you
Tale Gunner
Limp Gawd
- Joined
- May 29, 2007
- Messages
- 141
This is the best worklog I've seen in a long time! Keep up the awesome work! I love all of the pics.
Thank you very much. I plan this week end to do some of the home made trim.
Tale Gunner
Limp Gawd
- Joined
- May 29, 2007
- Messages
- 141
Good and solid wood work. And the case looks great, now finally assembled.
/subscribed
Thank you. I really appreciate all the comments from everyone.
Tale Gunner
Limp Gawd
- Joined
- May 29, 2007
- Messages
- 141
Because I have received emails asking about the locking mitre I thought I would post some pictures how it works.
The bit and fence were already adjusted from the other day.
First the horizontal board.
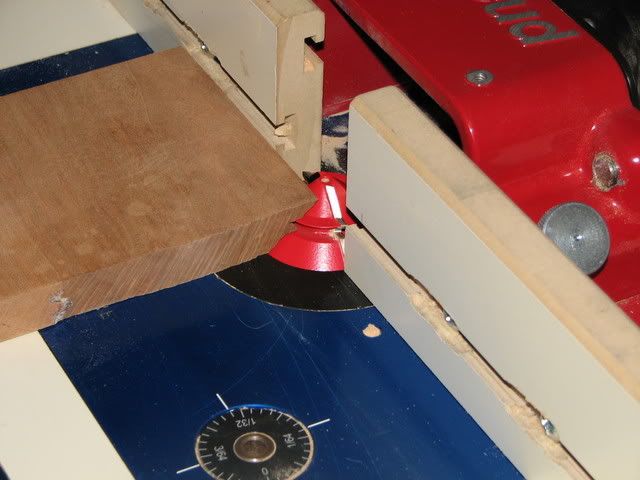
Then the vertical board.
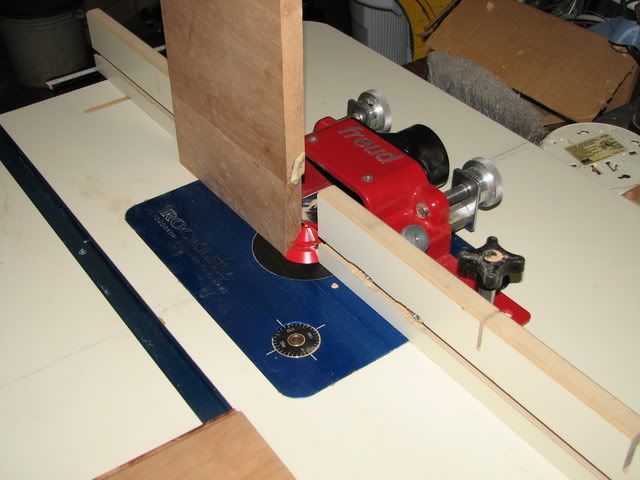
Then a pic of the 2 different boards. The wider board was the vertical and the skinny board was the horizontal.
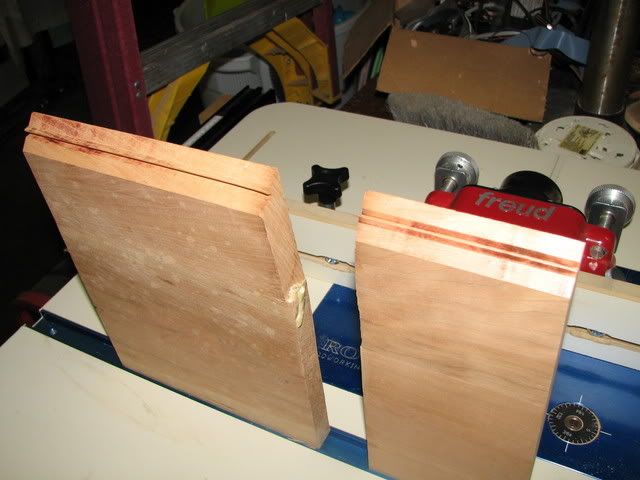
Then a pic of the joined boards.
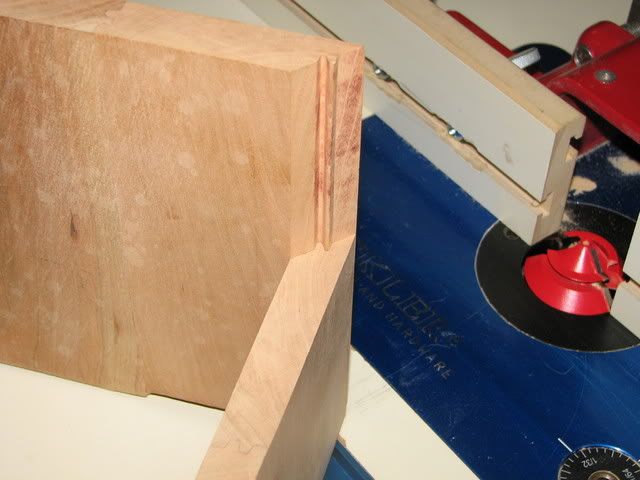
Because of safety reasons I cannot take any action pictures unless my wife would help out. Maybe I can get my daughter to help but shes gonna want her picture in the log too. LOL
The bit and fence were already adjusted from the other day.
First the horizontal board.
Then the vertical board.
Then a pic of the 2 different boards. The wider board was the vertical and the skinny board was the horizontal.
Then a pic of the joined boards.
Because of safety reasons I cannot take any action pictures unless my wife would help out. Maybe I can get my daughter to help but shes gonna want her picture in the log too. LOL
holybonkers
Limp Gawd
- Joined
- May 3, 2005
- Messages
- 167
Yeah please don't take any pictures while you are operating the router table haha. That's one sick looking joint I have to say.
kill4killin
Gawd
- Joined
- Jul 3, 2006
- Messages
- 842
Very nicely done sir. I can't wait to see the finished product!
digital_exhaust
[H]ard|DCer of the Month - May 2008
- Joined
- Aug 14, 2006
- Messages
- 6,903
Very nice... I'm anxious to see the finished product... I'll be watching this.
Tale Gunner
Limp Gawd
- Joined
- May 29, 2007
- Messages
- 141
Yeah please don't take any pictures while you are operating the router table haha. That's one sick looking joint I have to say.
And strong you can't believe how strong it is. Thank you.
Tale Gunner
Limp Gawd
- Joined
- May 29, 2007
- Messages
- 141
Very nicely done sir. I can't wait to see the finished product!
Thank you I promise I wont let you down.
Tale Gunner
Limp Gawd
- Joined
- May 29, 2007
- Messages
- 141
Very nice... I'm anxious to see the finished product... I'll be watching this.
I have been in the planning stages of this for a year or more. Im anxious too! Thank you
Tale Gunner
Limp Gawd
- Joined
- May 29, 2007
- Messages
- 141
Very Very nice craftsmanship.
I would have gone a little smaller though.
Keep up the good work
The size is keeping with the cabinets it will set next to, otherwise I would have made it smaller too. Thank you
Tale Gunner
Limp Gawd
- Joined
- May 29, 2007
- Messages
- 141
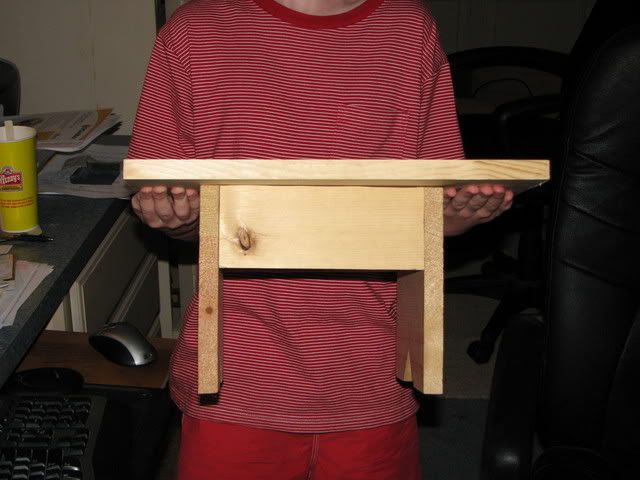
My son came back from camp today to tell me he wants to start making more projects. When he showed me his latest work I had to agree. He loves computers and now wood working. Hes 9 years old.
blendingnoise
Gawd
- Joined
- Jan 3, 2006
- Messages
- 912
Your son is a genius. I could so use that under my desk to prop my feet on
subscribed.
Apallohadas
2[H]4U
- Joined
- Oct 6, 2004
- Messages
- 2,795
Your son should sell those to the [H] crowd. I'd use one for my feet as well
Everfalling
Gawd
- Joined
- Jul 12, 2005
- Messages
- 676
this is coming along really well. we need to see more wood cases. i'm waiting for someone to make a case that looks like some really old Armoire or something.
I'd love to make my own wood case. There's plenty of reasons to justify it. For a start it's going to dampen vibration more than any other material. It's also going to be exactly the right size and dimensions for everything, because it's custom made. If I spent enough time working out exactly what was needed and where things were going to go I could end up with the perfect enclosure. I will never do it of course, I don't have the tools, and I've not even finished my (compared to this banal) upgrade. But maybe if my circumstances change... I do have a friend that is looking into giving up the rat race and going back to cabinet making. So maybe I could talk him into helping me.
The other style I'd like to see something in, is steampunk. So if I was given all the time in the world, money, inspiration and the know-how I'd make a functional wooden case, and it'd end up looking like something from H G Wells.
Anyway, don't be shy with the camera when this is finished.
The other style I'd like to see something in, is steampunk. So if I was given all the time in the world, money, inspiration and the know-how I'd make a functional wooden case, and it'd end up looking like something from H G Wells.
Anyway, don't be shy with the camera when this is finished.
Tale Gunner
Limp Gawd
- Joined
- May 29, 2007
- Messages
- 141
Your son is a genius. I could so use that under my desk to prop my feet on
subscribed.
Thats what he thought too, then he said he wanted to finish it for his mom.
Thanks...
Tale Gunner
Limp Gawd
- Joined
- May 29, 2007
- Messages
- 141
You've passed beyond hobbyist, into the realm of the artisan. Well done sir.
Thank you very much.
Tale Gunner
Limp Gawd
- Joined
- May 29, 2007
- Messages
- 141
Your son should sell those to the [H] crowd. I'd use one for my feet as well
I'll tell him LOL thank you.
Tale Gunner
Limp Gawd
- Joined
- May 29, 2007
- Messages
- 141
this is coming along really well. we need to see more wood cases. i'm waiting for someone to make a case that looks like some really old Armoire or something.
I had thought of that. I will give it some thought and start a drawing.
Tale Gunner
Limp Gawd
- Joined
- May 29, 2007
- Messages
- 141
I'd love to make my own wood case. There's plenty of reasons to justify it. For a start it's going to dampen vibration more than any other material. It's also going to be exactly the right size and dimensions for everything, because it's custom made. If I spent enough time working out exactly what was needed and where things were going to go I could end up with the perfect enclosure. I will never do it of course, I don't have the tools, and I've not even finished my (compared to this banal) upgrade. But maybe if my circumstances change... I do have a friend that is looking into giving up the rat race and going back to cabinet making. So maybe I could talk him into helping me.
The other style I'd like to see something in, is steampunk. So if I was given all the time in the world, money, inspiration and the know-how I'd make a functional wooden case, and it'd end up looking like something from H G Wells.
Anyway, don't be shy with the camera when this is finished.
Thanks I will post some pics with me and my son & daughter when I get the chance.
Tale Gunner
Limp Gawd
- Joined
- May 29, 2007
- Messages
- 141
I had planned to do trim this weekend, but things changed. My wife's birthday is next Tuesday so I have finish shopping for her present. I think maybe tonight I will do the raised panel door frame. Since the frame is 2 1/2" deep with a 3/4" panel on the front I will route both sides and bottoms with the interlocking bit prior to cutting them to width. That way I have a 6 or 7 inch board to work with which is easier then the 2 1/2" board. Then I will cut them to the correct width. The boards will already be cut to length so this will make the entire process easy.
BootSector
Limp Gawd
- Joined
- Aug 12, 2004
- Messages
- 165
Cabinet making runs in my family and I have to say you are doing excellent work. Your router table is a sweet set up also.
Tale Gunner
Limp Gawd
- Joined
- May 29, 2007
- Messages
- 141
Cabinet making runs in my family and I have to say you are doing excellent work. Your router table is a sweet set up also.
Thank you. I love cabinet making. I have built a cabinet for the DVDs my family has.
BillParrish
Supreme [H]ardness
- Joined
- Aug 25, 2006
- Messages
- 7,519
OUTdamnStanding !
Made my day.
I greatly appreciate the level of detail as this serves as an excellent guide as well as a worklog.
I tell them that there are more Jets in the ocean then subs in the sky.
Made my day.
I greatly appreciate the level of detail as this serves as an excellent guide as well as a worklog.
Tale Gunner
Limp Gawd
- Joined
- May 29, 2007
- Messages
- 141
OUTdamnStanding !
Made my day.
I greatly appreciate the level of detail as this serves as an excellent guide as well as a worklog.
Thank you. Hope you watch for the final product.