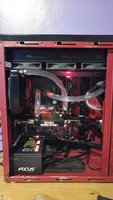
Will my old cooling loop hold up to a new system?

arnemetis

2[H]4U
Joined
Aug 2, 2004
Messages
4,086
Hi everyone,

I'm debating keeping my 9 year old cooling loop and case to save some $ for my upcoming build. It hasn't changed much since I built it in 08.

Cooling Loop:
Thermochill PA120.3 triple 120mm radiator w/ 6x 120mm medium Yate Loon fans in push&pull
Swiftech 120mm radiator w/ 1x 120mm medium Yate Loon in pull
2x DDC 3.2 pumps in series with Petra's tops
Swiftech MCRes Micro Reservoir
1/2" ID Tygon tubing (might be masterkleer, don't remember.)
Primochill PC ICE coolant
12v/7v switch for the fans that stays on 7v almost all the time

What it used to cool originally:
Q6600 @ 3.85ghz with a dtek fusion cpu block
bitspower 790i north & southbridge motherboard block
2x gtx 260 core 216s w/ ek full cover blocks

What it's cooling now:
8350BE @ 4.6ghz
2x 560 ti full cover blocks

What I want to cool in my new build:
8700k @ 5ghz from silicon lottery
Asus ROG Maximum x Formula (the built in vrm block)
1080 ti full cover block

So will I have adequate cooling capacity? I do plan on overclocking the 1080 for what it's worth, and I've already stated I plan on picking up a binned 8700k. I don't mind if this means I need to start keeping the fans on 12v when I'm doing intensive things, but what I really don't want to be is thermally limited after all this work goes into it. Here's a photo from it's glory in 08:
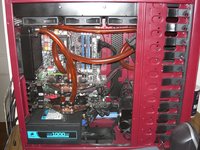
CIMG7482.JPG
 
should be fine. there's someone around here with just a 360 for that config, gets into the low 60s under load.
 
You meet the "rule of thumb" for radiator capacity: 2x120mm per overclocked component.

I'd personally replace the tubing on that thing, of course, and give it a good deep cleaning since you'll have it apart, but you should be fine for capacity.
 
You meet the "rule of thumb" for radiator capacity: 2x120mm per overclocked component.

I'd personally replace the tubing on that thing, of course, and give it a good deep cleaning since you'll have it apart, but you should be fine for capacity.
I've actually been considering that, the coolant IS nine years old. Only a little bit left in the bottle I've used for top offs. I'm not sure how I feel about cleaning it out, taking this entirely apart would be...destructive (the pumps are on a plate that is riveted into place.) What would you suggest for cleaning? Also what's a good suggestion for a non conductive fluid these days? I have had personal experience with my first rig spilling twice and this stuff didn't fry anything, and this rig developed a leak from the cpu block 2 months in that made a pool on the back of the gpu, and it never flinched.
 
I've actually been considering that, the coolant IS nine years old. Only a little bit left in the bottle I've used for top offs. I'm not sure how I feel about cleaning it out, taking this entirely apart would be...destructive (the pumps are on a plate that is riveted into place.) What would you suggest for cleaning? Also what's a good suggestion for a non conductive fluid these days? I have had personal experience with my first rig spilling twice and this stuff didn't fry anything, and this rig developed a leak from the cpu block 2 months in that made a pool on the back of the gpu, and it never flinched.
The life cycle on even the longest-lived coolants is a year or two. I would absolutely tear the thing apart and clean it, as well as inspect o-rings. If you don't find any gunk in your blocks I will be amazed.

As for non-conductive fluid, I'd skip it. It doesn't stay non-conductive; ions from the metals in your loop leach into it over time and make it conductive. I can promise the stuff you've got in your machine right now is conductive.
 
I'd say you are fine.

Typical components today (unless you are going for a Threadripper or something like that) don't really use more power than when you built that loop.

I'd be tempted to give the loop a good clean first though, replace the fluid, and maybe take a look at the pump. Pumps don't last forever.
 
Same as the other replies, just needs a good cleaning and new coolant. My setup is over 10 years old and still going strong. I built it to handle an opteron 165 and two nvidia 7900 gto's in sli, all overclocked heavily. Today it's running a skylake i5 and a gtx 970 just fine.

For cleaning, I always found an old toothbrush and ketchup works well. Rinse well after.

I don't buy the pre-made coolant, my loop is all copper and brass so no dissimilar metals issues. I just get a jug of deionized water from the auto parts store and a couple drops of ptnuke to prevent algae. As long as you don't care about dye, it's cheaper and works great.
 
I'd tear it apart completely as others have mentioned and give it a good scrubbing down. Replace tubing & fluid. You've got plenty of raddage for pretty much any build aside from what Zarathrusta stated with a TR build.

I'm anal so I tear my entire loop apart every year. Never had any issues.
 
Yeah I ordered everything except the cpu last night, had fun fighting with the bank because apparently that was a lot of spending in a short while which did not fit my patterns. Hopefully I can order the cpu tomorrow and get it all by Friday, might try to tear it apart this weekend. Going to be challenging, I need to 100% tear it down and get a fully functioning system again by Tuesday.

I did pick up new tubing, and decided to go with deionized water and a silver kill coil. I think I'll leave the silver out for the first few days, in case there is a leak I'll at least have a small chance, but with the silver in there I'm sure it will fry everything.

As far as I can tell, both pumps are still going strong. I knew putting two in series was overkill, but I liked the idea of a safety net in case one failed. One should get me by to get work done, if not game, while another ships. Of course, I'm hoping they both just keep going for a long time to come.

Opted for an evga sc2 hydro 1080 ti so I didn't have to play around with one block, and got the EK M9H monoblock for the Asus Maximus X Hero. The cost of the Maximus X Formula + CPU block was so much greater than this combo, mobo for 260 and monoblock for 121, vs 450 for JUST the Formula.
 
Good choices.
I bought my son the Maximus X Hero and an 8600K on a package deal.
The board is a dream to use. OCs well with just VCore and Load-Line Calibration adjustment. Nothing else.
I love me some Hero. (I think I've owned 6 of them)
Overclocked to 4.7 on a Corsair H80i V2 after I de-lidded the CPU.
Your stuff should be fine to use, keeping with tubing and coolant replacement.
My only worry is I believe after looking closer I have 7/16" ID / 11/16" OD Masterkleer tubing currently, and I got 1/2" x 3/4" tubing to replace it with. I have some holes where the tubing passes through, and I bought grommets for them back in the day. I wonder If I was picky enough to find exact sizes, or if they're really 3/4" anyway. I need to borrow a drill to take out the rivets too, I'll replace them with nuts & bolts now.
 
Gonna be a nice rebuild! Looking forward to results and pics!
I never did post pics of the original build when I tore it all apart and painted the CM Stacker caase back in 08, maybe I'll get around to posting some of those too. Silicon Lottery got stock in, and the prices came back down a bit so I splurged and got a 5.1ghz 8700k instead of the 5ghz I was planning on when it was 499. Still crazy expensive, but I don't plan on upgrading again for another 4 years or more.
 
Hi everyone,

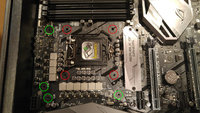
I now have all my components for my build, including the M9H block and Asus Maximus X Hero, however I have a concern. Upon taking off the heatsinks for the mosfets, I see that there was a thin washer glued to the motherboard at these locations, however no such washers exist at the four holes around the cpu socket. The M9H appears to have the same height for all 8 of it's posts, which means it will bend the cpu socket area up towards the block if I am correct. Can anyone chime in with their thoughts, as I am not excited to kill this motherboard if all it needs are some small washers. Unfortunately the kit did not come with additional washers for the larger holes around the cpu socket, only the smaller mofset are holes. What should I do?

Here's a photo of my socket area, showing the presence of washers in green, and the lack of washers in red:
Asus Maximus X Hero Socket.jpg
 
Hi everyone,

I now have all my components for my build, including the M9H block and Asus Maximus X Hero, however I have a concern. Upon taking off the heatsinks for the mosfets, I see that there was a thin washer glued to the motherboard at these locations, however no such washers exist at the four holes around the cpu socket. The M9H appears to have the same height for all 8 of it's posts, which means it will bend the cpu socket area up towards the block if I am correct. Can anyone chime in with their thoughts, as I am not excited to kill this motherboard if all it needs are some small washers. Unfortunately the kit did not come with additional washers for the larger holes around the cpu socket, only the smaller mofset are holes. What should I do?

Here's a photo of my socket area, showing the presence of washers in green, and the lack of washers in red:
View attachment 47361
Test fitting time. That is the only smart answer to give you.

Use some cheapy TIM if you have any to check mating footprints, and see what kind of force you are putting on the PCB as well.
 
Test fitting is always the only way to be sure, but the fact that they are uniformly on the mosfets and not around the CPU, makes it not seem unreasonable that it is designed this way on purpose.
 
Test fitting is always the only way to be sure, but the fact that they are uniformly on the mosfets and not around the CPU, makes it not seem unreasonable that it is designed this way on purpose.
My concern is with the fact that the M9H monoblock was designed for the Maximus IX Hero, and just happens to work on the Maximus X Hero because Asus didn't change the layout in this area. EK did confirm compatibility, but this little detail seems off to me. So it's possible these attached washers are new to the X. I'm just trying to be extra careful!
 
My concern is with the fact that the M9H monoblock was designed for the Maximus IX Hero, and just happens to work on the Maximus X Hero because Asus didn't change the layout in this area. EK did confirm compatibility, but this little detail seems off to me. So it's possible these attached washers are new to the X. I'm just trying to be extra careful!


May be a silly question, but have you googled for pictures of the IX naked to see if it had them?
 
May be a silly question, but have you googled for pictures of the IX naked to see if it had them?
I did but wasn't happy with what I saw. This photo here though seems to confirm they were present on the IX: https://imagescdn.tweaktown.com/con...s-ix-formula-z270-motherboard-review_full.jpg

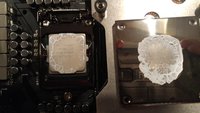
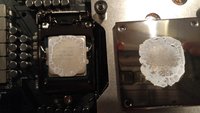
So I did what the boss suggested and did a test fit with some old thermalright paste I had. Dropped an uncooked pea in the middle and carefully put the motherboard down on the waterblock, and worked my away around starting, and then tightening down each screw. The screw the furthest away from the mosfet posts didn't seem to tighten any easier than the closer ones, which would be true if I was flexing the board appreciably. The I reversed my operation, and carefully lifted the motherboard straight up. Besides needing a hint more paste, it looks pretty good to me? First shot is focused on the cpu, second on the block:
1222171904.jpg 1222171904a.jpg
 
I did but wasn't happy with what I saw. This photo here though seems to confirm they were present on the IX: https://imagescdn.tweaktown.com/con...s-ix-formula-z270-motherboard-review_full.jpg

So I did what the boss suggested and did a test fit with some old thermalright paste I had. Dropped an uncooked pea in the middle and carefully put the motherboard down on the waterblock, and worked my away around starting, and then tightening down each screw. The screw the furthest away from the mosfet posts didn't seem to tighten any easier than the closer ones, which would be true if I was flexing the board appreciably. The I reversed my operation, and carefully lifted the motherboard straight up. Besides needing a hint more paste, it looks pretty good to me? First shot is focused on the cpu, second on the block:
View attachment 47378 View attachment 47379

Yeah, that looks like good contact to me!
 
I did but wasn't happy with what I saw. This photo here though seems to confirm they were present on the IX: https://imagescdn.tweaktown.com/con...s-ix-formula-z270-motherboard-review_full.jpg

So I did what the boss suggested and did a test fit with some old thermalright paste I had. Dropped an uncooked pea in the middle and carefully put the motherboard down on the waterblock, and worked my away around starting, and then tightening down each screw. The screw the furthest away from the mosfet posts didn't seem to tighten any easier than the closer ones, which would be true if I was flexing the board appreciably. The I reversed my operation, and carefully lifted the motherboard straight up. Besides needing a hint more paste, it looks pretty good to me? First shot is focused on the cpu, second on the block:
View attachment 47378 View attachment 47379
Looks good to me. You going to check the MOSFETs too? Use a toothpick and put down a tiny dot of TIM and see if you get contact there, assuming that you should. I have no experience with that block. Quite frankly, those all in one blocks do not attract me.
 
If you watch this water block install video, you can apply the same technique to check your compression on the thermal pads without ruining those. And know if those are solid mounts are not. Check the entire thing at one time, MOSFETs and CPU.

 
So I did the thermal pad test as Kyle mentioned, thankfully the pads stuck to the waterblock. This also allowed me to trim them a tiny bit better, since I could use the edge of the block as a guide and get that last 1/16" off. Then I threw it all together for a quick suicide run, just to see if I saw a bios message. Happy to report I did see some text before I killed the PSU, couldn't have been on more than 20 seconds. Pretty sure the heatsinks were enough for that much time to keep things from being damaged.
1223171453.jpg
Now on to start gutting my pc and clean all my existing gear.
 
So I did the thermal pad test as Kyle mentioned, thankfully the pads stuck to the waterblock. This also allowed me to trim them a tiny bit better, since I could use the edge of the block as a guide and get that last 1/16" off. Then I threw it all together for a quick suicide run, just to see if I saw a bios message. Happy to report I did see some text before I killed the PSU, couldn't have been on more than 20 seconds. Pretty sure the heatsinks were enough for that much time to keep things from being damaged.
View attachment 47470
Now on to start gutting my pc and clean all my existing gear.

Heat doesn't usually kill stuff anymore, unless something is wrong, or highly overvolted.

Chips just throttle way the hell down.

A modern Core CPU has more transistors dedicated to thermal management than the original Pentium had in total.
 
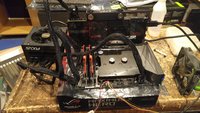
Ok so I'ts been set up now since Sunday night, after figuring out that I cannot install windows 10 via usb with the blue ports, I got it up and running. 5.1ghz is kept plenty cool right now since it's cold in the basement, but even with the fans at 7v it never broke 70c during prime small ffts. I've had less luck with the gpu I think, 2062mhz it will run all day, 2075 it crashes heaven within 10 minutes. I have power target at 120%, and voltage cranked all the way, yet it never goes higher than 1031mv. I tried Evga precision ocx, Asus gpu tweak II, and MSI afterburner with identical results. I know 2062mhz is nothing to sneeze at, and it's stable even with the memory at it's current happy spot of +700 (6210mhz) - but of course when I was trying to find my peak core speed I left memory at default. Temps never pass 45c! Maybe I should make a thread in the video card forum regarding the voltage; anyway here's a shot of the setup for now, I need to clean things up and take some better shots. Still have to drop the kill coil in too, thankfully I haven't had a leak yet.
1226171145.jpg
 
Ok so I'ts been set up now since Sunday night, after figuring out that I cannot install windows 10 via usb with the blue ports, I got it up and running. 5.1ghz is kept plenty cool right now since it's cold in the basement, but even with the fans at 7v it never broke 70c during prime small ffts. I've had less luck with the gpu I think, 2062mhz it will run all day, 2075 it crashes heaven within 10 minutes. I have power target at 120%, and voltage cranked all the way, yet it never goes higher than 1031mv. I tried Evga precision ocx, Asus gpu tweak II, and MSI afterburner with identical results. I know 2062mhz is nothing to sneeze at, and it's stable even with the memory at it's current happy spot of +700 (6210mhz) - but of course when I was trying to find my peak core speed I left memory at default. Temps never pass 45c! Maybe I should make a thread in the video card forum regarding the voltage; anyway here's a shot of the setup for now, I need to clean things up and take some better shots. Still have to drop the kill coil in too, thankfully I haven't had a leak yet.
View attachment 47867
I'd say you're doing pretty good with that clock on the GPU. 2100MHz is considered top-tier binning for the regular 1080 chips, which start out with a higher clock speed than the ti, IIRC.
 
Two 240mm, or like a few that make a Dual core Thick one like XSPC etc, or yeah a 360/480mm , should be enough for cpu and gpu.
 
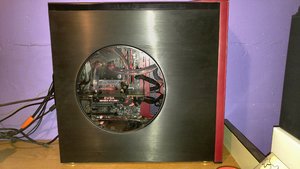
Finally got around to replacing the mesh side of my CM Stacker case with a piece of plastic, dang thing was really reflective. Leak free for a few weeks now, kill coil is in. Window seems small now...
0107181551.jpg
 
Back
Top