CentOS 7 BOINC Install Guides

EXT64

[H]ard|DCer of the Year 2020
Joined
Mar 27, 2013
Messages
786
These guides are intended to help get BOINC (or Folding @ home) setup on CentOS 7. I was drawn to CentOS due to the much more polished feel of the OS and better GPU driver support. F@h is fully supported on CentOS, so I will not specifically address it. BOINC is not supported on CentOS, so these guides will run through Compilation and Setup. There are four guides:

1.) CentOS 7 for CPU
2.) CentOS 7 for AMD GPU
3.) CentOS 7 for NVIDIA GPU
4.) CentOS 7 for Intel CoProcessor (Maybe)

I appreciate any feedback on this guide, as I am neither a Linux expert nor a forum expert :D

Enjoy!
 
Last edited:
I start with a fresh install of CentOS 7 "Server with GUI" along with Hardware Monitoring Utilities, Compatibility Libraries, and Development Tools (I used the DVD as the installation source). Note that for this guide I planned to only run CPU work - so no drivers are dealt with in this guide. See the following guides for details on that. Note that this guide is still a WIP - I hope for it to eventually be "Grandpa Proof", however that has not been checked yet.

(Note: anything in () are notes, standard font is what you type in the terminal, and italics is directions)

(Download the CentOS 7 DVD ISO file from: http://www.centos.org/download/ )

(Use Win32DiskImager to write the CentOS 7 image file to a flash drive larger than 4GB)

(Setup BIOS to boot from the USB drive first)

(Boot the Computer to the USB Drive)

Select "Install CentOS"

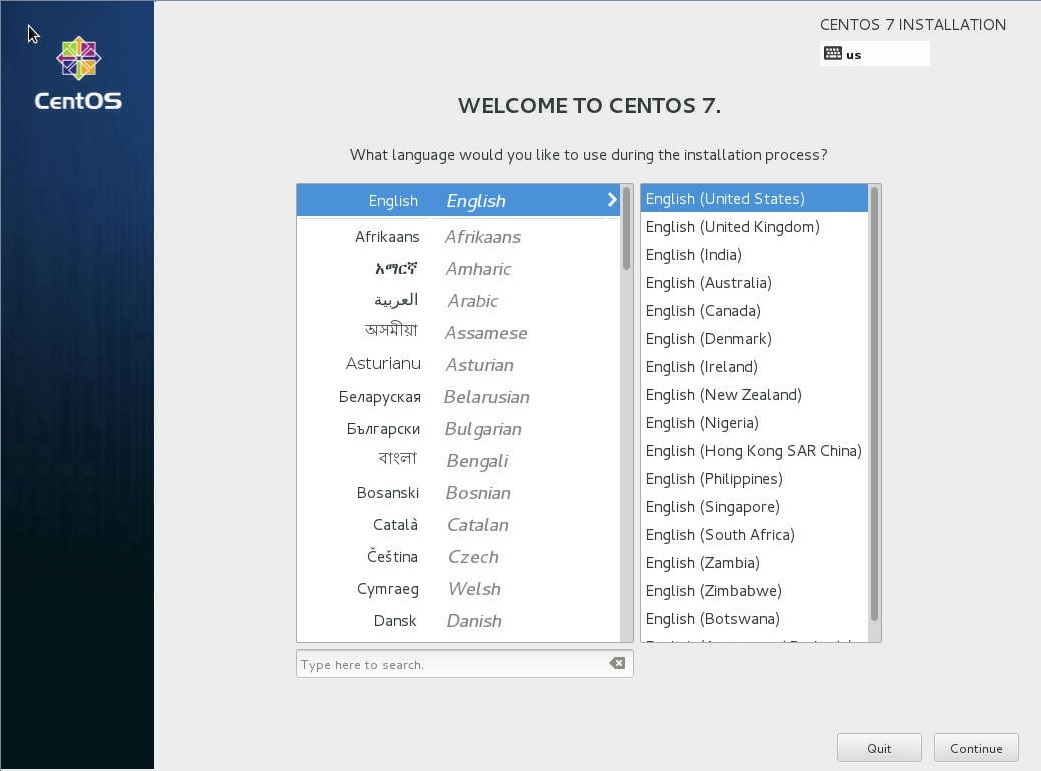
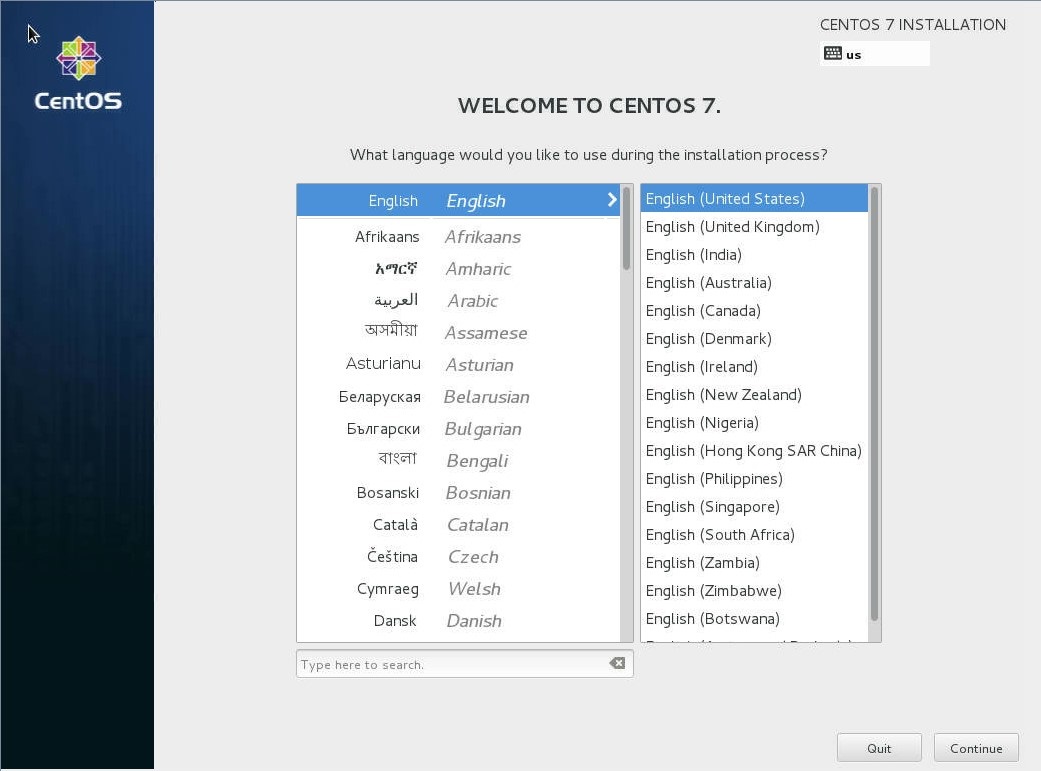
(Select Language and Keyboard)
59626.jpg


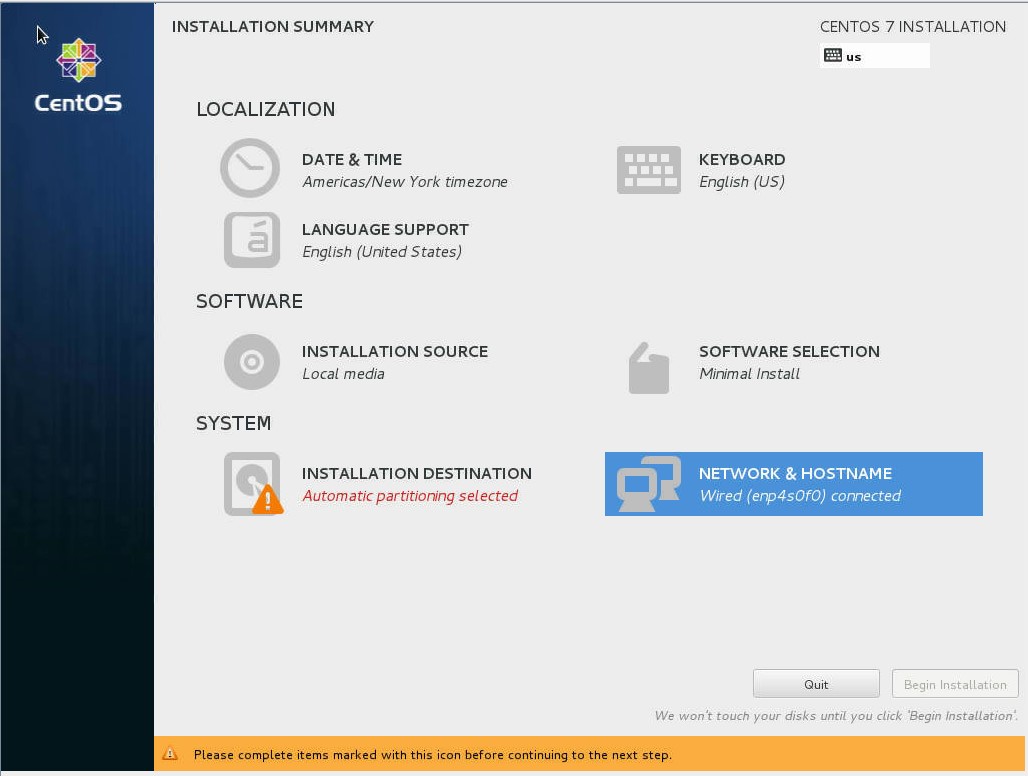
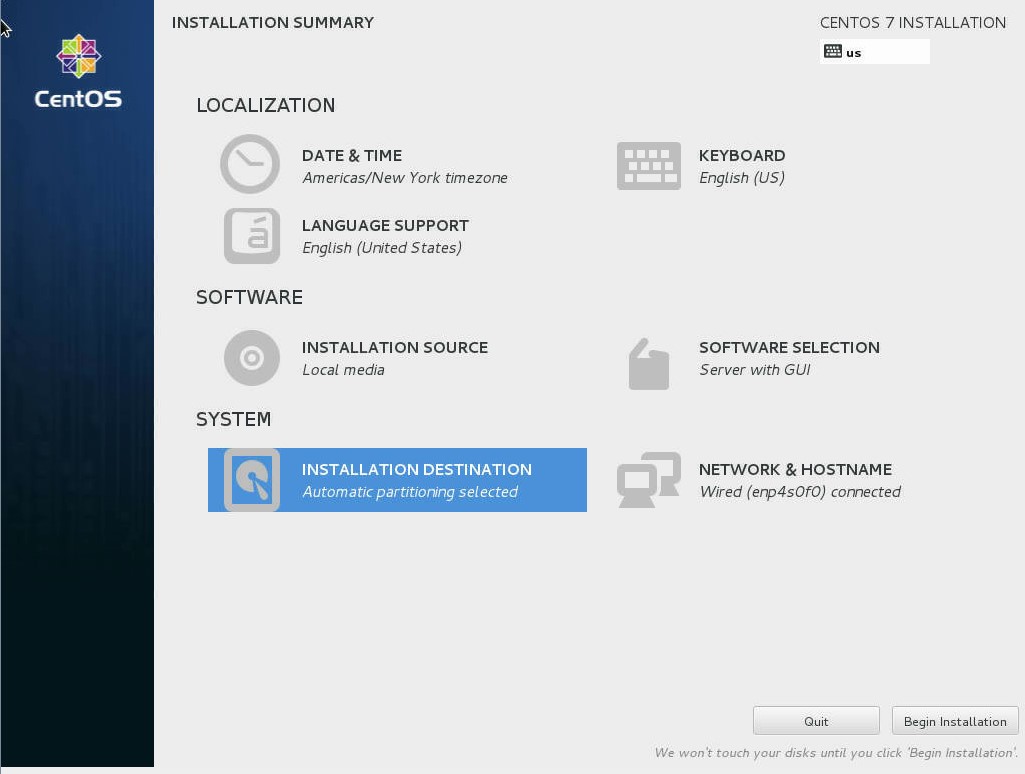
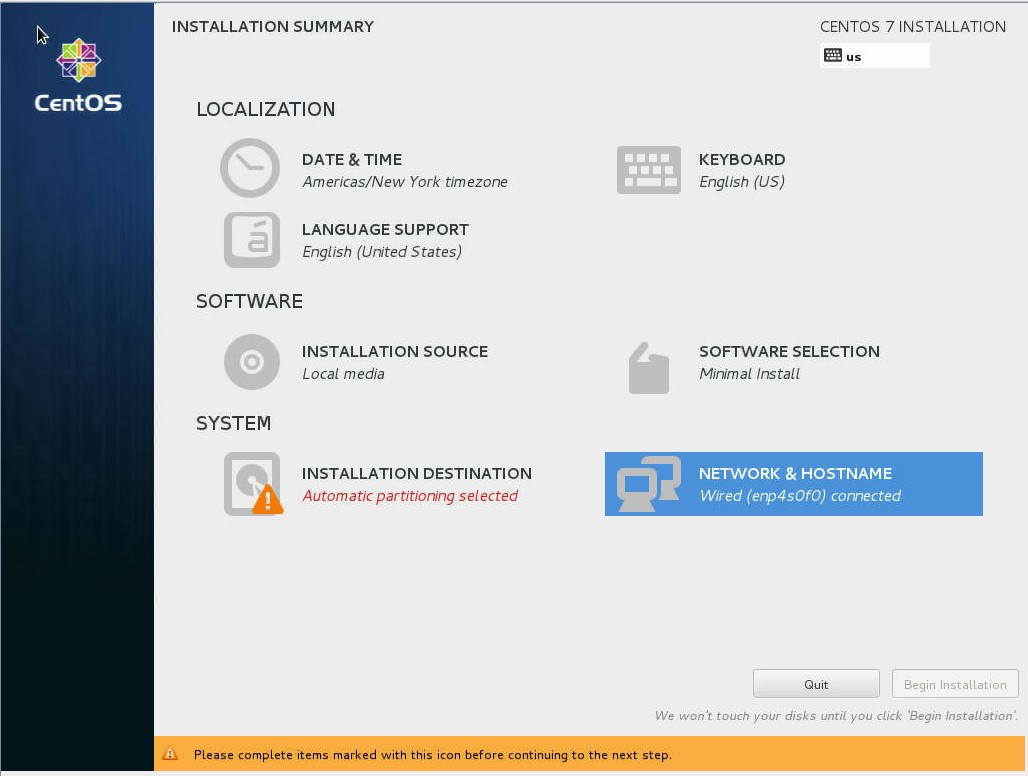
(Work through the Installation Summary)
59627.jpg


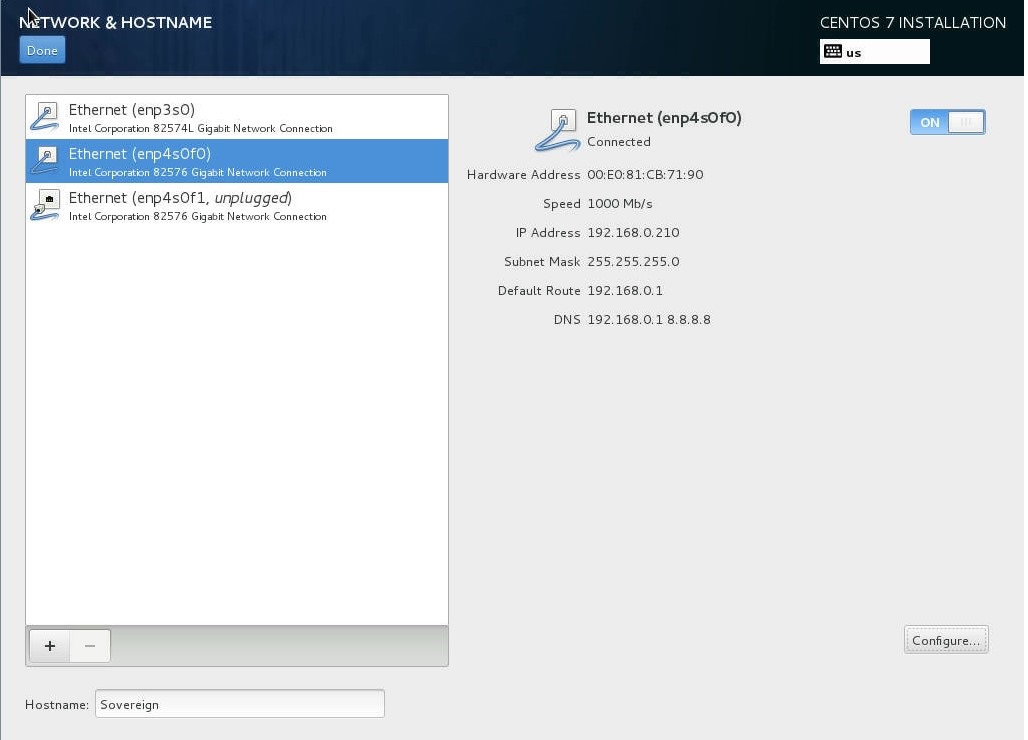
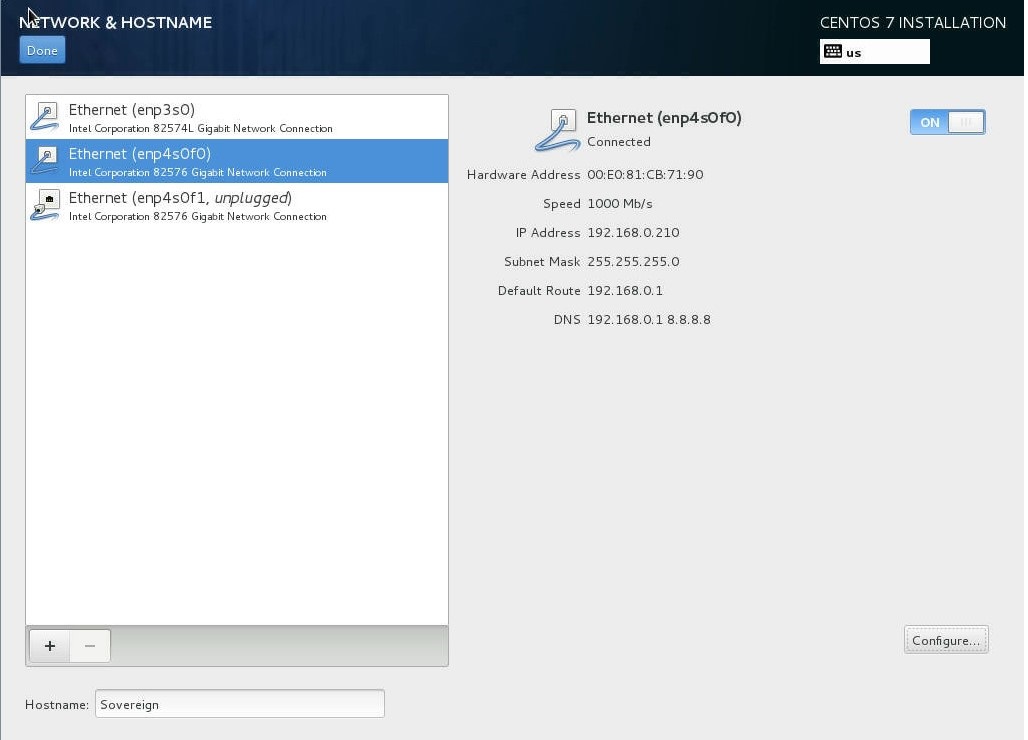
(First Setup your network : select the adapter you want to use, go to configure and setup as desired, then set your hostname, then check that the adapter is now active (if it is not, activate now))
59628.jpg


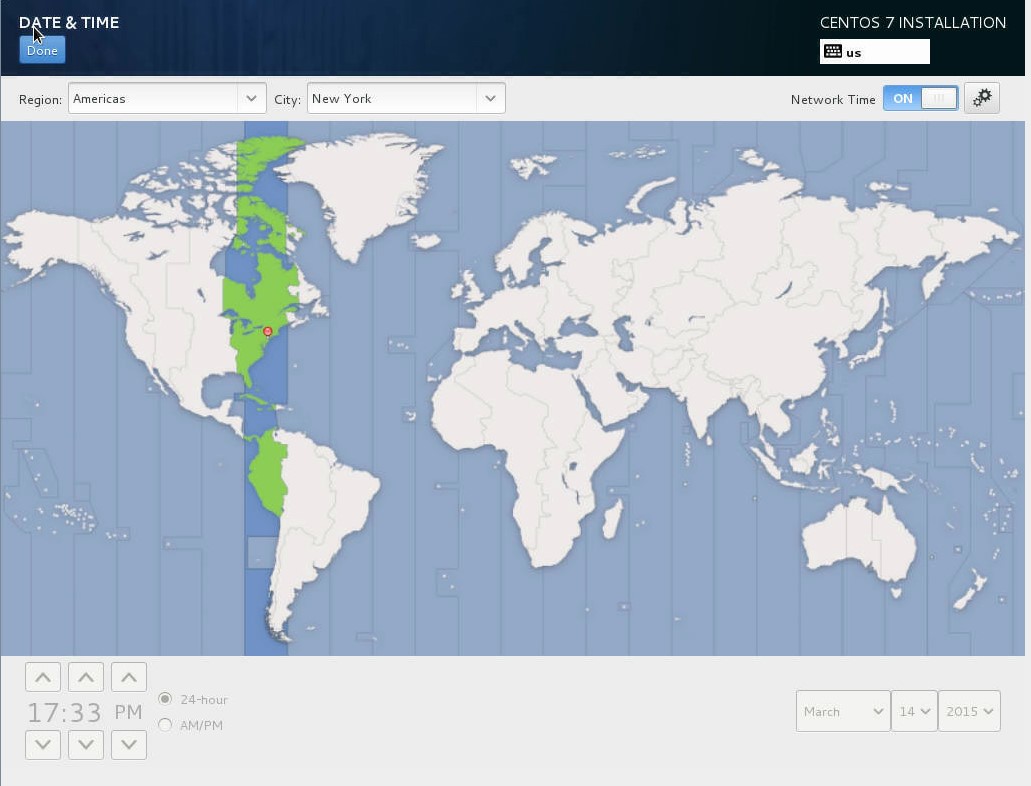
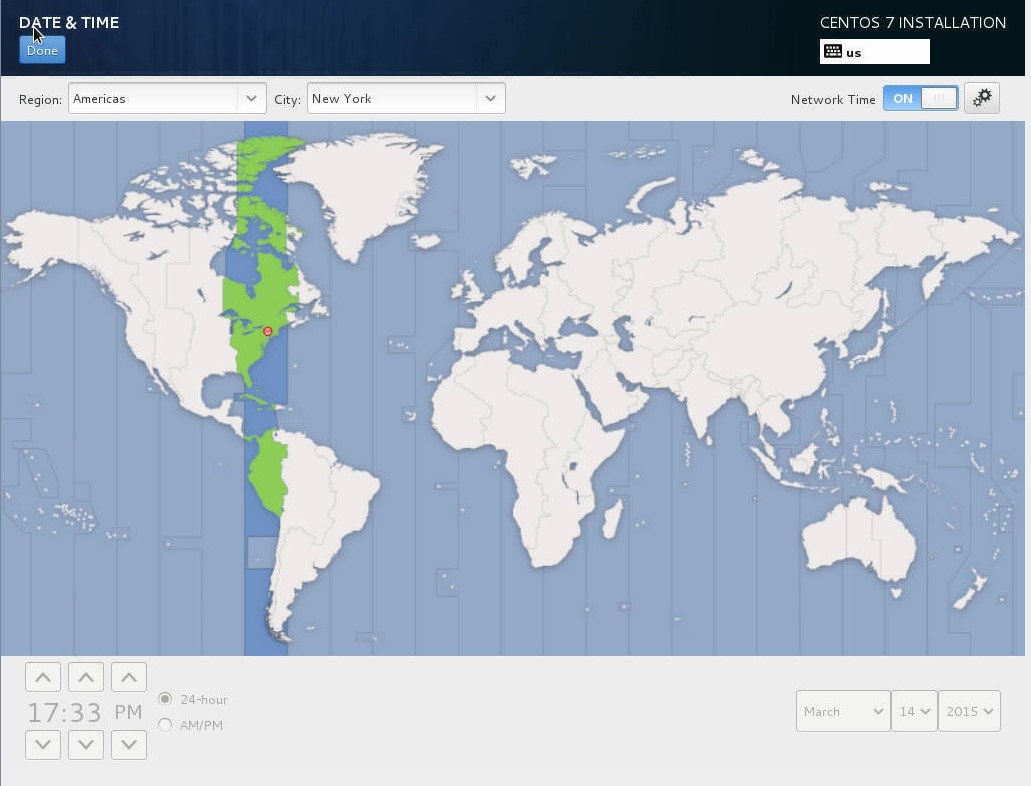
(Set Date and Time, make sure network time servers are working (turn Network Time "OFF" then "ON")
59629.jpg


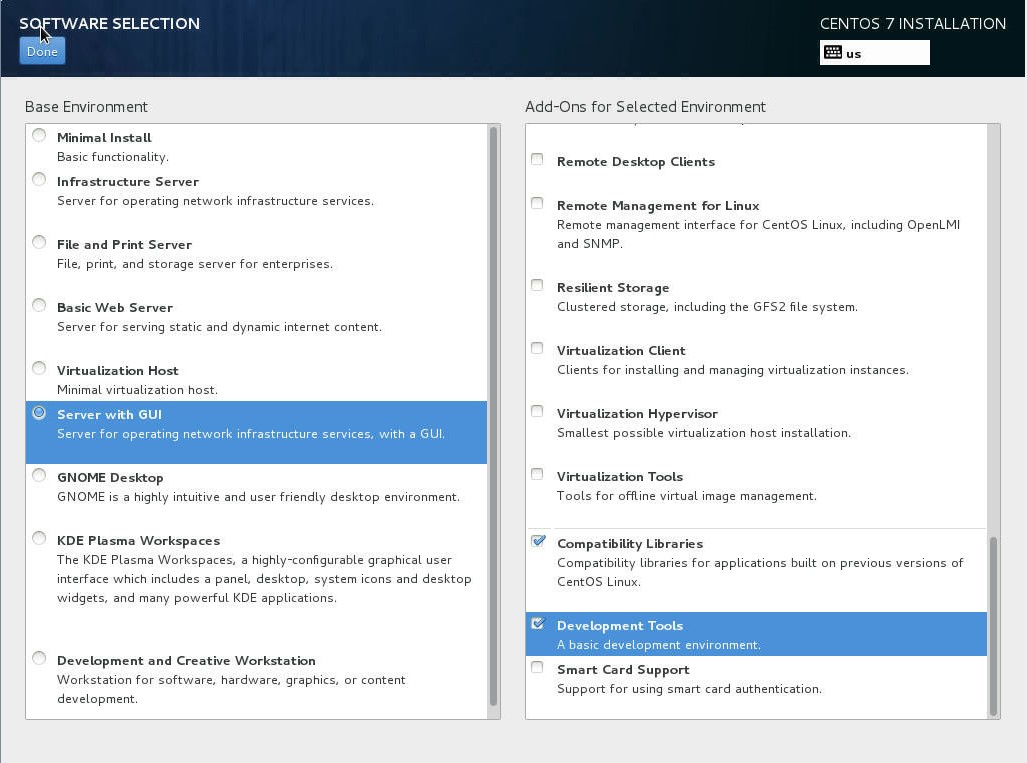
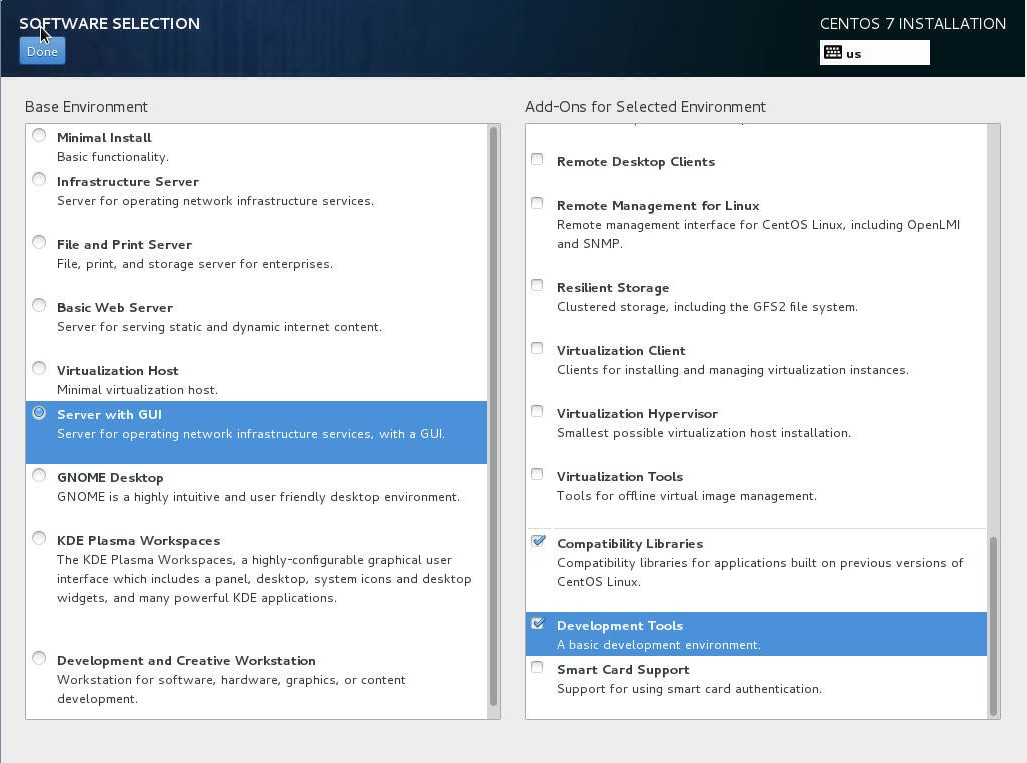
(Chose your Software Selection : for this guide I used "Server with GUI" along with Hardware Monitoring Utilities, Compatibility Libraries, and Development Tools)
59630.jpg


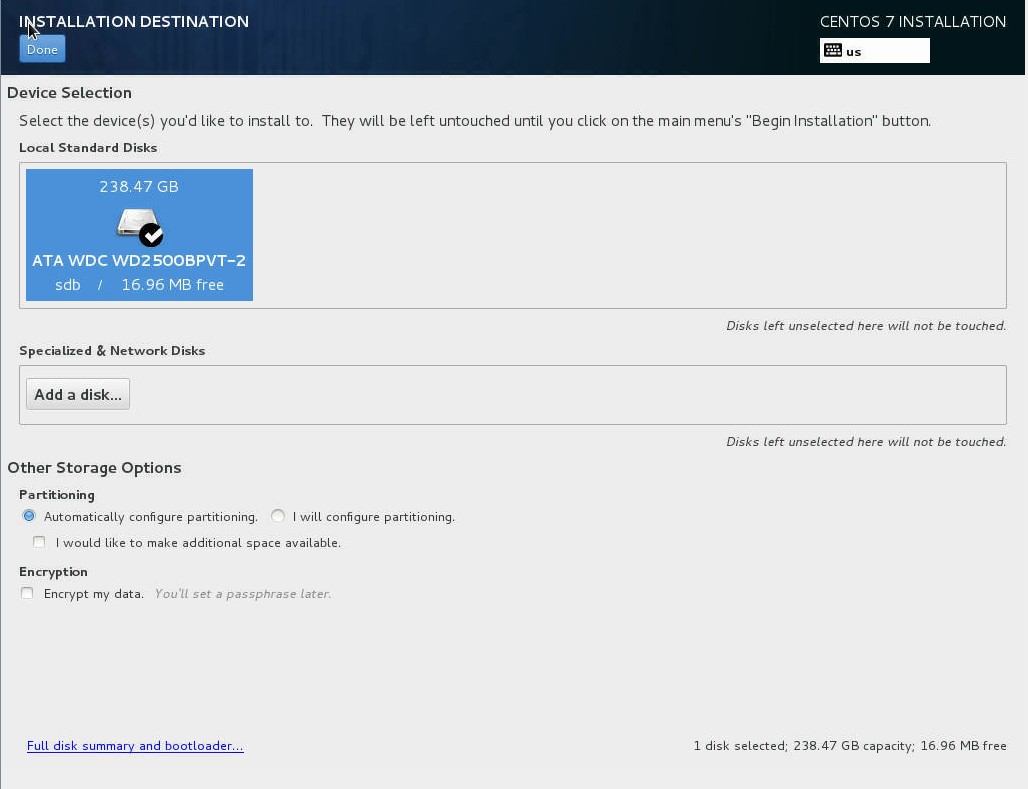
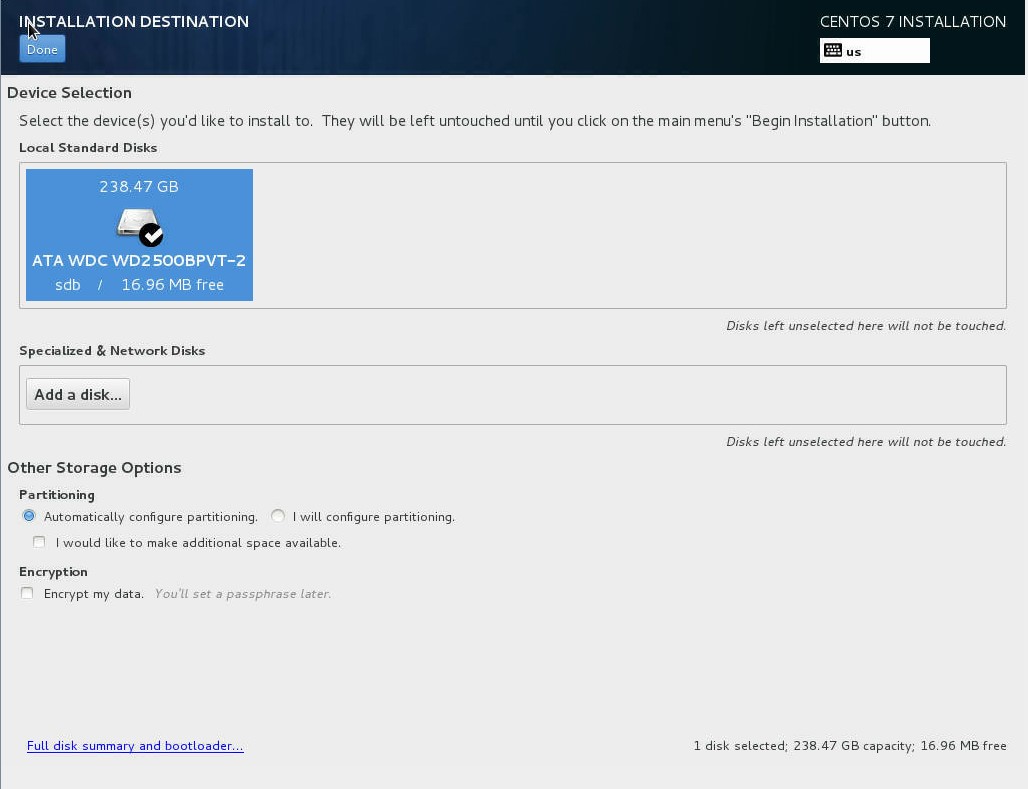
(Finally set your Installation Destination : I just left the default as I planned to use the entire (and only) drive for the CentOS install : if you need different look up other guides)
59631.jpg


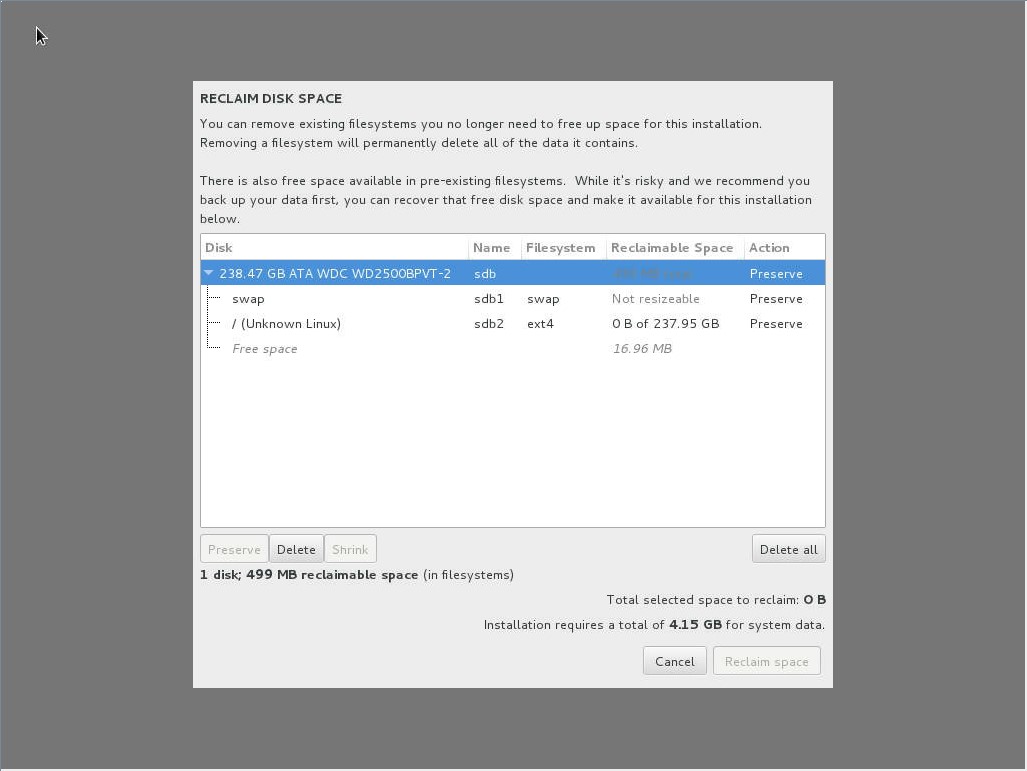
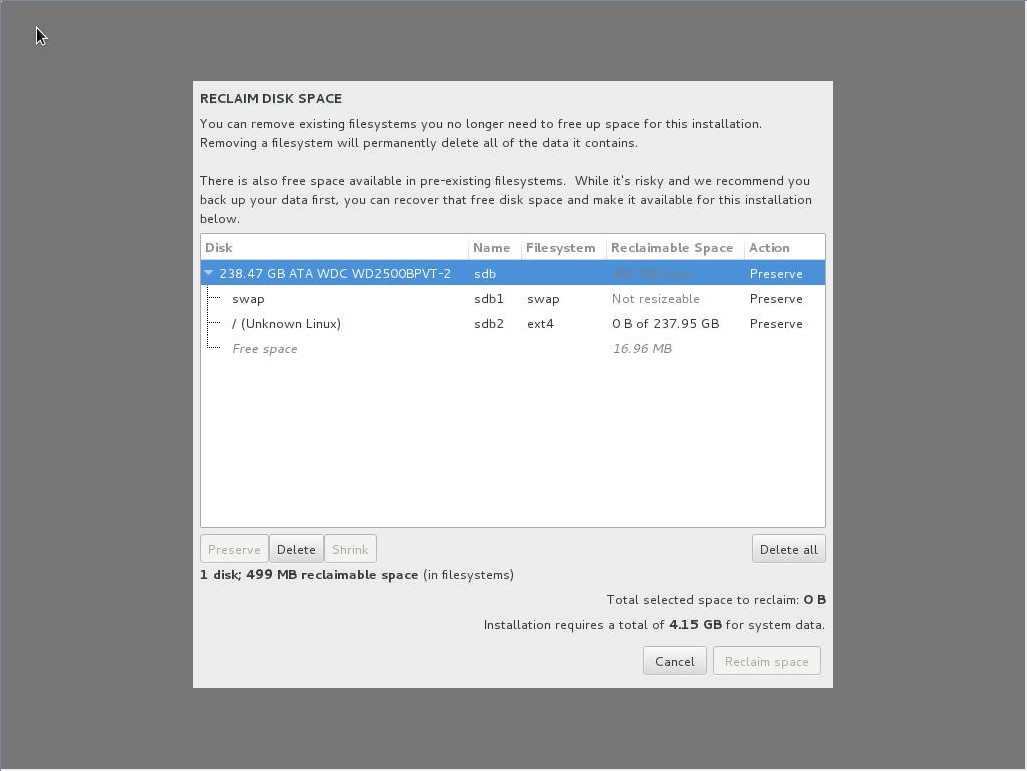
(In my case there was an old OS already installed : I wiped everything and let the installer setup how it wanted : just press "Delete All" then "Reclaim Space")
59632.jpg


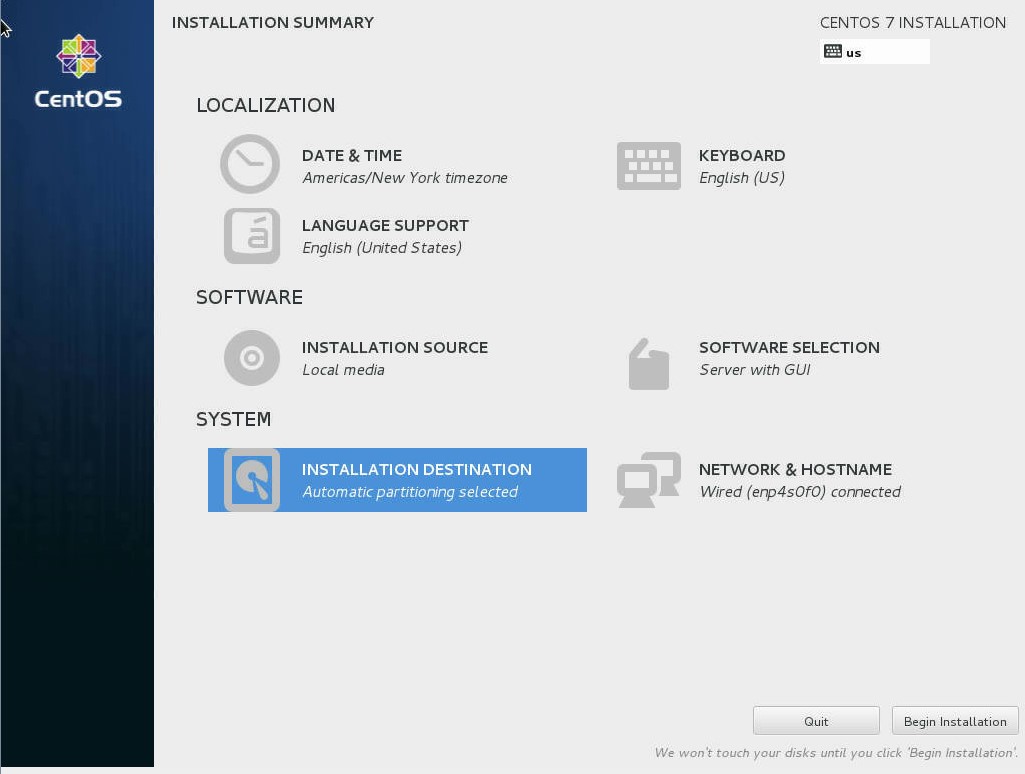
Now click "Begin Installation"
59633.jpg


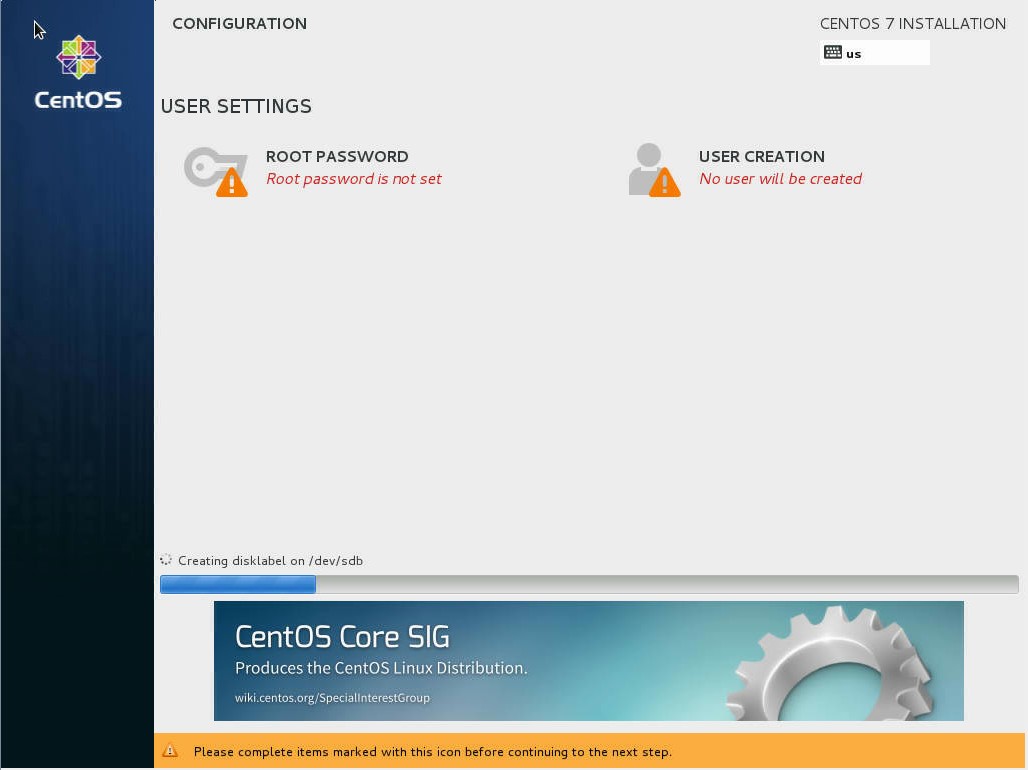
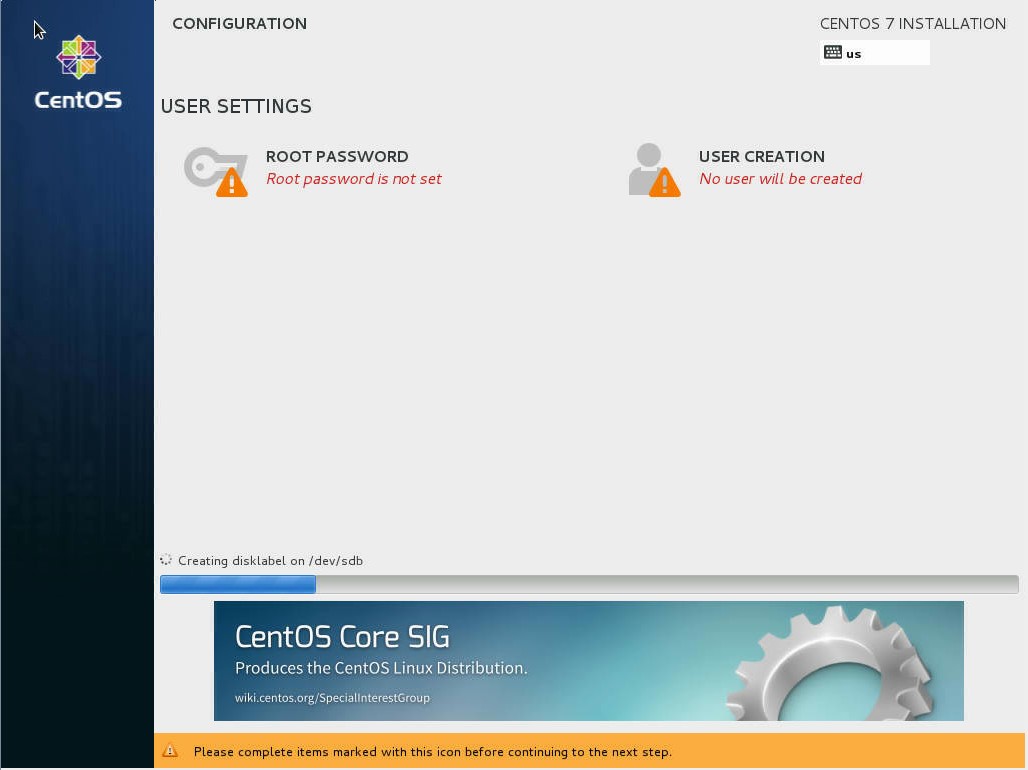
(Set your Root Password and Create a User)
59634.jpg


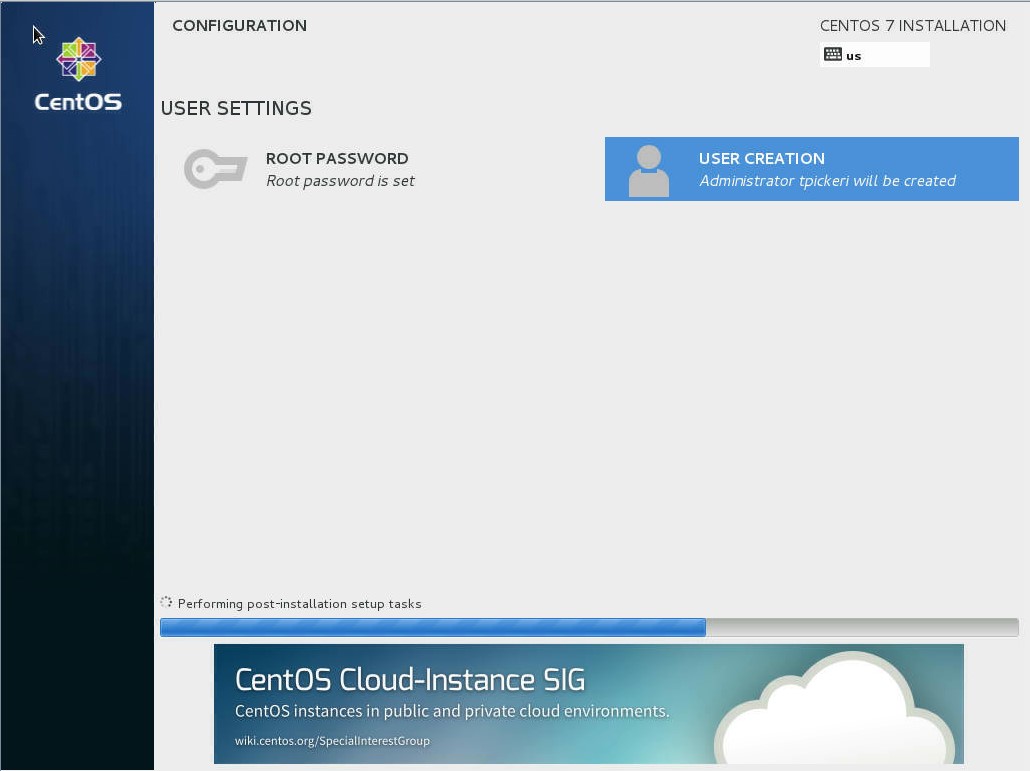
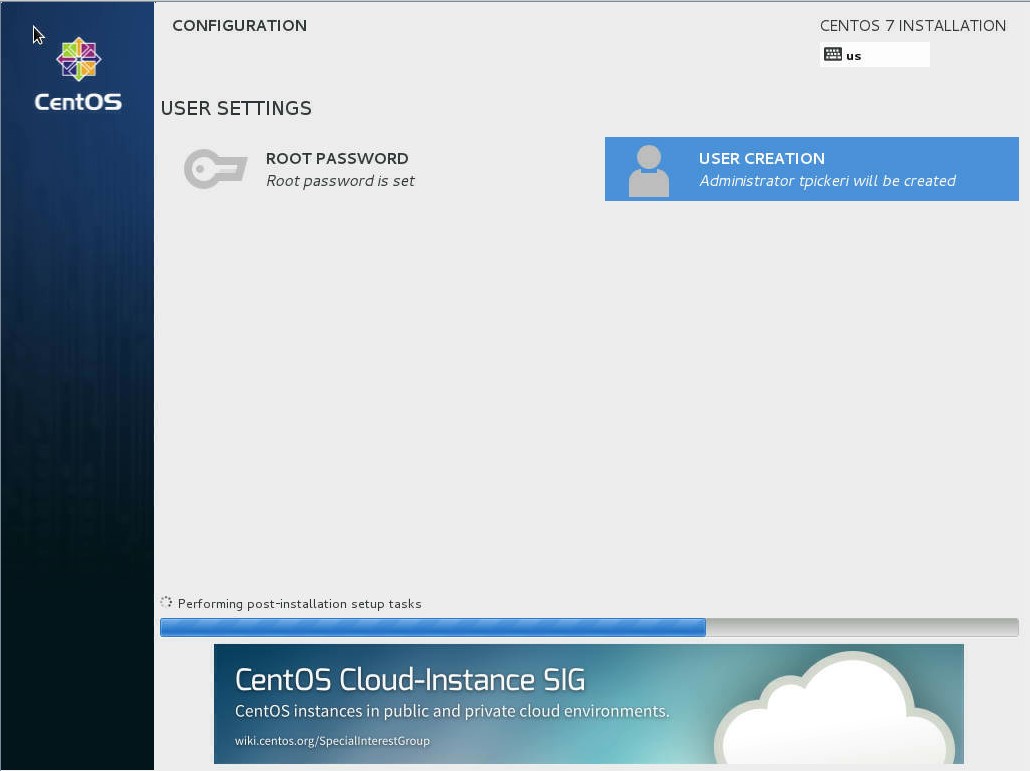
(And now wait for it to finish installation)
59635.jpg


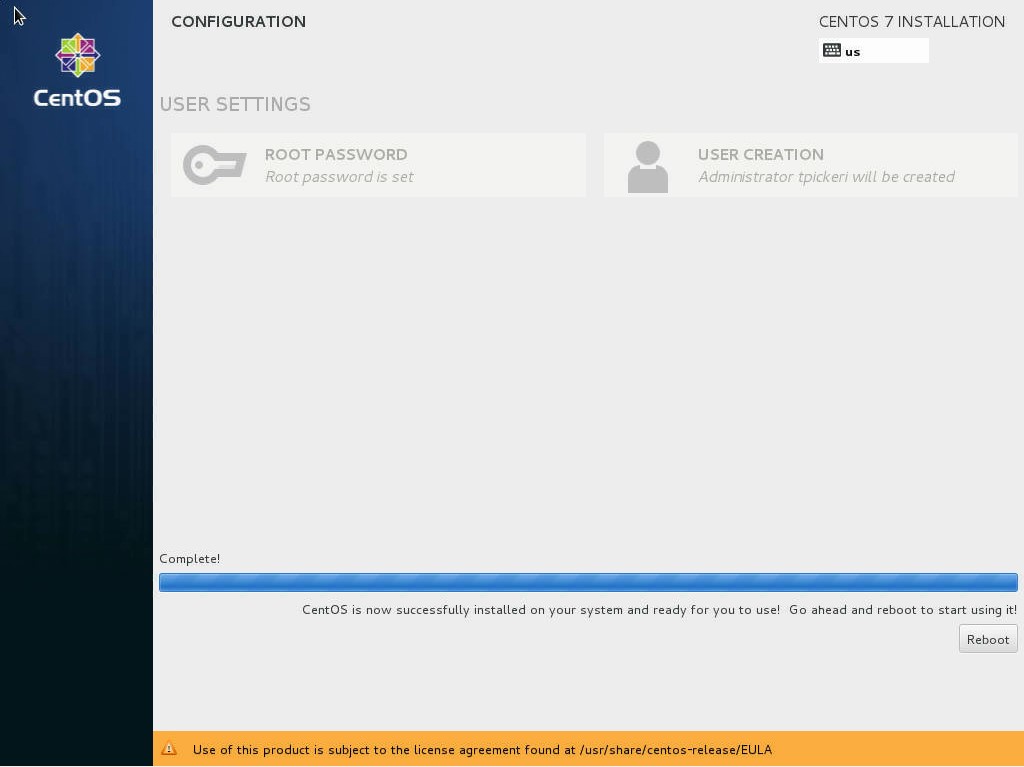
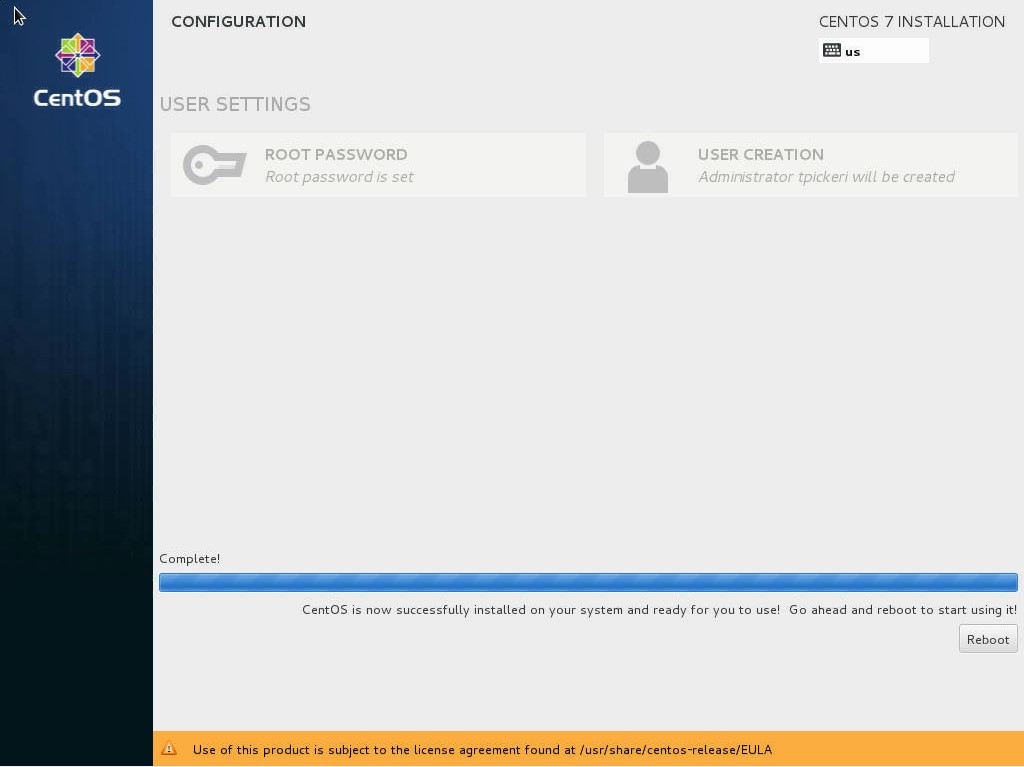
Pull the USB drive and press "Reboot"
59636.jpg


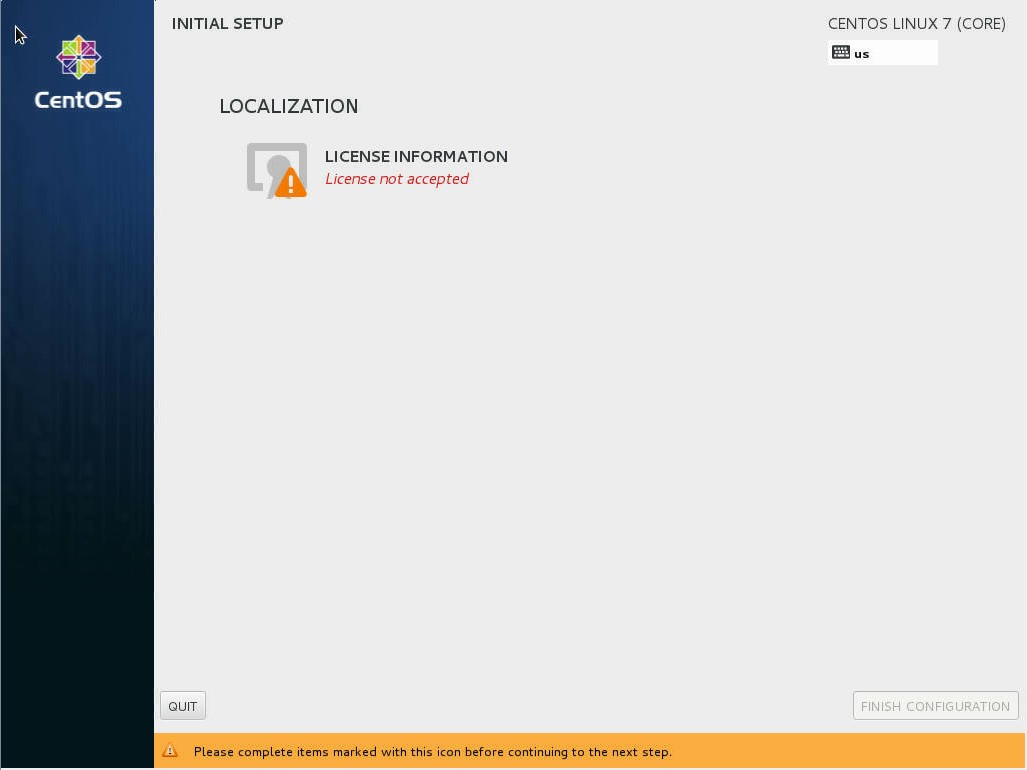
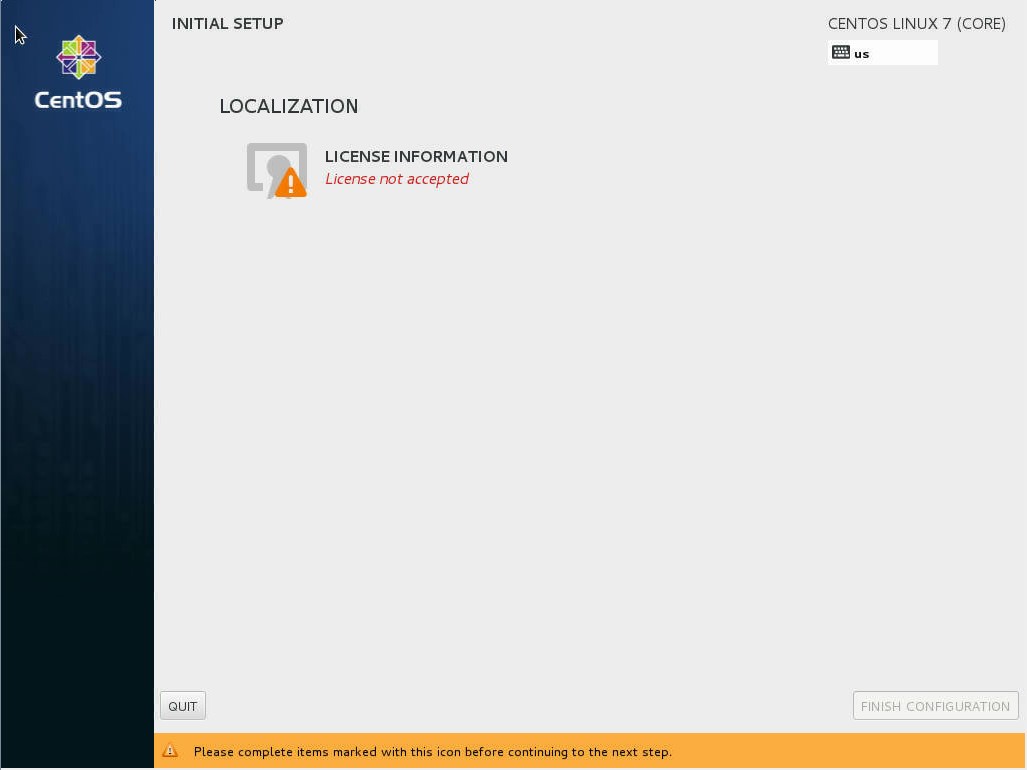
(After booting, Accept License Information and click "Finish Configuration")
59637.jpg


Login as your user

(Open a Terminal)
Applications > Favorites > Terminal

(Login root)
su -
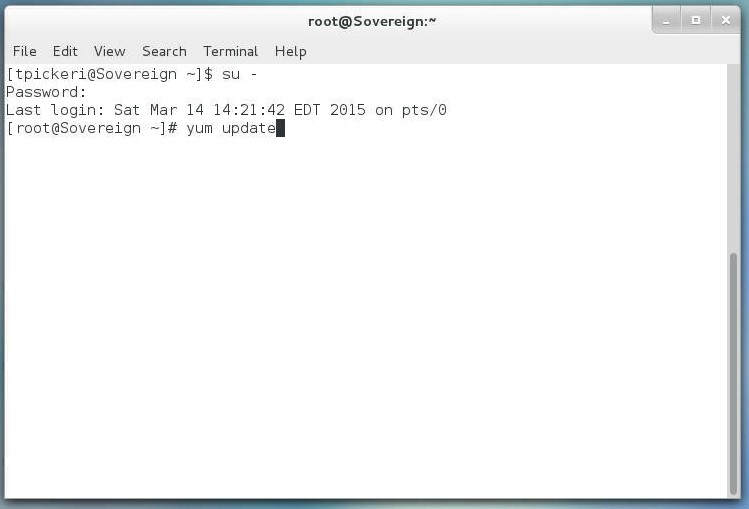
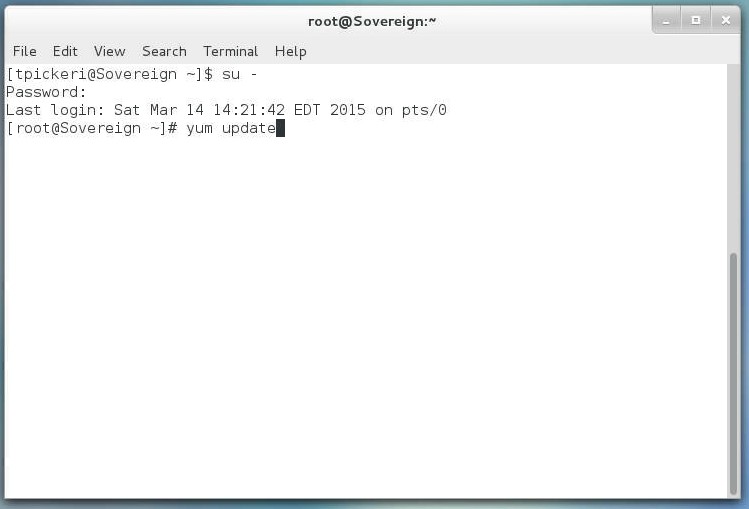
(Update CentOS)
yum update
59638.jpg


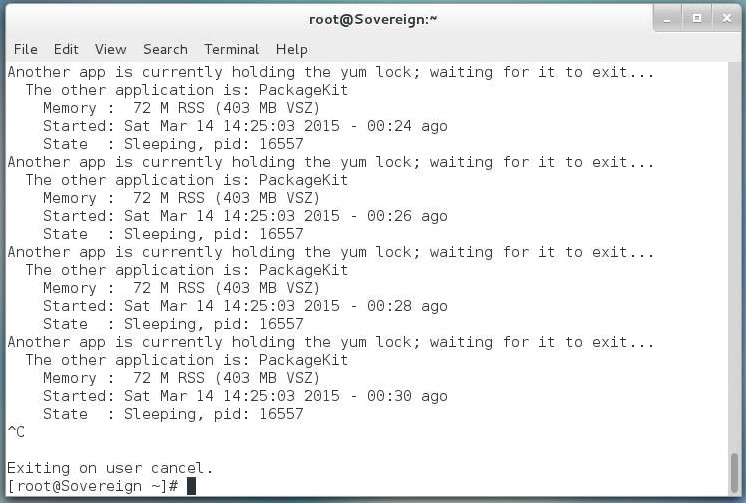
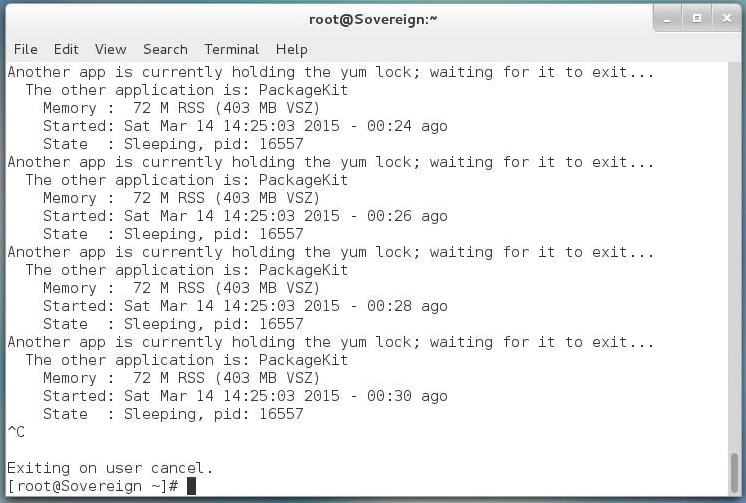
(If you get this : wait a minute or so for PackageKit to do the autocheck for updates. After it is done you can run your command, or do the same through the GUI)
59639.jpg


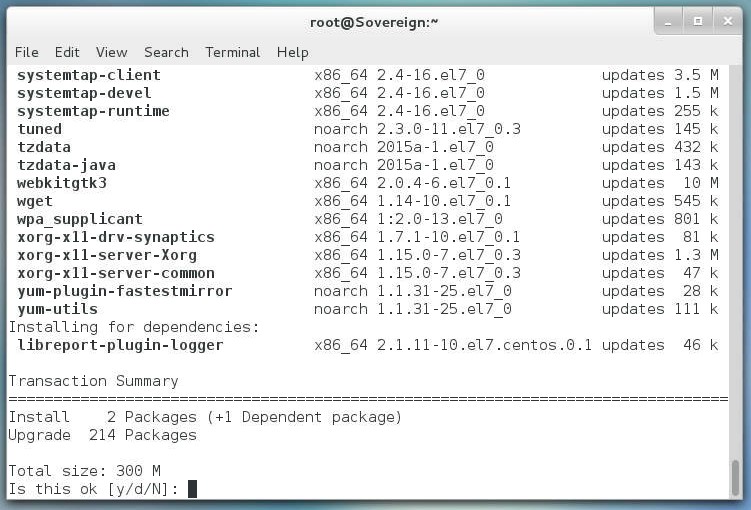
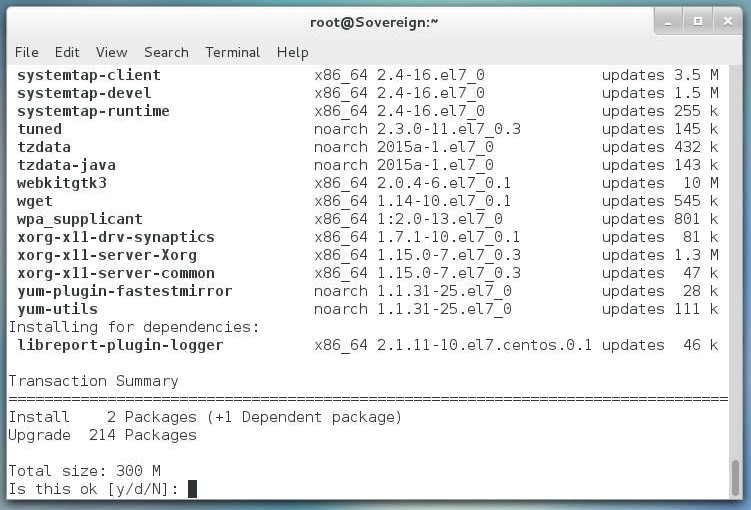
(Once it has found the updates press "y" to accept and install them (you then need to enter "y" again to accept the official CentOS security key))
59640.jpg


(After update completes, Reboot by typing this in the terminal or through the GUI)
shutdown -r now

(After reboot you can do the rest over ssh/putty, which I did as my server's glitchy IPMI lost video)

Open a terminal or over ssh
(Install BOINC Compile Essentials after becoming root (because we did basic dev most of these are already installed)
su -
yum install gcc-c++ autoconf openssl-devel automake libtool libcurl-devel

(These were some other libraries I found that the configure step requested. I don't think all of these are absolutely necessary for a basic client-only install, but who doesn't like a configure without warnings)
yum install libGL-devel libGLU-devel freeglut-devel libXmu-devel libXi-devel libnotify-devel xcb-util-devel libjpeg-devel

(Create boinc user, then login as boinc user)
useradd boinc
su - boinc

(Next you'll need to git the boinc source code; when you logged in as boinc you should have been placed in boinc's home directory (check using pwd); then create a directory for the repository; then git it)
mkdir boinc_source

(Correction from NixZiZ, The BOINC repository has moved. It is now located on github.)
git clone https://github.com/BOINC/boinc boinc_source

(Navigate into Repo)
cd boinc_source/

(Run _autosetup)
./_autosetup

(For the configure step there are tons of options (you can look at them by searching online or ./configure --help); for this I will just use two: no server (we are not a boinc work server) and optimize (because why not))
./configure --disable-server --enable-optimize

(Now we build the monster we just created :D (note : I got three warnings which were nothing to worry about))
make

(Now we install it : I login as root for this step (exit boinc user) so that it can install boinc with the full daemon/etc.)
exit
cd /home/boinc/boinc_source
make install

(Start the boinc daemon)
service boinc-client start

(All the boinc data files end up in the boinc user home directory. Now we log back in as boinc and go there to create/modify those files for remote access)
su - boinc

(How you setup your remote login is up to you. What I do is remove the client password and the restrict access to only my BOINCTasks computer's static IP address. This is what I show below)
nano gui_rpc_auth.cfg
Delete the password and leave only a newline (return/enter key)
Ctrl + X and then follow prompts (#8216;y' for yes, then enter) to save and exit

(Note that this next file does not yet exist : nano will create it)
nano remote_hosts.cfg
Type in your BOINCTasks PC IP address and the newline
Exit and save as before

(Now go back to root and restart the boinc daemon)
exit
service boinc-client restart

(Now we need to add a port to firewalld so that the BOINCTasks can communicate with the boinc client)
firewall-cmd --permanent --zone=public --add-port=31416/tcp
firewall-cmd --reload

(Now your BOINCTasks should be able to connect to the computer's IP (see network icon top right corner); if not, blame RFGuy)

Additional Suggestions and Error help:

From Skillz:

If you get this error while running configure:

Code:
checking for curl-config... no
checking whether libcurl is usable... no
configure: error:
================================================================================
ERROR: could not find (recent enough) development-libs for libcurl.

If libcurl-dev is installed on your system, make sure that the script
'curl-config' is found in your PATH, and that
'curl-config --version' gives something recent enough (see above).

You can download libcurl from: http://curl.haxx.se/

================================================================================

Then run this and try it again:
yum groupinstall "Additional Development" "Development tools" "Desktop Platform Development" "Server Platform Development"

All the groups might not be required, but I installed them all anyway. Pretty sure I selected the same three add-ons in the guide, but I could be mistaken.

Also from Skillz:

Got tired of power going out here and having to restart all the clients manually even though the systems would power on automatically. So I got boinc setup to run at startup.

systemctl enable boinc-client

Type that in a console as root and anytime you restart/start the boxen BOINC will automatically start.
 
Last edited:
Reserved for CentOS 7 for AMD GPU
 
Last edited:
You will install drivers after the system update ("yum update") and reboot. Before you actually install the NVIDIA drivers, you need to blacklist Nouveau and then reboot. Here is an excellent guide for getting the drivers installed: http://www.dedoimedo.com/computers/centos-7-nvidia.html

Let me know if you have any questions (or if this guide disappears) and I will post clarifications or a full guide.

Note: I did notice that now with NVIDIA drivers installed some of the BOINC graphical API is disabled during the "configure" stage. I have not figured out why (perhaps the NVIDIA compat libs?) but I haven't noticed any negative impact of this.
 
Last edited:
Reserved for CentOS 7 for Intel CoProcessor (Maybe)
 
Last edited:
The BOINC repository has moved.

It is now located in github. Therefore the "git clone" command above is now:

git clone https://github.com/BOINC/boinc boinc_source


I know I necro'd but fuck, I'm saving you googling :p
 
NixZiZ, it is fine to necro guides. Especially, if it updates the guide to be current.
 
Little confused here:

(Note that this next file does not yet exist – nano will create it)
nano remote_hosts.cfg
Type in your BOINCTasks PC IP address and the newline
Exit and save as before


What's my BOINCTasks PC IP and how do I get it?
 
Well I thought I figured this all out. I am trying to connect to a rig that's not located on my local network.

Either way, I've tried connecting using the password provided, changing it to my own password and even deleting the password with an empty line and using the remote host IP file with my computer's IP address.. No avail. It just keeps trying to connect to the client remotely. I can't even see a log or output of what it's doing or anything.
I posted it in the other thread but <allow_remote_gui_rpc> is your friend.
https://boinc.berkeley.edu/wiki/Client_configuration
 
If you get this error while running configure:

checking for curl-config... no
checking whether libcurl is usable... no
configure: error:
================================================================================
ERROR: could not find (recent enough) development-libs for libcurl.

If libcurl-dev is installed on your system, make sure that the script
'curl-config' is found in your PATH, and that
'curl-config --version' gives something recent enough (see above).

You can download libcurl from: http://curl.haxx.se/

================================================================================

Then run this and try it again:
yum groupinstall "Additional Development" "Development tools" "Desktop Platform Development" "Server Platform Development"

All the groups might not be required, but I installed them all anyway. Pretty sure I selected the same three add-ons in the guide, but I could be mistaken.
 
Got tired of power going out here and having to restart all the clients manually even though the systems would power on automatically. So I got boinc setup to run at startup.

systemctl enable boinc-client

Type that in a console as root and anytime you restart/start the boxen BOINC will automatically start.
 
In this guide I setup BOINC on CentOS 7. I start with a fresh install of CentOS 7 "Server with GUI" along with Hardware Monitoring Utilities, Compatibility Libraries, and Development Tools (I used the DVD as the installation source). Note that for this guide I planned to only run CPU work - so no drivers are dealt with in this guide. See the following guides for details on that. Note that this guide is still a WIP - I hope for it to eventually be "Grandpa Proof", however that has not been checked yet.

(Note: anything in () are notes, standard font is what you type in the terminal, and italics is directions)

(Download the CentOS 7 DVD ISO file from: http://www.centos.org/download/ )

(Use Win32DiskImager to write the CentOS 7 image file to a flash drive larger than 4GB)

(Setup BIOS to boot from the USB drive first)

(Boot the Computer to the USB Drive)

Select "Install CentOS"

(Select Language and Keyboard)
Cent_Guide_1.jpg


(Work through the Installation Summary)
Cent_Guide_2.jpg


(First Setup your network : select the adapter you want to use, go to configure and setup as desired, then set your hostname, then check that the adapter is now active (if it is not, activate now))
Cent_Guide_3.jpg


(Set Date and Time, make sure network time servers are working (turn Network Time "OFF" then "ON")
Cent_Guide_4.jpg


(Chose your Software Selection : for this guide I used "Server with GUI" along with Hardware Monitoring Utilities, Compatibility Libraries, and Development Tools)
Cent_Guide_5.jpg


(Finally set your Installation Destination : I just left the default as I planned to use the entire (and only) drive for the CentOS install : if you need different look up other guides)
Cent_Guide_6.jpg


(In my case there was an old OS already installed : I wiped everything and let the installer setup how it wanted : just press "Delete All" then "Reclaim Space")
Cent_Guide_7.jpg


Now click "Begin Installation"
Cent_Guide_8.jpg


(Set your Root Password and Create a User)
Cent_Guide_9.jpg


(And now wait for it to finish installation)
Cent_Guide_10.jpg


Pull the USB drive and press "Reboot"
Cent_Guide_11.jpg


(After booting, Accept License Information and click "Finish Configuration")
Cent_Guide_12.jpg


Login as your user

(Open a Terminal)
Applications > Favorites > Terminal

(Login root)
su -
(Update CentOS)
yum update
Cent_Guide_13.jpg


(If you get this : wait a minute or so for PackageKit to do the autocheck for updates. After it is done you can run your command, or do the same through the GUI)
Cent_Guide_14.jpg


(Once it has found the updates press "y" to accept and install them (you then need to enter "y" again to accept the official CentOS security key))
Cent_Guide_15.jpg


(After update completes, Reboot by typing this in the terminal or through the GUI)
shutdown -r now

(After reboot you can do the rest over ssh/putty, which I did as my server's glitchy IPMI lost video)

Open a terminal or over ssh
(Install BOINC Compile Essentials after becoming root (because we did basic dev most of these are already installed)
su -
yum install gcc-c++ autoconf openssl-devel automake libtool libcurl-devel

(These were some other libraries I found that the configure step requested. I don't think all of these are absolutely necessary for a basic client-only install, but who doesn't like a configure without warnings)
yum install libGL-devel libGLU-devel freeglut-devel libXmu-devel libXi-devel libnotify-devel xcb-util-devel libjpeg-devel

(Create boinc user, then login as boinc user)
useradd boinc
su - boinc

(Next you'll need to git the boinc source code; when you logged in as boinc you should have been placed in boinc's home directory (check using pwd); then create a directory for the repository; then git it)
mkdir boinc_source
git clone git://boinc.berkeley.edu/boinc-v2.git boinc_source/

(Navigate into Repo)
cd boinc_source/

(Run _autosetup)
./_autosetup

(For the configure step there are tons of options (you can look at them by searching online or ./configure --help); for this I will just use two: no server (we are not a boinc work server) and optimize (because why not))
./configure --disable-server --enable-optimize

(Now we build the monster we just created :D (note : I got three warnings which were nothing to worry about))
make

(Now we install it : I login as root for this step (exit boinc user) so that it can install boinc with the full daemon/etc.)
exit
cd /home/boinc/boinc_source
make install

(Start the boinc daemon)
service boinc-client start

(All the boinc data files end up in the boinc user home directory. Now we log back in as boinc and go there to create/modify those files for remote access)
su - boinc

(How you setup your remote login is up to you. What I do is remove the client password and the restrict access to only my BOINCTasks computer's static IP address. This is what I show below)
nano gui_rpc_auth.cfg
Delete the password and leave only a newline (return/enter key)
Ctrl + X and then follow prompts (#8216;y' for yes, then enter) to save and exit

(Note that this next file does not yet exist : nano will create it)
nano remote_hosts.cfg
Type in your BOINCTasks PC IP address and the newline
Exit and save as before

(Now go back to root and restart the boinc daemon)
exit
service boinc-client restart

(Now we need to add a port to firewalld so that the BOINCTasks can communicate with the boinc client)
firewall-cmd --permanent --zone=public --add-port=31416/tcp
firewall-cmd --reload

(Now your BOINCTasks should be able to connect to the computer's IP (see network icon top right corner); if not, blame RFGuy)
 
Back
Top