Neutronium (Version 4) buildlog

Machupo

Gravity Tester
Joined
Nov 14, 2004
Messages
5,756
Title.jpg

Version 4


Project Goals:

So, it's been less than a year since I completed the last version of Neutronium, but I've decided that there's more deadspace to be squeezed out of this design. At the bottom line, this project is all about putting the most "oomph" into the smallest container (à la Neutron Degenerate Matter). Secondary goals were to allow me to game at 2560x1600 with a system that would be TSA approved for carry-on travel (so both size requirements and no-liquid requirements).

The goal for this iteration of Neutronium is a Sub 3 Liter system.


Design:

I am deviating from the previous form factor of an upright-motherboard construction. This has been heavily swayed by the absolutely stunning S3-Mini made by NFC. I'm going to try going a little bit smaller (minor tweaks), with a little less complexity (standard riser in lieu of an inversion cable for now), and pack in a bit more power intensive hardware, but the bulk of credit goes to NFC for pushing me in this direction.

Initial attempts at modifying a case to meet the precise requirements for this version were not fruitful (a moment of silence for the Apex MD-100, please :p
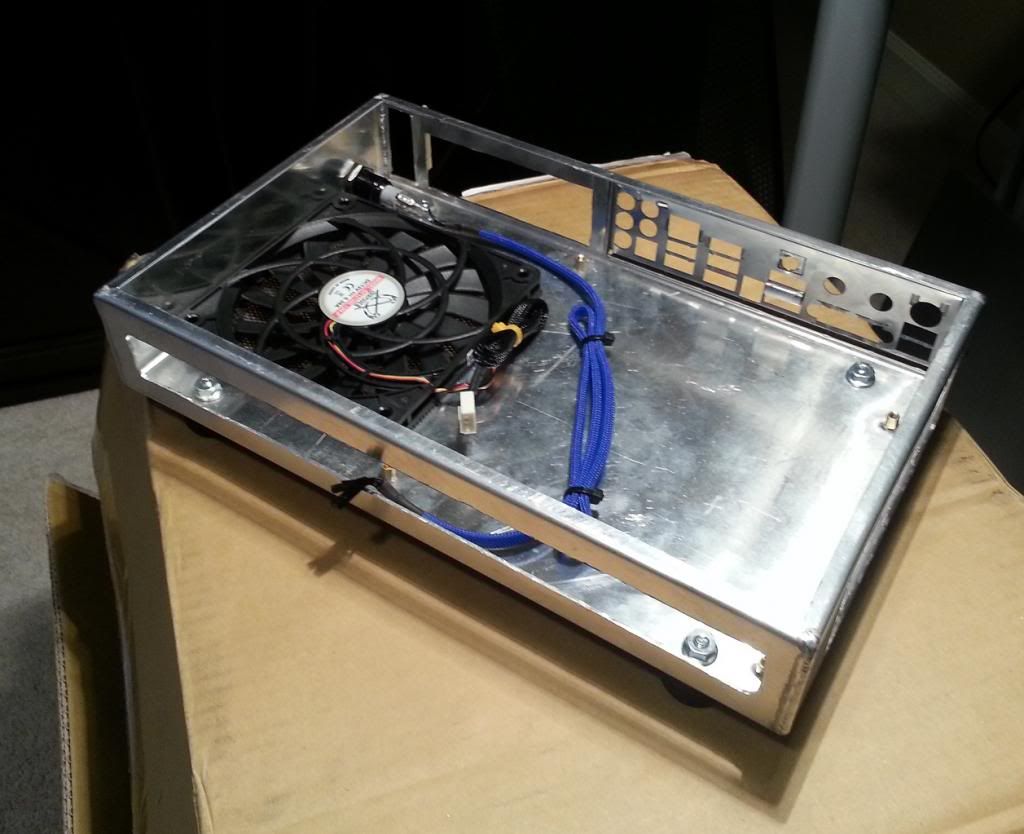
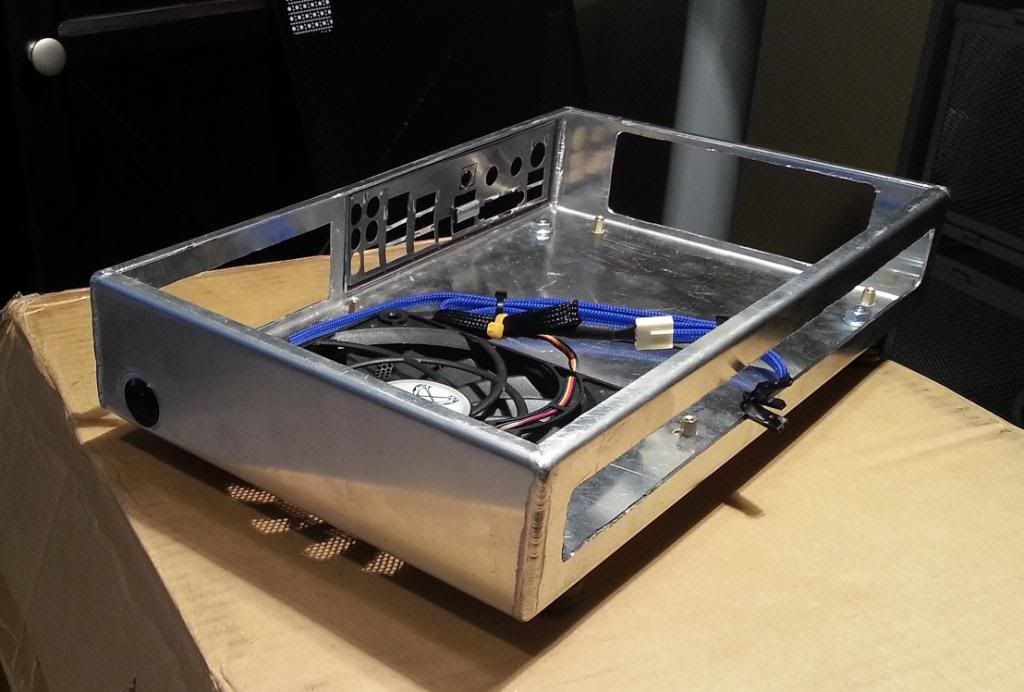
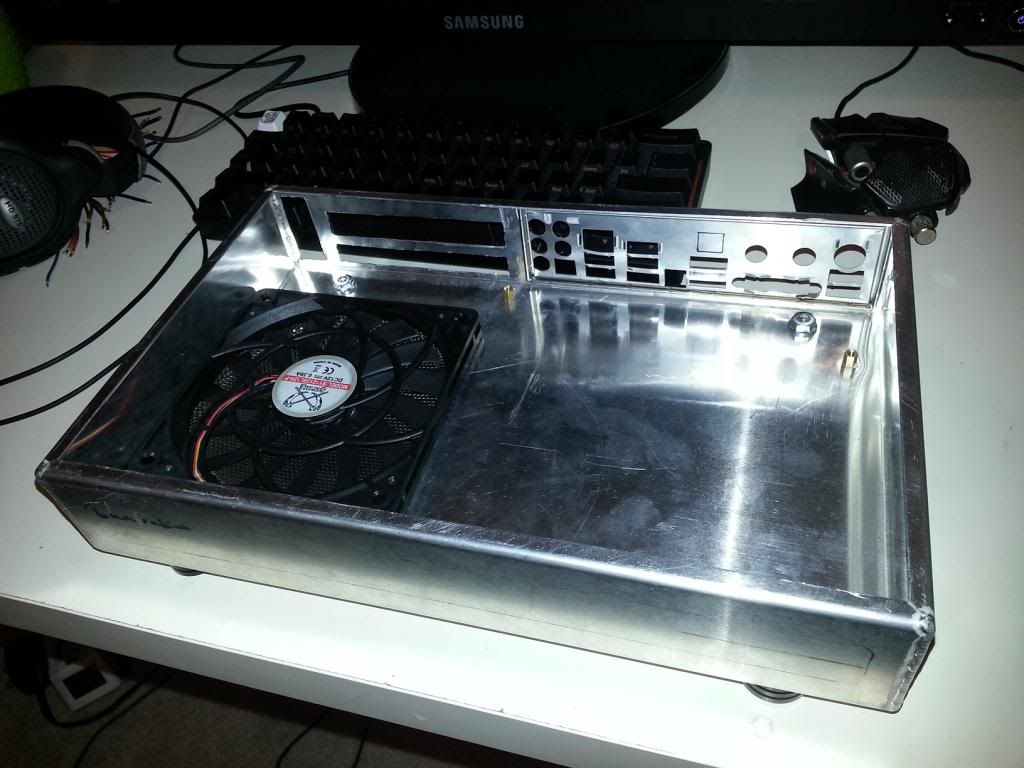
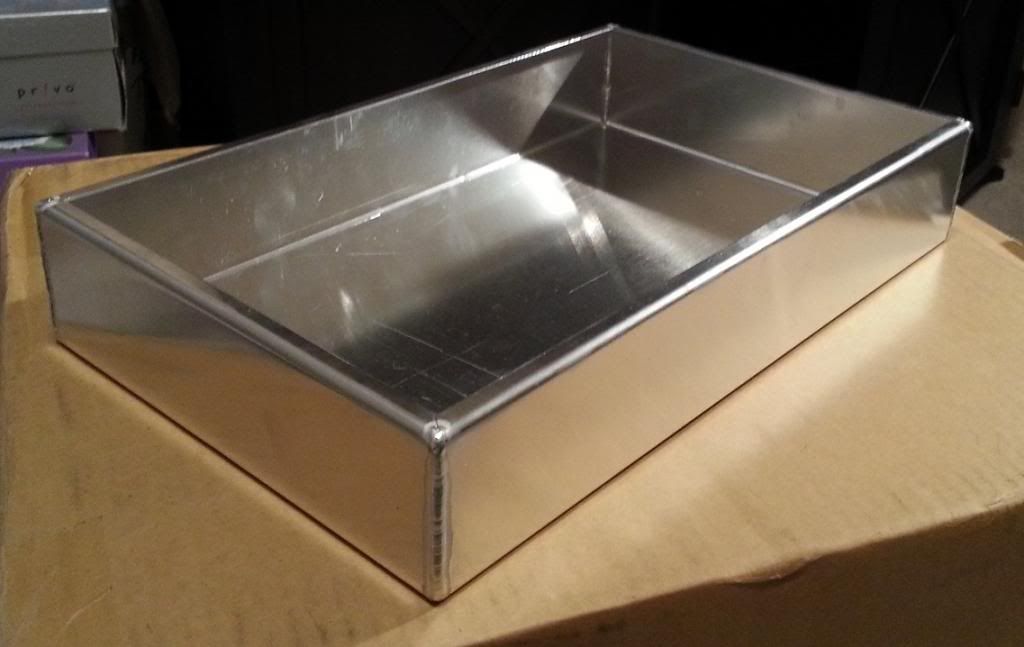
), so this will be a scratch build out of 3003 Aluminum :)

As a reference, I will point out the IDC definitions (see 1.1) of the various SFF categories.


Components:

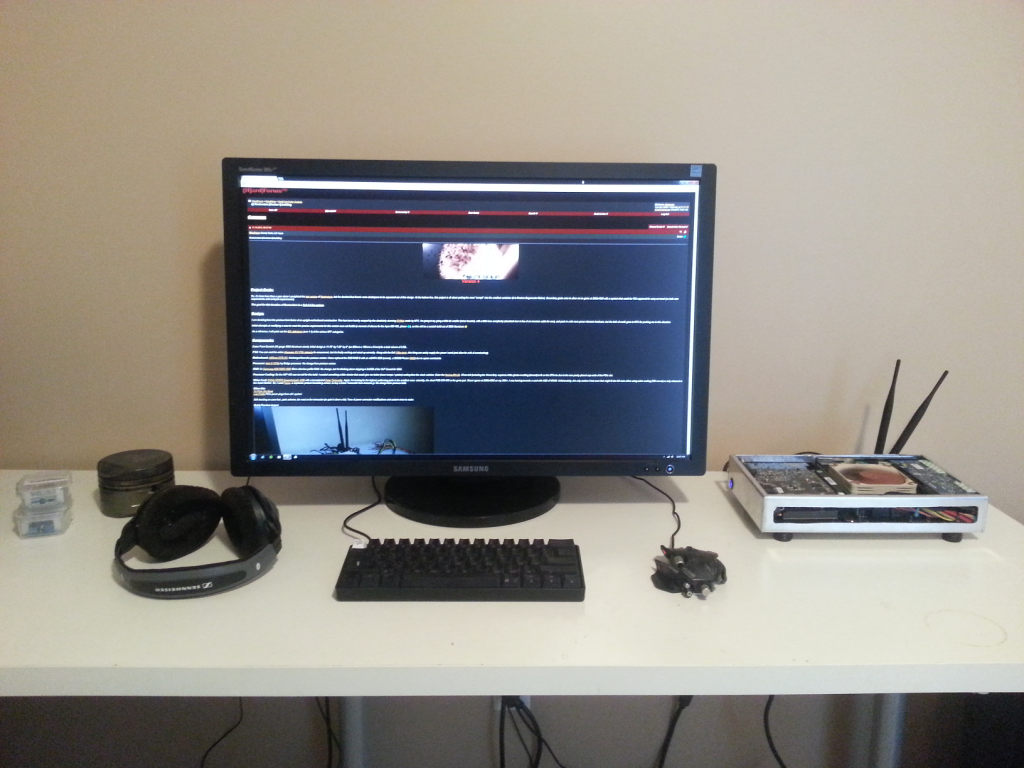
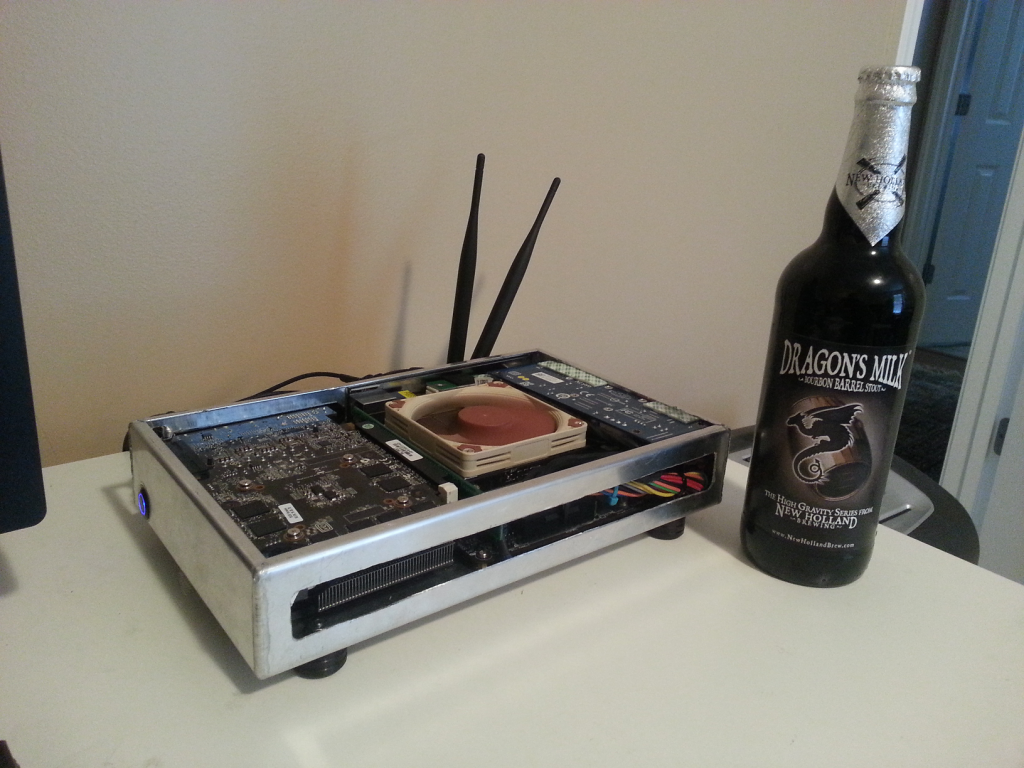
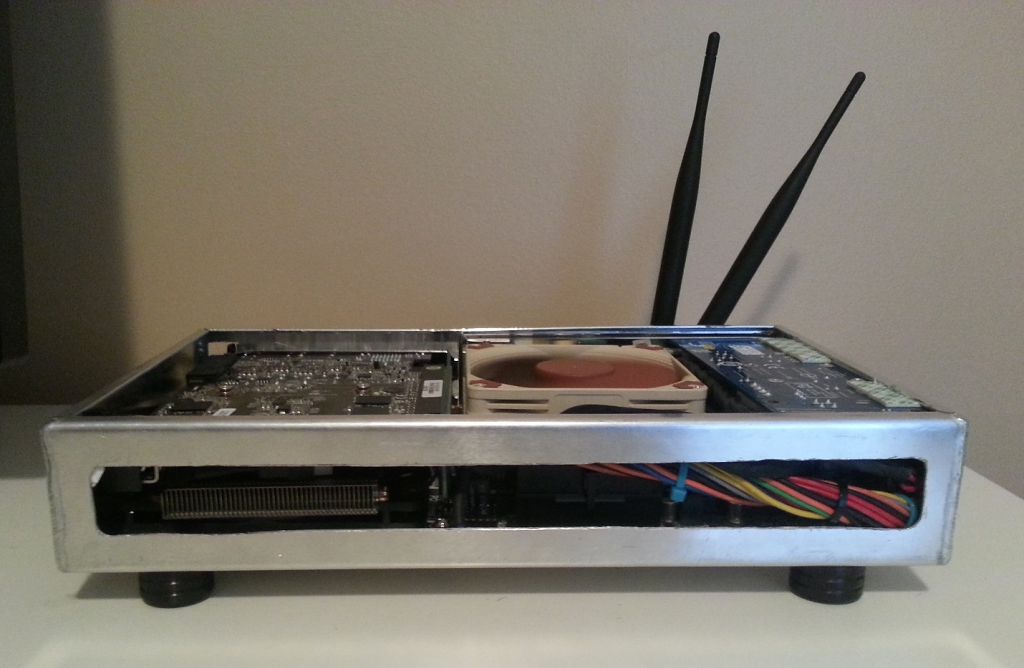
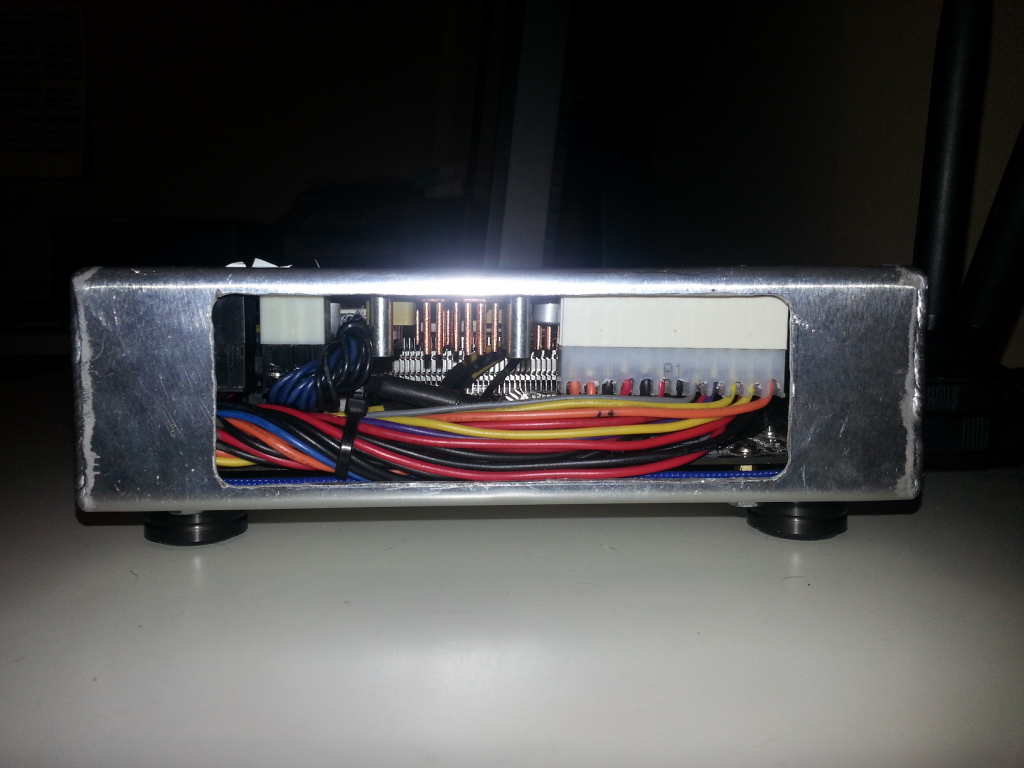
Case: From-Scratch (16 gauge 3003 Aluminum stock). Initial design is 11.75" by 7.25" by 2" (so 299mm x 185mm x 51mm) for a total volume of 2.82L.

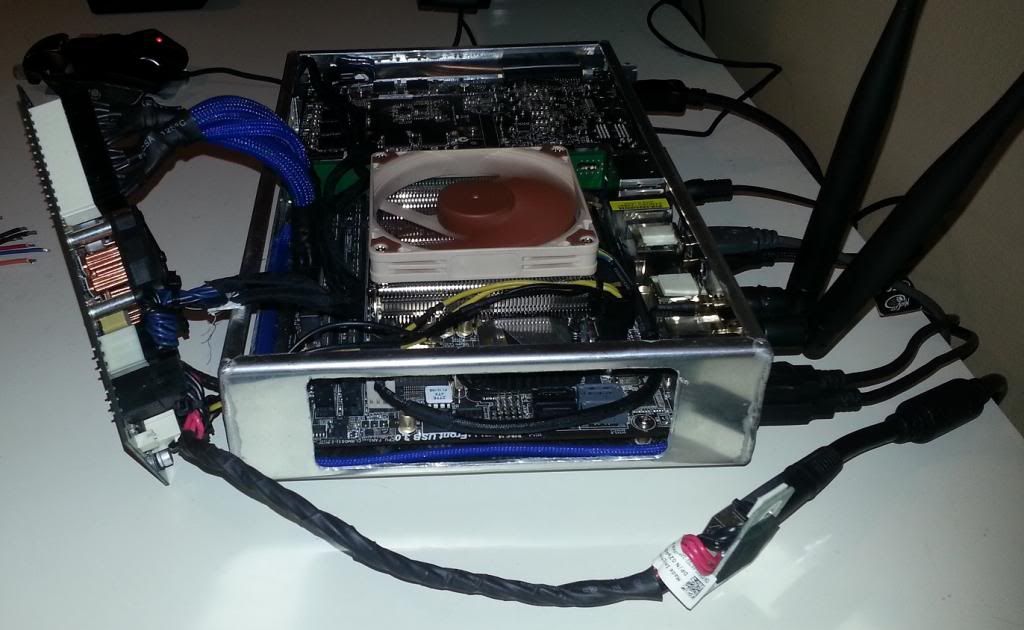
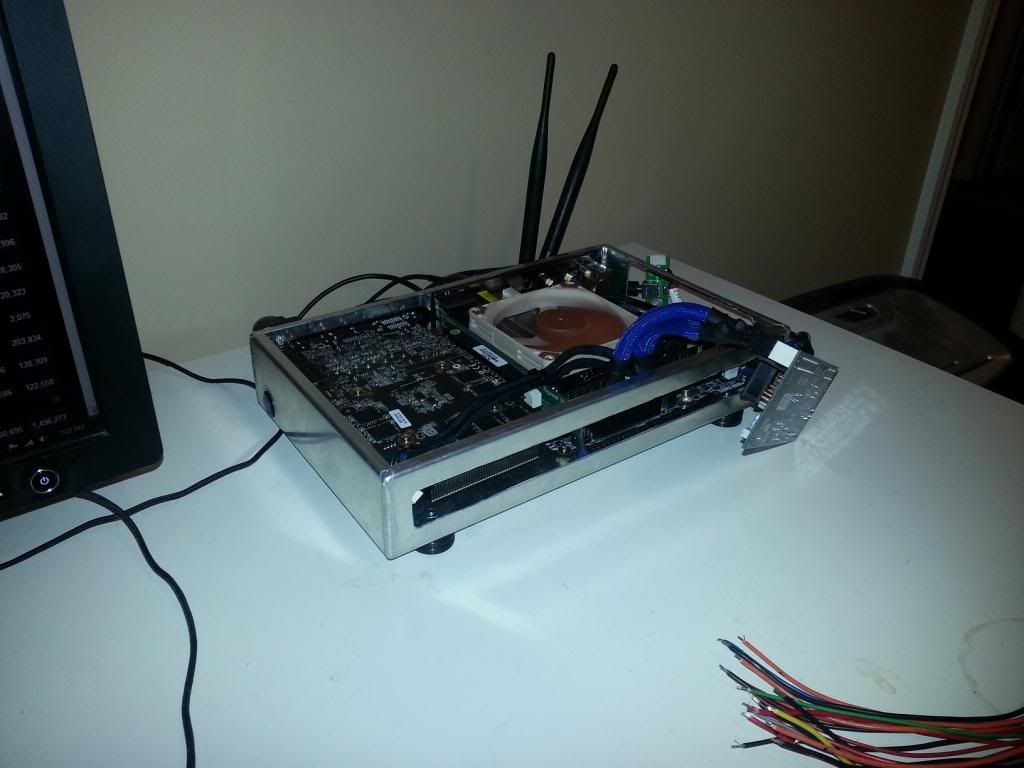
PSU: You can read the entire Alienware X51 PSU debacle for amusement, but it's finally working and wired up correctly. Along with the Dell 330w brick, this thing can easily supply the power I need (and allow for a bit of overclocking).

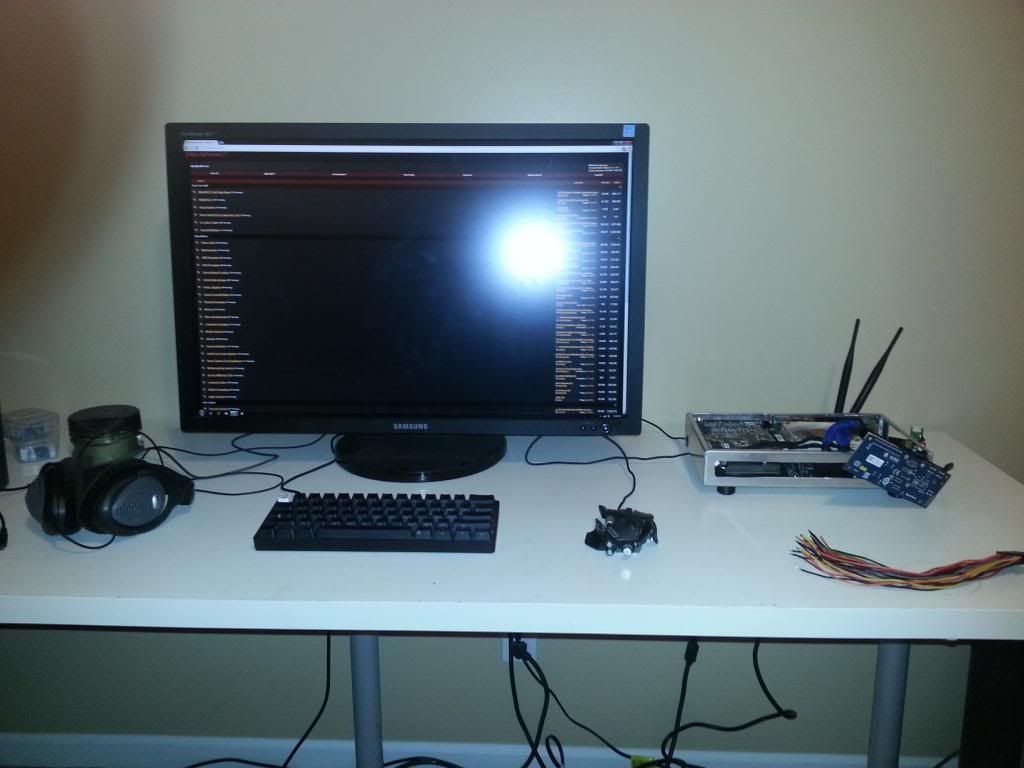
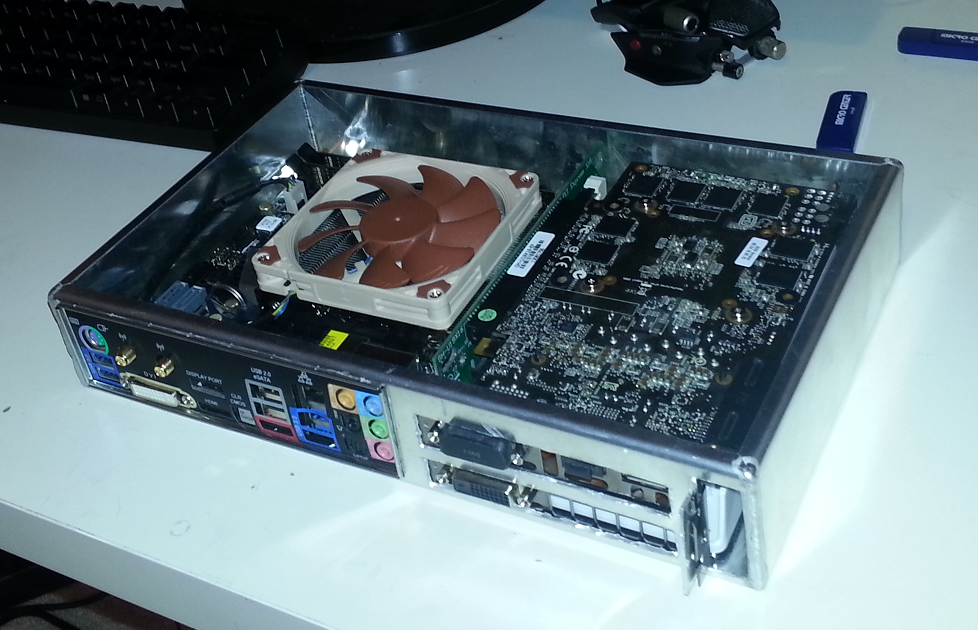
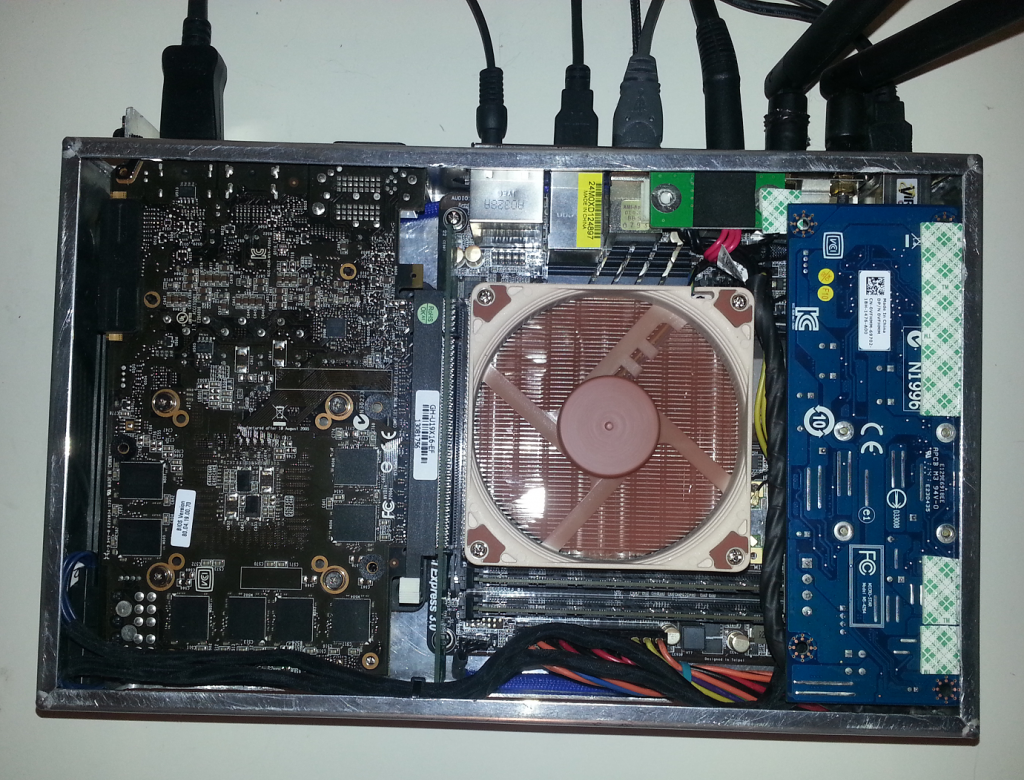
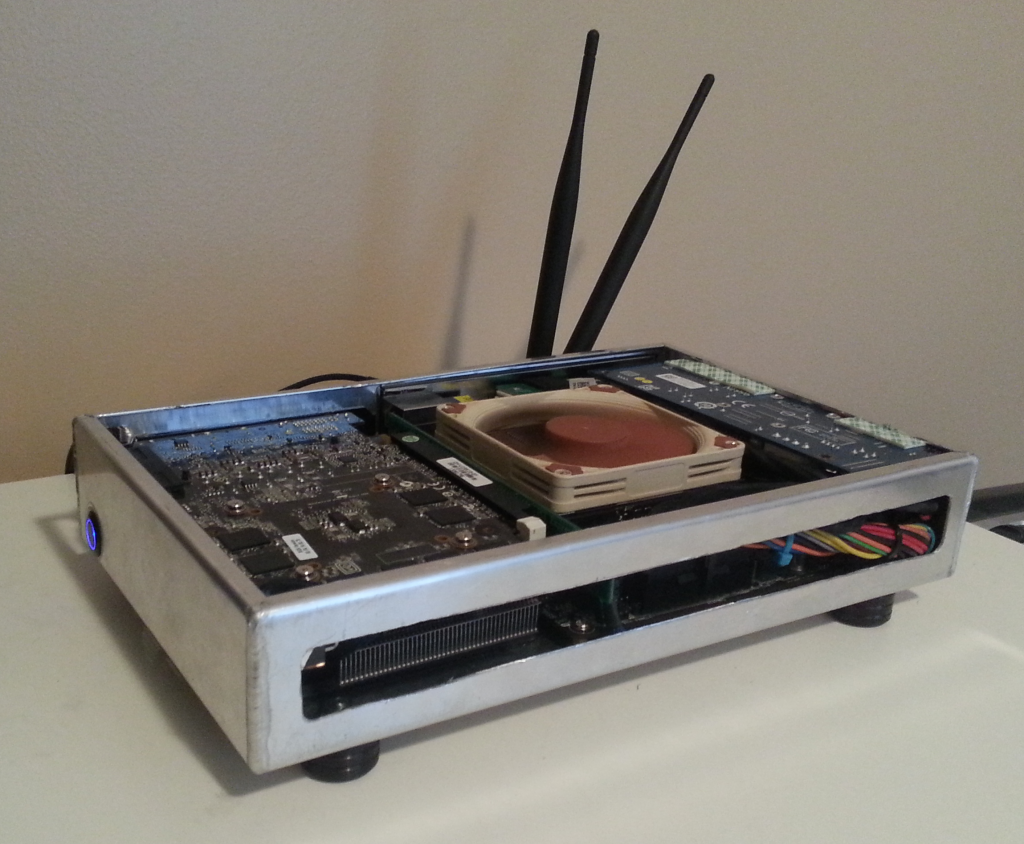
Motherboard: ASRock Z77E-ITX. Unchanged from the previous version. I have replaced the SSD RAID 0 with an mSATA SSD (namely, a 256GB Plextor M5M) due to space constraints.

Processor: Intel i7-3770k Ivy Bridge processor. No change from previous version.

RAM: 2x Samsung 4GB DDR3-1600 30nm ultra-low-profile RAM. No change, but I'm thinking about slapping in 2x8GB of the VLP Crucial for S&G.

Processor Cooling: So the AXP-100 was too tall for this build. I needed something a little shorter that would give me better (lower temps / quieter) cooling than the stock solution. Enter the Noctua NH-L9i. 37mm tall (including the 14mm fan), required a little ghetto-modding (dremel) to fit on the Z77e-itx due to the one poorly placed cap north of the PCIe slot.

Video Card: EVGA GTX670 Superclocked+ 4GB with a transplanted Zotac Twincooler. Again, I'm looking for the highest performing parts in the smallest case: naturally, the short PCB GTX 670 is the go-to part. Since I game at 2560x1600 on my 305t+, I was leaning towards a card with 4GB of VRAM. Unfortunately, the only coolers I had seen that might fit the bill were either using water cooling (TSA no-no) or only released in the Asian Market. So, I used Tenso, a Japanese product forwarding service, to buy a Zotac Twincooler from Amazon.jp. No change from previous build.

Other bits:
1U PCIe 16x Riser
Low Profile PCIe power plugs from x51 system

Still deciding on case feet, paint scheme, fan mod on the twincooler (to quiet it down a bit). Tons of power connector modifications and custom wires to make.


Current status (as of 20JAN 2014):
Engineering / wiring finished... now on to sanding, finishing, prep, and paint!

left_front_zpsf9c92c50.png
 
Last edited:
As an Amazon Associate, HardForum may earn from qualifying purchases.
Project Updates:

05 JAN 2014 - Decided to get rid of the divider between the two PCIe slots for simplicity's sake. Also cut the front opening and the mobo side opening (still need to fit/shape the mesh for these two openings). Got the power button installed into it's rather odd location :D Yes, I'm still procrastinating on the 24-pin ATX, so now powerboard install pics yet (hey, there's football on!) I did drill the hole in the I/O plate for the power plug, though :)

front_internal_zpse14bea02.jpg
pwrbtn_zpsc85eac61.jpg


Some put together shots:
right_side_zps8e7eed98.jpg


front_zps54832f93.jpg


overall_zpsc2bd3d2b.jpg


03 JAN 2014 - Fit the GPU fan (Slim Scythe 120mm PWM fan, which will plug directly into the GPU to replace the dual fans on the Zotac Twincooler). Also fit the case feet, mobo standoffs, tapped the GPU mounting holes on the PCIe bracket tab, and did the initial plan/sketch for the opening on the front of the case (which will have mesh behind it). Procrastinating on the 24-pin ATX cable, but got it cut to size and stripped, so just need to solder&crimp (I tend to over-engineer things). Found an interesting place for the power button, wonder if you guys will like it: on the left side of the case at the back. The body of the vandal switch will be between the second DVI port of the video card and the back of the fan body / GPU heatsink :eek: Can't wait to show off what's going to happen to the x51 powerboard... I hope it works, lol!

There is *just enough room* for a motherboard to fit in here with a 120mm fan under the GPU... they're basically touching (really, my calipers say that there is .05mm between them, but c'mon... that could be negated by heat expansion :p)

In this photo you can also see where I'm going to add a cutout for the power plug in the I/O bracket.

03JAN_zps698d007d.jpg


02 JAN 2014 - Initial fit of major components. I cut the I/O bracket hole and the PCIe holes / screw-down tab. Pretty rough job, so there will be some more filing and polishing at a later date (probably right before it gets powdercoated or anodized). Have all the wires done except for the 24-pin ATX, and that should be pretty straight forward now that I've modified all of the connectors to be low-profile (90 degree).

Initial_fit_zps3da2015b.png


20 DEC 2013 - Bare case (box with no holes) received from fabricator. It has begun!
I also need to fab up a little bracket and modify some standoffs to give the power board something to rest on (wire fitting and holding it on with double-sided sticky pads is cool and all, but I think it needs something a little more permanent).

box2_zpsa6fbe26f.jpg
 
Last edited:
Would something like this provide enough power?

http://www.mini-box.com/M4-ATX?sc=8&category=981

How much room is there under the GPU?

I've gotten this system up to 285W (at the wall), with just a bit over 150W of that on the PCIe-power plug. I didn't see the ability to route 12v to pcie (nor a max amperage @ 12V) on the M4, so I think it would be doubtful.

There is about 4-5mm under the gpu, and some of that will probably fall to foam standoffs and intake grille. I might be able to get away with 2x thin SSDs for RAID0 over the vid card, but I think that would box the back of the PCB in a bit too much (prevent convection cooling) and destroy the visuals through the top of the case.
 
Last edited:
This is the dream machine! I'm drooling all over my keyboard just imagining the end product. I'll definitely be trying to copy your build some time in the future, but first thing is to find a out where to get that PSU from. :)

Good luck!
 
The bare case is back from the fabricator, welds look awesome and it is sized spot on :)

External dimensions: 299mm (W), 187mm (D), 52mm (H) for a total volume of just over 2.9L! I'll have a pic posted up once everyone in the house wakes up and I can get some shots set.

Nice comparison shot of my aluminum SFF cases:
- Two M1's on the left
- Neutronium v3
- Neutronium v4

AluminumSFFCases_zpsfe657c54.png
 
Last edited:
hot damn. Side by side the v4 looks like you could put a bow on it and it'd be wrapped for christmas. S-show us some I/O?

What did the fabrication set you back?
 
hot damn. Side by side the v4 looks like you could put a bow on it and it'd be wrapped for christmas. S-show us some I/O?

What did the fabrication set you back?

It's just the bare case right now (so I haven't cut the I/O panel or PCIe slots or any other vents/holes, or tapped holes for mounting components, or ... :D), so no I/O shots yet.

The fab was right around $50 shipped (fedex) and Mark does absolutely fantastic work (he's done a couple protos for me), it's to my specifications right down to the millimeter (certainly means that I had to do my due diligence on getting my specifications correct!)

I'll be off big-mountain riding for the next couple weeks, but will get right on the build again in the new year, so stay tuned!
 
hot damn. Side by side the v4 looks like you could put a bow on it and it'd be wrapped for christmas. S-show us some I/O?

2nd post updated with shots of the initial fit with some I/O love :D
 
Did a little dremel work, or did you find the secret source of the x51 LP connectors?

I wish! Box cutter, a leatherman, and some elbow grease. Same idea, but definitely not as pretty as the x51 LP connectors.
 
A couple updates this weekend. If you're worried about the scratches, don't; there will be a great deal of sanding, priming, and a number of coats of paint in this case's future! :cool:
 
Here are some pics of the first build up... you can see the errant 24-pin ATX cable which is the only reason I haven't packed the powerboard into the chassis :p

[/pics] -- moved to the update post (post #2 in the thread)

that's a 30-inch 2560x1600 monitor and the case is only 2.9L of volume... and it games just fine (testing temps right now, though it's only an approximation until I fold the powerboard in there and close the top).

FWIW, it's quite a bit hotter than my last case (thought quieter due to the GPU hsf/fan swap out).
8T Prime95 Blend + Furmark burn in (2560x1600, 4xMSAA) yielded 88C on the GPU and 69C on the CPU after 30 minutes. The heat was very well compartmentalized between the GPU half of the case and the mobo/CPU half of the case (noticeable to the hand, even), so I'm not that concerned once I button up the top.

Time to get off my butt and finish the wiring, lol.


[edit]and.... the GPU just snow crashed... reboot fixed it, but that's definitely the first time I've seen that![/edit]
 
Last edited:
I hope you connect the id pin (center pin) of your custom jack-expander (the input port for the dell psu) to ground otherwise the ddll psu will shutdown after using more then 240w power current. The reason for this is the id chip inside the dell psu. If it gets 19v or nothing the psu 2orks in 240w mode if the chip gets ground 330w+ mode is activated.
 
I don't know what custom jack expander you're speaking of -- everything on the power side prior to the motherboard is stock x51 (other than thermal upgrades). If you're talking about the 3-prong wall plug that goes into the Dell 330w power brick then yes, it's plugged into a Kill-a-Watt (3-prong)... I was pulling >280W on the previous test.

Can you explain more?
 
Absolutely killer, Machupo! Always love your case builds/mods. This one is really pushing the envelope. I see now what you want me to get a CNC machine back in my shop! It would be my dream to make a stable living on custom case fabrication and collaboration with awesome enthusiasts.
 
I don't know what custom jack expander you're speaking of -- everything on the power side prior to the motherboard is stock x51 (other than thermal upgrades). If you're talking about the 3-prong wall plug that goes into the Dell 330w power brick then yes, it's plugged into a Kill-a-Watt (3-prong)... I was pulling >280W on the previous test.

Can you explain more?

I see you use the default alienware jack-expander. Than you can pull up to 420w if you cool the dcdc-board with heatsinks and and a bigger fan. One picture looks like you use a custom one.
 
I see you use the default alienware jack-expander. Than you can pull up to 420w if you cool the dcdc-board with heatsinks and and a bigger fan. One picture looks like you use a custom one.

Ahhh, ok -- thanks!
 
Absolutely killer, Machupo! Always love your case builds/mods. This one is really pushing the envelope. I see now what you want me to get a CNC machine back in my shop! It would be my dream to make a stable living on custom case fabrication and collaboration with awesome enthusiasts.

For sure -- that would be a blast! I'd probably be better off setting up a direct monthly allotment to your shop, lol.
 
well, flipping the psu is not going to work after all :mad:

back to the original plan, lol
 
Last edited:
I will be following your build closely, because this is truly inspiring! Can't wait to see the end product, and least of all some temps with the case closed... (fingers crossed :) )
 
Machupo, how's the case coming?

I just sold off my drum set and I've been eyeballing a much smaller CNC machine here recently. We may have venture into a joint build!
 
Amazing work, glad you figured out the PSU issues.

It's too bad we will likely never see a case like this for sale on the retail market. Closest the masses will ever get is probably the new Valve Steambox prototype case at just under 7 liters.
 
I will be following your build closely, because this is truly inspiring! Can't wait to see the end product, and least of all some temps with the case closed... (fingers crossed :) )

I think its going to be toasty, but survivable (without thermal throttling or under clocking)

Machupo, how's the case coming?

I just sold off my drum set and I've been eyeballing a much smaller CNC machine here recently. We may have venture into a joint build!

I've been selling a bunch of stuff lately too, lol (getting ready to move again). Once we get settled down again, I've been kicking around the idea of buying / building both an additive and a subtractive method machine... I'll definitely be hitting you up for advice. One thing I would like to work with you in the shorter term, though, is taking a look at this design and seeing if there is a way to make it without welding (so just cuts and bends and rivets) and preserve the clean front/sides/top as much as possible).

Going to do a bit of finishing / sanding today :)

Amazing work, glad you figured out the PSU issues.

It's too bad we will likely never see a case like this for sale on the retail market. Closest the masses will ever get is probably the new Valve Steambox prototype case at just under 7 liters.

Yeah, lots of custom parts / wiring, but where there's a will, there's a way!
 
I think its going to be toasty, but survivable (without thermal throttling or under clocking)

One of the great things about going this small is it actually gets easier to cool components. In larger cases your pushing around pre-heated air inside an enclosure, but in smaller cases the side panels are so close to everything that you end up getting fresh outside air being pushed directly onto heatsinks and components.

You don't need nearly as much cubic feet per min airflow when you have less cubic feet worth of volume.
 
Man, it would be SOOOOOO much easier if this thing was 60mm wider (and the PSU was on standoffs on the floor instead of flipped on top of the mobo). Resoldering some wires :p
 
Wiring complete!!!

Holy hell, this was like an elephant making love to a pig. I'm really looking forward to taking it all back apart for sanding, finishing, prep, and paint... LOL!

Overall system with the 30" monitor and accessories:
it_all_fits_zpsda69db69.png


Size comparison next to a bomber of Dragon's Milk BBS:
size_comparison_zps25b1d476.png


Close up of the front (yes, all the lines will be cleaned up during sanding/finishing :p):
front_zps9ac7f1ac.png


You can see how tight everything is from the top-down view:
top_zps7038ec27.png


Wiring was SUPER tight... yowza, I hope this doesn't go electro-BOOM:
crammed_wiring_zps4954dde1.png


Wiring was definitely the show stopper with this build, and if I had it to do all over again, I would make the case about 60mm wider so I wouldn't have to flip the power supply on top of the motherboard (and there would be a slightly easier wiring path to build). It's running 8T Prime95 Blend and Furmark (2560x1600) right now, and we're sitting at 89C (GPU) and 65C (CPU)... I really hope the power supply can take this! :eek:
 
This is beyond awesome, congrats on an amazing build. I am sure any of us would love to have that computer.
 
Thanks ;) -- here's the question, though...

Matte black or fluorescent orange? :D
 
Matte Black! :) Regarding your load temps, was that without anything covering the cutouts? I'm assuming you are covering them with some fancy mesh or something? Still curious how that affects the temps...
 
Correct, that was with it open, so we'll see what a little mesh does to the temps ;)
 
I only understand about half of how this build works, but I'm incredibly impressed and following your thread with much interest!
 
Try adding some kind of exhaust fans to the PSU cutout and to the front side of the VGA, I guess. Still, the CPU temps look really good for that setup... mostly the GPU and the PSU I'm worried about :D
The X51 supports a 4770 + a GTX670, but I have no ideas about the O/C part, and by the looks of it you will have thermal headroom for that, at least on the CPU side... and it's a K-series, after all :)
You could also try upping the speed of the GPU fan as well, I guess?
 
Yeah, I downloaded a software thermal fan controller, edited the PWM map, and the GPU temp has backed off a bit. The main game I play is Civ 5, and the system only draws 190w in late-game ultra detail, so none of the components get nearly as warm as furmark+8Tblend.
 
Did you get it stripped and painted yet? Very eager to see more pics, even just with the mesh covering the cutouts..
 
Back
Top