Tonight when I get home from work, I will be opening up a loop that has ben sealed for 6 YEARS! This loop has never been drained, never been flushed and has been running with UV DYE its entire life. My brother in law purchased the system from me in 2009 and a couple of weeks ago the mobo finally died, and the guts were transplanted. I couldnt pass up this opprotunity to answer some of the most common myths and watercooling questions we all have, and this is an awesome opportunity to investigate what Time + UV Dye + No Flushing does to a watercooling loop
The reason I am posting this now is so that I can get requests from the watercooling crowd on things they would like to see when I disassemble this loop and block.
Here are the items still sealed (I removed the entire kit in 1 piece, still sealed)
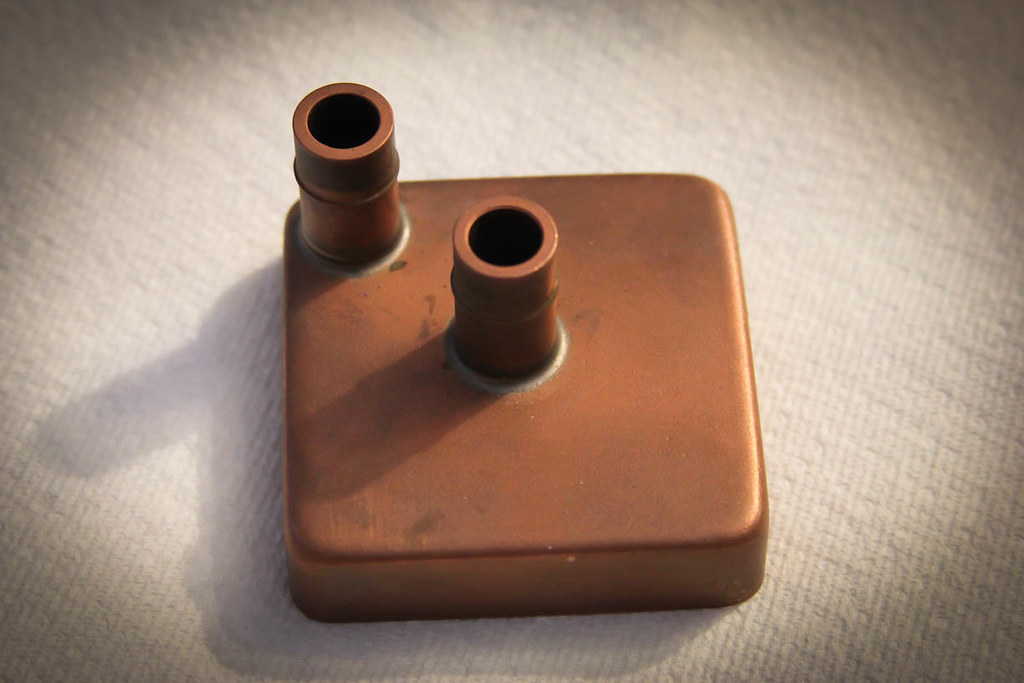
CPU Block - Swiftech Solid Copper with integraded Barbs. I will be using a dremel to cut open this block and look inside since it is a solid piece of metal.

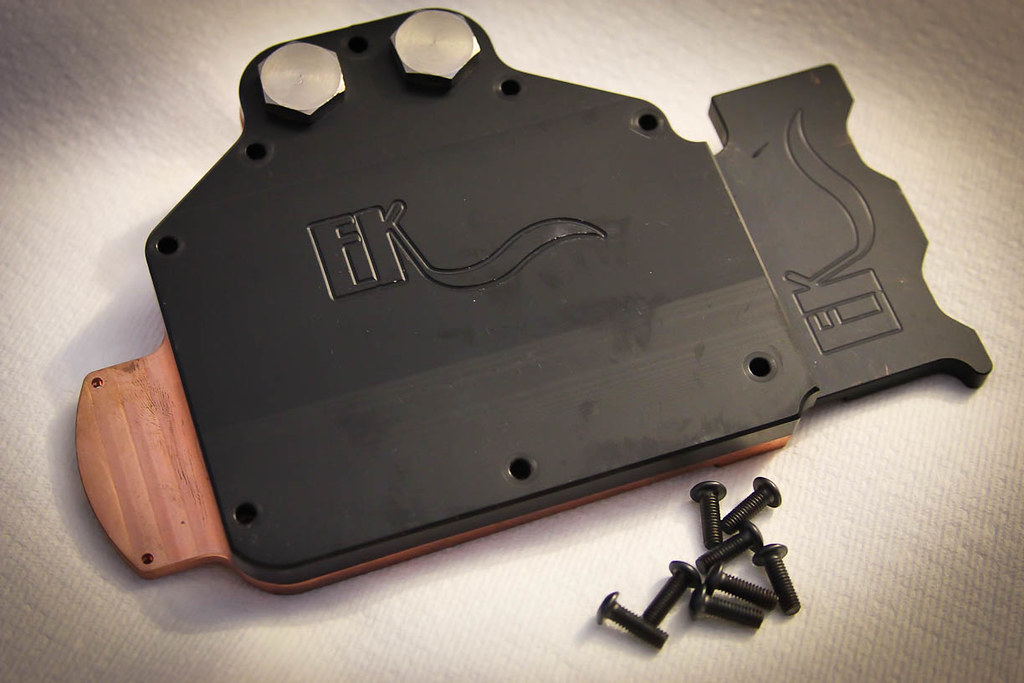
GPU Block - EK 8800GTX Ultra Full Cover block. This bad boy will be disassembled!

Radiator - GT Black Ice 240mm - This is one awesome rad. It kept my HEAVILY overclocked E6300 CPU and overclocked 8800 Ultra nice and cool.

Pump - DangerDen basic pump. I got this bad boy for $40 from FrozenCPU back in 2006 and it has been running like a champ ever since.

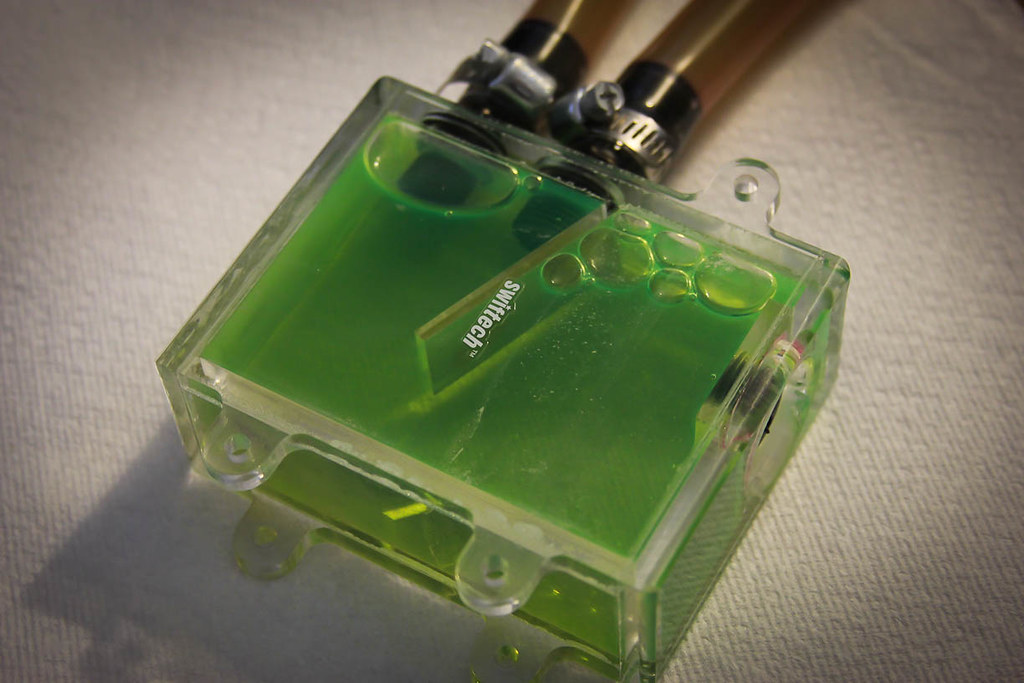
Res - Swiftech Micro Res v1.0 - This is the original res that Swiftech made with none of the fancy improvements that they made over time. Its nice and stained!
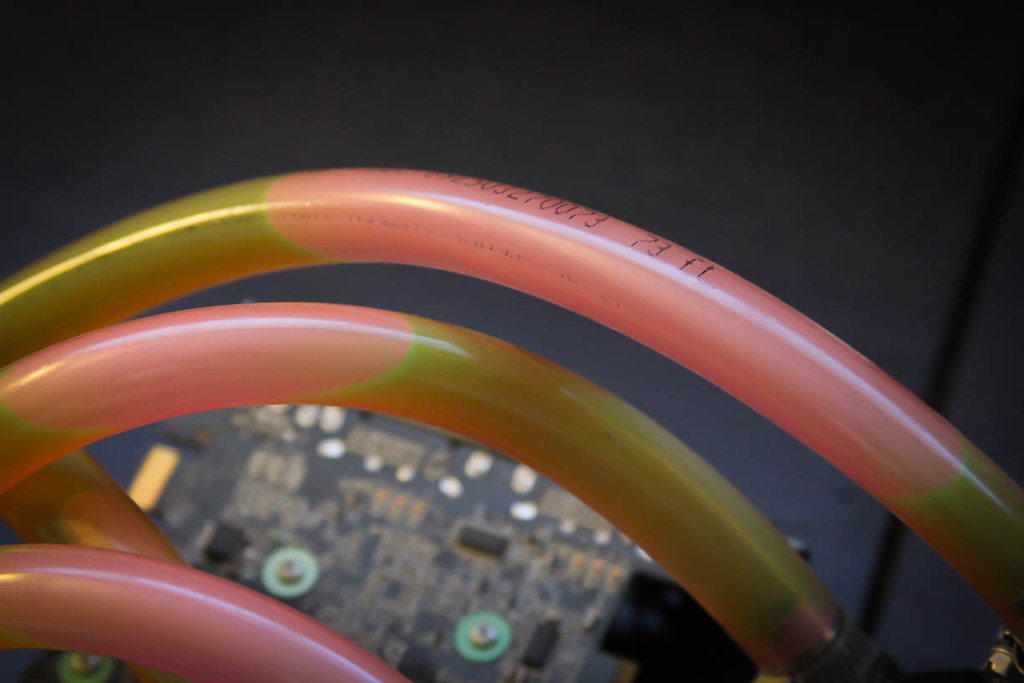
Tube - 1/2ID - 3/4OD Vinyl tubing that I had gotten from Ace Hardware. Its kind of funny, the tube is clear, and the coolant is Alien Green, yet the tube turned orange. Go figure.
Coolant - FluidXP - The so called "Non Conductive, Biodegradable, Anticorrosive, Super Coolant. I guess the Anti Corrosives will be put to the test once its opened up.

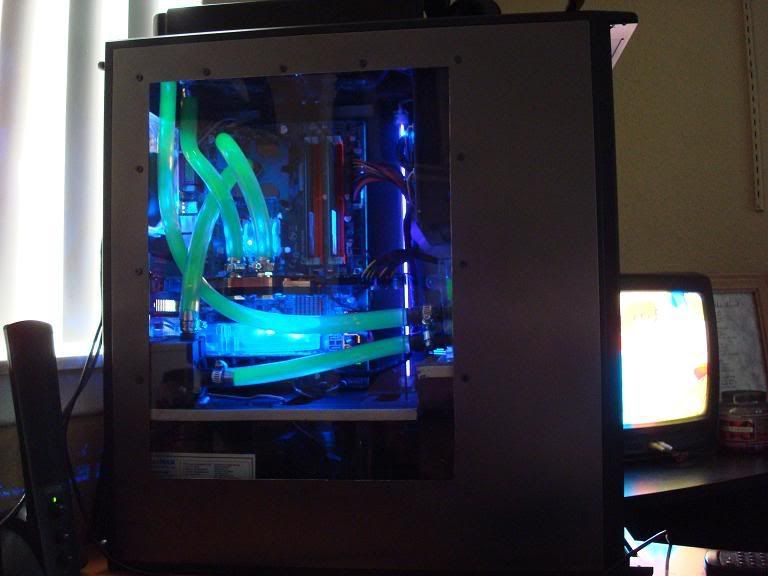
Here is a pic of the system right after I built it back in 2006.
Here are the questions that I am hoping to answer, and it is my hope that you guys will add to this list before I get home tonight .
1. Did the coolant turn conductive over time? Now I dont actually have any means of measuring the amount of electricity that is/can be conducted through the coolant. I am hoping that the continuity function on my Fluke meter will suffice in answering this question. Tips on doing this?
2. Did the UV dye cause gunk to build up in the block? I will be disassembling the GPU block, as well as cutting open the CPU block for inspection.
3. Did the UV Dye stain any parts of the system? This one I can already answer. The Res which is a clear acrylic has a cloudy tinge of green to it. The tubing also reacted to the coolant, but the stain doesnt match the color of the coolant. The coolant is still clean, but slightly cloudy but most of all still green, however the tube is a peachy/orangy color. I assume this is a chemical reaction to other elements found in the coolant.
4. What is the condition of the coolant? I somewhat touched on this in question #3, however until I get the coolant out of the system, and examine it, it will be hard to say. I do recall the FluidXP having a fairly thick viscosity when I assembled the loop, so we will see what it feels like now
5. Did the Anti-Corrosive elements to the fluid work? Is there any discoloration to the copper, particles, etc? Pretty self explanitory. Is the metal still clean and pure?
6. ??? What would you guys like to see?
I will be taking high res photos with a professional DSLR for this experiment, so expect very detailed photographs to accompany this science project. I cant remember the last time I was so excited about tearing something apart.
I will update this first post to include the results and will post in the thread when I have updated this OP to let any subs know it is present.
-----------------------------------------------------------------------------------------------------
Answers to Questions:
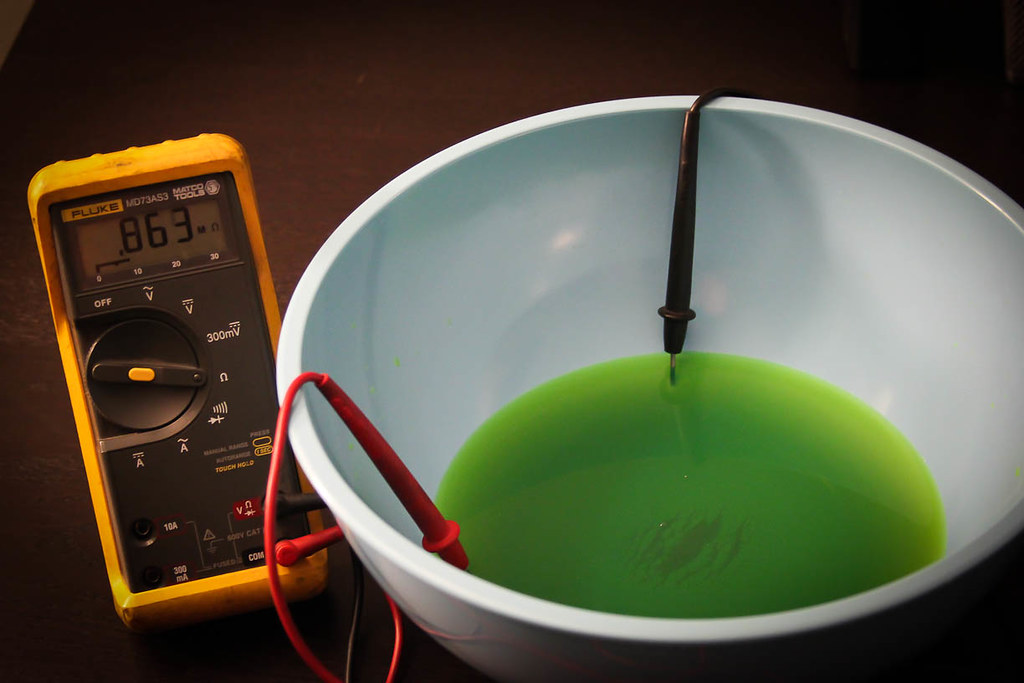
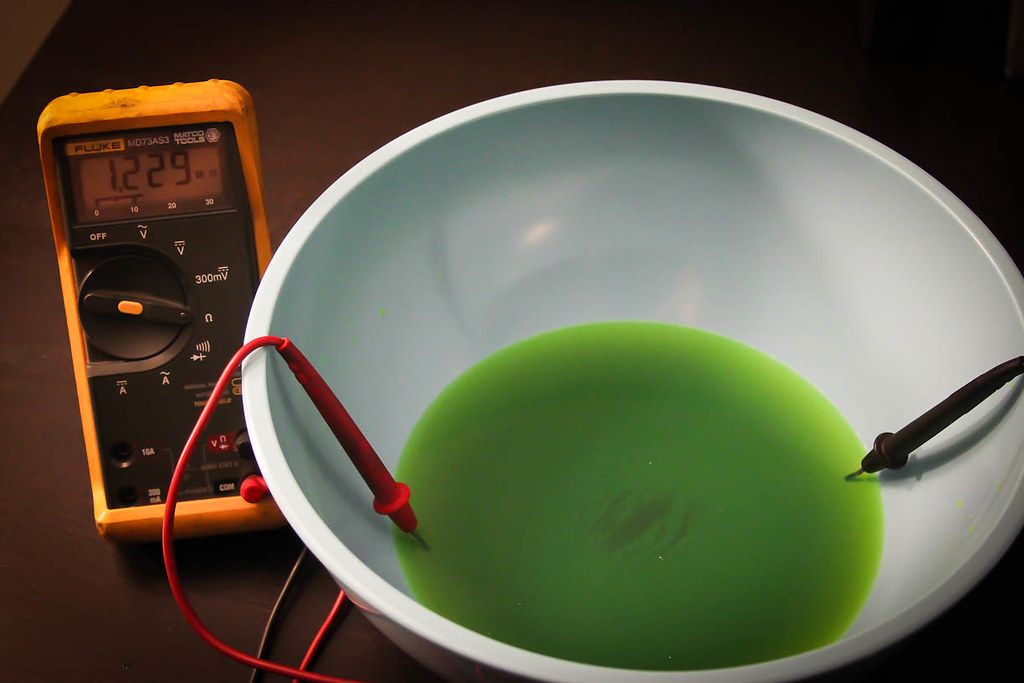
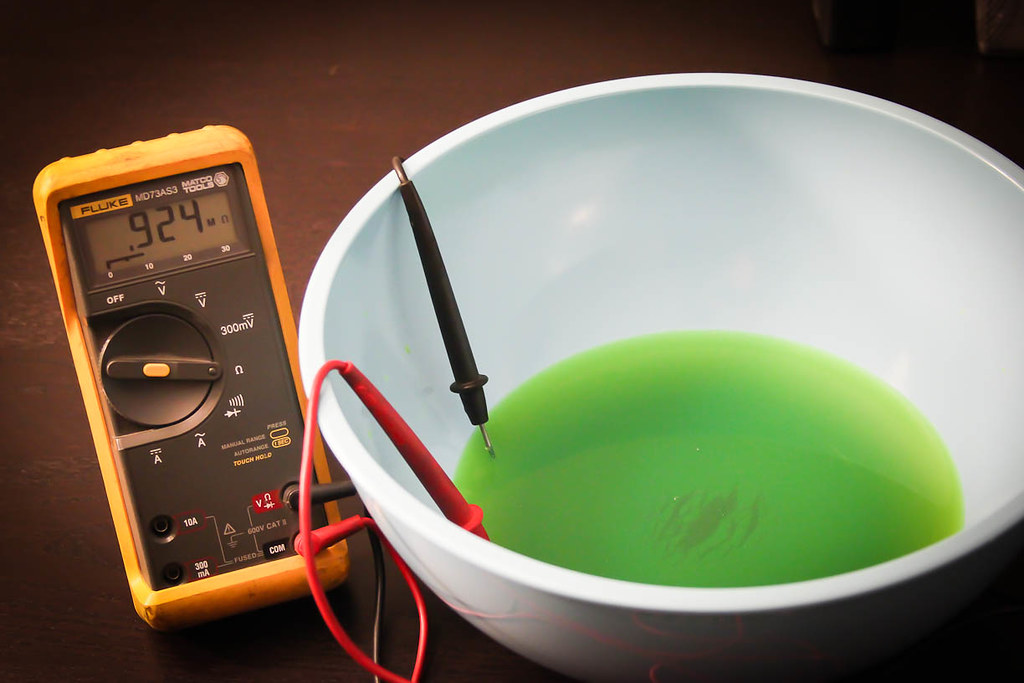
1. Yes. The coolant turned conductive over time. My Fluke confirms that there is conductivity. As to how much, I will let anyone with electrical and Ohm experience chime in on whether or not it is a dangerous level of conductivity.
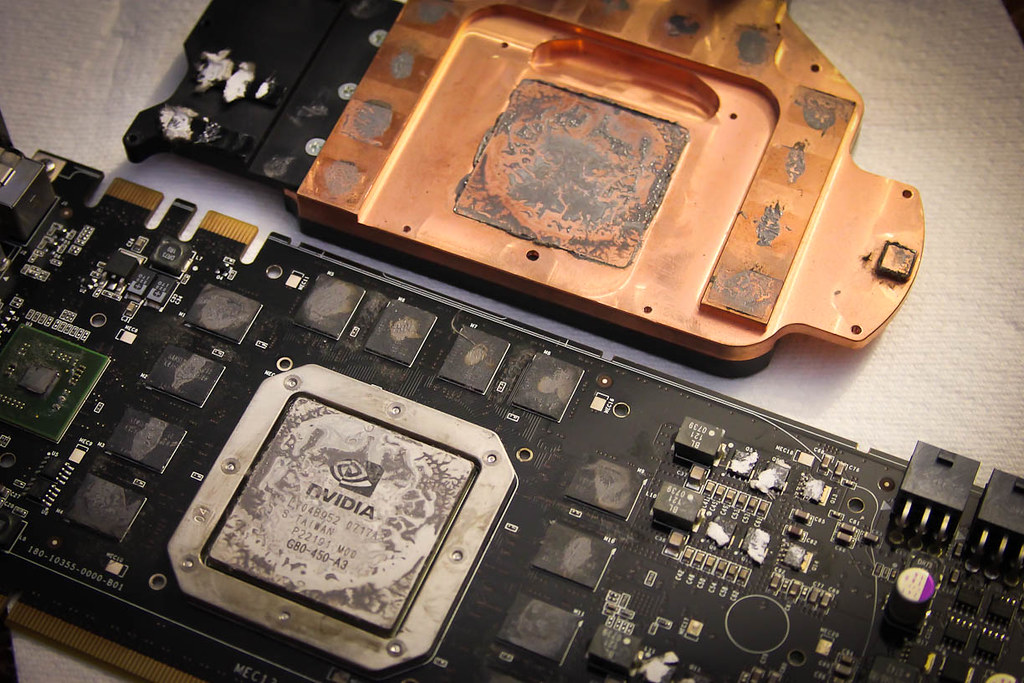
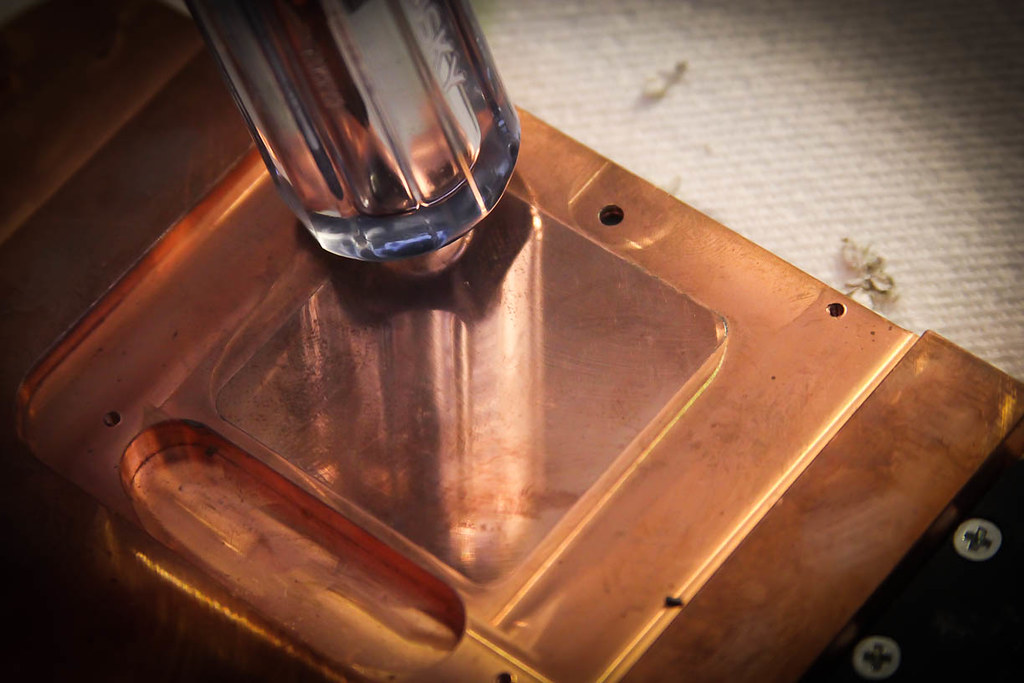
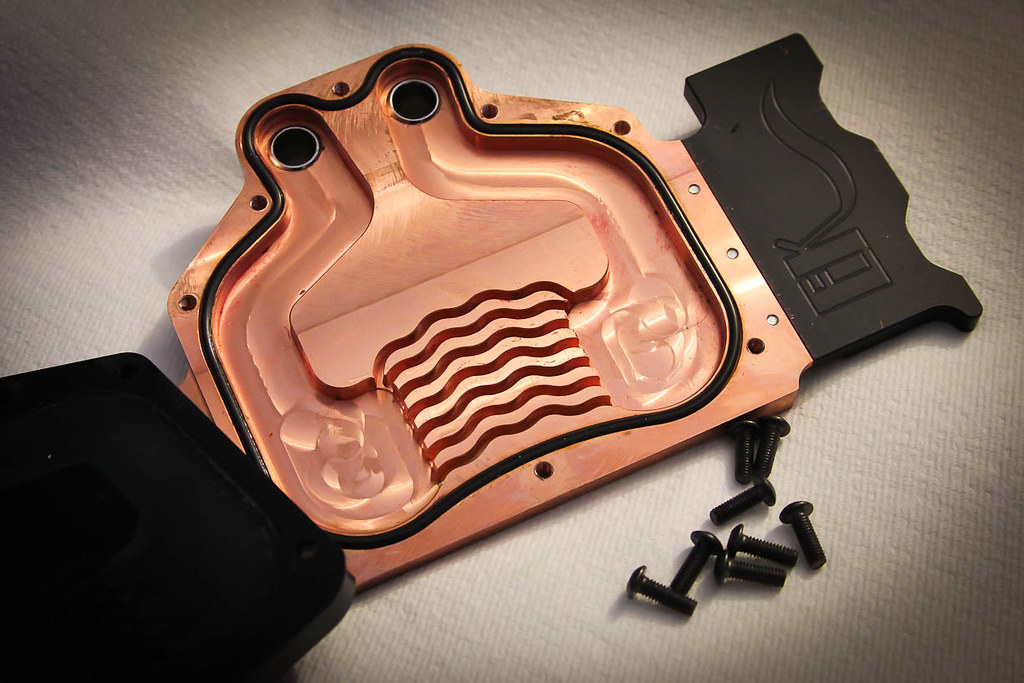
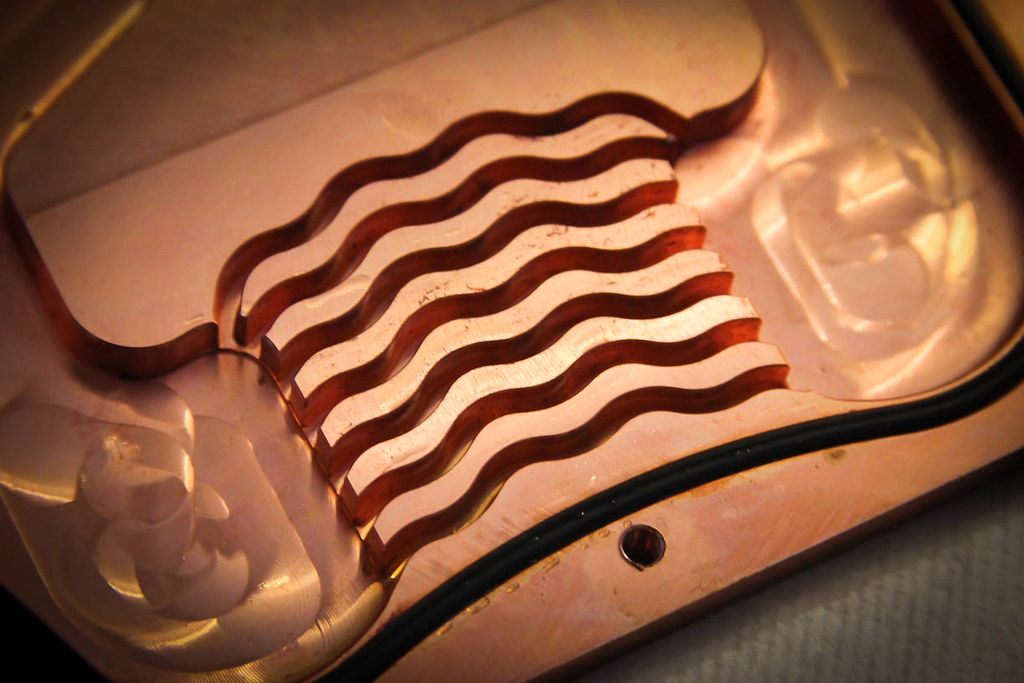
2. There is a zero build up on the GPU block. The inside looks as good as day 1. The CPU block on the other hand turned quite brown, and has a slime to it... I would say that there was some buildup in the CPU block, but overall, it isnt that bad.
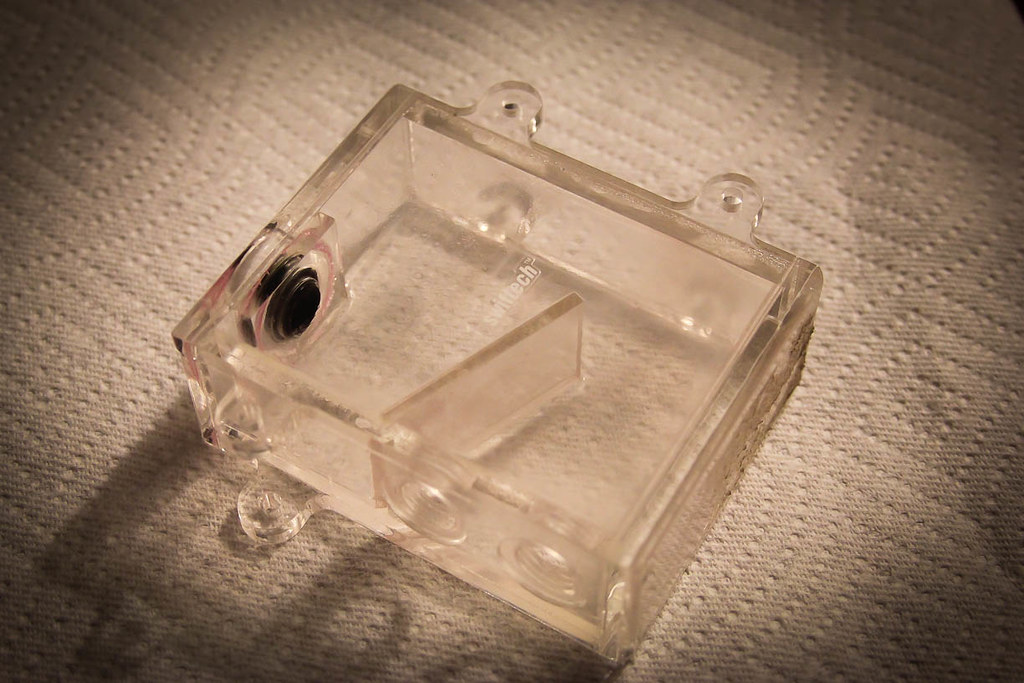
3. The tubing turned a nasty peach color, as for the acrylic of the res... there is absolutely no stain at all. Its completely clear.
4. The coolant has the same weight and feel as it did the day it was filled. It is not cloudy at all, has a nice glow to its color, and still has that slightly oily viscosity to it. Id say that it held up excellent over the 6 years it was flowing against metal!
5. This one will have to be answered by the photos... yes, there was corrosion, but probably not where you would expect to find it. The Radiator is toast.
Here she is, still completely sealed as it was pulled from the system, still in one piece. Notice how the tubing turned a weird color of peach, must have been a chemical reaction between the vinyl and something in the FluidXP

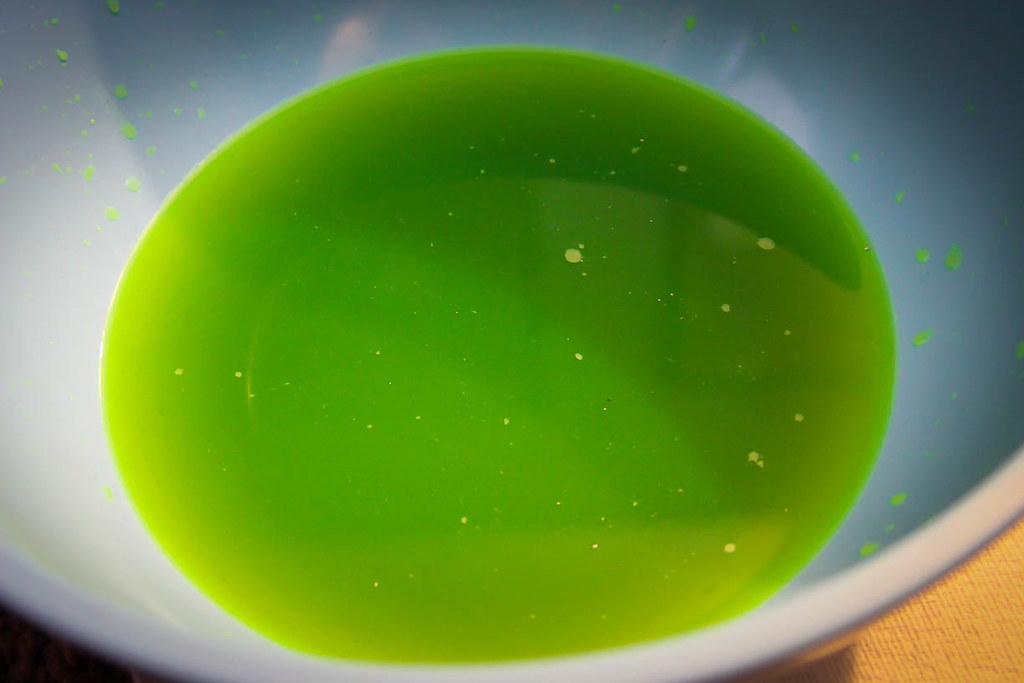
EEEW... nastiness inside! Looking at this up close, I am expecting the coolant to be completely smelly and grunge... or is it???
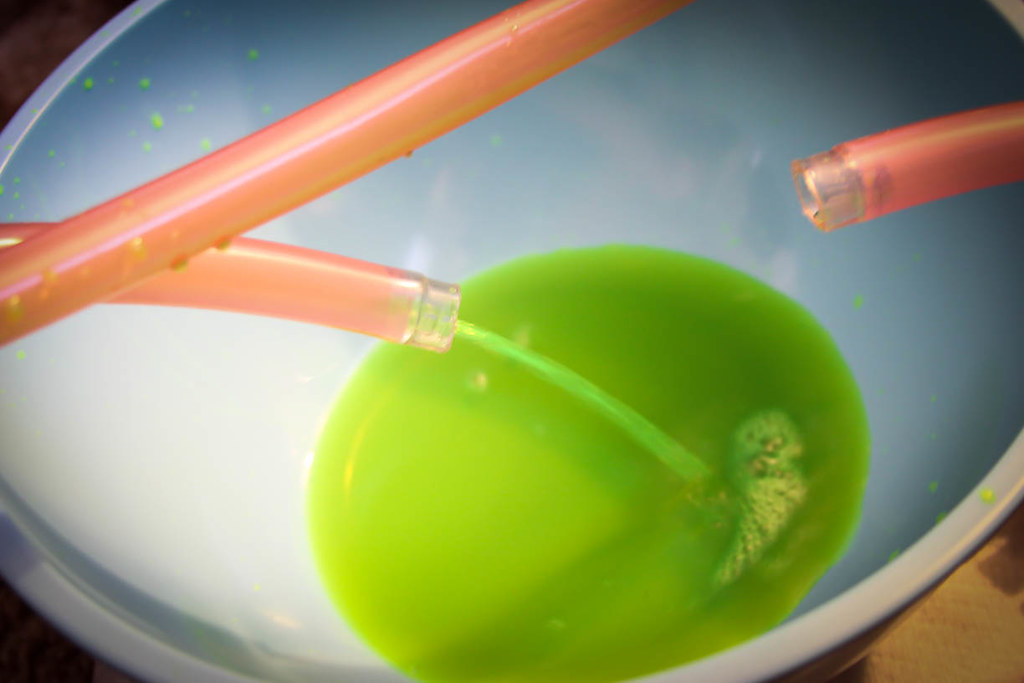
Hmm, here the coolant doesnt look half bad... cant wait to get it out of the loop!
Aside from the ugly tube reacting, the coolant looks bright and healthy. Maybe FluidXP was on to something!
And here was our first sign of something bad lurking inside the loop... floaties are NEVER a good sign... ever. You can also see some brown spots that sank.
I'm quite embarrassed with my TIM job on this one. Fortunately my skills have improved greatly over the past 6 years.
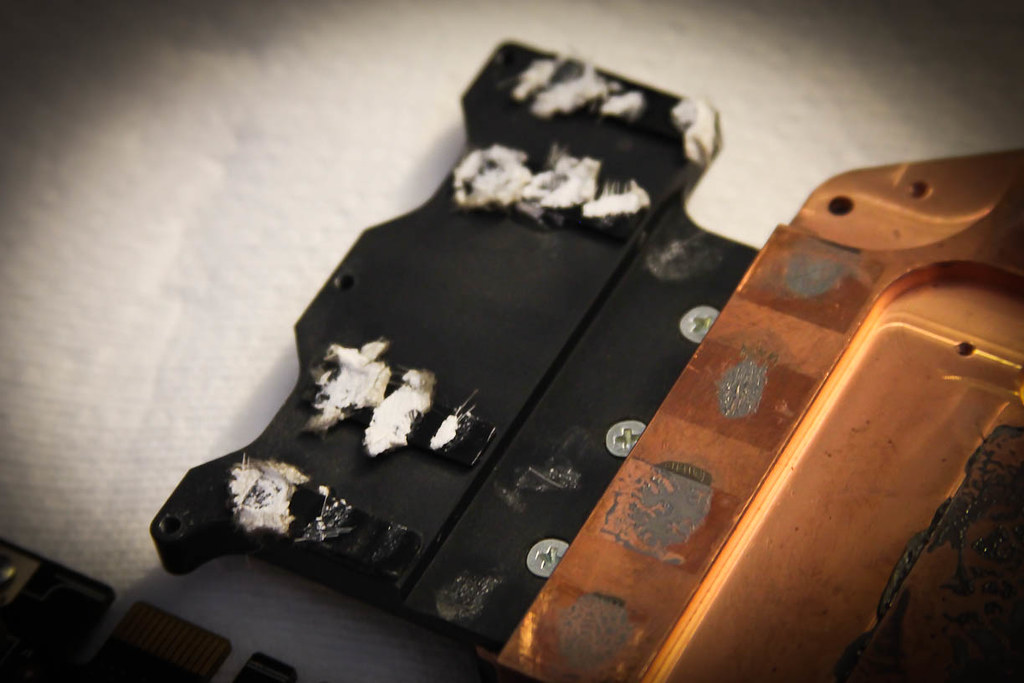
What the frigg happened to my thermal pads?? They look like they caught fire! Sheesh...
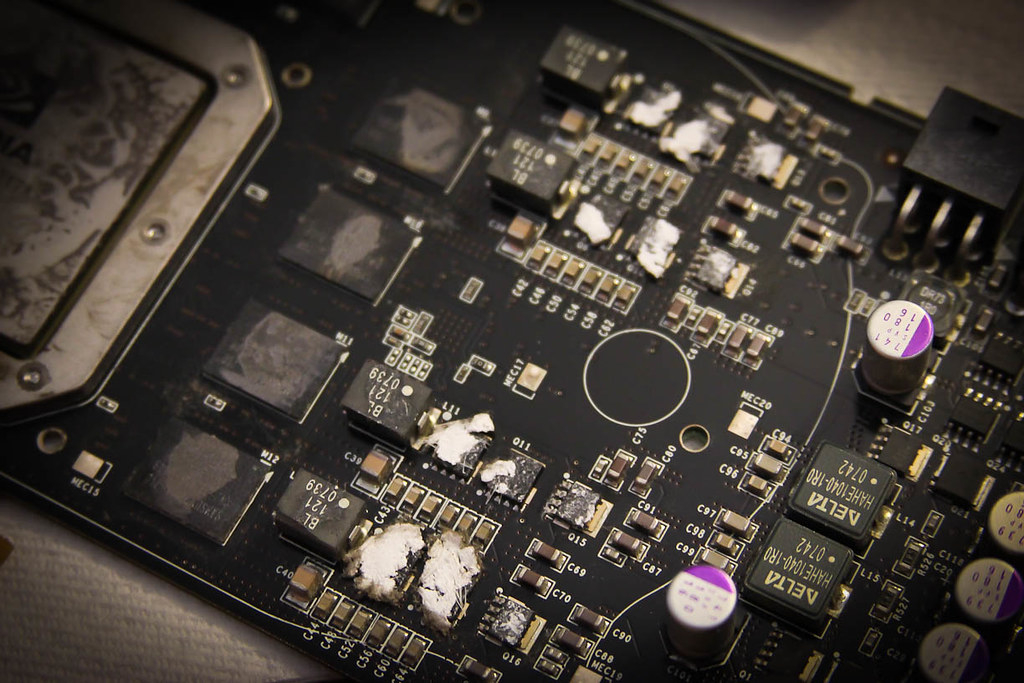
I dont even know what to think. Thats just insane!
The business end of the block doesnt look too bad. Still has a nice shine, no signs of any crazy temps etc.
Here we go, moment of truth!
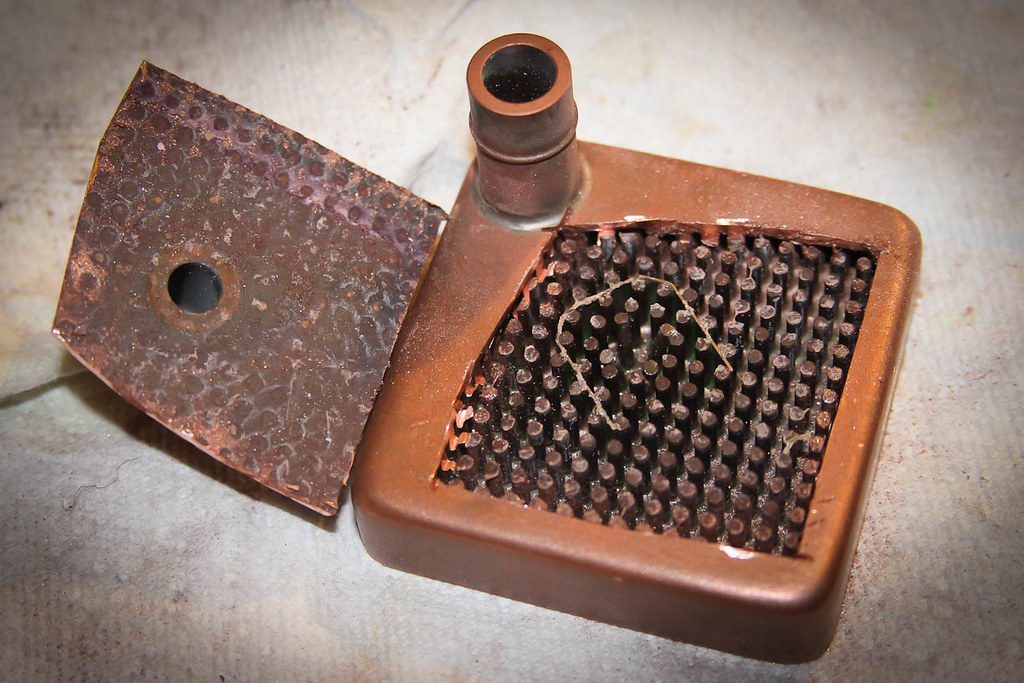
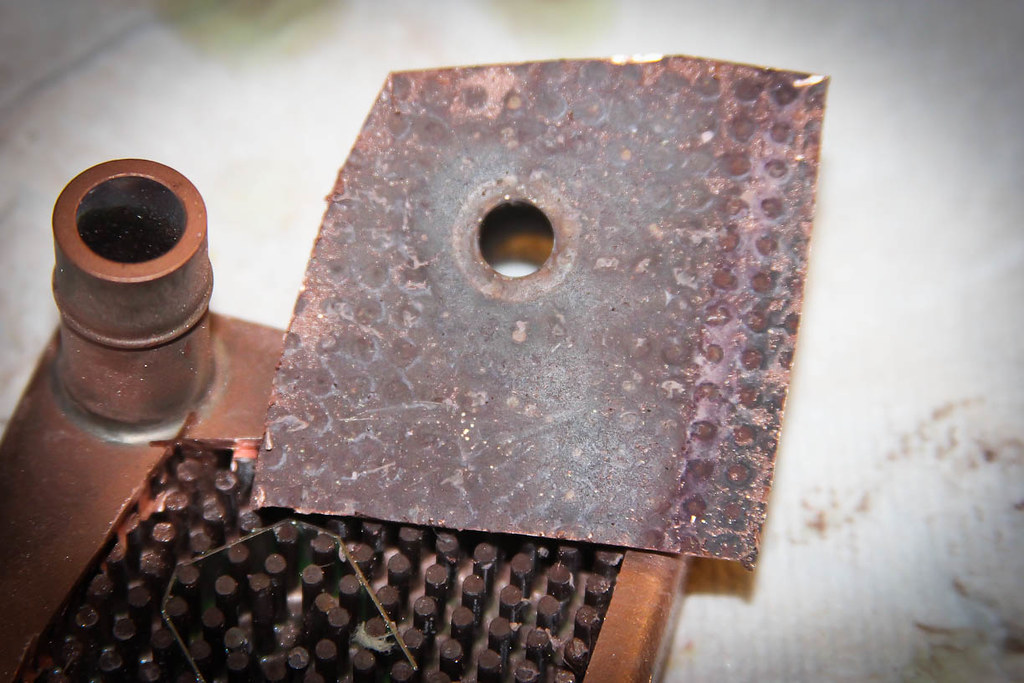
Looks almost brand new! Well, aside from the small brown deposits that are speckled through out... we will get to that later.
Swiftech CPU block. This big heavy chunk of metal is so primitive!
The inside is... brown? That's odd. Is this just tarnish? Why did the copper turn brown? I'm diggin the wall in the middle forcing the coolant around the sides of the block. I also love the way they bent the middle pins to make less resistance for the water entering the block.
As mentioned. The res has no stains at all. So its safe to say that if you had FluidXP Ultra in your loop with a clear acrylic res or block top... it wasnt going to stain on you
There are some signs of nastiness inside the pump. But where could it have come from? There is only one component left..........
My DSLR's onboard flash, as well as my bounce flash were not able to allow me to capture any images inside the hole of the radiator. So I decided to take out my iPhone and use the LED to peek inside the bung and see what I could see. The colors inside intrigued me. Here is a pic of the display on my iPhone which really peaked my interest. There is only one way I was going to get a good look inside and after seeing what I saw on the iPhone, I knew that there was no way I would resell this rad in this condition.
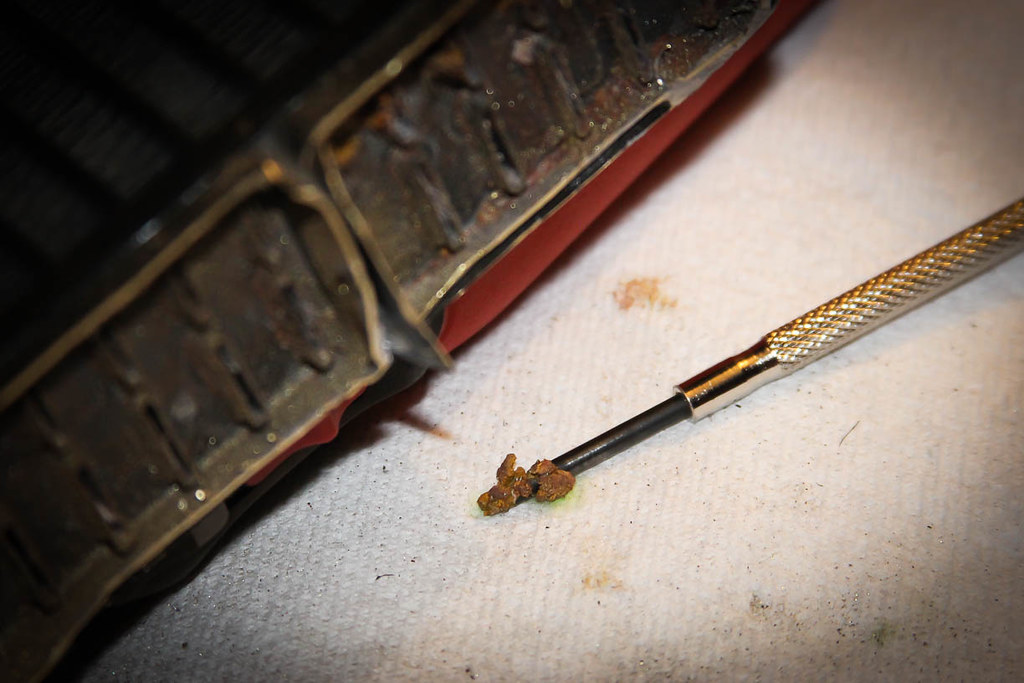
Time to cut her open... and what a mess. This was the inlet side of the rad and that is some nasty buildup/corrosion. It was pretty hard and I had to scrape it off like a resin. This RAD was toast so I decided to open up the other side. too.

Some more of the nastiness. I'm glad I took a look inside and didnt try to resell this rad. Sure, I could have tried the vinegar and distilled water method, but why chance sending something that was no good. I'm just not like that.
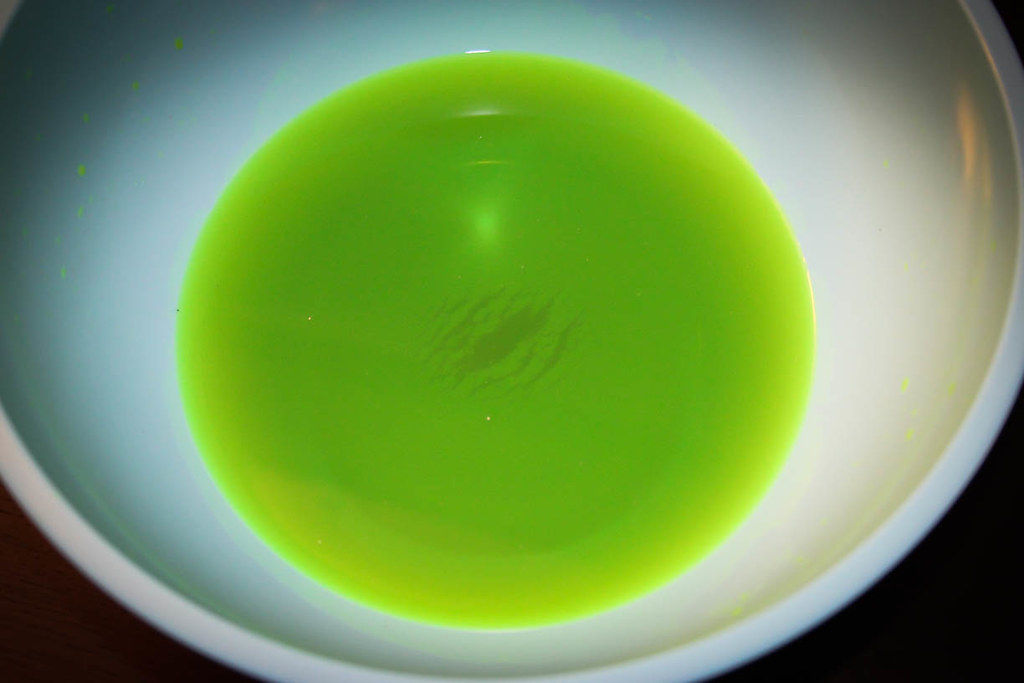
The floaties have settled at the bottom of the bowl. I suspect this is from the radiator. At this point the only piece of the loop that I would trust is the GPU Block (and no, not just because the others are all cut up!) Considering I put this loop together for less than $300, I would say it got its money's worth!
Looks conductive to me. I would really love it if something could tell me HOW conductive this fluid is now based on the resistance shown on the meter.
So there you have it. Its really not bad considering that the loop is 6 years old. I'm sure that it held up pretty good compared to if it was just distilled water with PT Nuke, so who knows. Today's blocks would probably have not fared so well with the much tinier passages, and would have likely gunked up.
I hope you guys enjoyed watching me cut up my old water cooling loop. I now feel [H]ard.
The reason I am posting this now is so that I can get requests from the watercooling crowd on things they would like to see when I disassemble this loop and block.
Here are the items still sealed (I removed the entire kit in 1 piece, still sealed)
CPU Block - Swiftech Solid Copper with integraded Barbs. I will be using a dremel to cut open this block and look inside since it is a solid piece of metal.
GPU Block - EK 8800GTX Ultra Full Cover block. This bad boy will be disassembled!
Radiator - GT Black Ice 240mm - This is one awesome rad. It kept my HEAVILY overclocked E6300 CPU and overclocked 8800 Ultra nice and cool.
Pump - DangerDen basic pump. I got this bad boy for $40 from FrozenCPU back in 2006 and it has been running like a champ ever since.
Res - Swiftech Micro Res v1.0 - This is the original res that Swiftech made with none of the fancy improvements that they made over time. Its nice and stained!
Tube - 1/2ID - 3/4OD Vinyl tubing that I had gotten from Ace Hardware. Its kind of funny, the tube is clear, and the coolant is Alien Green, yet the tube turned orange. Go figure.
Coolant - FluidXP - The so called "Non Conductive, Biodegradable, Anticorrosive, Super Coolant. I guess the Anti Corrosives will be put to the test once its opened up.
Here is a pic of the system right after I built it back in 2006.
Here are the questions that I am hoping to answer, and it is my hope that you guys will add to this list before I get home tonight .
1. Did the coolant turn conductive over time? Now I dont actually have any means of measuring the amount of electricity that is/can be conducted through the coolant. I am hoping that the continuity function on my Fluke meter will suffice in answering this question. Tips on doing this?
2. Did the UV dye cause gunk to build up in the block? I will be disassembling the GPU block, as well as cutting open the CPU block for inspection.
3. Did the UV Dye stain any parts of the system? This one I can already answer. The Res which is a clear acrylic has a cloudy tinge of green to it. The tubing also reacted to the coolant, but the stain doesnt match the color of the coolant. The coolant is still clean, but slightly cloudy but most of all still green, however the tube is a peachy/orangy color. I assume this is a chemical reaction to other elements found in the coolant.
4. What is the condition of the coolant? I somewhat touched on this in question #3, however until I get the coolant out of the system, and examine it, it will be hard to say. I do recall the FluidXP having a fairly thick viscosity when I assembled the loop, so we will see what it feels like now
5. Did the Anti-Corrosive elements to the fluid work? Is there any discoloration to the copper, particles, etc? Pretty self explanitory. Is the metal still clean and pure?
6. ??? What would you guys like to see?
I will be taking high res photos with a professional DSLR for this experiment, so expect very detailed photographs to accompany this science project. I cant remember the last time I was so excited about tearing something apart.
I will update this first post to include the results and will post in the thread when I have updated this OP to let any subs know it is present.
-----------------------------------------------------------------------------------------------------
Answers to Questions:
1. Yes. The coolant turned conductive over time. My Fluke confirms that there is conductivity. As to how much, I will let anyone with electrical and Ohm experience chime in on whether or not it is a dangerous level of conductivity.
2. There is a zero build up on the GPU block. The inside looks as good as day 1. The CPU block on the other hand turned quite brown, and has a slime to it... I would say that there was some buildup in the CPU block, but overall, it isnt that bad.
3. The tubing turned a nasty peach color, as for the acrylic of the res... there is absolutely no stain at all. Its completely clear.
4. The coolant has the same weight and feel as it did the day it was filled. It is not cloudy at all, has a nice glow to its color, and still has that slightly oily viscosity to it. Id say that it held up excellent over the 6 years it was flowing against metal!
5. This one will have to be answered by the photos... yes, there was corrosion, but probably not where you would expect to find it. The Radiator is toast.
Here she is, still completely sealed as it was pulled from the system, still in one piece. Notice how the tubing turned a weird color of peach, must have been a chemical reaction between the vinyl and something in the FluidXP
EEEW... nastiness inside! Looking at this up close, I am expecting the coolant to be completely smelly and grunge... or is it???
Hmm, here the coolant doesnt look half bad... cant wait to get it out of the loop!
Aside from the ugly tube reacting, the coolant looks bright and healthy. Maybe FluidXP was on to something!
And here was our first sign of something bad lurking inside the loop... floaties are NEVER a good sign... ever. You can also see some brown spots that sank.
I'm quite embarrassed with my TIM job on this one. Fortunately my skills have improved greatly over the past 6 years.
What the frigg happened to my thermal pads?? They look like they caught fire! Sheesh...
I dont even know what to think. Thats just insane!
The business end of the block doesnt look too bad. Still has a nice shine, no signs of any crazy temps etc.
Here we go, moment of truth!
Looks almost brand new! Well, aside from the small brown deposits that are speckled through out... we will get to that later.
Swiftech CPU block. This big heavy chunk of metal is so primitive!
The inside is... brown? That's odd. Is this just tarnish? Why did the copper turn brown? I'm diggin the wall in the middle forcing the coolant around the sides of the block. I also love the way they bent the middle pins to make less resistance for the water entering the block.
As mentioned. The res has no stains at all. So its safe to say that if you had FluidXP Ultra in your loop with a clear acrylic res or block top... it wasnt going to stain on you
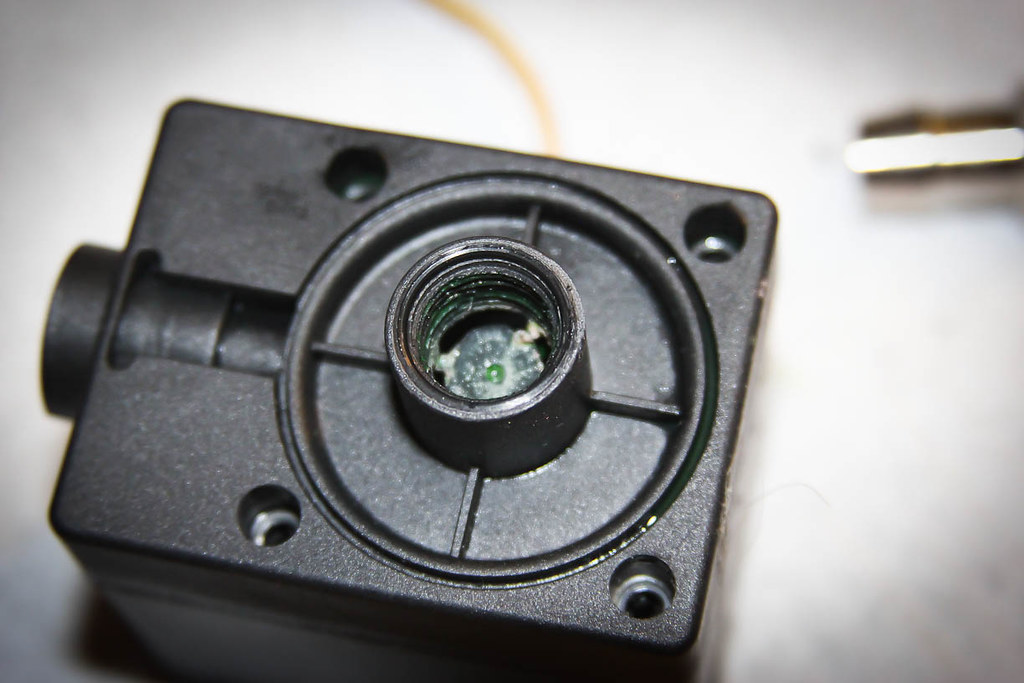
There are some signs of nastiness inside the pump. But where could it have come from? There is only one component left..........
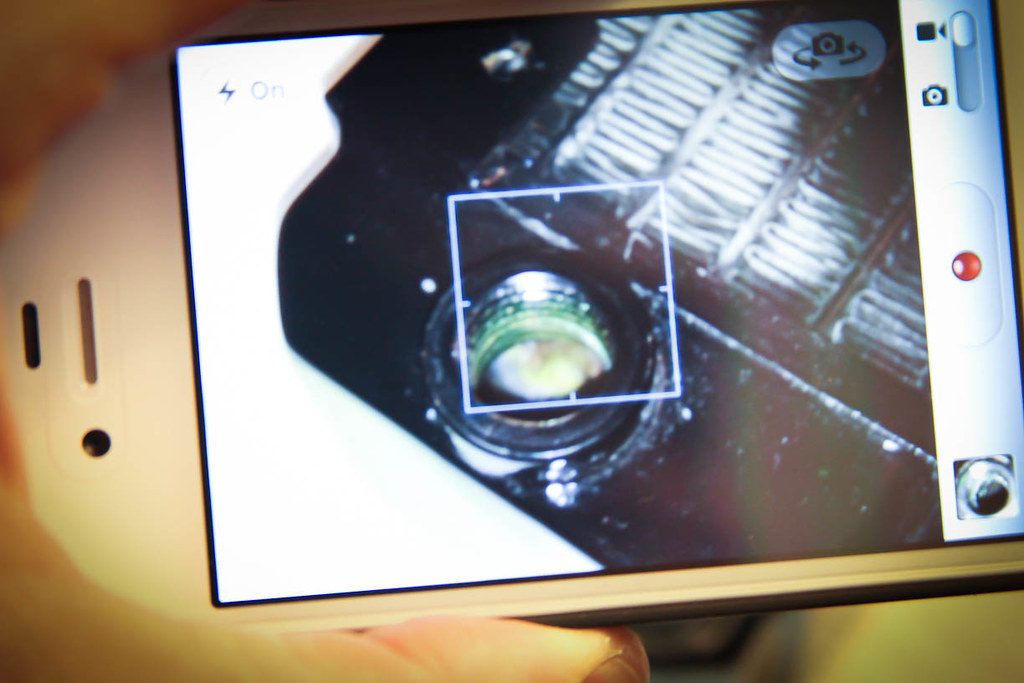
My DSLR's onboard flash, as well as my bounce flash were not able to allow me to capture any images inside the hole of the radiator. So I decided to take out my iPhone and use the LED to peek inside the bung and see what I could see. The colors inside intrigued me. Here is a pic of the display on my iPhone which really peaked my interest. There is only one way I was going to get a good look inside and after seeing what I saw on the iPhone, I knew that there was no way I would resell this rad in this condition.
Time to cut her open... and what a mess. This was the inlet side of the rad and that is some nasty buildup/corrosion. It was pretty hard and I had to scrape it off like a resin. This RAD was toast so I decided to open up the other side. too.
Some more of the nastiness. I'm glad I took a look inside and didnt try to resell this rad. Sure, I could have tried the vinegar and distilled water method, but why chance sending something that was no good. I'm just not like that.
The floaties have settled at the bottom of the bowl. I suspect this is from the radiator. At this point the only piece of the loop that I would trust is the GPU Block (and no, not just because the others are all cut up!) Considering I put this loop together for less than $300, I would say it got its money's worth!
Looks conductive to me. I would really love it if something could tell me HOW conductive this fluid is now based on the resistance shown on the meter.
So there you have it. Its really not bad considering that the loop is 6 years old. I'm sure that it held up pretty good compared to if it was just distilled water with PT Nuke, so who knows. Today's blocks would probably have not fared so well with the much tinier passages, and would have likely gunked up.
I hope you guys enjoyed watching me cut up my old water cooling loop. I now feel [H]ard.
Last edited:
