Lapping the Thermal Right Ultra-120 Extreme... Help

BassKozz

Limp Gawd
Joined
Nov 10, 2005
Messages
311
Need help... This is my 1st Lapping Job EVER, and I need to know what I am doing wrong...

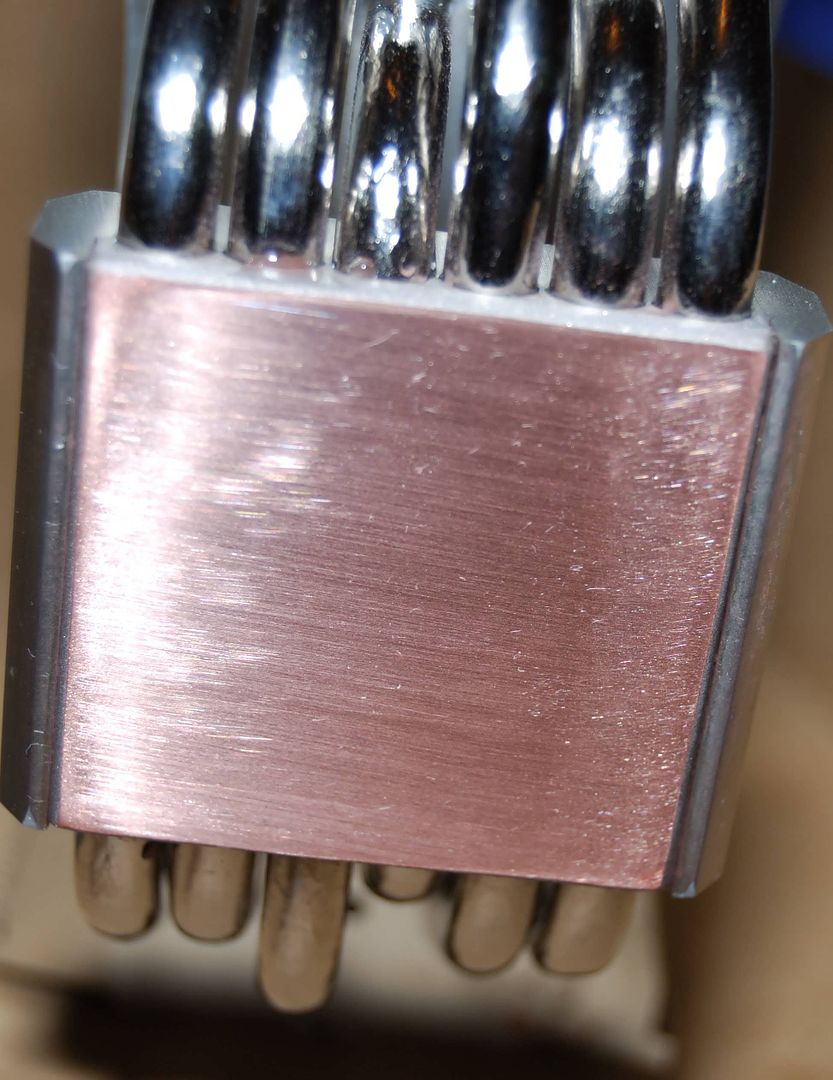
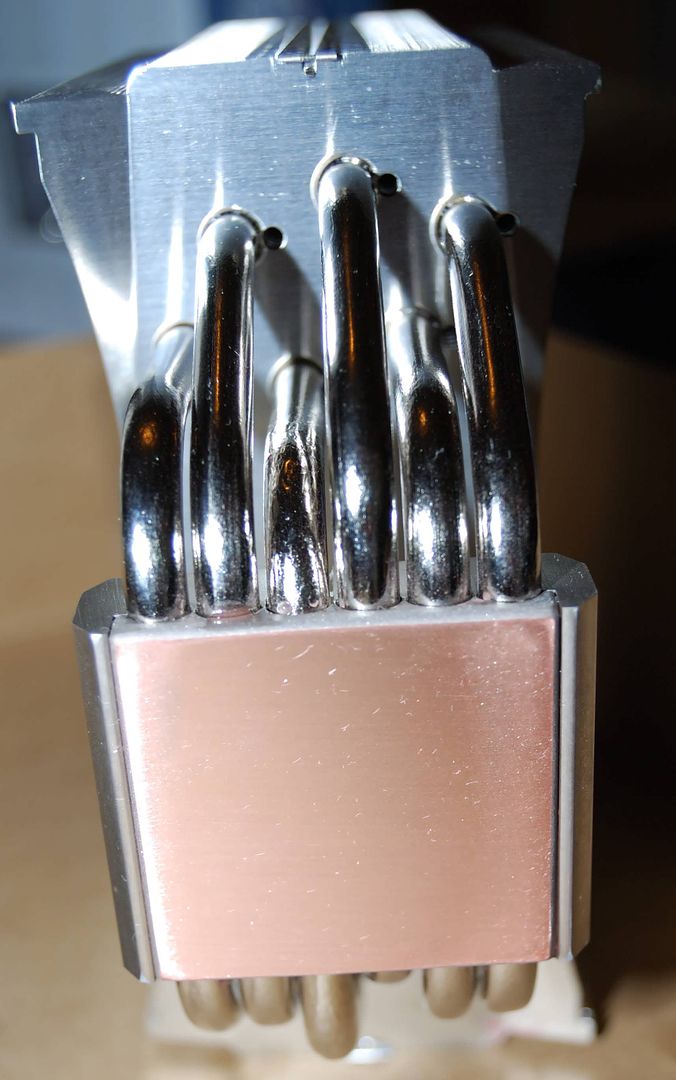
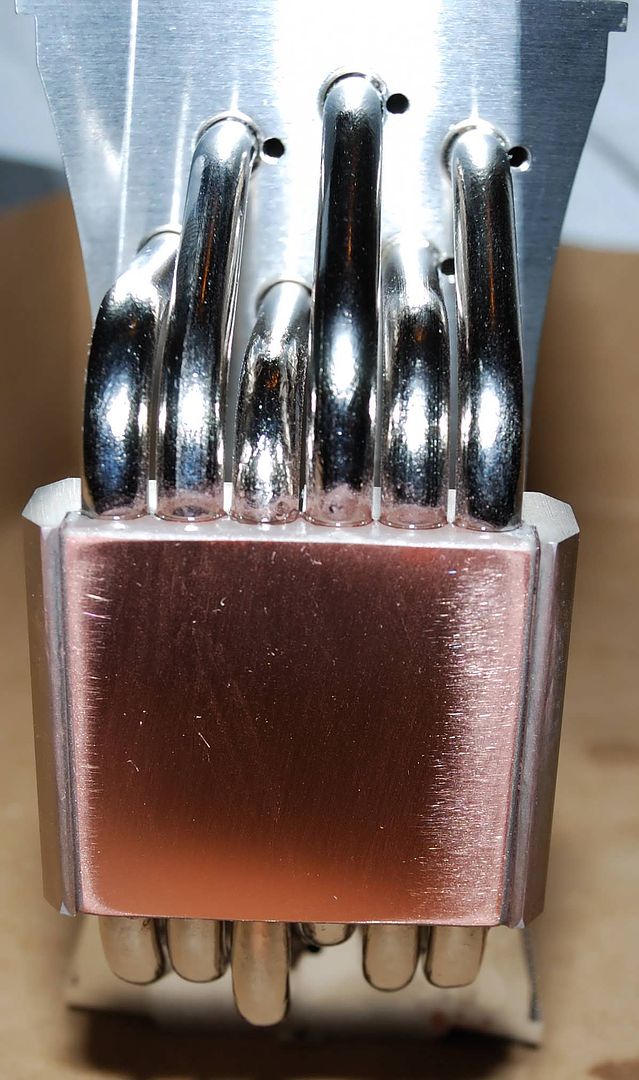
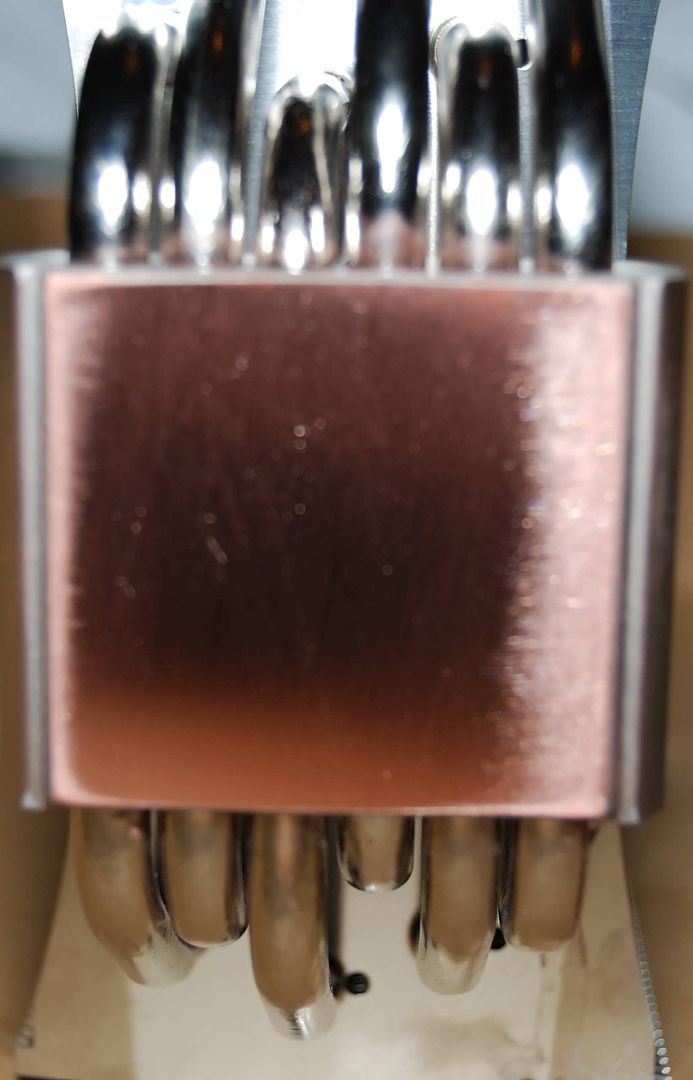
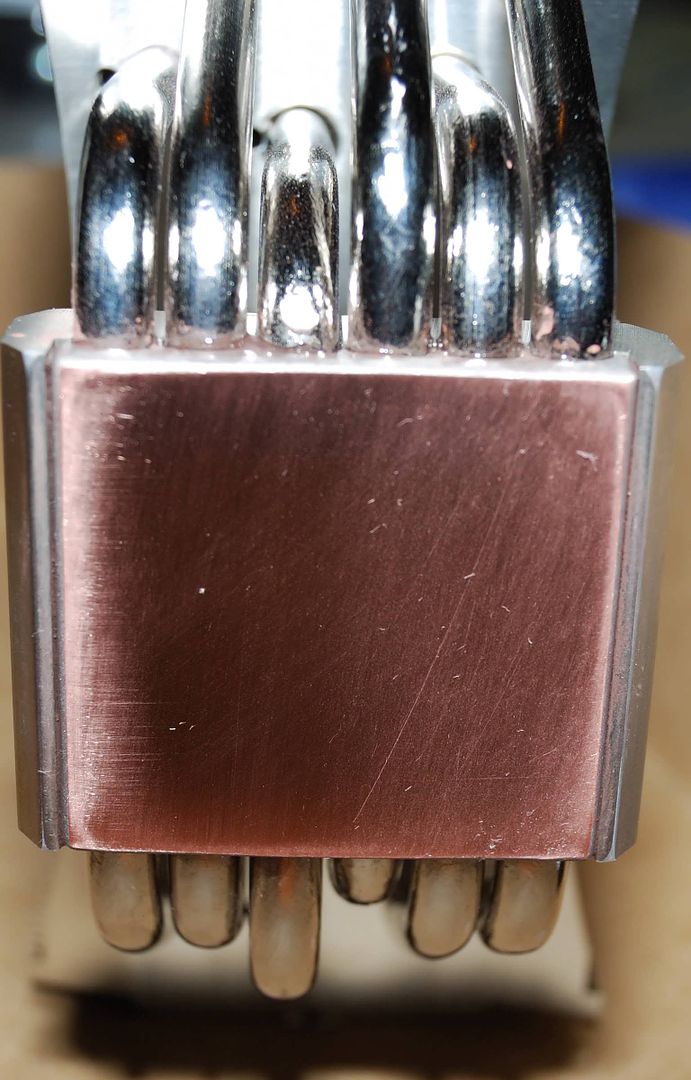
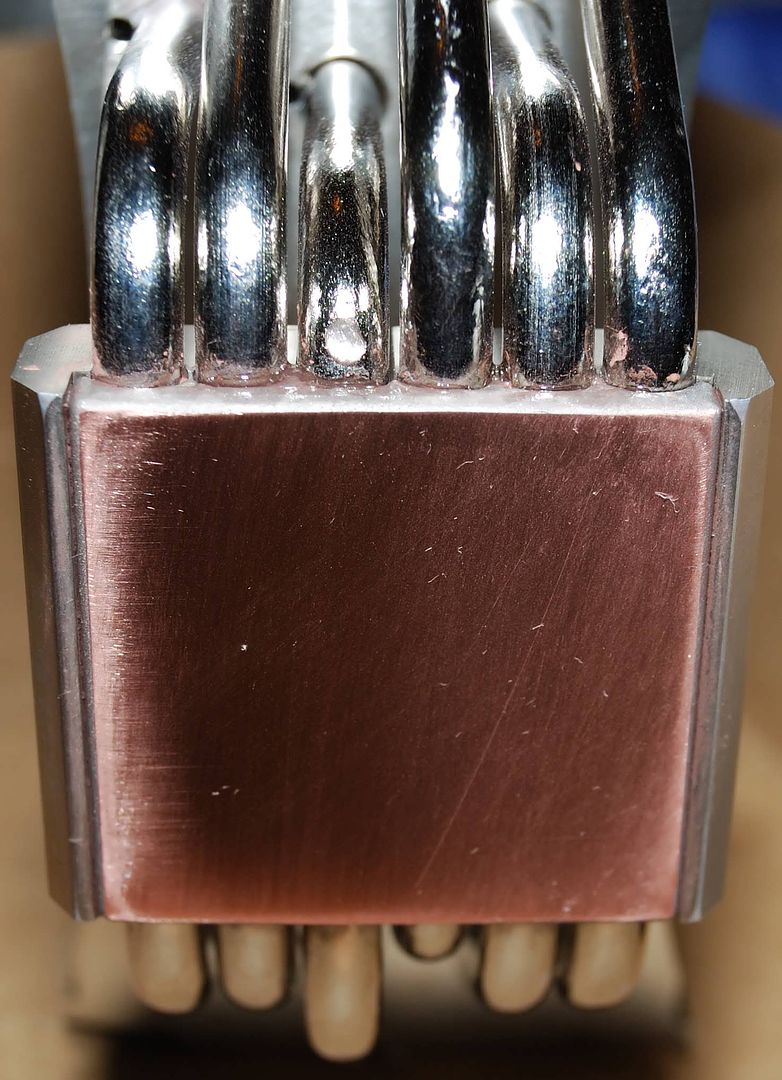
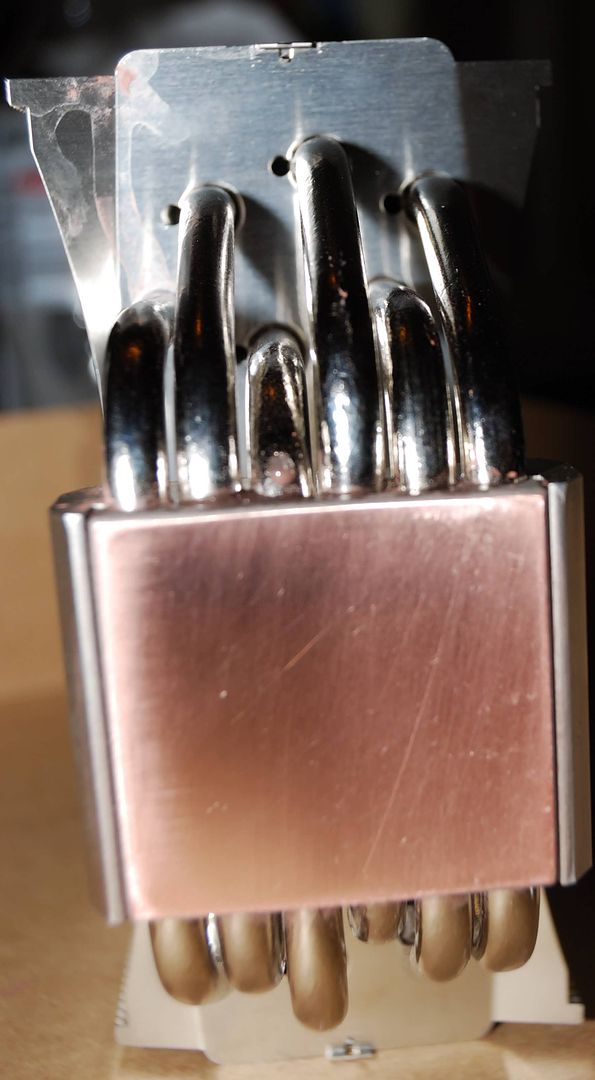
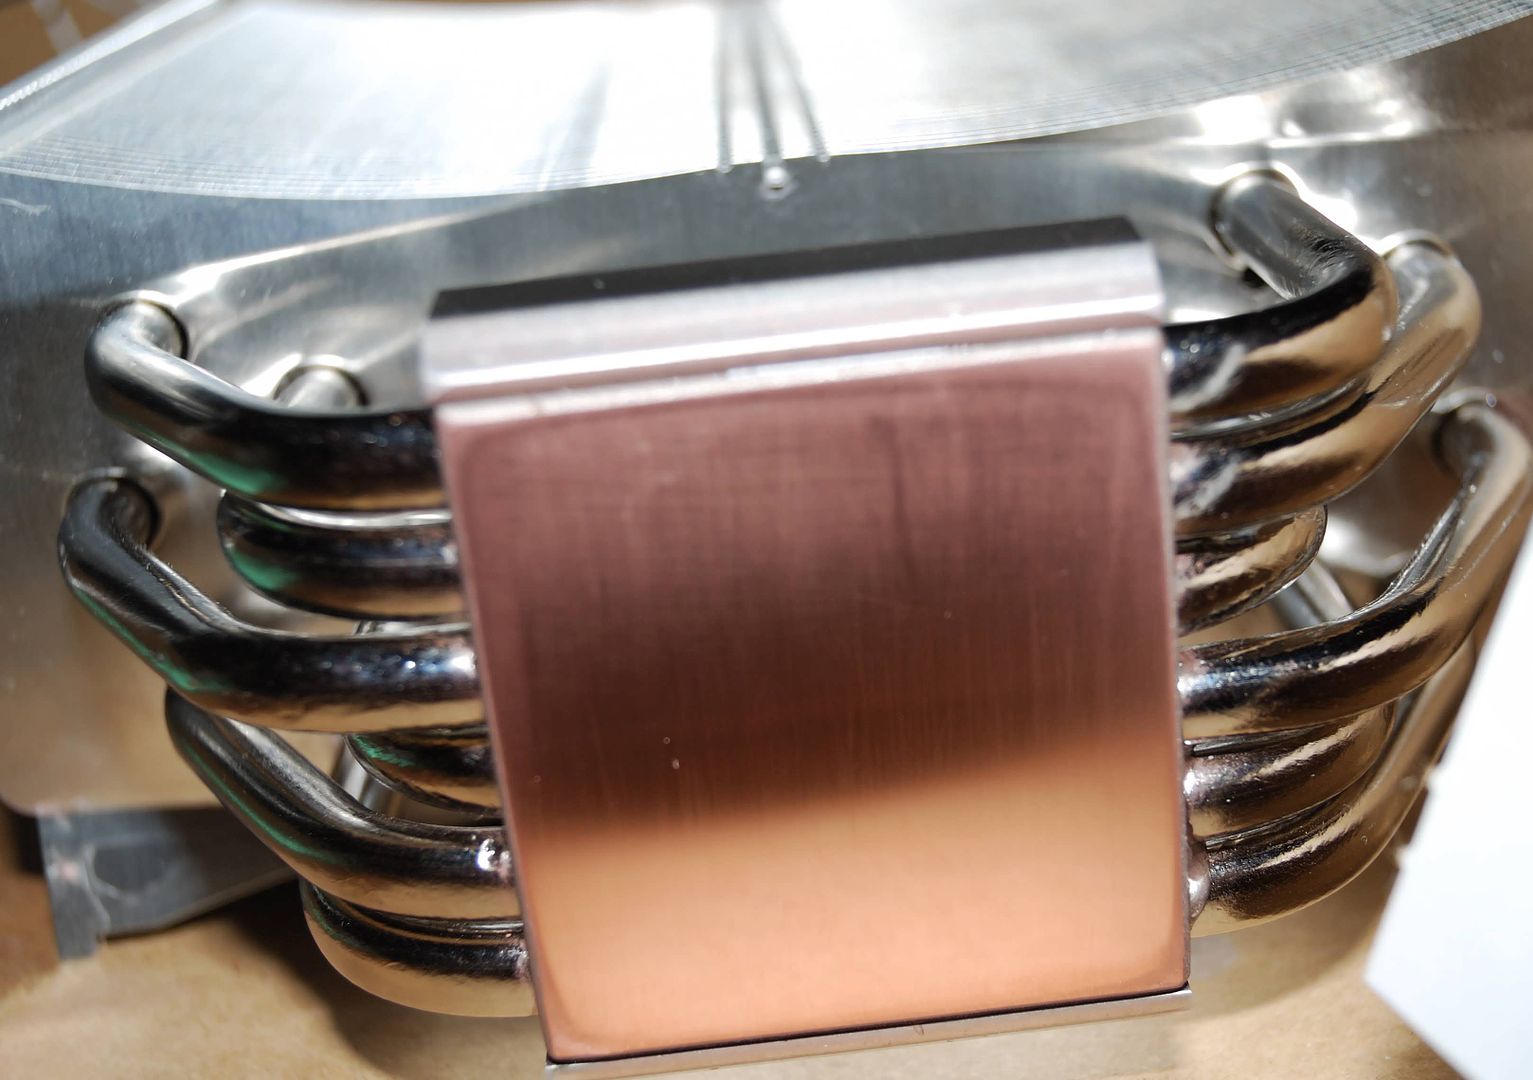
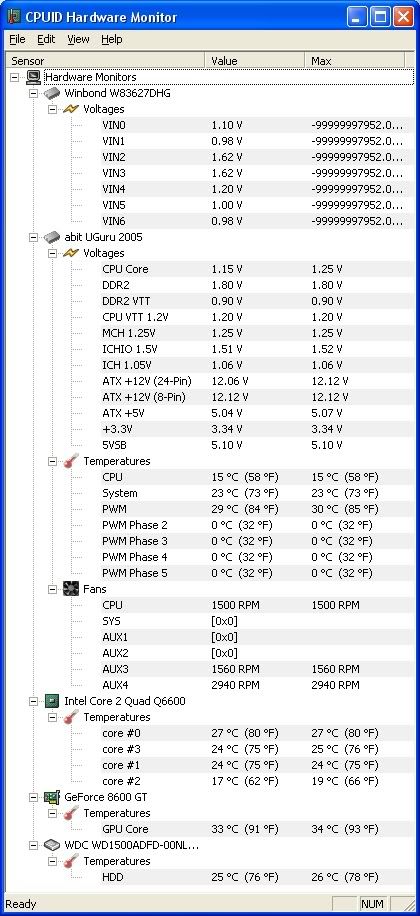
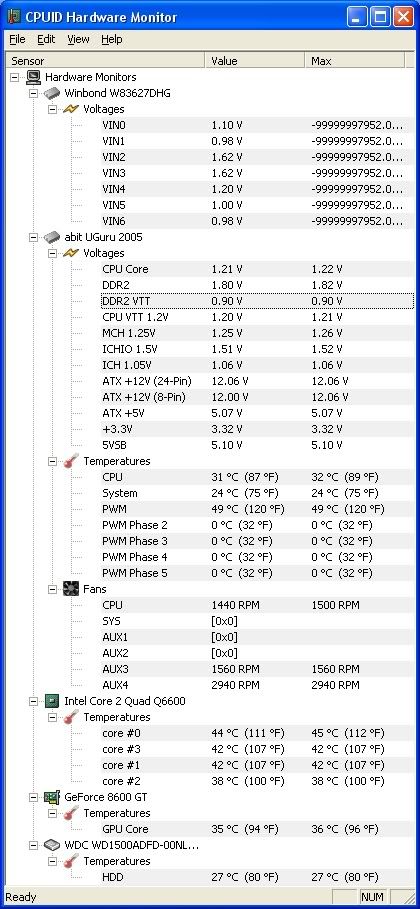
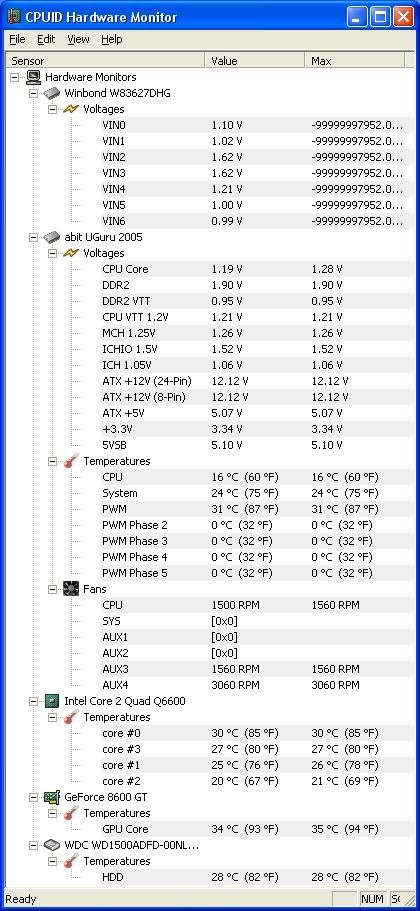
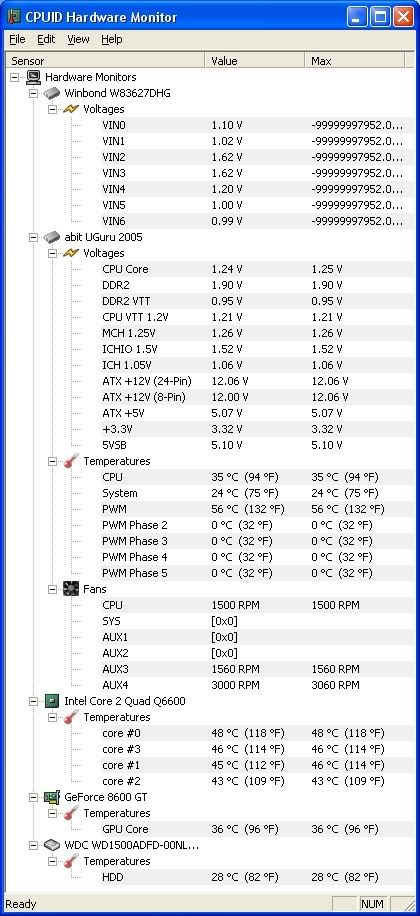
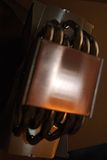
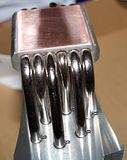
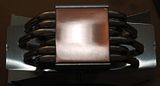
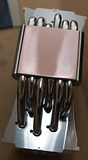
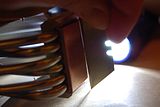
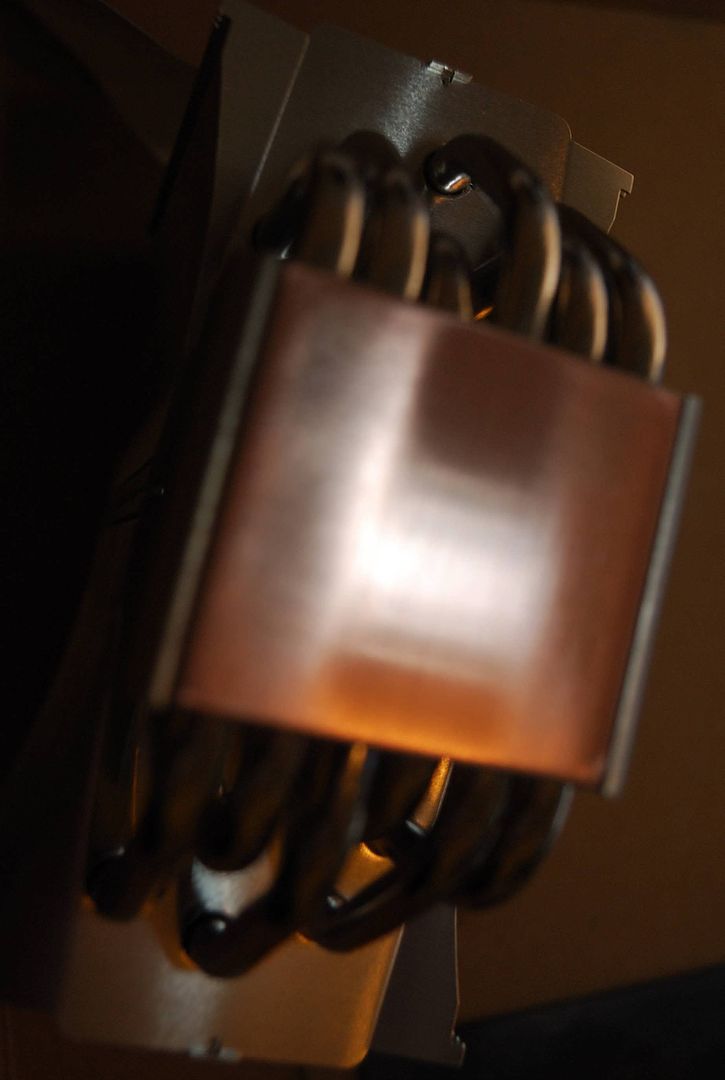
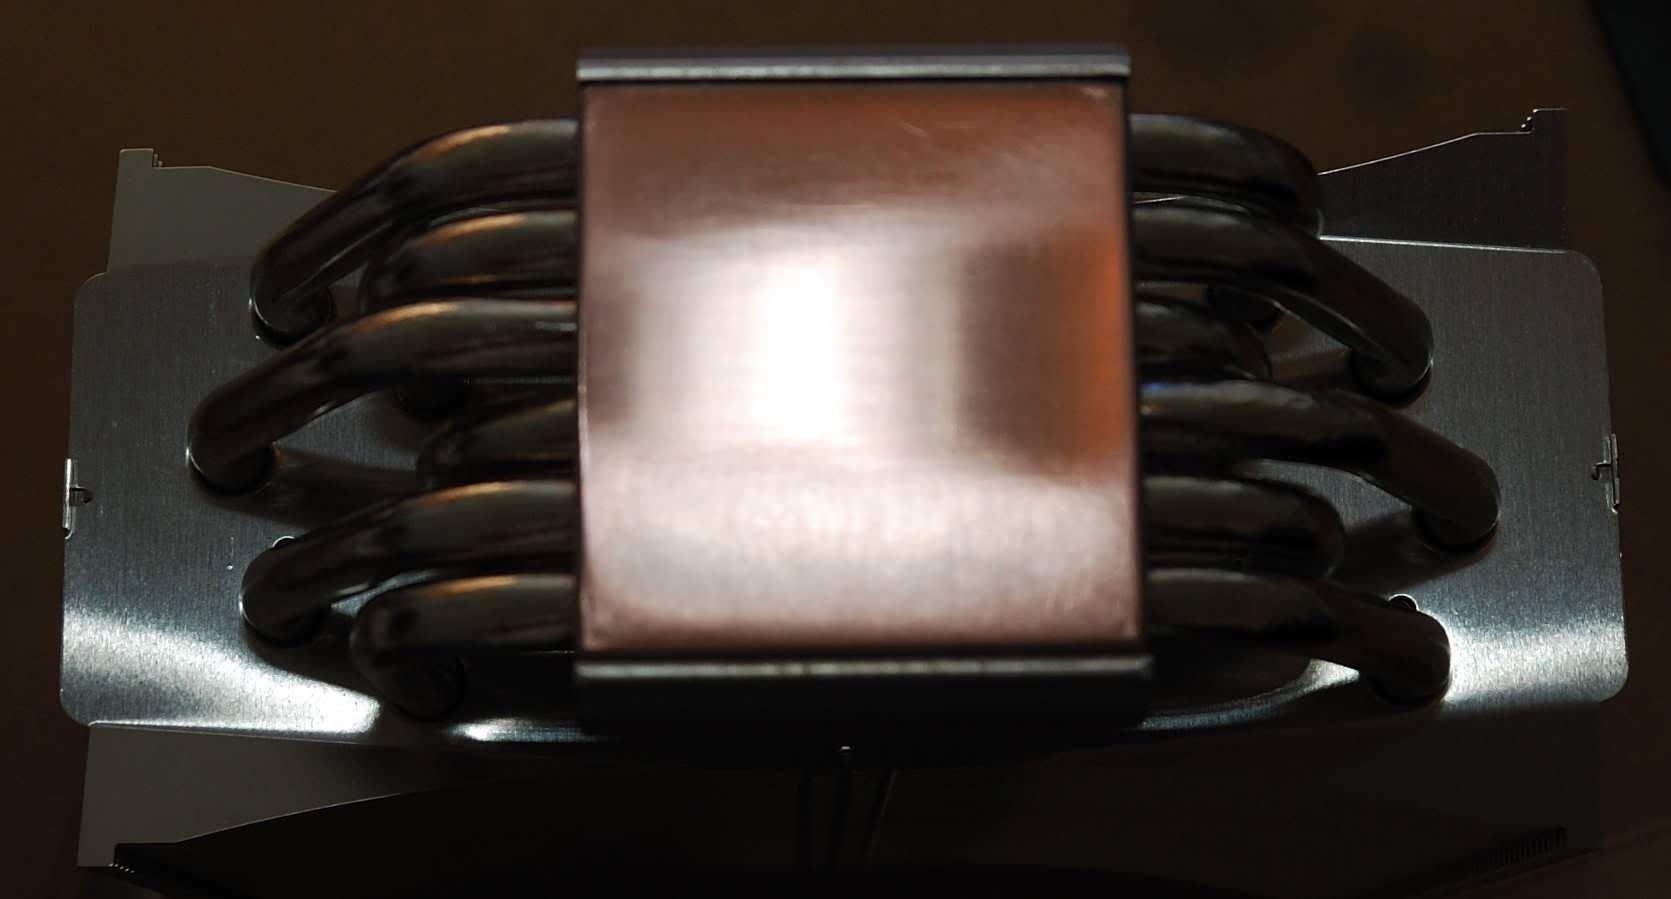
I ordered the EasyPCKits Premium Lapping Kit, and I just got my TRUE (Thermal Right Ultra-120 Extreme) in and I began the lapping process, I started with 400grit and worked all the way to 1000grit (400,600,800,1000), but I think I might have skipped thru the grits too fast, here are some pics of what my TRUE looks like now:

(Click to see larger)

  • What am I doing wrong?
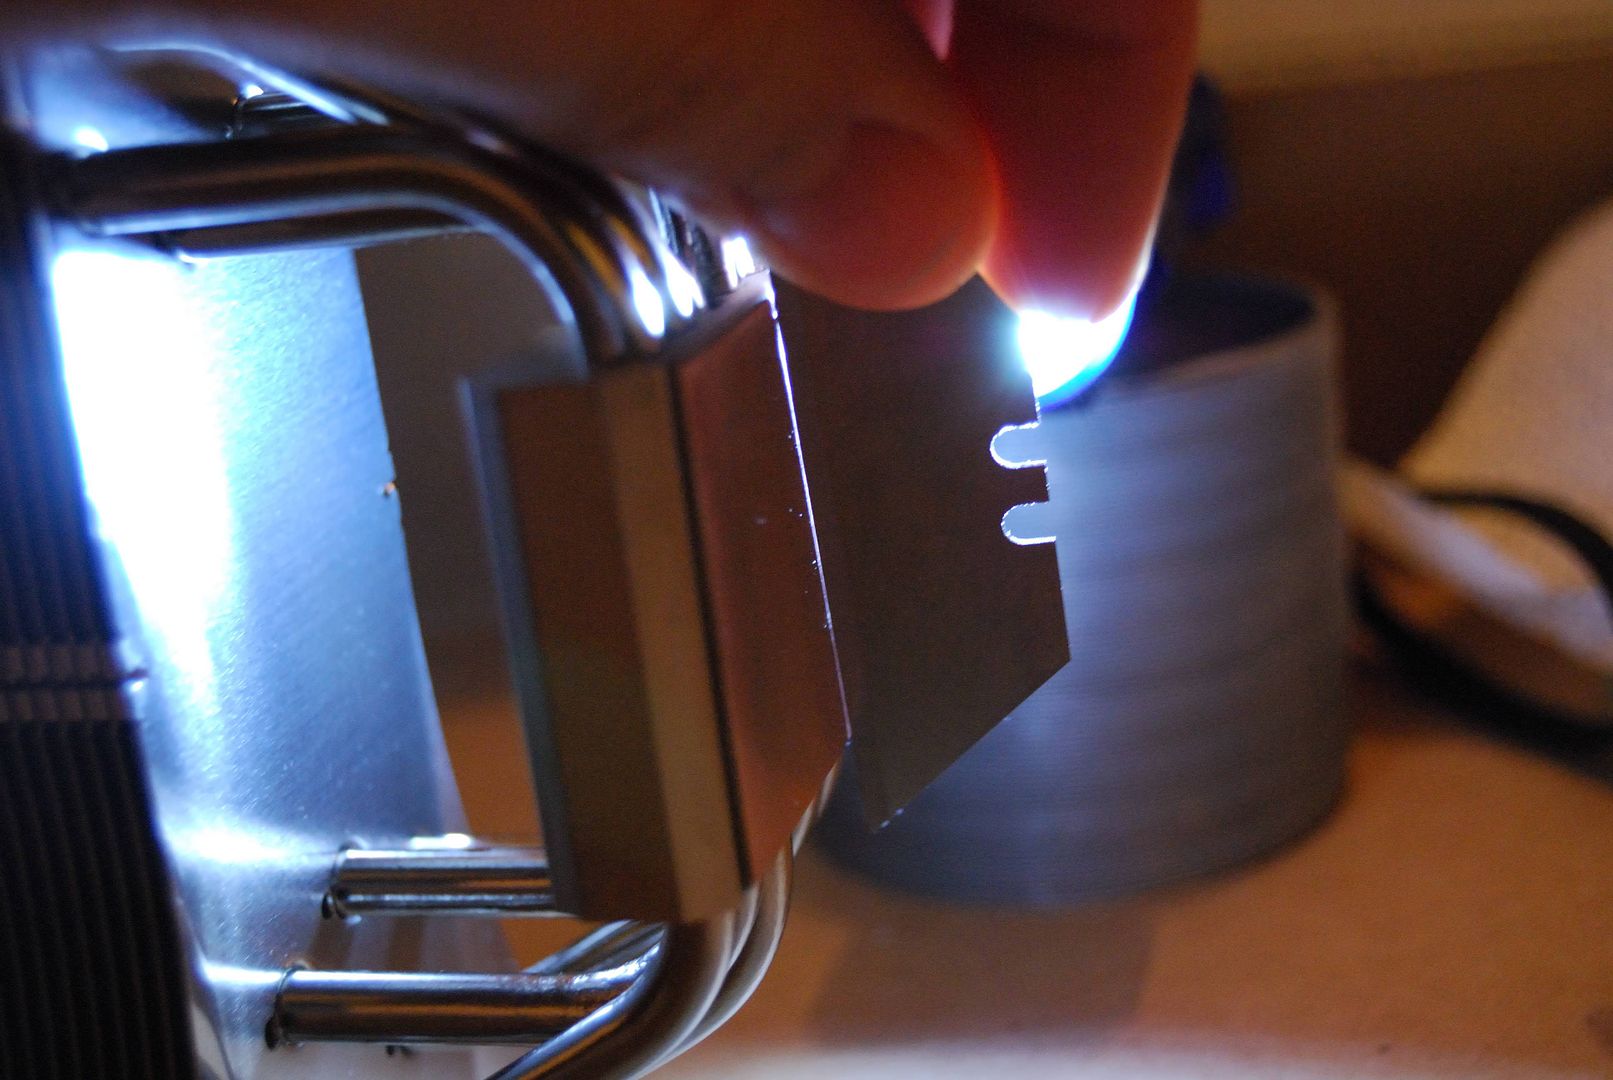
  • Am I supposed to hold the sandpaper+glass and rub it against the HS, or am I supposed to put the sandpaper+glass on a flat surface and rub the HS against it?
  • Is it possible to over lap and eat thru all of the HS metal :eek:?
 
I'm not sure what you think is wrong... is it that razorblade shot? There are other methods to gague flatness such as using a marker to write on the base (dots or an 'X') and then gently lap it and see if they wear off evenly. You think it's uneven?

In my opinion, the proper lapping technique is described in my article over at techarp. I don't wanna waste my time retyping it since it's all in there. You can also see the following posts here: This thread about U-120 Ex lapping. Also know that you lapped one of the two surfaces (the heatsink), you should lap the other 1/2 of the thermal junction (the IHS on your CPU). For that, have a look at this thread lapping my Q6600.

Can you overlap and eat through the metal? I guess it's possible, but you'd be at it all day long.
 
BazzKozz -

Optimal results are usually obtained by placing the glass flat on a stiff surface with the wet paper on it, and moving the heat sink above. For VERY large sinks, it can be handier to have a bit larger glass or move the glass/paper across the sink - I have fabricated "files" of glass for such action. But your sink seems fine for normal operation.

I like to use a light magic marker to make a mark or squiggle on the base of the sink - sand at a given grit level until that mark is substantially gone or untilt he previous grit's scratches are removed. If you rotate your sink 90 degrees between grit levels this is very easy to do. In the pictures above, it looks to me as if your sink is not flat and you did not spend enough time on the lower grit levels.

Remove as much gear off your sink as you can (fan, shroud, etc) to make it lighter and easier to work with. Go back to your coarsest paper and start over, using more water. Rink frequently including the sink and the paper. You should be able to tell when the core of the sink face is flat (you can normally ignore the very outer edges). Once it is flat, you can THEN progress through the grit levels to begin the polishing.

If this does not answer your question, let me know and I will try to answer as best as possible.

David
[email protected]
 
man dude you're supppose to go up to 1500 gritt and 2000 and 2500gritt

the higher you go up in grit, the less pressure you have to apply. you probably can fix it if the base is still flat. from your images that you posted it just looks severally scratched. so keep working up and up.
 
man dude you're supppose to go up to 1500 gritt and 2000 and 2500gritt

the higher you got the less pressure you have to apply. you probably can fix it if the base is still flat. from your images that you posted it just looks severally scratched. so keep working up and up.


True, but gotta get it flat first. :)
 
you can lap it anyway you want. some people perfer to lock down the heatsink in a vice and lap it using a flat surface. i perfer laying a thick glass down on a flat surface. then tape sand paper onto the glass with the rough part facing up. then let your heatsink rest on the glass/sandpaper and start doing a back and fourth motion. I find it easier using a large piece of sand paper.

but if your base is uneven then you have to keep working at it to bring it back to a smooth and flat surface.. but i highly doubt you would be able to do that again.
 
The best way to polish (same as lapping) something is to work in one direction with whatever grit you start with. You'll end up with scratches that look like

--------
--------
--------

Then turn the sample 90 degrees. And work it with the next step down. As you work you'll see all the scratches you put on turn to the direction your going now like this


--|-----
|----|--
--|---|-


|-||||-||
||||-||||
|||-||-||

||||||||||
||||||||||
||||||||||


ONLY when you've got NO scratches in the previous direction do you change directions.

I would highly advise ANYONE thinking about doing this to go buy a POS 5$ HS to try this on before you start. You can start from any grit sandpaper as long as you have enough material to remove, but I can't believe you started that high. I just got my Ultra 120 in today and at most I'd start at a 1000 grit on it. Honestly, it's not a "mirror finish" but its is clearly FLAT. Which is very important. I'm not going to bother with it tbh with you. You are going to have to get some 1000-2500 grit if your going to have "true mirror" results.
 
lapping heatsinks is a whole different monster than cpus. It is MUCH harder to keep flat because you're dealing with a much taller object. To keep an object that is basically 'flat' flat while lapping, a minimal, even, pressure is applied. But when you're dealing with something 10cm+ tall, it becomes very hard to do this while pushing the object back and forth.

When I was using a Scythe Mini Ninja, I lapped it and got worse results. I then had to lap it again and it was a veeeeeerrrrrry slow proccess. Very slow motion, ensuring the contacts were as flat and even as possible. After I did it this way, the temps went back down, and didn't differ from stock.

While my TRUE 120 has that funky grated finish, the idle temps dropped from the Mini Ninja and the load temps dropped a few degrees, so I was pretty happy with it and decided there was no way I was going to lap it.
 
if my TRUE 120 isn't flat when placed upon a glass surface, i should lap it correct?

it seems as the middle part of the base is rounded out. (concave?)
so when placed upon a glass it doesn't sit flat...
 
2 things.
1) Don't assume glass is flat. It's not. It can be close, but it's not true flat.
2) The middle of the heatsink is where you are going to make contact with the center of the CPU, where all the heat is. This would make the distance through your thermal paste the shortest here. If anything this is a good thing. (Tempeture differntial * thickness * thermal resistance / length = heat transfer rate)


Lapping on QUALITY heat sinks is about like indexing your spark plugs on your car. Yeah you can gain 1-2 HP, but if thats on a car thats making 300-400 HP does it REALLY matter? <0.5% does that really matter? I've never seen anyone dropping thier temps by 10 degrees after lapping. I've heard of lots of people destroying thier heatsinks though.
 
WOW, Thanks EVERYONE for all the feedback, it is much appreciated...
What I was doing was lapping using a back and forth motion, and from some youtube video's I've seen (specifically this one), it's best to lap in 1 direction, instead of back and forth...

I went out and bought some 220 grit paper, and some more 400grit so I can start over again from "scratch" (pun)...
I'm not sure what you think is wrong... There are other methods to gague flatness such as using a marker to write on the base (dots or an 'X') and then gently lap it and see if they wear off evenly. You think it's uneven?
You see in the pictures how there seems to be a channel going down the middle and the two sides don't have that same look... That's what was getting me confused, I assumed the whole heatsink should/would have a uniform look...
is it that razorblade shot?
You like that huh :p
Can you overlap and eat through the metal? I guess it's possible, but you'd be at it all day long.
Thanks for clearing that up, I didn't know if it was easy to do, or if I should be concerned, since it seems like I will have to start all over from 200grit and work back up
BazzKozz -

Optimal results are usually obtained by placing the glass flat on a stiff surface with the wet paper on it, and moving the heat sink above. For VERY large sinks, it can be handier to have a bit larger glass or move the glass/paper across the sink - I have fabricated "files" of glass for such action. But your sink seems fine for normal operation.

I like to use a light magic marker to make a mark or squiggle on the base of the sink - sand at a given grit level until that mark is substantially gone or untilt he previous grit's scratches are removed. If you rotate your sink 90 degrees between grit levels this is very easy to do. In the pictures above, it looks to me as if your sink is not flat and you did not spend enough time on the lower grit levels.
David
[email protected]
Thanks David, will do the magic marker trick ;)... I'll post pictures when I am done...
you probably can fix it if the base is still flat. from your images that you posted it just looks severally scratched. so keep working up and up.
Probably :eek:... I hope I can, please don't tell me I FUBAR'ed my TRUE...
yeah if its no longer flat... your heat sink is a goner.
i hope this isnt his first time he's lapped a heatsink. :eek: i would never ever work on something that expensive.
you can lap it anyway you want. some people perfer to lock down the heatsink in a vice and lap it using a flat surface. i perfer laying a thick glass down on a flat surface. then tape sand paper onto the glass with the rough part facing up. then let your heatsink rest on the glass/sandpaper and start doing a back and fourth motion. I find it easier using a large piece of sand paper.
but if your base is uneven then you have to keep working at it to bring it back to a smooth and flat surface.. but i highly doubt you would be able to do that again.
Are you serious... I can't fix it ??? :eek::confused:
 
Heh i lapped my TRUE and q6600 at like 1am one night while i was drunk. All i used was 400 grit, nothing higher. I just pulled the TRUE towards me about 20 times, turn, repeat. Temps on the outter cores came down about 14C and inner cores about 5C. I saw no point in "polishing" it past getting it flat with 400grit. At 1.55v it never goes over 65C full load, before lapping, cores 0 and 3 hit as high as 80C during 3dmark06.
 
^
so i guess lapping does help...

would just lapping the heatsink only help too?
 
^
so i guess lapping does help...

would just lapping the heatsink only help too?

It helps if the heatsink isn't flat. If it is already flat then you aren't really doing anything. As far as ruining the heatsink goes, I wouldn't worry about it. Worst thing you are likely to do is round off the corners from not holding it flat enough while you lap it - not a world ender. As you lap it you can see whether the heatsink was flat or not - if you are taking a lot of material off the outsides without touching the middle, then it wasn't flat (or vice versa). The Thermalrights seem to be convex, bowed out in the middle, so lapping does seem to help them.
 
Put the glass and sandpaper in a large flat bottomed pan, a baking cookie sheet pan is ideal, and put some water in the pan to barely cover the paper, you cannot hold the glass/paper at a steady angle because of the bow in that plate. You have not hurt a thing but you are in for a long haul. Go back to your roughest paper, maybe even get 200 grit and start over. Do not change paper until you get the entire bottom of the sink evenly "scratched". From the looks of it, it will take at least 1/2 hour with the roughest paper. You are nowhere near the point in which any direction or any of the above comments make any difference at all. You need to remove the excess metal to get it flat, until then nothing matters. Sand it in a motion that seems to remove the metal the fastest. The marking with a maker on the bottom so you can easily see that you are removing the material in the place you want is a good idea, the rest of them, eh.

A pane of glass will "bend" slightly make sure it is supported underneath evenly, however you should not be pushing down that hard. It can be slow going, take your time.
 
I read somewhere (I forget where), that for the best mirror finish one would need to use a polishing compound like Turtle Wax, so I went to my local Auto Parts Store and picked up the following:

The 100% cotten towels were because the directions on the back of the turtle wax said to use 100% cotten towels :)

Now before I go and eff up my TRUE some more, is this the right stuff to be using (obviously after I get it flat and shinny with my sandpaper)???
 
Dude, don't touch those chemicals to your heatsink. They will hurt the thermal conductivity. It's not about shiny, it's about flat.
 
Put the turtle wax down, and step away from the heatsink :D

Thanks greysky... Will take back to the store tomorrow to return.
 
I read somewhere (I forget where), that for the best mirror finish one would need to use a polishing compound like Turtle Wax, so I went to my local Auto Parts Store and picked up the following:
http://i4.photobucket.com/albums/y105/basskozz/Server_Rig/Lapping_TRUE/th_DSC_0375.jpg

Now before I go and eff up my TRUE some more, is this the right stuff to be using (obviously after I get it flat and shinny with my sandpaper)???

Nooooooo. Don't use any polishing compound at all. The way they work is they improve the flatness by filling in all the little gaps, but the problem is that polishing compounds have very bad thermal conductivity so it will actually produce worse temps. If you really want a mirror finish then finish lapping with a very high grit sandpaper. Shininess isn't really important though, since the degree of flatness you'll get with ~1500-200 grit sandpaper is adequate to provide good contact even though it's not flat enough to produce a perfect reflection.
 
I'd argue that any grit over 1,000 is just overkill. Again, it's not about a shiny surface, it's about a flat surface. Same comment goes for the IHS on your chip.
 
I've finished e TRUE, and here are some pictures of the results in consecutive order... unfortunaly I didn't mark down the grit number used when I took each picture, but I can say I went in this order with the sand paper:
320grit, 400, 600, 800, 1000, 1200, 40 micron, 25 micron, 20 micron, 15 micron, 10 micron:


The only problem I have now is that even thou I've tightened the bracket as tight as possible the TRUE still twists... I did a quick search on google about this, and apparently it is normal... has anyone else experienced this?
 
Because of the design of the bracket it will be able to twist a little. The important thing is contact between the CPU and the base, and that is not affected by the twisting so you have nothing to worry about.
 
You can actually use a metal washed as a spacer that will add a little resistance to the system. Here is the thread that talks about it.

I see from your pics that the IHS on the chip remains unlapped.. doing the base of the heatsink is only 1/2 the surfaces involved. You'll need to do the IHS on your chip to maximize the effect.
 
I see from your pics that the IHS on the chip remains unlapped.. doing the base of the heatsink is only 1/2 the surfaces involved. You'll need to do the IHS on your chip to maximize the effect.
Yah, I know, but I don't want to void the warranty until I am comfortable with the CPU's performance... I'll lap the IHS to knock off a few more °c after I am happy with the chips performance/stability. Besides I purchased the retail boxed version of the Q6600, and it comes with a 3yr warranty, I'd like to wait a few before I completely throw that out the window, otherwise I should've/would've bought the OEM version.
 
looking good.

can you post how your temps are like before and after you lapped the TRUE?

thanks!

btw: i used AS5 in the amount that you did, and when i took the heatsink off, it spread to the outside of the cpu...
it may be too much, but i don't know...whatever works i guess works...
 
It might be just me but that does that seem to be a lot of thermal paste you've used...
 
Besides I purchased the retail boxed version of the Q6600, and it comes with a 3yr warranty, I'd like to wait a few before I completely throw that out the window, otherwise I should've/would've bought the OEM version.

Maybe, but I've had mine since April of 2007 and lapped it in late May or June. I'm already interested in the 45 nm quads and who knows, maybe I'll get one in 6 months or so. My point is how likely are you to even own the chip in 3 years? Seems like the technology out paces that warranty. Plus, I believe by overclocking the chip you have voided that warranty so lap away :)
 
looking good.
can you post how your temps are like before and after you lapped the TRUE?
thanks!
Sorry but I can't :(
I started my lapping endeavor as soon as I took the TRUE out of the box, so I don't have a baseline...
btw: i used AS5 in the amount that you did, and when i took the heatsink off, it spread to the outside of the cpu...
it may be too much, but i don't know...whatever works i guess works...
It might be just me but that does that seem to be a lot of thermal paste you've used...
I put the AS5 on as per the AS5 Site's Instructions (for Quad Core Procs)...

(Click to see larger)

Ok, my line of AS5 might be a little thicker then the RED line depicted in the instructions, but is it too much...
I hope it's not wayyy too much ???
Can anyone else chime in on this? I'd hate to have to remove and re-apply, but if the consensus is that I used too much I guess I will :(...
Maybe, but I've had mine since April of 2007 and lapped it in late May or June. I'm already interested in the 45 nm quads and who knows, maybe I'll get one in 6 months or so. My point is how likely are you to even own the chip in 3 years? Seems like the technology out paces that warranty. Plus, I believe by overclocking the chip you have voided that warranty so lap away :)
This may be true, but how can INTEL know if I've overclocked our not?
For example, (god forbid) lets say I fry my chip by overclocking, and I send it in under warranty, how will Intel know I overclocked? Is this information stored in the chip or something?
 
If your temps are good, let it be... if they seem a little higher then you hoped you could try reapplying. Most people seem to recommend a grain of rice sized lump of paste.

Remember if you have large gaps between your heatsink and processor you need a lot of filler, but since you've lapped your heatsink flat you should need less. (really depends how flat your processor is?)

Maybe just go with what you have then reapply when you finally decide to lose the warentee on the chip.

I'm not a big fan of AS5 even though it's what I used myself, seems to thick to properly squish out any excess, then again I'm sure they know what they were doing when they made the stuff :)
 
I would like to know the difference in arctic silver's directions for quad and core 2's

I mean a vertical line and a horizontal line when flattened are going to cover the same area, correct? I mean that seems obvious if you think about it.

I mean wont both methods up or across both spread into a "Squarelike" area that would be the same size?
 
the line and the grain shoudn't matter too much.
when i had the line and then the grain, the temp was about the same in either case.

by the way post the results of your temps.
looking to see what you get by lapping on the heatsink!

thanks!
 
Yah, I know, but I don't want to void the warranty until I am comfortable with the CPU's performance... I'll lap the IHS to knock off a few more °c after I am happy with the chips performance/stability. Besides I purchased the retail boxed version of the Q6600, and it comes with a 3yr warranty, I'd like to wait a few before I completely throw that out the window, otherwise I should've/would've bought the OEM version.

If you follow a great guide like graysky's and listen to the knowledgeable advice of many forum members, I do not see how you can ruin your cpu... Plus you already overclocked your card, you already voided the warranty =)
 
sent you a PM.

impossible temps!!! lol
your cpu must be really good.
ahhh
 
Back
Top