For the longest time I have always wanted to be able to game and work on the same machine without dual booting. This isn’t a problem for you if Windows is all you use. However, for me Linux and it’s many distros are something I utilize every day at work and when I am home. As I have become older the gaming sessions don’t last quite as long as they used to, but it’s still significant enough that dual booting was something I needed to do to satisfy my PC gaming needs. Dual–booting, while entirely functional… is a PITA.
Anyway, once it became really doable I decided to do it. There isn’t one guide out there that had it all in order to get this working properly. So I decided to place those instructions here.
Prerequisites:
- Processor that supports virtualization.
- Motherboard that supports virtualization and IOMMU and/or VT-D
- 2 Video Cards
- KVM Switch (Optional – you better have another keyboard, mouse, and monitor ready if you don't have one)
- The ability to burn an ISO
- Beer (Not Optional)
My Machine:
Lian Li - V1200 | i7-4930K | 16GB | Adaptec 5805 2x 256GB Crucial SSDs in RAID 1 & 5x 1 TB WD RE2s in RAID6 | Linux Host | KVM Virtualized Windows 7 64-bit Guest w/ GPU passthrough
Motherboard: ASUS P9x79LE
Credits:
Multiheaded NVIDIA Gaming using Ubuntu 14.04 + KVM
KVM VGA-Passthrough using the new vfio-vga support in kernel =>3.9 / Kernel & Hardware / Arch Linux Forums
KVM/Directly - Community Help Wiki
ISO - UbuntuGNOME/GetUbuntuGNOME/Non-LTS - Ubuntu Wiki
The Internet - Google
I used Ubuntu Gnome 15.04 to do this, but generally the directions should work for any one that’s based off of Debian / Ubuntu more or less. However you should make sure that you are using the latest version of whatever you use. The latest versions have patches added which save a lot of time and headache. Debian itself usually runs older packages, while Mint and Ubuntu are more current.
First thing you should do is burn a copy of your chosen distro. Once again I’m using Ubuntu Gnome. So use that, xubuntu, Ubuntu, Mint or be cool with seeing screens that don’t necessarily correlate.
Step 1: Installation / Turn on Virtualization and VT-D / IOMMU
Before booting into the ISO you might as well head to the BIOS and make sure VT-D, IOMMU, and/or Virtualization are all turned on. Save the BIOS setting changes and boot into your Live CD. NOTE: You must have a motherboard that supports IOMMU or VT-D.
Step 2: Boot into ISO of LIVE CD
(If you need instructions here for this you should stop here and do something else)
Step 3: Select “Install Ubuntu”
Step 4: Skip Downloading Updates
I just hit continue on this screen since when we hit the desktop we are going to update and install crap anyway and it’s faster to do once the OS is installed anyway.
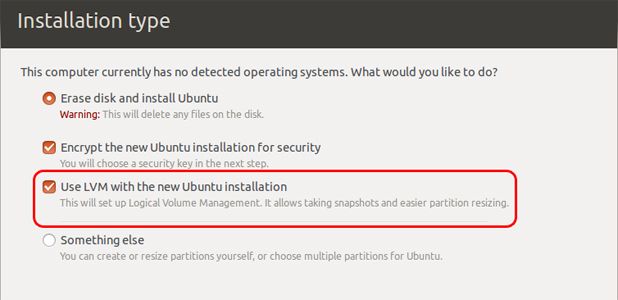
Step 5: Installation Type

Select “Use LVM with the new Ubuntu Installation”
Let Ubuntu go ahead and blow everything away and create the LVM partitions for you. It’s easier than wrangling with EFI partitioning and other problems created by being too creative within the installer. We will fix the sizing later. Click “Continue” and make sure the partitioning is happening on the right disk then click “Continue” again.
Step 6: Create User, Password, and Host Name
(Again… if you need instructions here for this you should stop here and do something else..like literally)
Step 7: Reboot
Once the installation completes reboot the machine.
Step 8: Login and Install Video Drivers
Login to the new system first in order to make sure everything is OK. Make sure you can open the web browser and get somewhere. If not fix that problem first before continuing. I’m not saying you’ll have a problem, but nothing is worse than following a long-ass guide only to realize you don’t have the Internet or anything else.

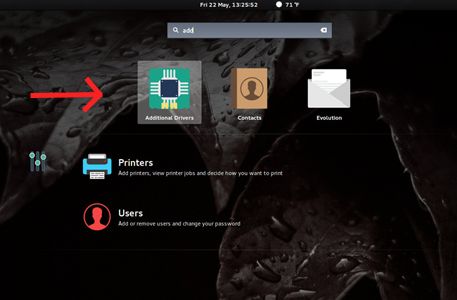
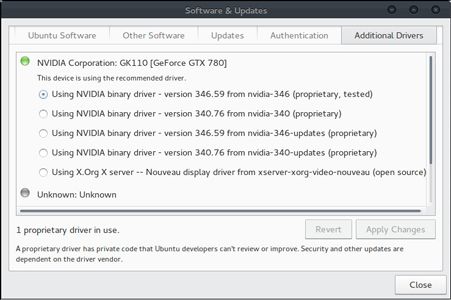
Let’s go ahead and install our video drivers for our host. Hit Windows Key Type Add and select the Additional Drivers icon. Wait a little bit for it to find your card and drivers, then select the proprietary drivers as needed. Once that’s done you may continue on.

Step 9: Reboot into Live CD / Fixing the LVM sizes
We are now going to fix the LVM partitioning.. I’m not going to get into a long dissertation on the wonders of LVM but it makes your life easier especially when you want to add, slice, dice, or clone VM’s.
Reboot into the Live CD but instead of selecting Install Ubuntu you are going to select “Try Ubuntu without Installing.” Once you hit the desktop press the Windows Key on your keyboard. Then type “Terminal” and hit enter.
OK here we go. Follow this exactly and all should be well. In terminal you are going to cut and paste each command and hit enter after each.
OK GO!
Code:
sudo vgchange -a yRunning check disk on Linux partition / LV
Code:
sudo e2fsck -f /dev/ubuntu-gnome-vg/rootOk so now we are going to resize (shrink) the partition that houses our Linux partition. We are going to make the partition about 10 - 15 gigs smaller than our desired size. I have two 256GB SSD’s in RAID 1 and I want each OS to get 100GB of the 256GB array more or less.
Code:
sudo resize2fs /dev/ubuntu-gnome-vg/root 80GRunning check disk on Linux partition / LV again
Code:
sudo e2fsck -f /dev/ubuntu-gnome-vg/rootNow we are going to shrink the LV container. You will get a warning here. Say “yes.”
Code:
sudo lvreduce -L 100G /dev/ubuntu-gnome-vg/rootAnd now bring up the partition to match the LV container.
Code:
sudo resize2fs /dev/ubuntu-gnome-vg/rootOnce again for feeling… hey I’m paranoid about this stuff.
Code:
sudo e2fsck -f /dev/ubuntu-gnome-vg/rootOK once that is done reboot, by typing “reboot” and hitting enter. I know cryptic right?
Code:
sudo rebootStep 10: Adding our LV for our Windows OS
Once you are back on the desktop, hit the Windows key and Type “Terminal” then hit enter.
Next:
Code:
sudo suEnter your password.
We are now going to create that other 100G LV container for our Windows install.
Code:
lvcreate -L 100G -n windows_lv ubuntu-gnome-vgStep 11: Installing software and configuring networking
Now in terminal type:
Code:
apt-get install virt-manager libvirt-bin libvirt0 qemu-utils qemu-kvm qemu-system-common qemu-system-x86 seabios bridge-utils uml-utilitiesWhen it’s done type:
Code:
gedit /etc/network/interfacesMake the file look like this:
Code:
# interfaces(5) file used by ifup(8) and ifdown(8)
auto lo
iface lo inet loopback

auto eth0
iface eth0 inet manual

auto br0
iface br0 inet dhcp
        bridge_ports eth0
        bridge_fd 9
        bridge_hello 2
        bridge_maxage 12
        bridge_stp off
Save and Close
In Terminal:
Code:
sudo rebootStep 12: Grub, Modules, and System Updates
Once e you are back to the desktop we need to add our grub entries, and modules.
In Terminal:
Code:
sudo apt-get update && sudo apt-get upgrade
Code:
sudo gedit /etc/modulesAnd add this in there:
Code:
pci_stub
vfio
vfio_iommu_type1
vfio_pci
kvm
kvm_intel
Save and Close
Code:
sudo gedit /etc/default/grubMake this:
Code:
GRUB_CMDLINE_LINUX_DEFAULT="quiet splash"Look like this if you have an Intel machine:
Code:
GRUB_CMDLINE_LINUX_DEFAULT="quiet splash intel_iommu=on"Or like this if you have an AMD machine:
Code:
GRUB_CMDLINE_LINUX_DEFAULT="quiet splash amd_iommu=on"**NOTE: When I had an Opteron I didn’t have to do anything to grub other than turn IOMMU on in BIOS but the above couldn’t hurt just to make sure everything works as intended.
Save and Close
Now back in Terminal type
Code:
sudo update-grubThen hit Enter.
Then type:
Code:
sudo rebootThen hit Enter.
Step 13: Blacklist Devices
Ok once you are back to the desktop we need to find the device ID that we want to detach or blacklist from our host machine.
Type this command in the kernel:
Code:
lspci -nnIt will return something like this:
Code:
02:00.0 VGA compatible controller [0300]: NVIDIA Corporation GK110 [GeForce GTX 780] [COLOR="red"][[B]10de:1004[/B]][/COLOR] (rev a1)
02:00.1 Audio device [0403]: NVIDIA Corporation GK110 HDMI Audio [COLOR="Red"][[B]10de:0e1a][/B][/COLOR] (rev a1)
What we want is in bold. For my set up I passed through the video and audio on the video card. This will make everything a breeze when it comes to audio later on.
Take those device IDs and anything else you want to passthrough and put it in this file. However, take my advice and passthrough an entire USB controller now. Every motherboard that I have ever come in contact with usually has 2.0 coming from the Southbridge and 3.0 coming from a 3rd party chip. I grabbed the ID’s from one controller and gave the whole thing to my Windows guest and kept the other for my host..
** NOTE: Also write down those hardware addresses (02:00.0) you’ll need them later. Get the one for the video, audio, and USB controller.
To find the USB controller use:
Code:
lspci -nn | grep USBAnd add those to the file below.
In Terminal:
Code:
sudo gedit /etc/initramfs-tools/modulesIt should look like this:
Code:
pci_stub ids=10de:1004,10de:0e1a,20de:1001Save and Close
In Terminal:
Code:
sudo update-initramfs -uThen reboot
Code:
sudo rebootAfter rebooting run this in Terminal to make sure the correct things are blacklisted.
Code:
dmesg | grep pci-stubStep 13: Add Values for VM Script
OK now we need to create a file that contains values which will be used with our script. The values are the hardware addresses for our devices.
In Terminal:
Code:
sudo gedit /etc/vfio-pci1.cfgThe hardware addresses in the file will look like this:
Code:
0000:02:00.0
0000:02:00.1
0000:05:00.0
0000:04:00.0
(The extra ones are for the USB controller)
Save and Close when done.
Step 14: Create Start-up Script
In Terminal:
Code:
sudo gedit /usr/MyMachineCopy this into that file.
Code:
#!/bin/bash

tunctl -t tap0 -g kvm
brctl addif br0 tap0
ip addr flush eth0
ifconfig eth0 0 0.0.0.0
ifconfig tap0 0.0.0.0

configfile=/etc/vfio-pci1.cfg

vfiobind() {
    dev="$1"
        vendor=$(cat /sys/bus/pci/devices/$dev/vendor)
        device=$(cat /sys/bus/pci/devices/$dev/device)
        if [ -e /sys/bus/pci/devices/$dev/driver ]; then
                echo $dev > /sys/bus/pci/devices/$dev/driver/unbind
        fi
        echo $vendor $device > /sys/bus/pci/drivers/vfio-pci/new_id

}

modprobe vfio-pci

cat $configfile | while read line;do
    echo $line | grep ^# >/dev/null 2>&1 && continue
        vfiobind $line
done

sudo qemu-system-x86_64 -enable-kvm -M q35 -m 4096 -cpu host,kvm=off \
-smp 6,sockets=1,cores=6,threads=1 \
-bios /usr/share/seabios/bios.bin -vga none \
-device ioh3420,bus=pcie.0,addr=1c.0,multifunction=on,port=1,chassis=1,id=root.1 \
-device vfio-pci,host=02:00.0,bus=root.1,addr=00.0,multifunction=on,x-vga=on \
-device vfio-pci,host=02:00.1,bus=root.1,addr=00.1 \
-drive file=/dev/ubuntu-gnome-vg/windows_lv,if=virtio \
-device vfio-pci,host=05:00.0,bus=pcie.0 \
-device vfio-pci,host=04:00.0,bus=pcie.0 \
-usb -usbdevice host:0c45:7000 \
-net nic,macaddr=D2:A1:B0:E5:8A:78,model=virtio -net tap,ifname=tap0,script=no,downscript=no \
-boot menu=on

exit 0
Now before we start this thing notice these lines.
This is our video and audio from the video card (change address as necessary)
Code:
-device vfio-pci,host=02:00.0,bus=root.1,addr=00.0,multifunction=on,x-vga=on \
-device vfio-pci,host=02:00.1,bus=root.1,addr=00.1
These are the addresses for the USB controller (change address as necessary)
Code:
-device vfio-pci,host=05:00.0,bus=pcie.0 \
-device vfio-pci,host=04:00.0,bus=pcie.0 \
This is the number of sockets, cores and threads to give the machine (change as necessary)
Code:
-smp 6,sockets=1,cores=6,threads=1 \Change the MAC if need be as well
Code:
-net nic,macaddr=D2:A1:B0:E5:8A:78,model=virtio -netSave and Close
In Terminal:
Code:
sudo chmod u+x /usr/MyMachineStep 14: Starting the Guest
Now one of the things that I did to make all of this work seamlessly was to buy a HDMI KVM switch. The audio, video, and USB from the host go into the first slot and the audio, video, and USB from the guest go into the second. So basically when I want Windows or Linux I push a button and that’s it. It works flawlessly for me. I will say this: buy one that you know is good and durable and use it if you don’t have a second monitor.
Also you may want to put in the USB stick with your Windows image on it before turning everything on. Just put it in the right USB controller.
Ok if you have made it this far. Let’s go.
In Terminal:
Code:
sudo /usr/MyMachine
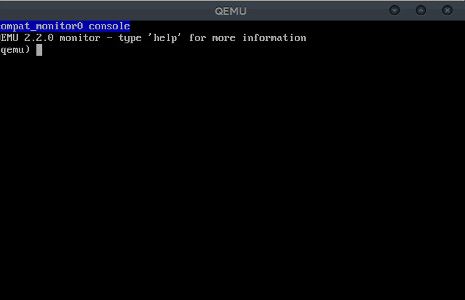
Enjoy. If everything is OK you should see a QEMU Console window appear. Once that pops, hit your KVM switch button and boot into Windows and begin installing drivers. Oh BTW for the video card driver installation (in the guest) start with the oldest driver first and then upgrade as necessary. That way if something goes wrong as a result of driver changes you can revert back to a previous working version (There’s a bigger reason behind this just go with it).
Once loaded you will need the virtio guest drivers. You can find them here:
KVM Guest Drivers for Windows project files : KVM Guest Drivers for Windows
Last edited:
![[H]ard|Forum](/styles/hardforum/xenforo/logo_dark.png)
